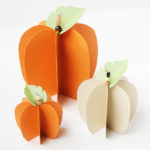
Easy Paper Pumpkins
Use paper to make cute paper pumpkins for fall with this step-by-step tutorial which includes templates for pumpkins of three sizes.
Equipment
- Paper trimmer
- Scoring tool (optional, but recommended)
- Pencil
- Scissors
- Needle nosed pliers
- Hot Glue Gun
Materials
- Paper Pumpkin Tracing Templates available for download in the original post
- Cardstock/scrapbooking paper see my note in the original for recommended materials
- Glue stick
- Wire
- Wood beads
- Hot glue
Instructions
- Use a paper trimmer to cut squares from the cardstock/paper. For each pumpkin, you will need 8 squares cut to the following measurements: Small pumpkins: 3”; Medium pumpkins: 4”; Large pumpkins: 6”.
- Fold each square in half, and set aside. (Using a paper scoring tool helps achieve nice, crisp folds.)
- Print and cut out the paper pumpkin tracing templates.
- Working with one of the folded squares, use the glue stick to evenly coat the front of the piece. Glue a second folded square on top of the first one so that the folded edges meet and all outer edges and corners are precisely aligned.
- Use a pencil to trace the pumpkin template onto the adhered pieces, making sure to place the template on the folded edge as indicated. Trim around the traced line. Repeat this process with the three remaining pairs of paper squares.
- Fold one of the glued sections flat, and evenly apply glue with the glue stick to the front side. Place a second folded section on top of the first so that the folded edges match up and the curved edges are aligned. Repeat these steps to attach each of the remaining two sections to form a continuous piece.
- With the stack folded nice and flat, use the glue stick to apply an even layer of glue to the topmost flap. Bring the opposite end around and secure it to form a loop.
- Trace the leaf template with a pencil onto green paper. Cut out and set aside.
- Trim a 2” section of wire, and use needle-nosed pliers to form a small loop at the end. Thread wooden beads as desired onto the wire.
- Apply a dab of hot glue to the top center of the pumpkin where all of the folds meet. Fold the leaf shape gently down the center. Place the notched edge of the leaf around the top center of the pumpkin and then poke the straight end of the beaded wire down through the opening at the center of the pumpkin where all of the sections meet. Press firmly do the hot glue anchors the stem and leaf in place.