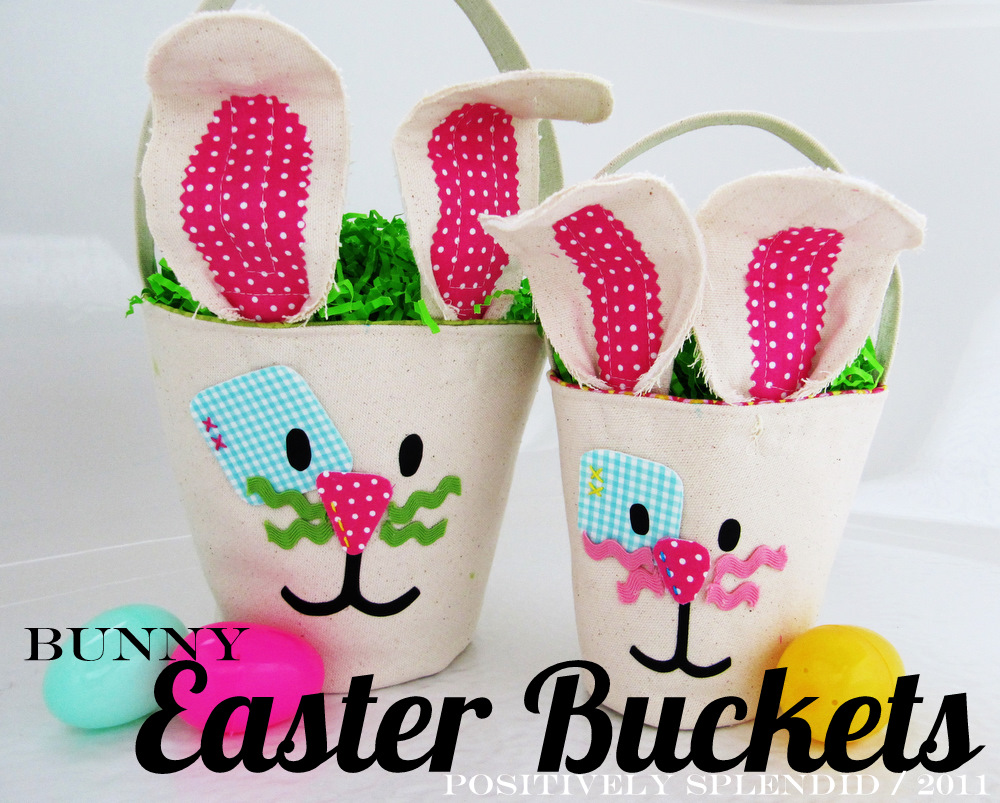
With ears that can be bent and shaped, rick-rack “whiskers” and fluffy little tails, these buckets, our latest Let’s Make Something Together project, are sure to be a hit with even the Easter bunny himself!
This project is one I completed a few weeks back over at SYTYC for the Just Scraps challenge. With the exception of two small supplies, each and every element I used to create these little guys was something I had used in the competition’s previous challenges! In case you missed it, here is part of my writeup about them from that week’s post…
Pattern Pieces
Large Bucket
Small Bucket
Canvas Fabric
Fusible Fleece
Quilting Cotton Fabric (for lining)
Washable Ink Pen
Assorted Fabric Scraps
Fusible Web
Fusible Peltex
White Pom-Poms
Craft Wire
Iron-On Vinyl (Black)
Hot Glue
Rick-Rack
Embroidery Needle and Floss (optional)
Coordinating Thread
Basic Sewing Supplies: Machine, Shears, etc.
Prep Work:
Cut out all of your pattern pieces, and connect the different sections of your main bucket pattern according to the instructions on the PDFs. Once your patterns are prepared, cut out the pieces for you bucket:
1 canvas main bucket piece
1 canvas bucket bottom piece
1 fusible fleece main bucket piece
1 lining fabric main bucket piece
1 lining fabric bucket bottom piece
4 canvas outer ears
2 fusible fleece outer ears
2 patterned fabric inner ears (fuse this fabric to your fusible web before cutting your pieces out)
1 strap piece – Large Bucket: 6 x 18 inches; Small Bucket: 4 x 12 inches
Note: All seam allowances are 1/4″, unless otherwise specified.
step 1 / Fold your strap piece in half lengthwise; press. Fold each of the long edges up to your pressed center line so they meet in the middle as shown; press. Fold your piece in half again; press.

step 2 / Edgestitch along each of the long edges of your pressed strap piece. If desired, stitch a series of lines in the center of your piece for a decorative touch. On your large strap piece, you will stitch 4 additional lines that are each 1/4″ apart. On your small strap piece, you will stitch 2 additional lines that are each 1/4″ apart. Set your finished strap piece aside.

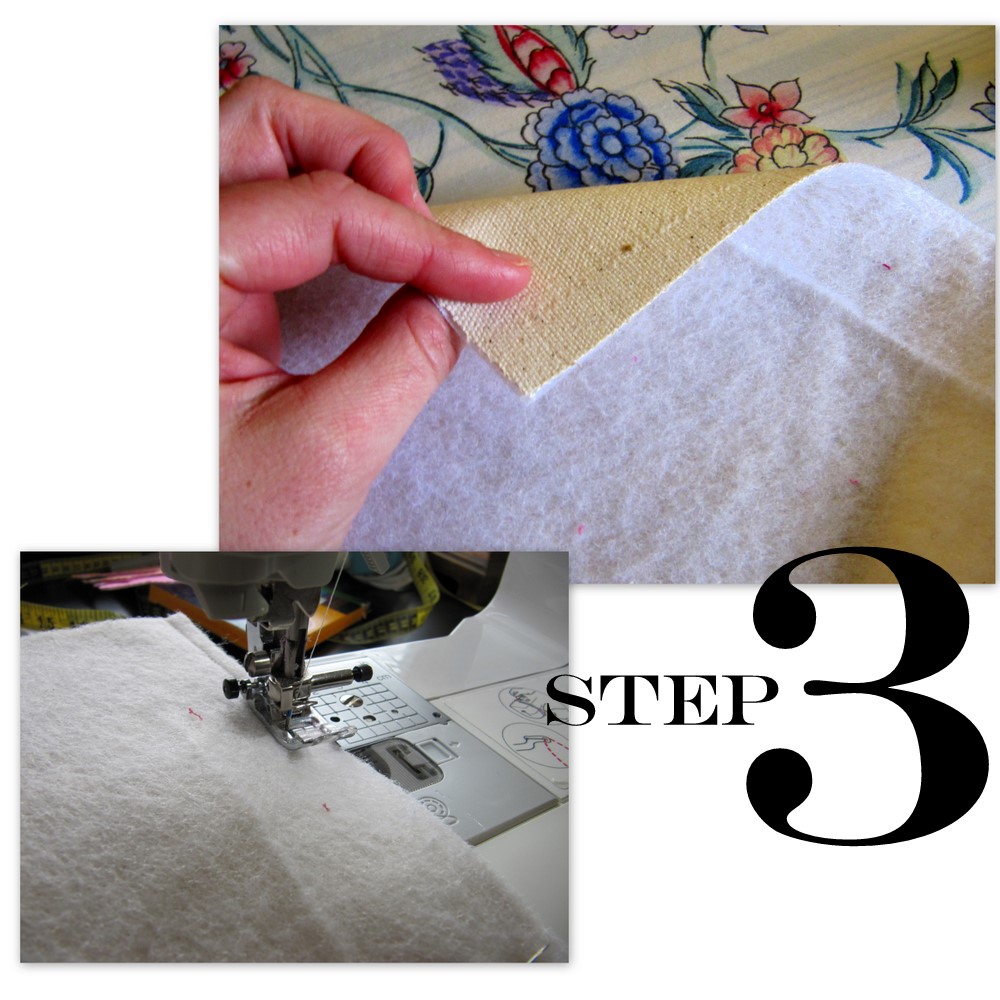
step 3 / Iron the fusible fleece to your main bucket canvas piece and your bucket bottom piece according to the product directions. Fold your assembled piece in half, right sides facing, so that the short edges are aligned. Stitch along this short edge. Stitch your lining fabric piece in the same manner.
step 4 / Pin your bucket bottom piece to the narrower opening of your stitched main bucket piece, with the fleece side of your bottom and main bucket pieces facing out, as shown. Carefully stitch these pieces together. Repeat with your lining bottom piece and your stitched lining main bucket piece.

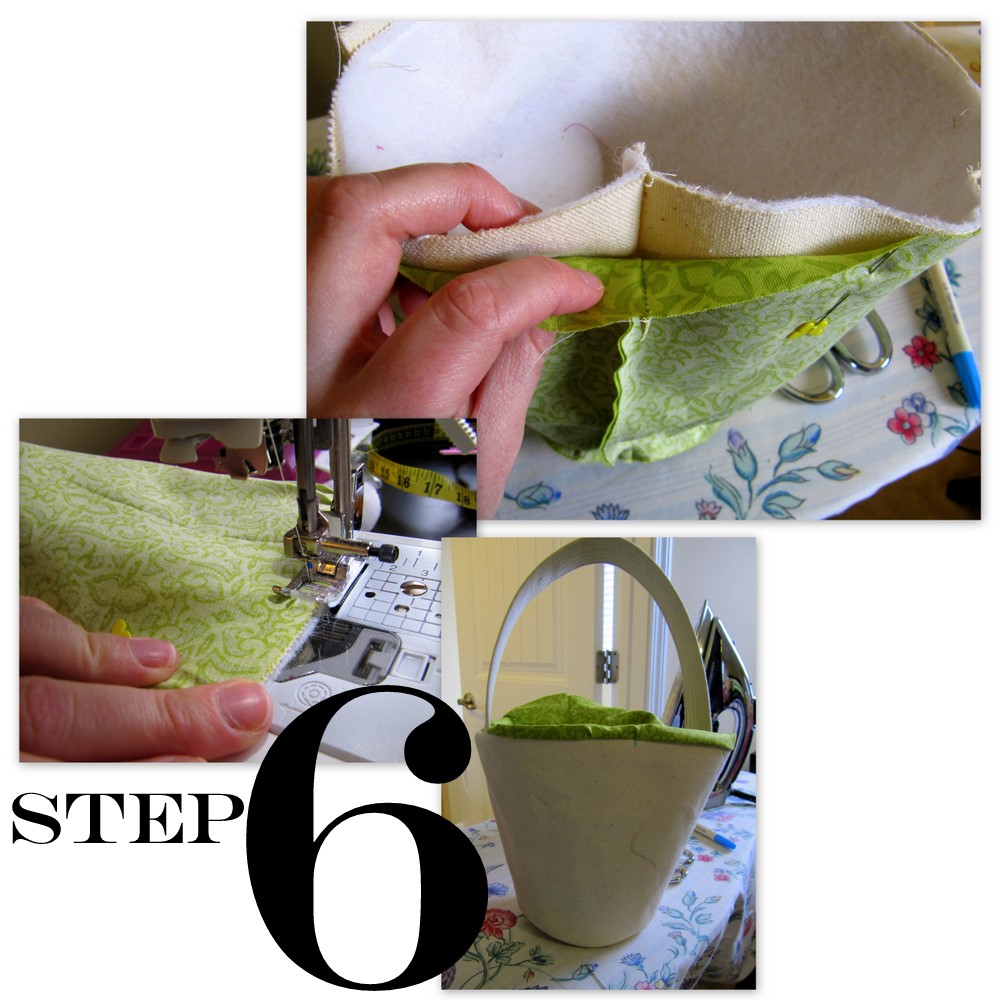
step 5 / Turn your bucket right-side out, and pinch the outside edges so that the back seam is exactly centered with the front of your bucket. Make marks with your washable ink marker at each of these outer side creases, as well as at the point directly opposite the back seam. Center one end of your strap piece over each of the side marks you just created, looping the strap down and around the bottom of your bucket. Baste your strap pieces to your bucket piece, and remove your pins. (This will make stitching the lining and main pieces together much easier!)

step 6 / With your canvas main bucket piece right-side out and your lining piece wrong-side out, slide your canvas piece inside your lining piece, as shown. Pin these pieces together along their aligned upper edges. Stitch together, leaving a 3-inch opening for turning. Turn your bucket right-side out through this opening.
step 7 / Carefully press the joining seam you just stitched, and pin the opening closed. Edgestitch along the upper edge of your bucket, closing the opening as you go.

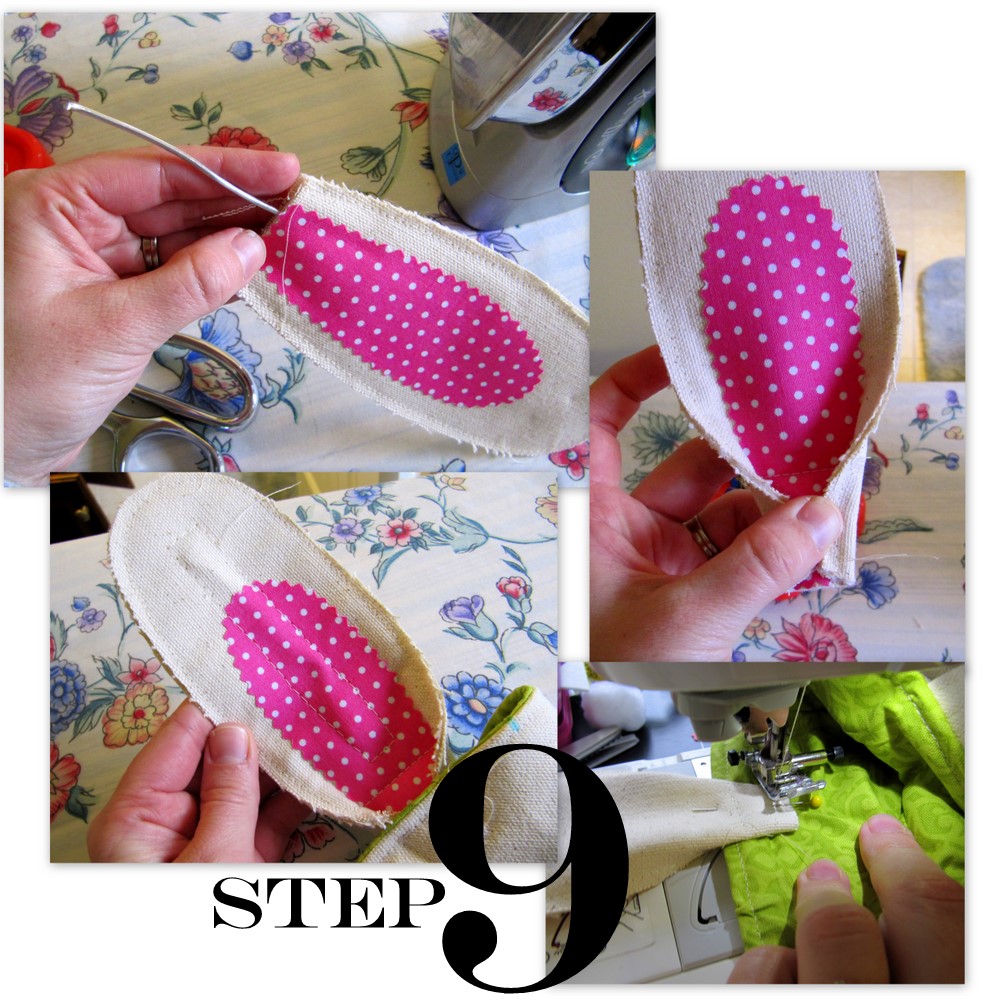
step 8 / Iron your fusible fleece outer ears to the back of two of your canvas outer ear pieces. Fuse your inner ear piece on top of this piece, as shown. Stack this assembled piece on top of another of your plain canvas outer ear pieces, and pin together. Edgestitch along the outer edge of these stacked pieces to attach them to one another, leaving the bottom edge open.

step 9 / Tuck a piece of craft wire (3.5″ for the large bucket, 3″ for the small bucket) up through the bottom opening of one of your ear pieces, so the end of the wire piece is about 1 1/4 inches from the bottom of your ear piece. Stitch a rectangle to encase your wire to prevent it from shifting around. Fold the bottom edges of your piece toward the center, as shown, and baste to secure these folds. Pin your piece to the inside of the front of your bucket, using the center front mark you made in step 5 as a guide for placement. Stitch a small rectangle shape to attach your ear to your bucket.
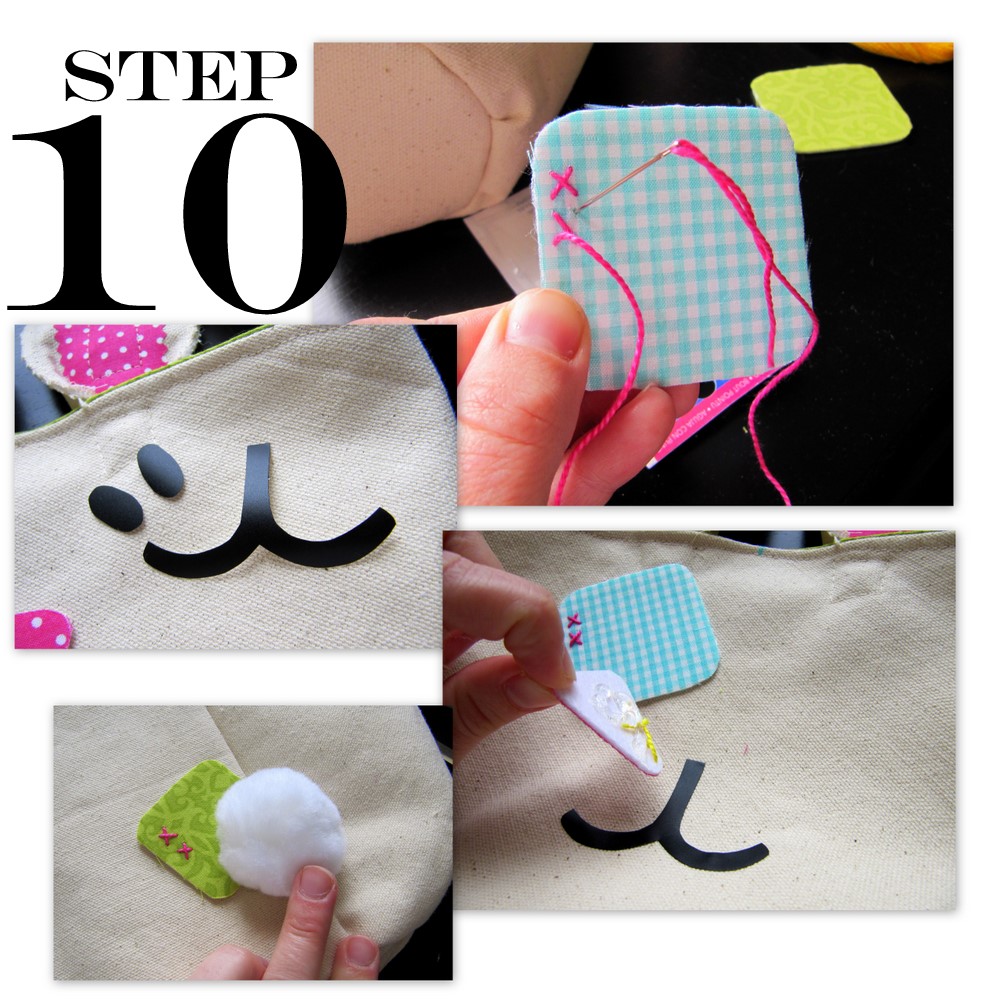
step 10 / Iron fusible Peltex to the back of your scrap fabric pieces, and cut various patches out to embellish your bucket. (I cut a square for one of my bunny’s eyes, and one for behind the tail, as well as a triangle nose piece.) If desired, embellish these pieces with embroidery floss. Cut two eyes and a mouth shape from your iron-on vinyl. Use hot glue to affix your eye patch and tail patch pieces to your bucket. Iron your vinyl eye and mouth pieces to the front of your bucket. Hot glue your nose piece above your mouth piece. Finish by affixing rick-rack whiskers on either side of your nose piece with hot glue and a pom-pom tail to the back of your bucket.
All finished!


Have a terrific week!

Having grown up in a home brimming with sewing notions and paintbrushes, Amy has a deep love for all things creative. On any given day, you’ll find her knee-deep in her latest creative endeavor, with projects ranging from sewing and crafts to home decor and kid-friendly ideas. Amy believes that everyone, regardless of skill level or experience, possesses the ability to create something beautiful, and Positively Splendid was born of her passion for helping others harness their innate creative potential.
your Easter buckets are great! My daughter wants me to make her one, they seems fairly easy to make thanks to your directions! Thanks.
She added “they are so sweet!”
Amy, I love these. You are so very creative. My girls think this is the cutest.
Thank for making my Monday morning happy,
Cha Cha
wow these are so so cute. i have been making easter bunnies using tin cans over on my blog tina x x http://scratchycatcrafter.blogspot.com
Really cute. Would love for you to link them up to Craftastic Monday!
LOVE these little guys! Their ears just kill me. Definitely the cutest Easter baskets I’ve seen in a long time.
These are just way too adorable!
Love these! Great tutorial- love the large pictures & numbers…great format!
OMGosh…really?? I have been looking for something for my grandson; and this is Perfect! Thank you so much for sharing, it really is adorable!
Desi
These are so cute Amy!! Love their ric rac whiskers!! 🙂
Adorable! I’ve got to get a stash of canvas, because my list of canvas projects is weighing heavily on my mind. I’m hoping to get to these before Easter!!
Thanks, Amy!
These are DARLING!
Those are absolutely precious!
Truly, truly adorable, Amy!! I’ll be stumbling and facebooking! Too cute!
I LOVE THESE!!!!!!
So Cute
http://runwithglitter.blogspot.com/
These are GREAT!!! I absolutely am in love. I just shared your link on my Facebook Fan Page
http://itsybitsypaper.blogspot.com
http://www.facebook.com/itsybitsypaper
I love this idea! I saw them on SYTYC and fell hard- I might have to make some just for decorations- Great tutorial!
xoxo,
Amy
LOVE LOVE LOVE THIS!! Thank you so much for giving us a darling tutorial. I can’t wait to make these for easter.
Your Bunny Baskets are incredible! I love all of the details! I hope you’ll share them at the Pretty Packages PartY!
http://blackberryvine.blogspot.com/2011/03/pretty-packages-party-7.html
Smiles!
Jami
The bunny baskets are so cute!
This is completely darling and I’ll be adding it to the Tip Junkie Easter site immediately.
You’re crazy talented!
So precious!! Visiting from Sumo’s Sweet Stuff and I am a NEW follower!
Hope you had a great Monday,
Michelle
http://www.delicateconstruction.blogspot.com
WOW! Just gorgeous 🙂
These are soooo cute!!! I linked to your tutorial on Craft Gossip Sewing:
http://sewing.craftgossip.com/tutorial-canvas-easter-bunny-bucket/2011/03/08/
–Anne
I’m losing my mind – there are the lessuht, most beautiful cucumber vines on the trellis, 8 feet long vines covered in nothing but male flowers. I’ve had five weeks of solely male flowers now, on 7-9 plants.
most adorable bunnies I have seen!
I am having a giveaway on my blog. A chance to win $15 store credit to buy great hair accessories, pettikirts, hair bow organizers,zipper flower clips, bottlecap necklaces and more. All you have to do is leave a comment .
check it out.
http://houseonashwelllane.blogspot.com/2011/03/15-store-credit-giveaway-from-hair.html
You really do have the cutest ideas!!
I am so jealous of your sewing talent! What an impressive easter pail! I am seriously green with envy! FABULOUSNESS!!!!!!!
Linking up thru Spring Fling @ The Blessed Nest
~Rachel @ http://cookscleansplayswithpaper.blogspot.com/
Oh how I love these! And such a great tutorial, thanks! I’d love for you to submit this to the M&T Spotlight at http://www.makeandtakes.com/spotlight
are you kidding me?
this is crazy adorable! girl, you are rockin the sewing machine. so so cute.
sorry it’s taken me for-evah to comment…crazy days over here.
sure wish i could of hung out with you all over the weekend.
thanks for linking up to the FLING!
xo
kellie
This is a FANTASTIC project. Great idea! I would be delighted if you would link this to my VIP party today! http://designergarden.blogspot.com/2011/03/vip-party-6.html
Cheers!
Sommer
I love this! I’d love for you to link up at Inspire Me Mondays @ Singing Three Little Birds.
http://singingthreelittlebirds.blogspot.com/2011/03/inspire-me-monday.html
These canvas Easter buckets are adorable!! I’m linking them up to my Easter craft post!! So cute!! 🙂
http://bluerobincottage.blogspot.com
Congratulations, amazing tutorial, you are so creative!!!
All the best ; )
Carine
I’d love it if you’d link up these “positively splendid” bunnies on my new Tuesday Time Out Link Party!
http://reasonstoskipthehousework.blogspot.com/2011/03/tuesday-time-out-link-up-party.html
Smiles,
Melanie
http://reasonstoskipthehousework.blogspot.com
This comment has been removed by the author.
First of all, thanks for sharing this pattern with us, cause i could do MY canvas bunny easter bucket!
I live in brazil and i had to change some things (that i´d never heard about!)
but it works, as you can see on my blog: http://nascalenha.blogspot.com/2011/03/balde-coelho-fiz-hoje-tarde-de-tecido.html
I saw the tutorial last week, and i was so excited to make it cause i thought it´s so cute!
i almost forgot to say: i linked your post on my blog, ok?!
Featured these on Easter Get Crafty today :-)))))
http://www.redtedart.com/2011/04/01/easter-get-crafty/
Maggy
hola !!hermoso tu blog,,soy nueva por aqui,,ya te sigo..saludos desde tampico mexico..besos
Lindo!!!
Cheio de detalhes e muito caprichado…
Parabéns
Giselle
This blog is content amazing information about Easter bunny which is very useful for me. It very important information about Easter festival.
Thank you very much for this great information.
Easter Bunny Decoration Ideas