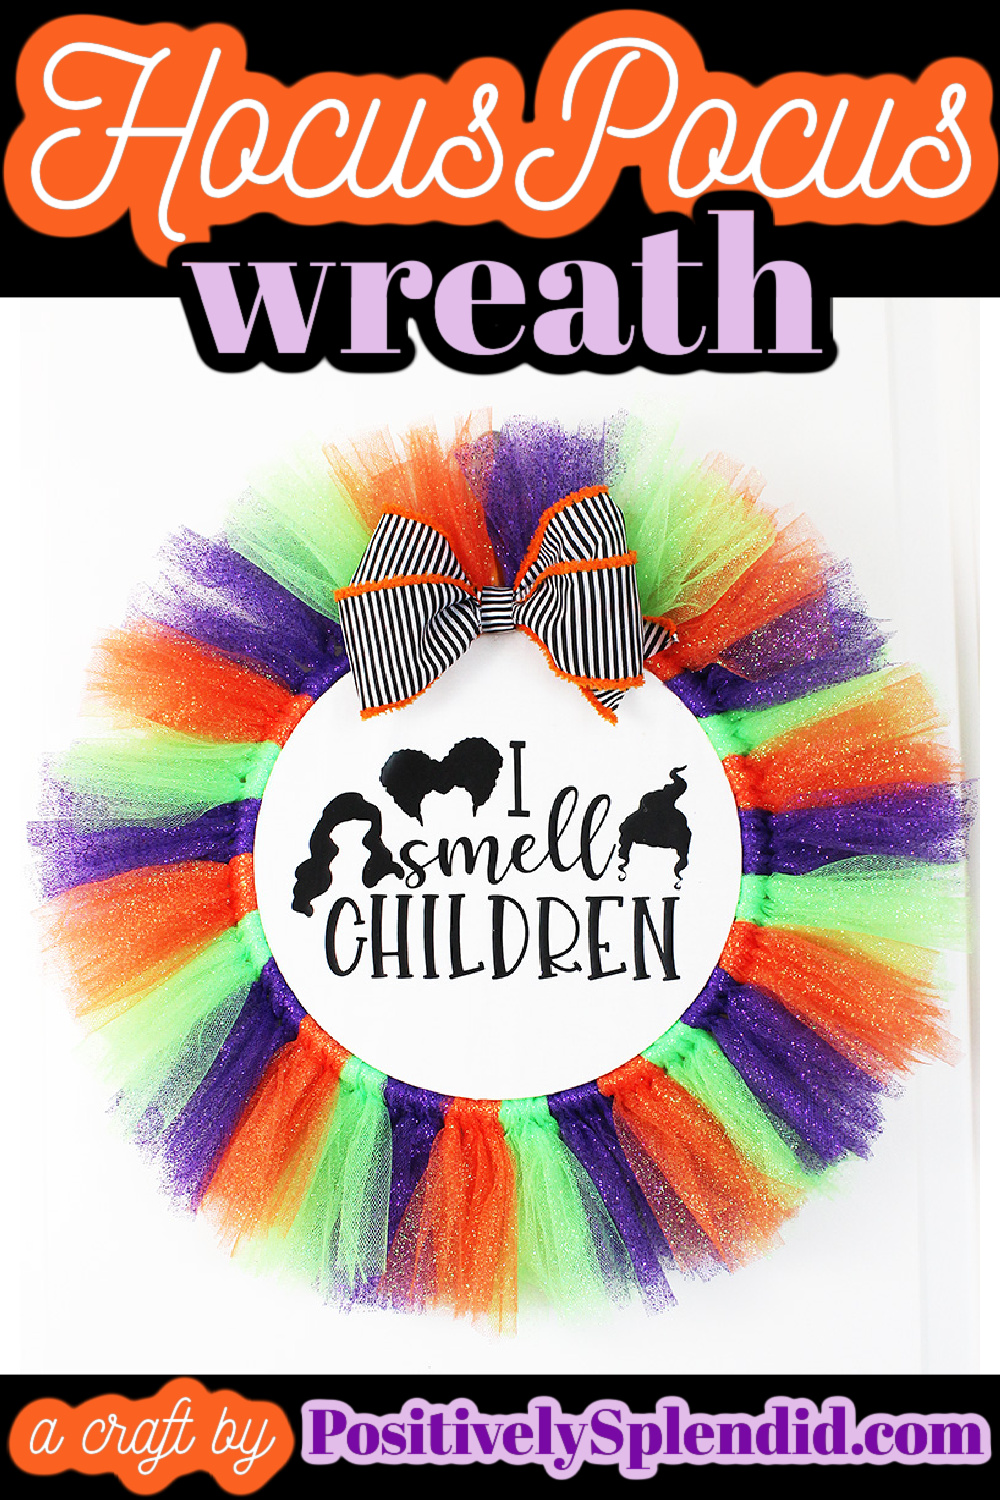
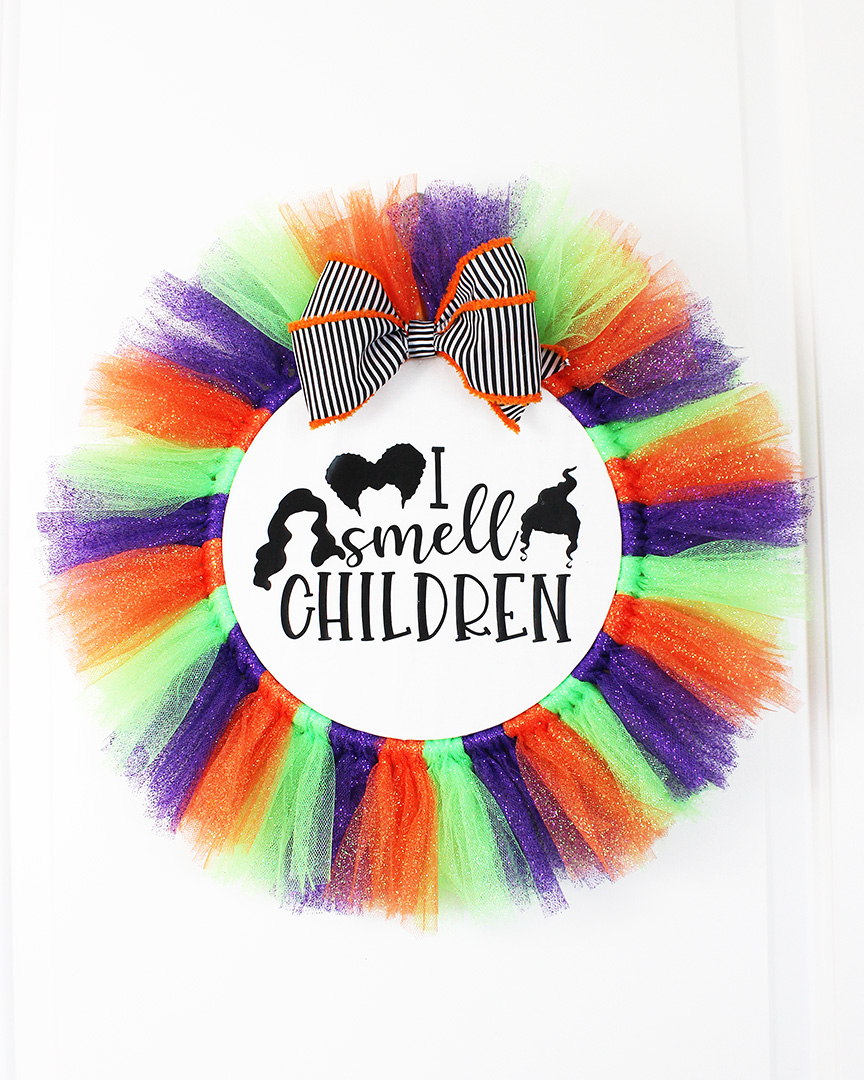
This year, I decided to make a Hocus Pocus wreath to pay homage to my all-time favorite Halloween movie! This cute Halloween wreath is easy to make with tulle and an embroidery hoop, plus any fabric Hocus Pocus design you like created with a Cricut and heat transfer. I’ve got all the details below for how this Halloween tulle wreath comes together. Let’s get started!
More fun Halloween wreaths to make!
How to Make a Hocus Pocus Wreath
A PDF version of these instructions is available below.
Supplies
- 14″ square of white fabric (see my note for materials to use in the Tips & Tricks section below)
- Black heat transfer
- Hocus Pocus SVG file (link to the free file is available in the Tips & Tricks section below)
- 10″ wooden embroidery hoop
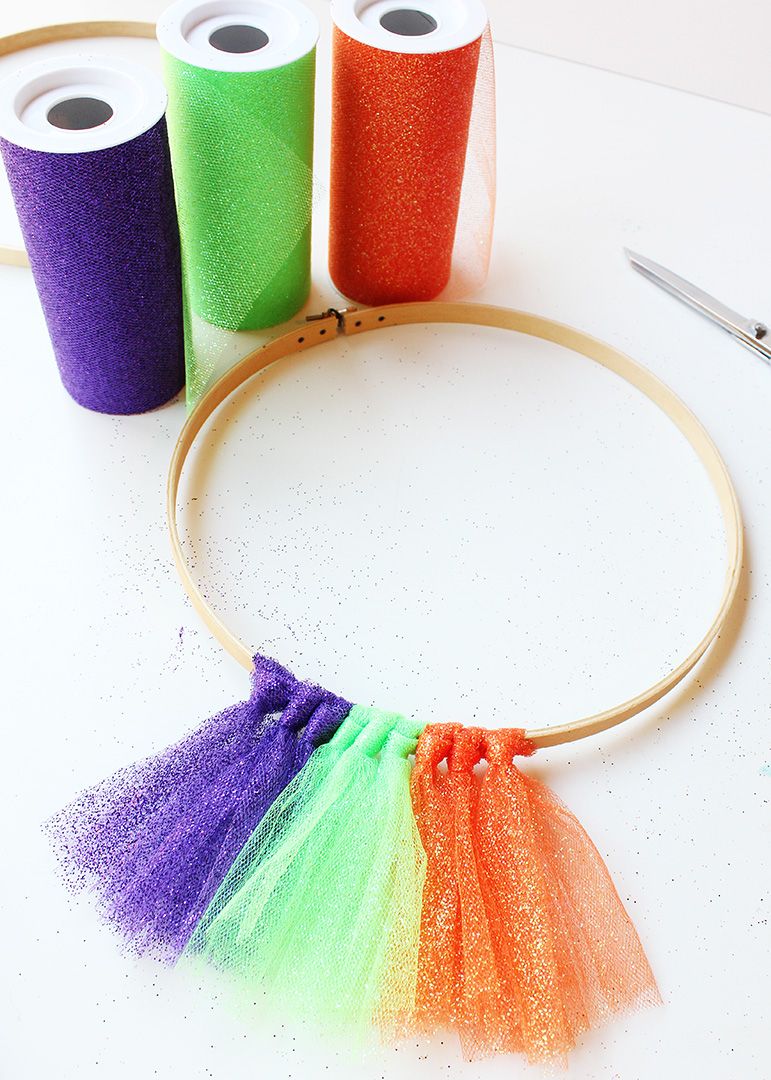
- (3) 10-yard rolls of 6″ tulle (I used lime green, orange, and purple glitter tulle)
- Hot glue
- Wired ribbon
Tools
Pssst…Don’t have a Cricut? There is a great alternative you can use that I describe in the Tips & Tricks section below!
Instructions
Create Your Fabric Design
Using a Cricut, cut the SVG Hocus Pocus design (linked in the Tips & Tricks section below–thank you, Perfect Stylish Cuts!) from the black heat transfer material. Use the Cricut EasyPress to fuse the design onto the white fabric piece. Set the piece aside.
Cut and Attach Tulle Pieces
Use fabric shears to cut 12″ sections of the tulle. For my tri-colored wreath, I used 27 pieces of tulle of each color, or 81 pieces total.
Separate the outer and inner rings of the embroidery hoop, and set the inner ring aside.
Working with one tulle piece at a time, gather the piece into a tube and then fold in half lengthwise, as shown.
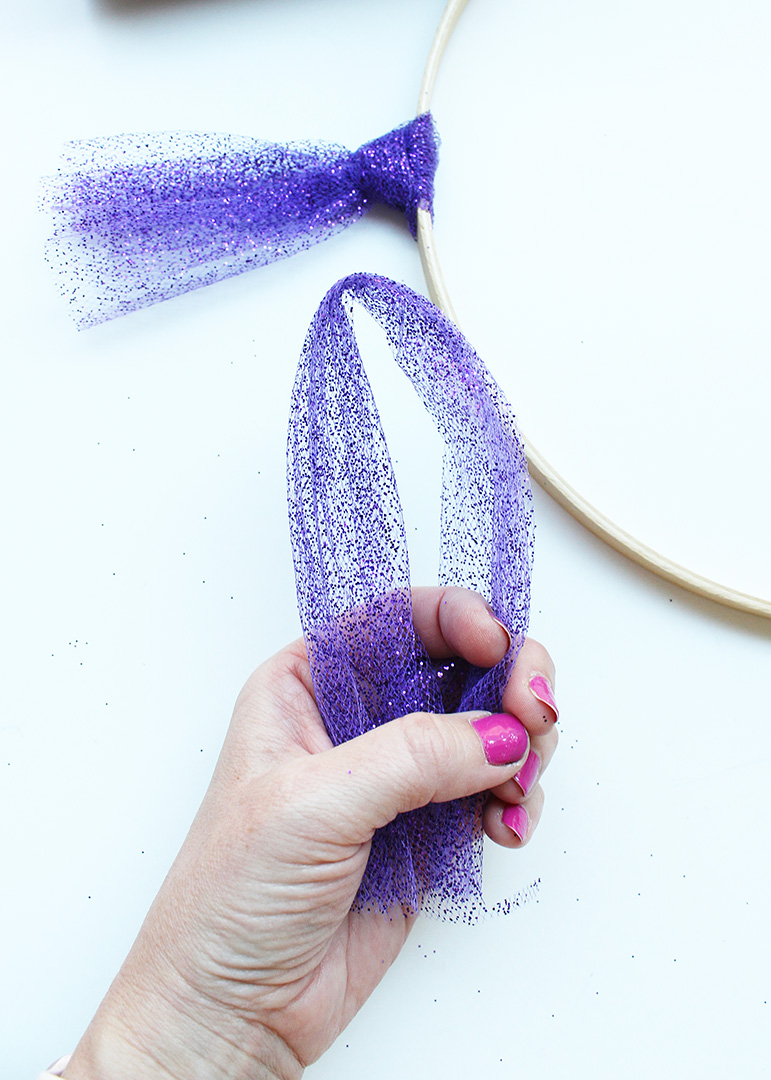
Attach the piece to the outer ring of the embroidery hoop with a slipknot.
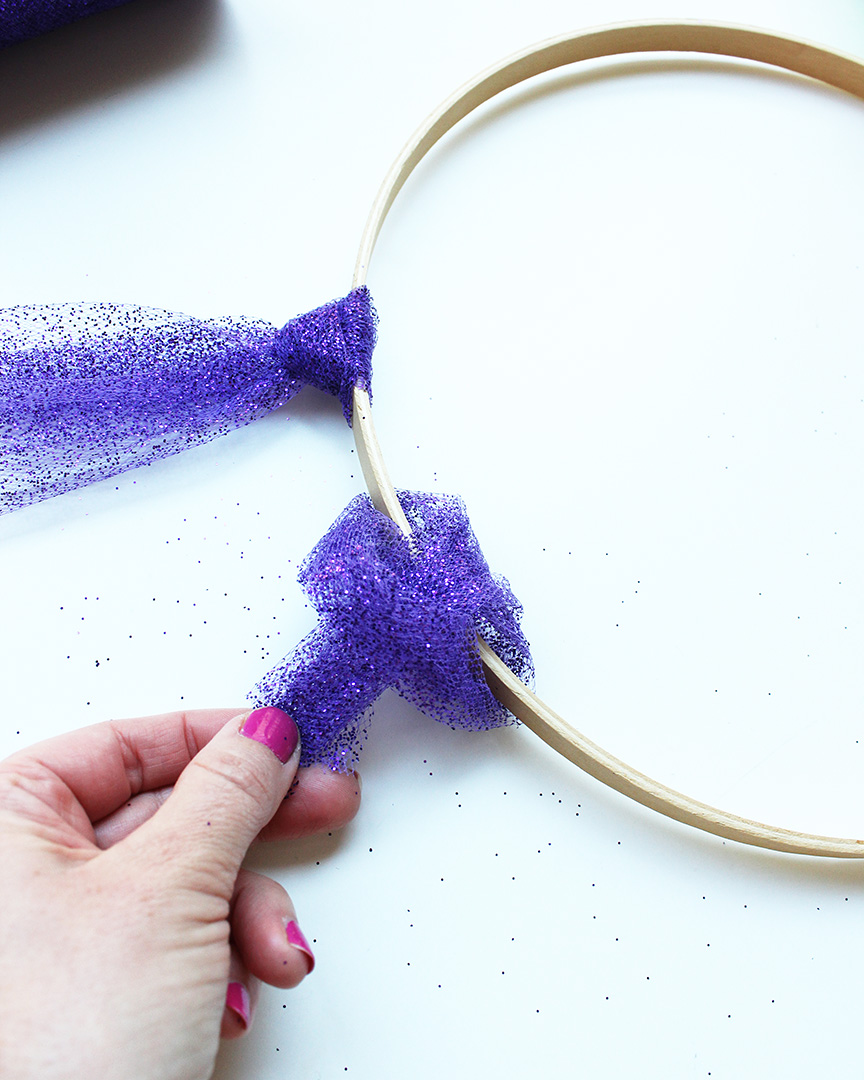
For a tri-colored wreath like mine, alternate adding three sections of tulle per color.
Helpful Hint: Make sure the loops of your slipknots are all facing the same direction, like in the photo below. This will give your finished wreath a tidy, professional look!
Continue adding the pieces until you have worked your way around the entire perimeter of the outer ring. Make sure to leave the screw closure of the ring uncovered so you can tighten it later on. Set the wreath aside.

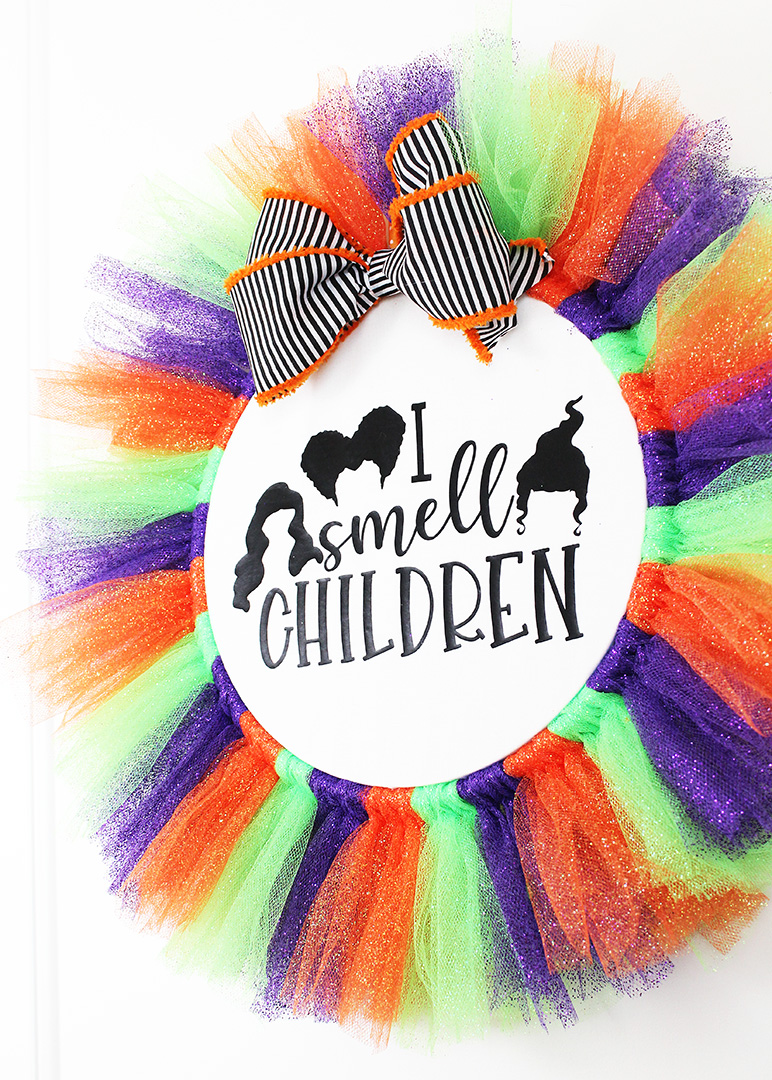
Add the Fabric Design to Wreath Center and Finish
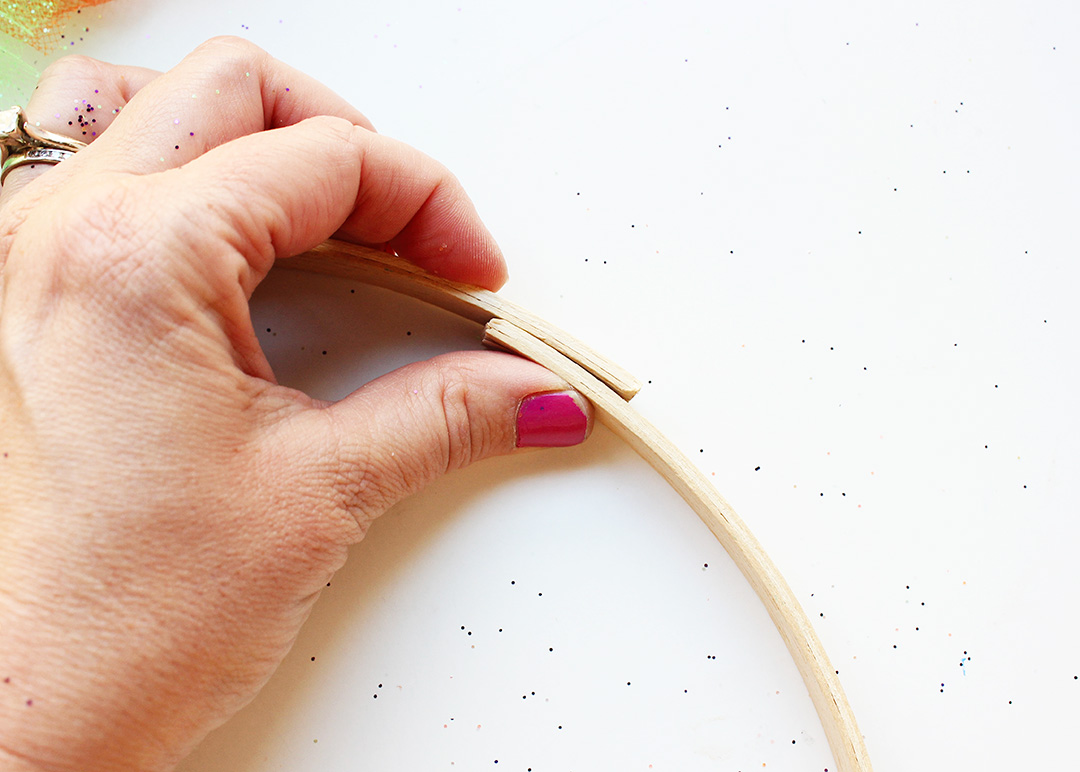
Because the sections of tulle add so much bulk to the outer ring, you will need to shorten the inner ring so that it can fit inside of the wreath. To do so, use sharp scissors to cut the ring, and then overlap the edges by 1″ and secure with hot glue. (A handy saw like this one used for dollhouse projects works great for cutting the ring, too!)
Stretch the fabric piece over the inner loop, and then press it down through the back side of the wreath, as shown. Important: Make sure the metal clamp at the top of the outer ring is oriented with the top of your design. Tighten the embroidery hoop screw to secure everything into place.
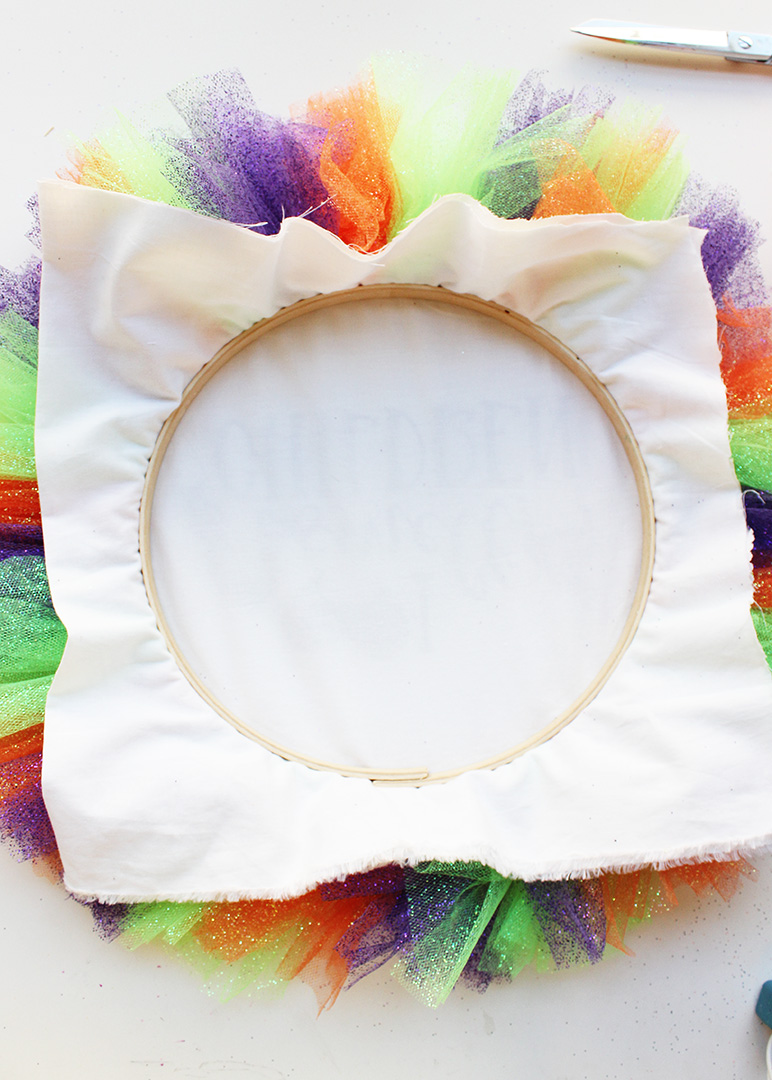
Use pinking shears to trim away the excess fabric on the back of the wreath. I like to leave a 1/2″ border of fabric, and then fold the fabric over the inner hoop and secure it with hot glue to keep the back of my wreath tidy, but that is totally up to you.
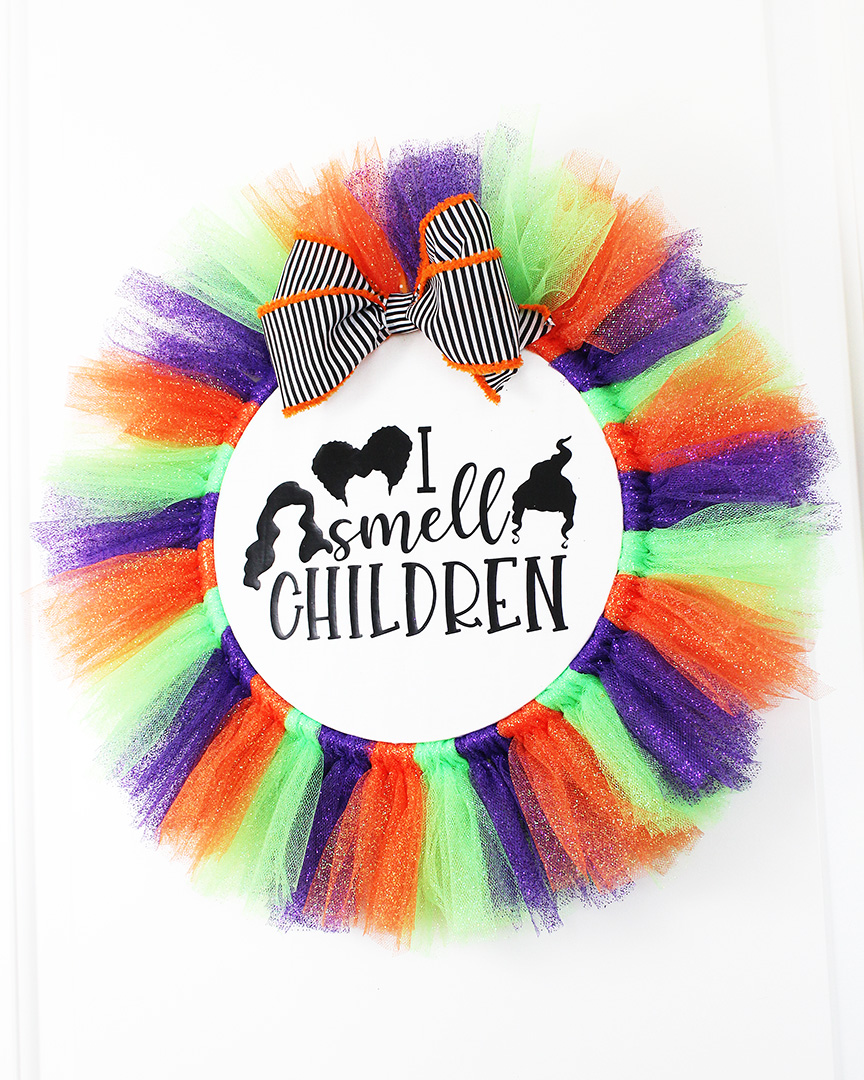
Create a bow with the wired ribbon, and secure it to the top of the wreath with hot glue.
Your adorable Hocus Pocus wreath is finished!
Project Tips & Tricks
What type of fabric should I use for the center design? Heavier fabrics like canvas work best for this project, since the material will hold its shape better when stretched in the hoop, and you won’t have as much puckering as you would with lighter fabrics.
Where can I find the SVG design you used for your wreath? I downloaded the file for free from Perfect Stylish Cuts. There are four adorable Hocus Pocus designs to choose from!
What if I don’t have a Cricut? Create a design by using printable iron-on transfer sheets. Download and print a favorite Hocus Pocus image onto the sheet, and then cut out with scissors and iron the design onto the fabric. I used printable iron-on sheets for these Vintage Photo Pillows, and they are so clever and easy to use!
Can I use an embroidery hoop of a different size for my wreath? Absolutely! This wreath can be made with smaller or larger embroidery hoops if that is what you have on hand. For smaller wreaths, you will cut shorter sections of tulle, and for larger wreaths, you will need to make the tulle sections a bit longer.
How can I make cutting so many pieces of tulle go faster? Place a section of masking tape 12 inches from the edge of a desk or other work surface, and use that as a guide for cutting. Or, you can also cut a 12″ long cardboard piece, and then wrap the tulle around the piece and cut the ends to create your pieces. You can see photos of that process in my Patriotic Tulle Wreath tutorial.
How can I hang my wreath? Cut a small section of ribbon, and tie it into a loop. Hook the loop around the metal screw at the top of the hoop to create a hanger.
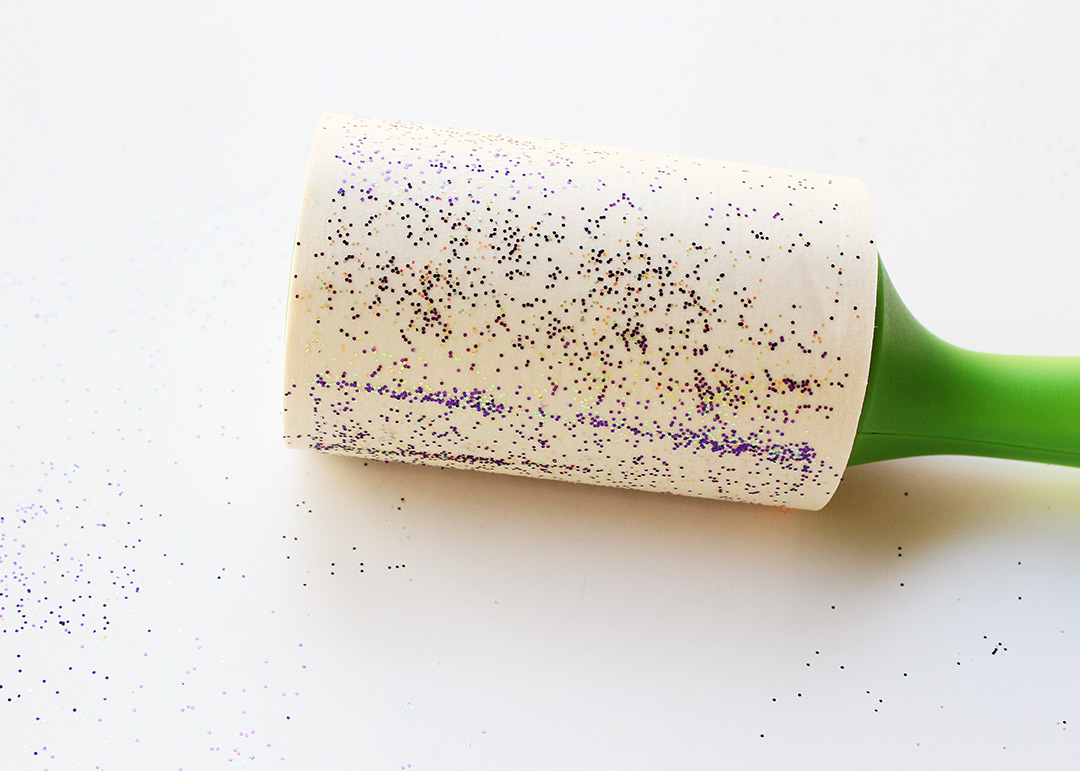
Help! I used glitter tulle and now my workspace is a mess! You probably noticed in the photos above that my desk was covered in glitter from making this project. A lint roller makes quick work of cleaning glitter off of work surfaces. One of my favorite crafting hacks!
If you love Hocus Pocus, don’t miss my Hocus Pocus Oreos!

More tulle wreath ideas

Hocus Pocus Wreath
Equipment
- Cricut
- Cricut EasyPress
- Fabric Shears
- Pinking shears
- Hot Glue Gun
Materials
- 14" square of white canvas fabric
- Black heat transfer
- Hocus Pocus SVG file The link to the free file is available in the Tips & Tricks section in the original post
- 10" wooden embroidery hoop
- 310-yard rolls of 6" tulle (I used lime green, orange, and purple glitter tulle)
- Wired ribbon
Instructions
- Using a Cricut, cut the SVG Hocus Pocus design (linked in the Tips & Tricks section in the original post) from the black heat transfer material. Use the Cricut EasyPress to fuse the design onto the white fabric piece. Set the piece aside.
- Use fabric shears to cut 12" sections of the tulle. For my tri-colored wreath, I used 27 pieces of tulle of each color, or 81 pieces total.
- Separate the outer and inner rings of the embroidery hoop, and set the inner ring aside.
- Working with one tulle piece at a time, gather the piece into a tube and then fold in half lengthwise. Attach the piece to the outer ring of the embroidery hoop with a slipknot. For a tri-colored wreath, alternate adding three sections of tulle per color.
- Continue adding the pieces until you have worked your way around the entire perimeter of the outer ring. Make sure to leave the screw closure of the ring uncovered so you can tighten it later on. Set the wreath aside.
- Use sharp scissors to cut the inner ring, and then overlap the edges by 1" and secure with hot glue.
- Stretch the fabric piece over the inner loop, and then press it down through the back side of the wreath. Important: Make sure the metal clamp at the top of the outer ring is oriented with the top of your design. Tighten the embroidery hoop screw to secure everything into place.
- Use pinking shears to trim away the excess fabric on the back of the wreath. I like to leave a 1/2" border of fabric, and then fold the fabric over the inner hoop and secure it with hot glue to keep the back of my wreath tidy, but that is totally up to you.
- Create a bow with the wired ribbon, and secure it to the top of the wreath with hot glue.
Having grown up in a home brimming with sewing notions and paintbrushes, Amy has a deep love for all things creative. On any given day, you’ll find her knee-deep in her latest creative endeavor, with projects ranging from sewing and crafts to home decor and kid-friendly ideas. Amy believes that everyone, regardless of skill level or experience, possesses the ability to create something beautiful, and Positively Splendid was born of her passion for helping others harness their innate creative potential.