• Skip to primary navigation
  • Skip to main content
  • Skip to primary sidebar

Positively Splendid {Crafts, Sewing, Recipes and Home Decor}

Handcrafted. Splendidly.

  • Home
  • Blog
  • + Handmade
    • Crafts
      • Craft Gift Ideas
      • Holiday Crafts
      • Home Decor Crafts
      • Kids’ Crafts
      • Paper Crafts
      • Quick and Easy Crafts
      • Wearable Crafts
      • Wreaths
    • Gift Ideas
      • Budget-Friendly Gifts
      • Gift Wrapping
      • Gifts for Dads and Grandpas
      • Gifts for Kids
      • Gifts for Men
      • Gifts for Moms and Grandmas
      • Gifts for Neighbors
      • Gifts for Sports Fans
      • Gifts for Teachers
      • Gifts for Women
      • Quick and Easy Gifts
    • Kid-Friendly Projects
    • Sewing
      • Sewing for Children
      • Sewing for Men
      • Sewing for the Home
      • Sewing for Women
      • Sewing Techniques
      • Sewn Accessories
      • Sewn Gifts
  • + Home & Garden
    • DIY Home Decor Projects
    • Helpful Tips
    • Home Decor Crafts
    • DIY
    • Home Tour
    • Mantels and Tablescapes
    • Organization
    • Outdoor and Garden
  • + Holidays & Seasons
    • Spring
    • St. Patrick’s Day
    • Summer
    • Teacher Appreciation
    • Thanksgiving
    • Valentine’s Day
    • Winter
    • Back to School
    • Christmas
    • Easter
    • Fall
    • Fathers’ Day
    • Graduation
    • Halloween
    • Independence Day
    • Mothers’ Day
    • New Year’s
  • + Printables
  • + Recipes
    • Soups and Stews
    • Appetizers and Salads
    • Breads
    • Desserts
    • Food Crafts
    • Main Dish

Felt Gift Card Holder Tutorial

April 21, 2011 By Amy @ Positively Splendid

FacebookTweetPinYummlyPrint


I am honestly a person who loves to receive a gift card, since I enjoy having the option to choose exactly what I’m wanting or needing. I have to say, though, that when giving gift cards to other people, I tend to feel a bit guilty about the lack of personal touch such a gift entails. Enter these little gift card holders. Quick and easy to make, these will give your gift card some real personality. And with some rhinestone Silhouette bling, these make even more of a statement! What a great option for Mothers’ Day (or for upcoming graduation gifts)!

This was my first project to use my brand-spanking new Silhouette machine. (Yippee!) After pulling it out of the box, it took me only minutes to get on to the business of creating. Using the Silhouette rhinestone kit and some rhinestone designs I downloaded for 99 cents apiece from the Silhouette website, I was able to really take this little project to the next level! 

Interested to see how I put these together? Let’s get started!

If you’ve been reading a while, you might remember these fun little Bird Sachets I made for a friend’s baby shower last year. The technique I used to make these holders is very similar to the process I used for those.

To make a gift card holder you, will need…

Felt in various colors
Silhouette rhinestone kit (optional, of course, but they really do look terrific!)
Embroidery needle and floss
Cotton batting
Hot glue

step 1 / Cut (2) 4.5″ squares of felt, and (1) 2 x 4.5″ rectangle for the card pocket.

step 2 / Use your Silhouette machine to cut out a rhinestone placement template in your chosen design. Arrange your rhinestones onto your template using the method detailed in the package directions, and adhere them to your transfer sheet. 

Note: If you need detailed instructions for how to use the rhinestone kit, there are some great tutorials on the Silhouette website, as well as a helpful (hilarious!) video. 


step 3 / Iron your rhinestone design onto one of your felt squares, making sure to use a pressing cloth to avoid scorching the felt.


step 4 / Cut various felt strips that are 1/4″ wide and anywhere from 12 to 20″ long. Roll these up as shown, and secure the end with a dab of hot glue. Adhere these to your square felt piece with the rhinestones, as desired. Accent with small felt leaves, if desired.

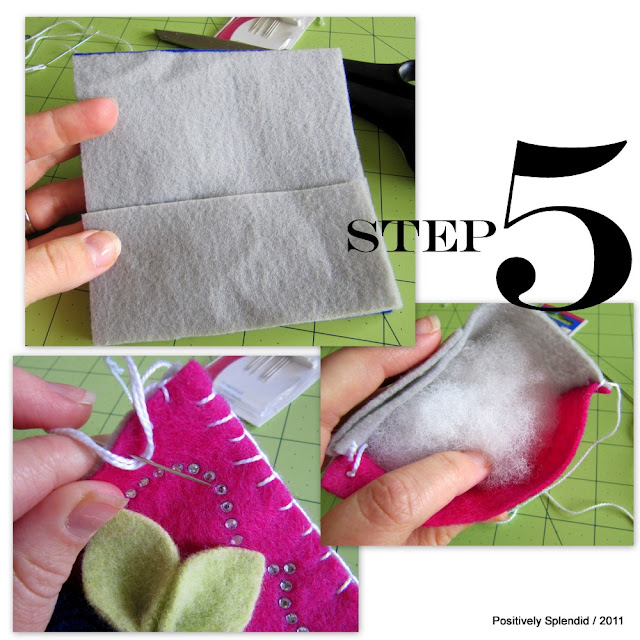
step 5 / Place your embellished felt square on top of your other felt square, right sides facing, lining up all of the edges. Align the small rectangle with the lower edge of your back square piece, as shown. Using your embroidery floss and needle, stitch around the perimeter of your holder with a blanket stitch. Stitch three sides, then fill your holder with batting before stitching the final side closed. 

Note: Anna Maria Horner has a fabulous blanket stitch tutorial that I have referred to many times.


All finished!


So, you love the look of the rhinestones, and you’re wanting to try them on your own? Lucky you! Silhouette is offering an amazing deal right this month on their rhinestone package. By entering the code POSITIVELY at checkout, you’ll receive the Silhouette Rhinestone Bundle, which includes…

The Silhouette SD
2 sheets of rhinestone template material
2 sheets of rhinestone transfer tape
2 rhinestone backing boards
1 rhinestone placement brush
1 CD of rhinestone images
1 pack of clear 10ss rhinestones
1 pack of clear 16ss rhinestones
1 pack of clear 20ss rhinestones
1 pack of pink 10ss rhinestones
and
1 Pick-Me-Up tool

ALL FOR $229!
 
That’s a savings of $125!

Already own a Silhouette, but wanting to get your hands on one of the rhinestone kits? All Silhouette rhinestone products are discounted 30% this month! Be sure to use the same POSITIVELY code when you shop.


Hurry over, because these offers end April 26.

Thanks so much for reading!

Photobucket

Amy @ Positively Splendid

Having grown up in a home brimming with sewing notions and paintbrushes, Amy has a deep love for all things creative. On any given day, you’ll find her knee-deep in her latest creative endeavor, with projects ranging from sewing and crafts to home decor and kid-friendly ideas. Amy believes that everyone, regardless of skill level or experience, possesses the ability to create something beautiful, and Positively Splendid was born of her passion for helping others harness their innate creative potential.

EVEN MORE GREAT IDEAS JUST FOR YOU!

FacebookTweetPinYummlyPrint

Filed Under: Gift Ideas, Tutorials Tagged With: Mothers' Day, Silhouette SD

Previous Post: « Lisa Leonard Designs Giveaway!
Next Post: Swap with Sumo’s Sweet Stuff »

Reader Interactions

Comments

  1. Alison@Oopsey Daisy says

    April 22, 2011 at 6:14 am

    Super cute, my friend!

  2. Stephanie says

    April 25, 2011 at 2:00 pm

    On the Silhouette deal…does it still come with the thin and thick mats, $10 gift card toward purchasing images, etc link the machine itself comes with? I emailed Silhouette last week but they haven’t answered me. Thanks!

Primary Sidebar

PS Search

Search this website

Seasonal Inspiration

Hocus Pocus Wreath
Ghost Plushies
Paper Pumpkins
Fabric Yo-Yo Pumpkins

Copyright © 2025 · Positively Splendid · All Rights Reserved. · Privacy Policy

Privacy & Cookies: This site uses cookies and other tracking technologies to assist with navigation and your ability to provide feedback, analyse your use of our products and services, assist with our promotional and marketing efforts, and provide content from third parties. To find out more, as well as how to remove or block these, see here: Our Cookie/Privacy Policy