
We’ve got another terrific feature this week: a truly ingenious project step-by-step compliments of Amanda from The Ivy Cottage Blog!
***
Hello Positively Splendid readers!
This is Amanda from The Ivy Cottage Blog.

I am totally psyched to be guest posting on one of the most inspiring blogs out there in blog land! Hopefully, my tutorial inspires you to make an investment in aluminum foil and to stop by The Ivy Cottage Blog and check out some of my other ideas and inspiration. Plus, I am giving away three vintage feed sacks this week.
Do you love silver leaf the way I do?
Do you choke at the price of silver leaf the way I do?
If so, this tutorial is for you!

Let’s make aluminum foil look like silver leaf!
This technique works great on walls, furniture, and I bet some of you can come up with some other uses as well. Why did I decide to cover the wall in my kitchen you may ask? Well, there used to be some scary 80s southwest wallpaper there and I was super pregnant and unable to take on a huge project like pulling down wallpaper . . .
solution: aluminum foil!

Materials:
* Heavy Duty Aluminum Foil with NO WRITING
* Paint tray and sponge roller
* Water based wallpaper paste
* Ruler
* Plastic smoother thing . . . in the wallpaper section at your hardware store
* Acrylic Paint
* Sealer: This is optional!
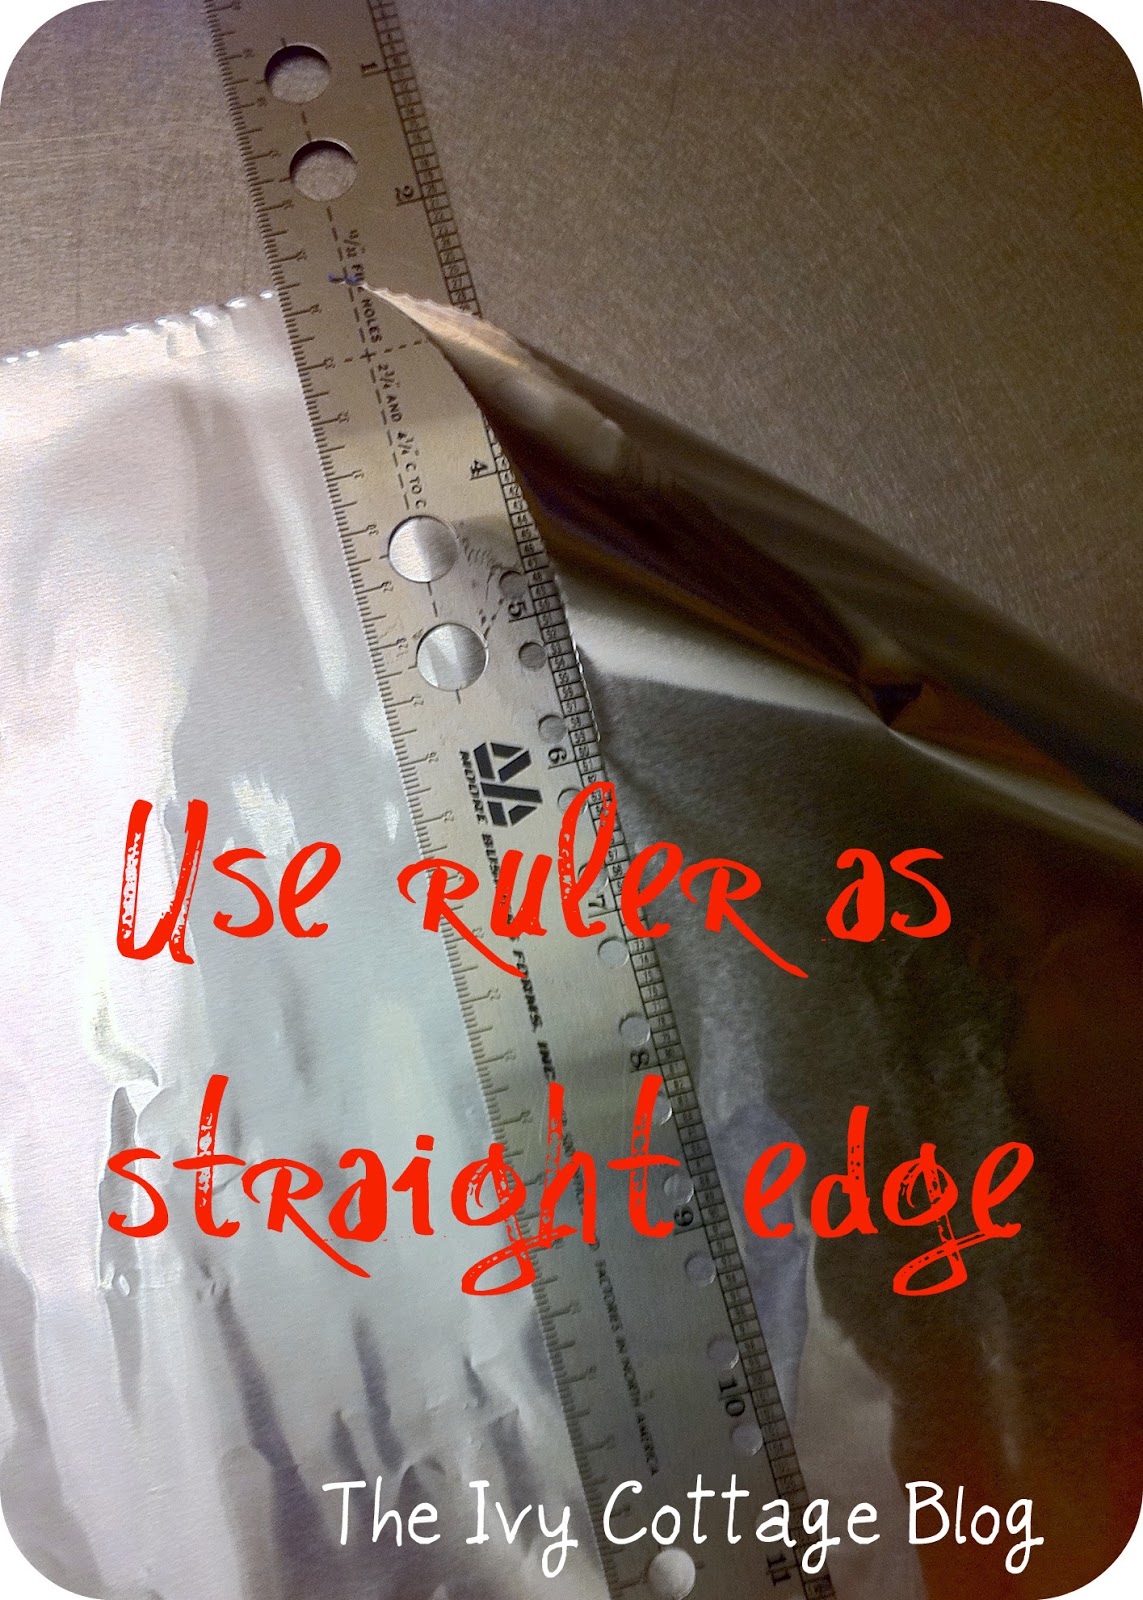
Step #1: Use the ruler as a straight edge and tear square pieces of foil. Make ALOT! I wasn’t perfect on my measurements . . . I just guesstimated. I chose to use the ruler instead of the toothed tearer on the aluminum foil box, because I wanted a clean edge like silver leaf.

Step #2: Use sponge roller to apply a thin layer of wallpaper paste. You want to make sure it goes on even and not globby. Use the plastic smoother to smooth out air bubbles and seal down edges of foil
Repeat until you have covered your surface and make sure to overlap the edges of each piece of foil.

You may get glue residue streaks that look like this.
But don’t worry . . .

Step #3: Use damp paper towel to wipe away glue residue. It is important to wipe away glue residue if you plan on adding acrylic paint. The paint really sticks to the residue.

Step #4: Apply a drop of acrylic paint and rub over foil using paper towel. For this demo, I choose to use teal colored paint, but the wall in my kitchen has black paint.
DON”T LET THE PAINT DRY and work a small section at a time.

Step #5: Come back with a clean paper towel and wipe away excess paint. This technique gives you a SUBTLE texture. WHY did I use paint? Well, let’s face it . . . this is aluminum foil and it is shiny. Adding the paint cuts down the shininess and doesn’t scream aluminum foil.
Now, let’s get CRAZY! For LOTS of texture . . .

Step #1: Wrinkle and crunch up foil.

Step #2: Apply a thin layer of wallpaper paste with roller. Smooth out the foil and press into place.

Step #3: Use plastic smoother to press down foil even more and create some gorgeous texture.

Pretty! Kind of looks like tooled metal.

Step #4: To enhance texture, apply acrylic paint with paper towel and work into grooves. Wipe away excess before paint dries. Work with a small area at a time.

Look how the paint defines the texture!

Here is the difference between the two techniques.
Final Optional Step: You can apply a layer of water based sealer is you want. I did not do this for my kitchen. However, I have used this technique on furniture and applying two coats of sealer is a MUST!
What kind of furniture have I foiled?
Some nightstands for the master bedroom, a coffee table, a dresser, and a lovely clock which I will be showing you later this week. This is a great technique if you need to cover up something ugly on your furniture.
Check out my kitchen wall!

I have a lot of clients come to my home and they almost always comment on the wall. Since I work with brides, they are always looking for something to dress up their newlywed homes.

Love the reflection this creates in what is typically a dark space.

Cleans up easily with damp rag . . . with two kids and a dog, trust me, I know!


A couple of tips:
1. I have tried many types of adhesives with this technique including modge podge, spray glue, etc. The wallpaper paste is the most forgiving. If you mess up, just soak it down and pull it off.
2. Work with small areas at a time. Drying time is fast for the paste and the acrylic paint.
3. If you get a lot of air bubbles, use a pin to poke a couple of tiny holes in the bubble and then smooth out with the plastic smoother.
Thanks so much for listening to me ramble! I like to give detailed tutorials and you can find many more like this over at The Ivy Cottage Blog.
Also, stop by for my GIVEAWAY! The Ivy Cottage Blog is giving away three vintage burlap sacks . . . you get to pick them and do your own project with them. Fun!
Thanks for letting my hijack your blog today, Amy!
***
Isn’t that look cool? I can see this technique being dynamite on furniture pieces, too! Thanks, Amanda, for stopping in the share your tutorial with us!
Would you like to share one of your tutorials here at Positively Splendid? Head to my Be Featured page to see how to go about doing so!

Having grown up in a home brimming with sewing notions and paintbrushes, Amy has a deep love for all things creative. On any given day, you’ll find her knee-deep in her latest creative endeavor, with projects ranging from sewing and crafts to home decor and kid-friendly ideas. Amy believes that everyone, regardless of skill level or experience, possesses the ability to create something beautiful, and Positively Splendid was born of her passion for helping others harness their innate creative potential.
WOW, what impact this simple project has! I’d love to give this a try on an accent table. Thanks for the tips!
Heidi @ Show Some Decor
What a fun project! I love the shine:)
What a cool technique! The kitchen wall looks amazing!
Ginger
Literally Inspired
What kind of sealer did you use? I want to put this on my backsplash, and I’m sure sealer is a MUST there as well. 🙂
Hi what size sheets did you work with ? 8×10? bigger.Any tricks to making the overlap less noticeable ? I may actually try this tomorrow. how long did it take to do a normal size wall? thanks for any help.
Thanks for this… I had been wondering if this was possible and yesterday I went into the hardware store to get some metallic pewter paint but it was 80 bucks and being the frugal gal that I am I had a real problem with spending that kind of money on a gallon of paint. So I settled on a paint color as close as I could get it to the pewter color I wanted for 25 dollars and decided to stencil a design over it with silver spray paint and then I thought about silver leaf but realized it was expensive which led to my search for how to use aluminum foil instead and I found your blog. I thought I was dreaming at first but you actually did it and made it look so good and authentic. I will definitely try this. Maybe on a practice board first. I can’t wait to get started. Thank again!