Today marks the first installment of A Swell Noel here at Positively Splendid.
Hooray for kicking off the holiday crafting season!!

Can I just say I am so excited to kick off this extravaganza with a super fun, super functional gift idea from the immensely talented Kim from A Girl and a Glue Gun? Take it away, Kim!
***

Hi. i’m kim from a
girl and a glue gun (and ironically, i’m not using my glue gun at
girl and a glue gun (and ironically, i’m not using my glue gun at
all today.)
I’m SO excited to be here on P.S.!
I’m a huge fan of amy’s and so excited for her and her growing family!
and I’m so excited that she got me started early on my
Christmas gift making…
i love Christmas.
love.
hate shopping.
hate.
i always dread that (insert person) won’t like the present i get
or worse, already has one.
so i choose to go the homemade route.
introducing…..
It’s a pillow….
it’s a blanket..
it’s
a planket….?
a planket….?
okay. so it’s a working title.
but whatever it is called…
it’s awesome.
and usable.
and a great gift for the traveler…
or the napper…
or the picnicer.
or the football fan…

and I loved the excuse to go to joanns and buy some fleece….
i narrowed it down to like 10

but ultimately i choose this one…
(cause i thought it matched amy’s
blog design nicely!)

I bought a yard and a half of the print..and half a yard of the green
(but realistically you could buy a pre-made blanket and just add the
pocket!
trimmed the edges to make it all even and nice..

then i had to break out the math.
i used to be very good at math.
then i had kids.
fried the brain or something.
but it’s not too difficult. I drew a picture cause I’m a visual
person….

basically..to get the measurements of the pillow piece..you need
to find out how big your blanket is…then divide it. the top piece
will have to be divided by odds (3 or 5). but the side pieces can be
whatever you fancy. (so if you have a HUGE blanket you could do 3
across the top…and 6 going down.
if your blanket is big…and you do only 4…than your pillow is going
to be pretty big. (so keep all this in mind. )
The measurements of my pillow is 14 x 18…so i added an inch for a
seam and cut 15×19

and cause i feel the need to add crap to everything..
i decided to sew on some flowers to decorate the pillow.
made a template

cut them out..and sewed them on

Now…if you are only using one piece of fabric than you need to pick
something that will be okay from both sides (like you can’t do a
letter k. cause it will be backwards on the blanket or pillow
side)
but you could just add another piece of fabric and then the
problem won’t be a problem.
I put the flowers face down on the blanket…(so the pillow will have
the pop outs)

okay..so just like my drawing…the pillow goes at the top (or bottom)
in the middle (centered) (on the back if you have a back to
your blanket)

sew it on…except for the part i have written do not pin here. that will be our
pocket to stick our blanket in

lucky for me, i’m using fleece. which means i don’t have to finish any
seams…but if you are using a fabric that frays you will need to
finish these edges before sewing it on…
okay.. sew it on!


you could get all fancy and bind it but i like the


this would be great to take to a ballgame
keep you warm if you need..
or keep your bum from going numb on the hard bleachers

(you could even get all fancy and make it in your team colors!)


i think i will keep this one in my car. great for picnics,
for long car rides when your kid is falling asleep against the cold window
or for ANYTIME you kid complains cause they are freezing…(even when
it’s like 75 degrees outside.)


i think i might just add a pocket to all my blankets. makes them so
handy to have!
thanks for having me amy!
and please feel free to stop by and hang out at my blog
we just finished a week full of hair
crap
crap

and you can go HERE to
see my other stuff

***
I totally love this idea, and I have to say Kim is a true gem for choosing a color scheme to match my blog! 🙂 What a marvelous gift idea that would be perfect for so many different folks in your life!
There are many more great ideas in store for week one of A Swell Noel, so be sure to stop back in for a daily dose of holiday goodness!

Having grown up in a home brimming with sewing notions and paintbrushes, Amy has a deep love for all things creative. On any given day, you’ll find her knee-deep in her latest creative endeavor, with projects ranging from sewing and crafts to home decor and kid-friendly ideas. Amy believes that everyone, regardless of skill level or experience, possesses the ability to create something beautiful, and Positively Splendid was born of her passion for helping others harness their innate creative potential.
Awesome gift idea! I love the idea of keeping one in the car. I never seem to remember a blanket when we need one. The whole planket concept is so cute. Love it. 🙂
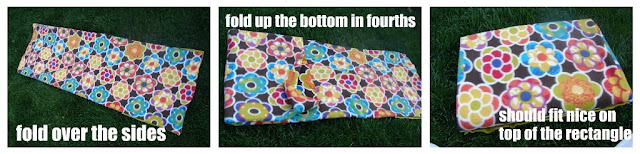
Great tutorial! MY SIL made one of these for us years ago and we love it. Glad you included instructions on how to fold it.. that’s not as intuitive as you might think. (It took us more than a few tries to figure it out! LOL) Love the pop up flowers- so cute!
Love it!!! Great tutorial.
I’ve made these for each of my boys and they love them! They are the most used blankets in the house. 🙂
Neat idea! However, that appears to be fleece, not flannel.
I had one of these when I was younger and loved it! I completely forgot about it and was SO happy to see your post. This inexpensive and CUTE Christmas present is already in the works for my niece! Thanks! And I love the flower embellishments!
We had these growing up in my family and called them quillows (quilt+pillow). They were the best for reading and watching TV. Thanks for the reminder about them. I think I’m going to make some for my niece and nephew!
I have one of these and also grew up calling them “quillows.” We love the foot pockets!
Yes, I believe the official name is “quillow.” Very cute, though, whatever you want to call it!
I also remember making one of these”quillows” about 20 yrs ago – haven’t seen any for a long time so thank you – I may have to get busy and make some for my granddaughter – she’d love it.
Very cute! I am going to make them for my nieces for Christmas. With doing the flower embellisment do you need more than 1/2 a yard of the solid color? Just checking before I head to the store this week. – thanks!
I am making 3 of these right now! I had one as a kid and loved to put my feet in the pocket when I used it as a blanket!