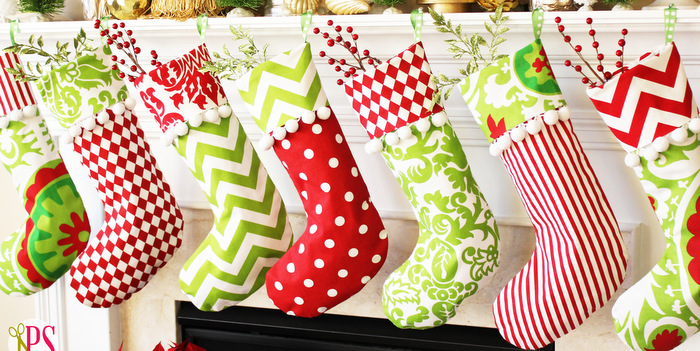
Add style to your holiday decor this year by creating custom Christmas stockings with my Classic Cuffed Christmas Stocking pattern. Using your favorite fabrics, a full set of these Christmas stockings can easily be completed in a weekend or less. Let me show you how!

I shared last week about this year’s Christmas mantel display, which includes a new set of Christmas stockings I sewed for each member of our family. Because I needed to sew seven of these gems (one for each of us, plus one for our beloved beagle, Maggie), I needed to come up with a pattern that could be whipped up in no time, but that yielded professional, polished results. This is the pattern I drafted.
The basic technique for creating these is the process I used in my Whimsical Christmas Stocking pattern, with a couple of modifications: I tweaked the overall shape of the stocking to a more classic silhouette, and I substituted a traditional cuff for the ruffled top. Ready to see how easily these come together? Let’s get started!
For this project, you will need…
- Classic Cuffed Christmas Stocking Pattern (Click link at left to be taken to the free download)
- Fabric in coordinating styles and colors (I highly recommend Premier Fabrics)
- White muslin
- Rotary cutter and mat
- Coordinating thread
- 1″ pom pom trim
- Fabric hot glue
- Ribbon
- Basic sewing supplies: machine, shears, etc.
- Optional: serger*
*To construct my stockings, I used a serger to enable me to stitch my stockings together and finish my seams in one step. If you do not have a serger, don’t worry! You can complete this project with a standard sewing machine. I’ll be including instructions for both methods throughout this tutorial.
To begin, print off the pattern pieces and assemble them according to the instructions on each piece.
Use the assembled pattern to cut out the following pieces for each stocking:
- From your main fabric: 1 outside front piece and 1 outside back piece (These can either be of the same fabric, or different fabrics, depending upon your preference)
- From your muslin: 2 inside lining pieces

When everything is layered with all of the outside edges precisely aligned, pin through all layers to secure all of the pieces together. Wondering why I pinned parallel to the edge instead of perpendicular to it like is typically recommended for sewing? I do this when I plan on serging an edge, to prevent any possibility of serging over a pin. That is a helpful tip I learned from Mama Reita!

Now, serge all the way around the stacked pieces, making sure to leave the top opening unstitched. (If using a conventional sewing machine, stitch around the edges using a 1/4″ seam allowance before finishing the seam with a wide zig-zag or an overcast stitch.)

Serging around an inside corner can be challenging, but I’ve found a great way to do so with success: gently pull the fabric in front of the presser foot to the left so that its edge always creates a straight line with the edge of the fabric under the presser foot. You will likely have to fold the fabric over a bit to make this happen (see below), but manipulating the fabric this way will make stitching a curve as easy as stitching a straight line.

When everything is stitched together, set the assembled main stocking aside for now.
Fold the stocking cuff piece in half width-wise, as shown, aligning the short edges. Pin.

Serge (or stitch with a 1/4″ seam allowance) along the short edge, so that the piece forms a tube. Lay the stitched piece on a work surface and press it flat, so that the seam runs through the center of the piece, as shown.
As an aside, it looks like I need some practice lining up my chevrons, no? 😉

Now, fold the bottom edge of the tube up through the inside of the tube, so that the piece is folded in half, with wrong sides facing, and the remaining raw edges are all aligned.


Cut a 6″ length of ribbon, and form it into a loop, as shown.

With your assembled main stocking still wrong-side out, place it on a flat work surface with the toe of the stocking facing the direction you want it to face on your finished stockings. (I chose to have the toe of my set face left, but that is completely up to personal preference.) Pin the loop face down to the top raw edge of your stocking, about 1/2″ from the outside seam. Note: Make sure that you pin it only to the top two muslin and fabric layers and not through all four layers to prevent sewing the top of your stocking shut in the next step!
Stitch 1/8″ from the edge to baste the ribbon to the stocking, making sure to remove the pin when you’re finished.

Slip the cuff down over the top of the stocking, as shown, with the seamed side aligned with the side you basted the ribbon to. Pin the raw edges together, making sure to pin the cuff only through two layers through the stocking to the top remains open, as shown.


Baste the cuff to the stocking by stitching 1/8″ from the edge with a conventional sewing machine. Remove all pins, and then serge the pieces together, as shown. (If using only a conventional machine, stitch the cuff to the stocking 1/4″ from the raw edge, and then finish the seam with a wide zig-zag or overcast stitch.)

Turn the stocking right side out and press. Fold the cuff down, and press again.
To add pom-pom trim, lay the stocking face up on a work surface, and fold the cuff up. Using a glue gun and fabric hot glue sticks (I just discovered that they make such a thing!), adhere a strip of pom-pom trim to the back of the cuff, so that only the tassels and pom-poms hang over the top edge. Fold the cuff back down.

You are finished!
I love the classic silhouette of these stockings, and the pom-pom trim really adds a pop of decorative pizzazz!


Once your stockings are finished, be sure to check out my stocking-hanging tips for making them look polished and sharp!
Wanting a more modern take on Christmas stockings? Check out my Whimsical Christmas Stocking pattern, a knock-off of the stockings from Ballard Designs.
For all of the details on the rest of my mantel display, visit my 2012 Christmas Mantel post.

As always, please be considerate when using my patterns and remember that they are intended for personal, non-commercial use only. You may not make any of these stockings to sell, but feel free to use the pattern as many times you wish to make stockings for yourself or to give as gifts. Thank you!
Thanks so much for making PS a part of your day!
Having grown up in a home brimming with sewing notions and paintbrushes, Amy has a deep love for all things creative. On any given day, you’ll find her knee-deep in her latest creative endeavor, with projects ranging from sewing and crafts to home decor and kid-friendly ideas. Amy believes that everyone, regardless of skill level or experience, possesses the ability to create something beautiful, and Positively Splendid was born of her passion for helping others harness their innate creative potential.
I think your stocking came out great. I love all the patterns you chose. Thanks for the great step by step tutorial. I’m thinking of making stocking for my family for next year. After Christmas, I’m hoping to get some great deals on Christmas themed fabric. Have a wonderful holiday!
Thanks so much, Jessica!
Thanks SO much for sharing this pattern; however, is anyone else having problems printing the pattern? I downloaded the pdf, but only one page printed partially. It stated “1 of 1” at the top, and I know there is supposed to be 3 pages. Please let me know if there’s a problem or if it’s me lol
Thanks
Hi, Linda! I tried downloading the pattern to a different computer with no issues. I would be happy to email you the file if you need! Let me know. amy (at) positivelysplendid (dot) com
gorgeous x infinity = your stockings! 🙂
just gorgeous, Amy! beautiful work, as always.
Absolutely beautiful! I love all the colors & patterns you used. I’m a new follower and am anxious to see other creations.
Thanks so much, Pat! Welcome!
Hi Amy!
I adore your stockings! I have featured your stockings on my blog at Seasons Of Joy. I love the beautiful fabrics that you have chosen! Thanks so much for sharing your talents! I want to make some! Happy Holidays to you and your family!
Love, Brenda
Thanks so much, Brenda, for your kind words! Happy Holidays to you, as well!
Oh my goodness! Those stockings are perfect in every way! I’ve been searching for stockings in green and red that are cute and beautiful. Guessing you wouldnt be selling any with these fabrics?! I love them.
Susan, email me at amy (at) positivelysplendid (dot) com, and I would be happy to discuss making you a set. Thanks so much!
These are just lovely Amy! I love the fabrics and the pom poms on the cuffs are just adorable!!
Hi Amy! These are so cute! What I really love about them is they can be cutesy, elegant, country, rustic…you name it, just by the fabric you choose. Thanks so much for the pattern…I’m pinning it for later! Merry Christmas!
Thanks so much, Amy!
First of all, great tutorial! Second of all, I think it’s so cool that you guys do a stocking for your dog too. 🙂 Santa always brings our Emma a new stuffed animal and a bag of treats. 🙂
I love your story and share the same passions…… Must be in the name. Love your stocking display. So festive!!!!
Thanks so much, Amy! 🙂
I love the stockings… Do you sell them? Can you please email me about purchasing a few stockings.
I just finished making my stockings for this year but these are so nice! I will save this for next year. 🙂
Thanks so much, Trisha!
Amy, they are so fun and cute. If you have a minute could you please link them up to my party. I would love to feature them! I am pinning…♥
Hi Amy! I was wondering if you would share the fabric line you chose for this? I just love it and it matches my other decorations perfectly!
All fabrics here are from Premier fabrics. I mixed and matched patterns in different colors. There are so many to choose from!
You’ll save me looking for a stocking pattern on line somewhere! My crafting to-do list just keeps getting longer and just this evening I discovered I needed to make a stocking for someone. The good news is, I have everything I need on hand! And now that I have the pattern I can take a little more time perusing the link parties, like Bev’s where I found your tute. Thanks again 🙂
Terrific, Tammy! Happy sewing!
These are lovely. I live how bright and colorful they are. Thanks for sharing
Donna @onceuponasewingmachine.com
These are lovely. I live how bright and colorful they are. Thanks for sharing
Donna @onceuponasewingmachine.com
The stockings you are are adorable. I wish I had seen this earlier and I would have made some. It will definitely be on my to do list next year.!
Thanks so much, Rhondi!
Love these!! I hope to make these for next year. I see you used 6 different fabrics, do you mind telling me how much material you used for each fabric? Thanks! 🙂
Hi, KC! The fabric I used is wide (54″), and I was able to cut enough for the front and back of two stockings from 1/2 yard. If you buy muslin for the lining that is equally wide, you will need 1/2 yard of your outer fabric, 1/2 yard of your lining fabric, plus 1/4 yard for your cuff fabric. Have fun sewing! 🙂
Can I get some clarification? Will 1/2 yard outer fabric, 1/2 yard lining fabric, and 1/4 yard for your cuff be enough for 2 stockings or just one?
Hi, Katie! Depending upon the width of your fabric, for directional prints, you should be able to get 2 stockings per half yard.
Amy,
I love your stockings!! Where did you get your fabrics? I went looking today but couldn’t find any fabric I liked as much as yours.
Thanks,
Stacy
Thanks so much, Stacy! All of the fabrics I used are from Premier Fabrics: http://premierprintsfabric.com/index.shtml Their fabrics are terrific quality, and they are a pleasure to work with. You can also purchase them from Fabric.com for a considerable cost savings. Thanks for stopping in!
Love your design!! I live in Thailand and am making stockings for my families in NYC. Not so easy finding the right fabrics here, but I found some that will work. Thank you for the excellent tutorial. I’m off to my sewing room right now to get started so I can take them when I visit NYC in Sept/Oct.
Wonderful, Debbie! Have fun!
Just searching the web for a Christmas stocking pattern and found yours. Printed it out and already working on it. I will be embroidering a design on mine. Thanks for making it so easy!!
Pat C
Terrific, Pat! Happy stitching!
Love love the stockings!! Do u sell them and how much?
Hi, Sabrina! At this time, I do not offer items to sell. Not enough hours in the day! 🙂
What font did you use for the embroidery stockings.
Can you tell me how much fabric you bought to complete this project?
Thank you!!
I love these 🙂
Hi, Stephanie! All of the fabrics used here are by Premier Fabrics. Happy sewing!
Hi, great pattern! I am planning to make this and have my cuff monogrammed. Do you know the length and width of the finished cuff from the front?
I am currently making the stockings and have run into a problem. Would you please tell me what the finished width of your stockings turned out to be? My cuff is about 2 inches too wide so I am trying to figure out where the problem is. Also, was there any ease in the cuff when you made it? Thank you!
Hello Amy,
I saw this pattern for the Christmas stocking and love love love them…. I printed the instructions but don’t know how to cut out the stocking part. I saw the part about the cuff, but could not find the pattern for the stocking itself.
Thank you,
Anne
Dear Amy,
Nevermind, I am such a dodo…. I found it!!
Thank you for this cute stocking pattern!
Anne
Would there be anyway to buy these? I need 4 like yours that match but each ones diff! I absolutely love these and I am not a sewer:-(
I am so sorry, Andrea, but at this time I do not make items for sale.
How much fabric total is needed?
Love these stockings!! Can you tell me what the finished stocking measures? width? length? Thanks:)
Hi! So excited to try this pattern, it looks like exactly the size I want. One question…I have the pattern printed, and I see 3 pieces: the toe, the heel and the shaft. But what about the cuff? Is there a pattern for that? I’ve looked up and down through all your instructions and the pattern, and I’m just not seeing it. Please help, thanks!
Hi, Lauren! There isn’t a pattern piece for the cuff, but in the cutting directions at the top of this page, it specifies to use a rotary cutter and mat to cut a piece for the cuff that is 10×13.5″. Have fun sewing! 🙂 http://www.positivelysplendid.com/2012/12/christmas-stocking-pattern.html/2
Awesome, thank you! I knew I was just missing it somewhere 🙂
Quick question for those of us who are new to sewing: If I’m using a conventional sewing machine, after I do the initial stitch 1/4″ from the edge, do I then finish the seam over the original stitch? Or ouside, closer to the edge of the fabric?
Thanks!
You finish outside the seam, closer to the raw edge of the fabric. Good question!
Amy,
I fell in love with these as soon as I saw them and knew I had to make some for our family! I have them displayed on my mantle now and would love for you to see: http://www.nightowlcorner.com/2013/12/handmade-classic-christmas-stockings/
Thank you so much for sharing the pattern and tutorial and being the inspiration for these amazing stockings my family will enjoy for years to come!
Linda
http://www.nightowlcorner.com
They turned out lovely, Linda! Thank you so much for sharing them with me!
Hello!!! So beautiful. What kind fabric did u use??? Thanks.
I completed 8 of these this weekend for our family (including 1 for the dog)! The pattern worked beautifully, thank you. I used a variety of primitive prints and trimmed them with vintage lace from my grandmother.