March 7, 2013

DIY Ribbon-Trimmed Table Runner

Hey PS Readers! It’s Megan from The Homes I Have Made, back with another tutorial for you to help you get ready for Spring entertaining. This time around, I’m showing you how to make this simple table runner that will bring layers, color and texture to your holiday tables, not just for Spring, but year-round by swapping out the ribbon linked through! Not only is this runner really quick and easy to make, but it gives you a chance to practice an invaluable sewing skill: button holes…over and over again!


Start by choosing your fabric and length for your table runner. This fabric was leftover from a set of curtains I recently made. Not only do I love the subtle weave pattern on it, but at 56″ wide, it was the perfect width to do “mini” runners for across the table (rather than one long runner down the center).

Once you decide how long you want your table runner to be, cut your fabric: desired length x 18″. (Note – you may have to piece the runner together if you want to do a really long runner).


Using an iron and seam gauge, iron over a half inch down the full length of your table runner. Repeat on the other side.


Go back down each side again, folding over another half inch, but this time pinning the fold in place.


Stitching closely to the fold, run a simple straight stitch down both lengths of your runner to hem up the sides.


This is what my runner looked like after hemming up both sides. You may also repeat this process on the short ends of your runner to have a cleaner, more tailored appearance. Since my overall goal was for a casual, shabby-chic feel for my tablescape, I decided to leave my selvage ends be.


Next, it’s time to measure out your button hole spots! This placement is completely up to you. The further apart your holes, the less button holes you have to make, but also the less of the ribbon you will see weave over and under the fabric. The closer your button holes, the more you have to make, the more you see the ribbon! I started out my holes 2″ from the edge, and then repeated every 4 inches. No matter how many button holes you decide to make, make sure you do an even number so your ribbon ends on the outside on both ends.

I placed my button holes against the hem, and they extend about an inch in toward the center of the runner. Below, you can see all my button hole markings down both sides of my runner.


Next, it’s time to sew button holes, lots and lots and lots of button holes! I’m telling you, at the end of this project, you will no longer fear making button holes! I’m not going to go into detail how to make button holes because each machine (and sewer) has a different technique. But this is a really good excuse to whip our your machine’s user manual or do a quick Google search on how to make one. On my machine, the process couldn’t be simpler: I used a button-hole foot and the button hole stitch, which together do all the work for me. To determine the length of my button hole, I used a 1″ button (make your holes long enough to fit most ribbon!).


I sewed a total of 28 button holes for each of the two runners, totaling 56 button holes – yikes! Once all my holes were sewn, I trimmed all the threads and cut open the holes using a tiny scissors.

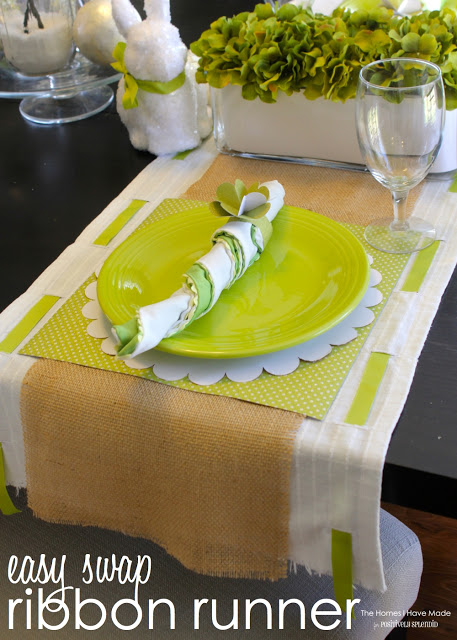
Now is the fun part! Take a stretch of ribbon that is about 4″ longer than your table runner. Attach a safety pin to one side and weave the ribbon in and out of your button holes, keeping the ribbon flat (and un-twisted) as you move down the runner.


Pull the ribbon taut, and repeat on the other side!


Because I want to be able to change out the ribbon for different holidays or themes throughout the year, I chose not to adhere my ribbon to the runner. If you are worried about it slipping or don’t foresee the desire to change out the ribbon, you can tack the ribbon down on each end.


Now your runner is done and ready to be dressed up and accessorized!


I used my runners as the foundation for a fun and fresh Easter/Spring tablescape. Hop on over to see me at The Homes I Have Made today to see exactly how I pulled the whole table together, using mostly things I had laying around the house!


Nothing says Spring to me like fresh pops of green and earthy burlap!


Hope you all have a fantastic March and a blessed Easter! See you next month!

Be sure to check out Megan’s PS Profile Page, and connect with her on her blog, Facebook and Pinterest!

Amy @ Positively Splendid

Amy @ Positively Splendid

Having grown up in a home brimming with sewing notions and paintbrushes, Amy has a deep love for all things creative. On any given day, you'll find her knee-deep in her latest creative endeavor, with projects ranging from sewing and crafts to home decor and kid-friendly ideas. Amy believes that everyone, regardless of skill level or experience, possesses the ability to create something beautiful, and Positively Splendid was born of her passion for helping others harness their innate creative potential.
Amy @ Positively Splendid

@splendidamy

Mama of four, creative enthusiast, craft & DIY blogger. Find me knee-deep in my next project at http://www.PositivelySplendid.com!
Happy mail from @taunitweets and americancrafts landed on my doorstep today! Can't wait to play with… http://t.co/gZGVlZLpTg - 12 hours ago
Amy @ Positively Splendid

Latest posts by Amy @ Positively Splendid (see all)

, , , ,

7 Responses to DIY Ribbon-Trimmed Table Runner

  1. Paula@SweetPea March 7, 2013 at 4:22 am #

    What a cute idea! I love that you can switch out the ribbon for each season or holiday.

  2. alicia March 8, 2013 at 8:38 am #

    Great idea! This turned out gorgeous! Thanks so much for the easy step by step instructions for those of use who are sewing challenged! ;)

  3. ann March 8, 2013 at 6:05 pm #

    I love this! I think ribbon is one of the best ways to add personality and color to anything. Your tutorial and pictures are wonderful too!

  4. Beckie March 8, 2013 at 7:28 pm #

    Simple yet so lovely! I love the color of the ribbon – just perfect for spring! Thanks for sharing!

  5. Chelsea March 9, 2013 at 12:13 pm #

    So pretty, Megan. It’s so light and fresh. I love the green ribbon – it’s perfect for spring!

Trackbacks/Pingbacks

  1. Tutorial: Table runner with interchangeable ribbon trim · Sewing | CraftGossip.com - March 8, 2013

    [...] Amy from Positively Splendid shows how to make this simple but elegant ribbon trimmed table runner.  The ribbon is threaded through buttonholes and can be changed to suit the season or your table decor.  Go to her blog for the how-to. [...]

  2. Tutorial: Table runner with interchangeable ribbon trim | Sewing Patterns - March 9, 2013

    [...] Amy from Positively Splendid shows how to make this simple but elegant ribbon trimmed table runner.  The ribbon is threaded through buttonholes and can be changed to suit the season or your table decor.  Go to her blog for the how-to. [...]

Leave a Reply

myfreecopyright.com registered & protected


© 2009-2012. Positively Splendid. All rights reserved.