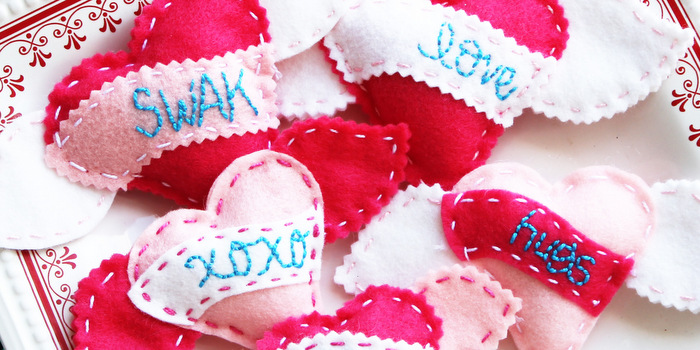
These felt heart sachets are stitched completely by hand, and they are a great project to try your hand at basic hand embroidery. Why not surprise someone special with a handmade valentine craft that smells as nice as it looks? Read on for the free pattern and full how-to.

For this project, you will need…
-
Winged-Heart Sachet Pattern
- Felt in assorted colors
- Embroidery floss or craft thread
- Tear-away stabilizer
- Pencil
- Pins
- Embroidery needle
- Fiberfill
- Dryer sheets, dried herbs (lavender is nice) or potpourri
- Shears
- Pinking shears (optional)
To begin, print the pattern pieces and cut them out. Note: If you wish to make sachets in various sizes, use your printer’s settings or a standard copy machine to resize the file to a larger or smaller size.
Cut out the pieces for each sachet from your felt. You will need 2 heart pieces, 1 banner piece and 4 wing pieces for each sachet you wish to make. For a fun look, you can use pinking shears to cut some or all of the pieces if you wish.

Cut a small piece of stabilizer that is the same size as the banner piece for your sachet. Draw a design (words, shapes, etc.) onto the stabilizer with a pencil. Note: Try to leave the design as simple as possible to make it easier to stitch by hand. Pin the stabilizer piece to the banner piece, and then pin all layers to one of the heart pieces, as shown.

Now, use a backstitch to embroider the outline of your letters. (If you need help, this is a great photo glossary of hand-embroidery stitches.) When you are finished stitching the lettering, carefully remove the stabilizer, using tweezers to remove any stubborn pieces, if needed.
When you are finished with your lettering, stitch with a running stitch (or whichever stitch you like!) along the top and bottom edge of the banner piece.

Stack the wing pieces in groups of two, and stitch each stack together with a running stitch, starting and finishing at the straight edge of the pieces.

Place the plain heart piece face down on a work surface, and place the wing pieces on the left and right sides, as shown.

Place the embroidered heart piece face up on top of the bottom wing/heart layer, carefully aligning all raw edges. Pin. Starting at the center of the top right curve of the heart, stitch through all layers with a running stitch. Stitch until you reach the center of the top left curve of the heart. Important: Don’t snip the thread just yet!

Place a handful of fiberfill into the opening at the top of the heart, making sure to poke it down well into the bottom corner of the heart. At this point, you may also add any scented materials you wish to use. As odd as it sounds, I love using cut up dryer sheets for this purpose. The sheets from Mrs. Meyers are my personal favorite!
Finally, finish stitching the top of the heart with a running stitch to close.

All finished!

Even if you aren’t experienced with hand embroidery, this project is completely attainable for you! Your friends and family will love to receive a special, handmade goody from you for Valentine’s Day this year.

Another fun option would be to add a ribbon hanger to these to display them on doorknobs, garlands and more!


Thank you so much for making PS a part of your day!
Happy stitching!
Linking this to Tatertots and Jello
Having grown up in a home brimming with sewing notions and paintbrushes, Amy has a deep love for all things creative. On any given day, you’ll find her knee-deep in her latest creative endeavor, with projects ranging from sewing and crafts to home decor and kid-friendly ideas. Amy believes that everyone, regardless of skill level or experience, possesses the ability to create something beautiful, and Positively Splendid was born of her passion for helping others harness their innate creative potential.
Oh I’m dying over the cuteness!! These are just darling!
Thank you so much, Rachel!
Super cute!!! Love them!!
These are so cute – I love a great felt project and hand embroidery just tops it off! I’d love it if you stopped by to link up at Thrifty to Nifty Thursdays at A Jennuine Life. http://www.ajennuinelife.com/2013/02/thrifty-to-nifty-thursdays-6.html
How adorable! I need to practice my handstitching. I’m terrible. 🙁
This would be the perfect project to practice on, Michelle! Don’t be intimidated and dive right in! 🙂
Such a cute idea! Lovely. Reminds me of tattoos.
very pretty hearts, love your blog amy, i need to introduce you to my readers. anna
These angel hearts are really sweet!
I really liked the thread you used.