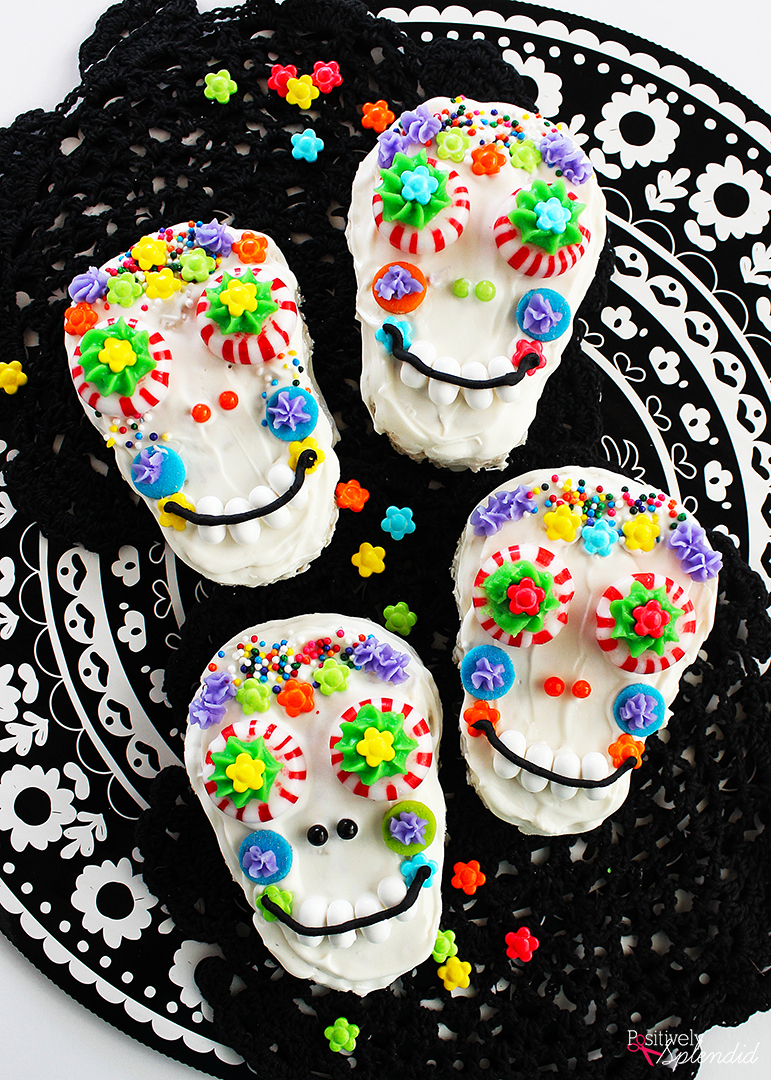
Being from the Southwest, I have always been smitten with the bold, vibrant colors of The Day of the Dead (El Día de los Muertos), a traditional Mexican holiday which takes place each year on November 2. I love that this holiday is a time to celebrate loved ones who have passed away with a happy party and plenty of good food, and these yummy Day of the Dead Sugar Skull Kellogg’s® Rice Krispies® treats would be the perfect treat to prepare for this occasion–or anytime throughout the fall season when a bright, fun treat is in order! Read on for all of the delicious details.
I’ve partnered today with Kellogg’s® Rice Krispies® to bring you this post, which includes only opinions that are 100% my own. This post contains affiliate links.
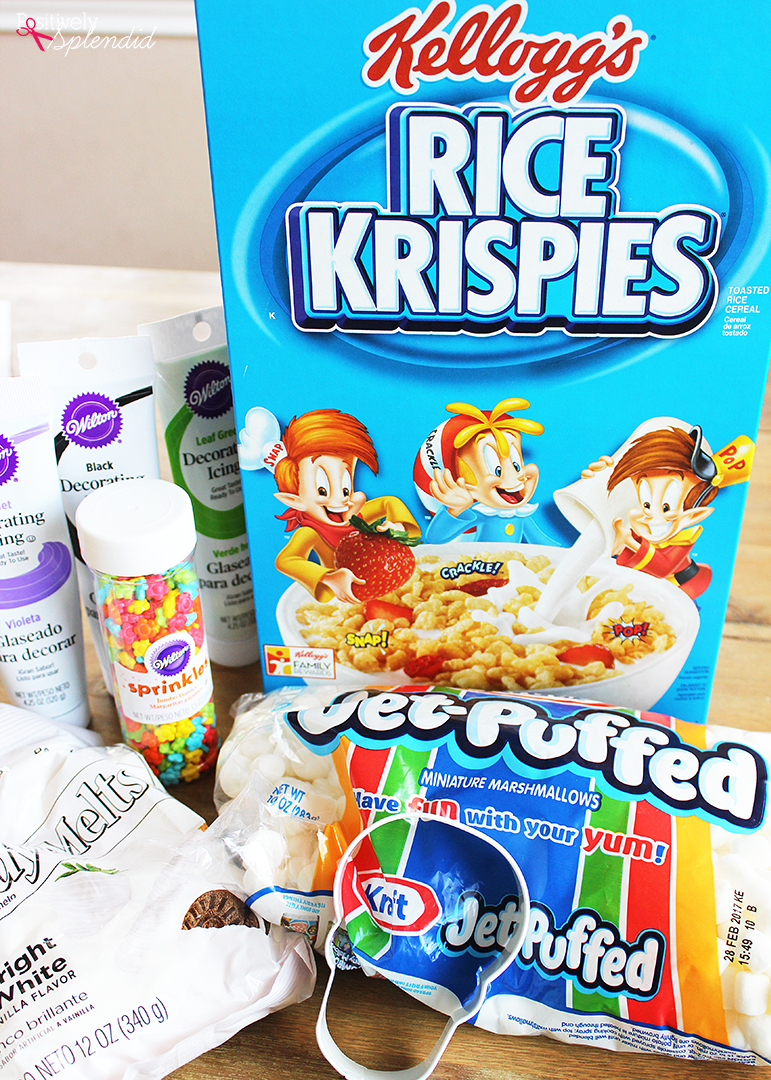
To make a batch of Day of the Dead Sugar Skull Rice Krispies® treats, you will need…
(Note: A printable version of this recipe is available below)
- 6 cups Kellogg’s® Rice Krispies® cereal
- (1) 10-ounce package miniature marshmallows
- 3 tablespoons butter
- Bright white candy melts
- 2-3 tablespoons shortening
- Frosting in assorted colors: black, green and purple are used here
- Assorted candy for decorating: starlight peppermint discs (eyes), rainbow nonpareils, flower sprinkles, jumbo confetti sprinkles, sugar pearls, and Tic-Tacs are used here, but you can opt for anything else that suits your fancy!
Special equipment: skull cookie cutter, candy melting pot, piping tips, small frosting spatula
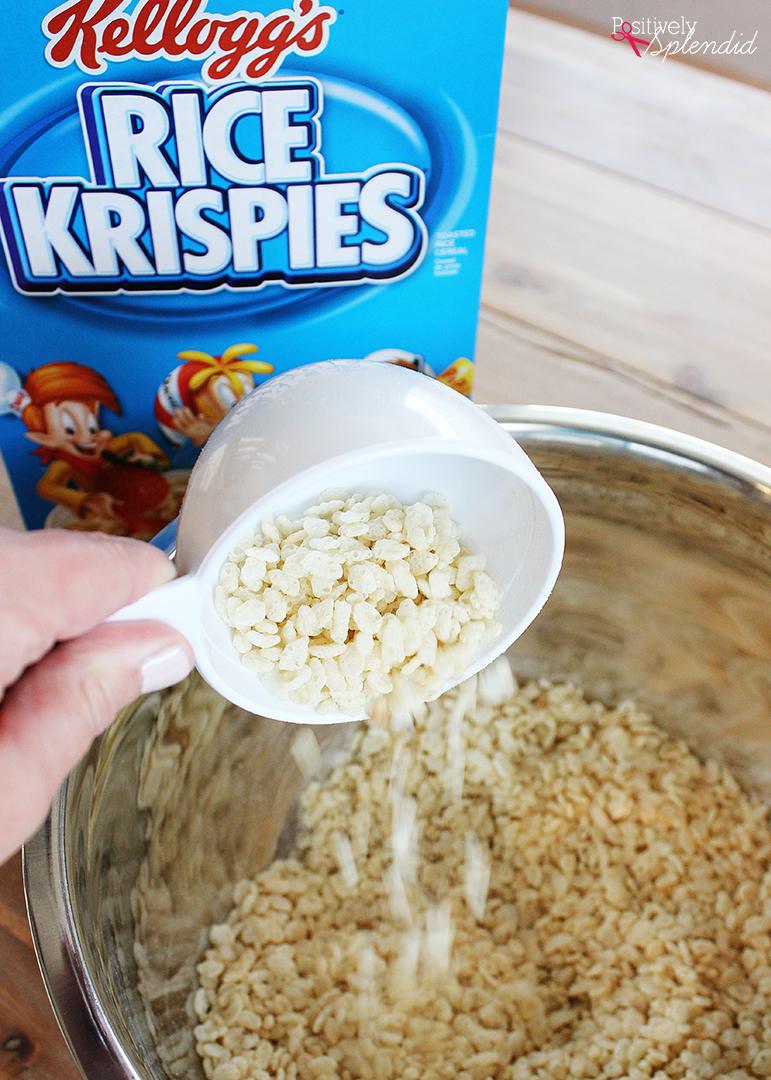
Measure the Kellogg’s® Rice Krispies® cereal into a very large bowl, and set aside.
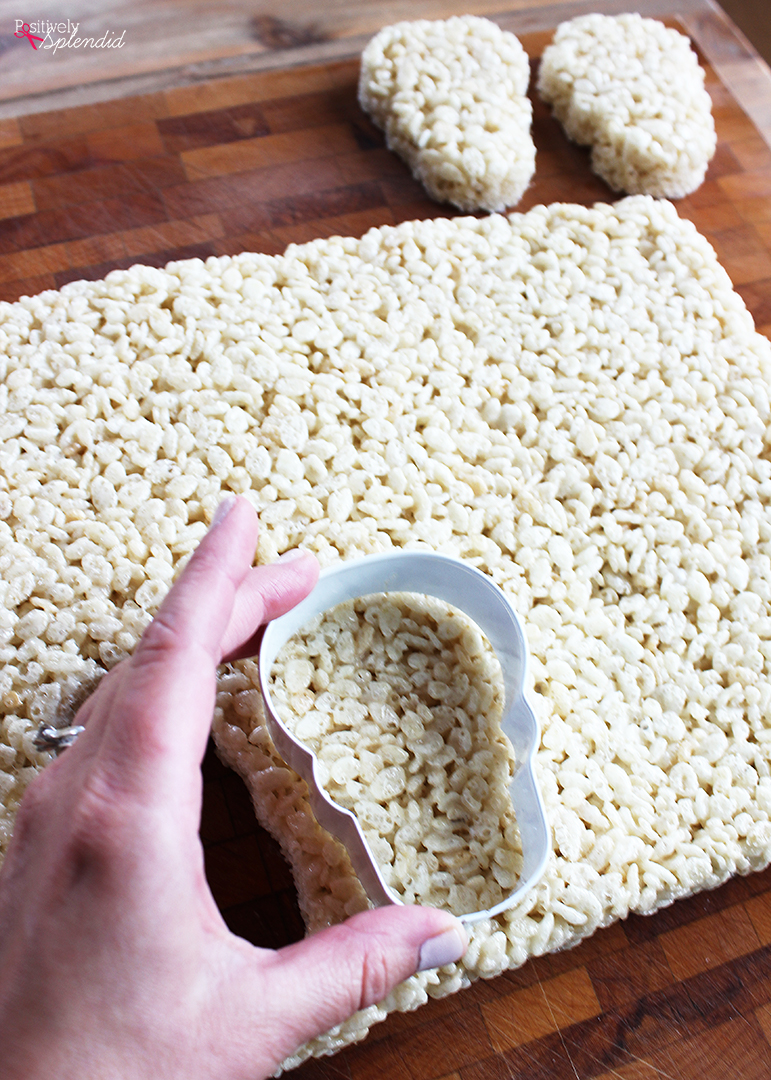
Place the marshmallows and butter in a large microwave-safe bowl. Microwave on high in 30 second intervals, stirring after each interval, until mixture is totally melted and fully incorporated. Immediately pour the mixture over the cereal, stirring to combine. Dump the mixture into a greased 9x13x2″ pan, pressing evenly. Cool for 30 minutes, or until completely set.

Invert the pan onto a cutting board. Using the skull cookie cutter, cut out as many skulls as possible from the prepared Kellogg’s® Rice Krispies® treats. (My 3″ cutter yielded exactly 12 skulls.)
Melt the candy melts according to the package instructions, adding 2-3 tablespoons of shortening to the melted candy to achieve a thin enough consistency for dipping. Dip each of the skull shapes into the candy coating, using a small spatula to smooth the coating evenly, if necessary. Reserve any unused candy coating, and keep warm and melted. (I absolutely love to use this handy melting pot for this purpose, as it makes melting and keeping candy coating at the ready a total cinch!) Place the skull treats on a cookie sheet lined with wax paper and refrigerate for 15-20 minutes, until the candy coating is completely set.
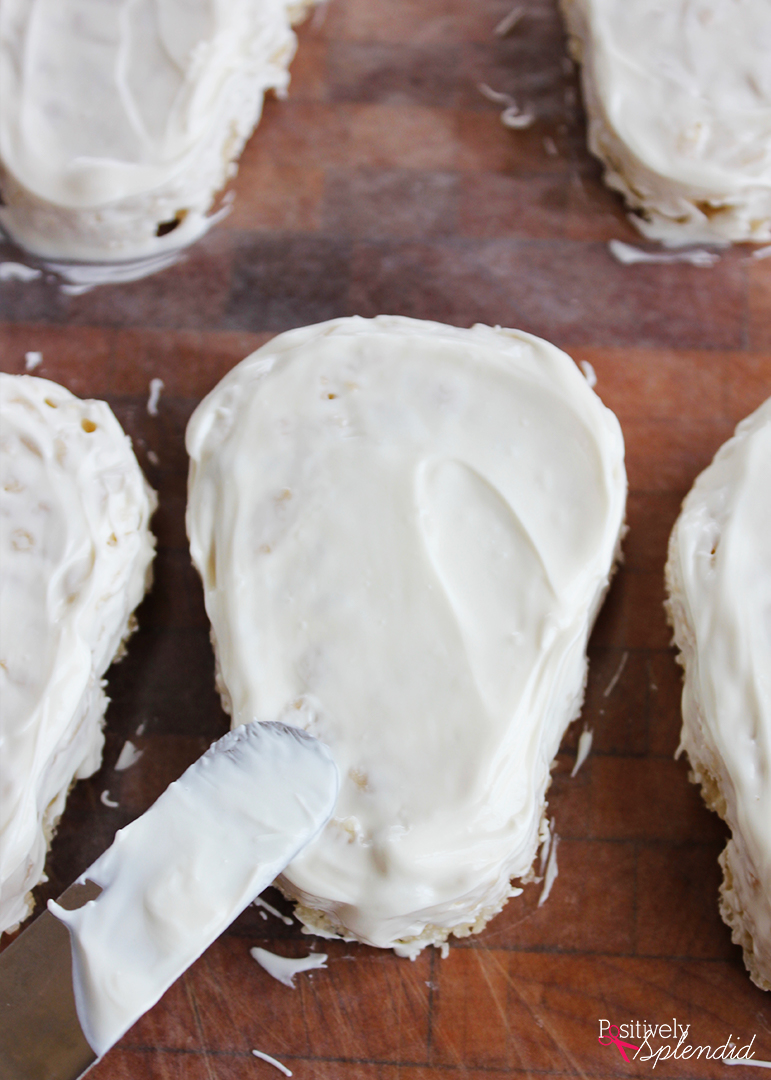
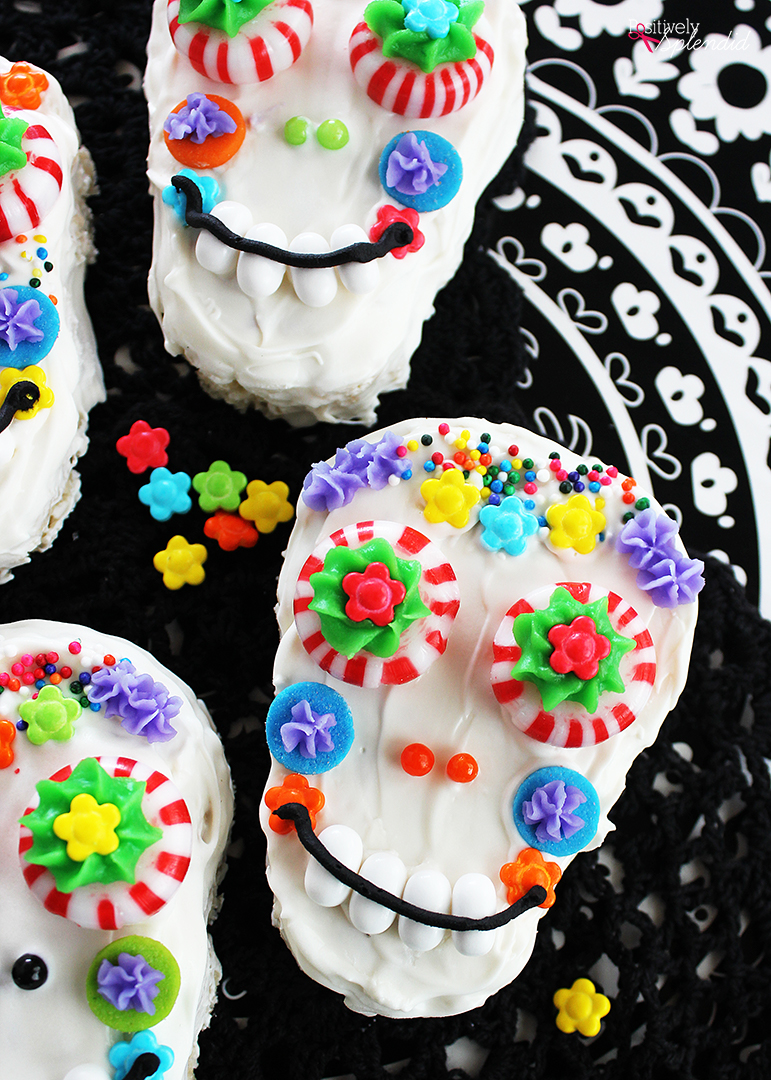
When the coating is set, it’s time for the fun part–turning these plain skulls into festive Day of the Dead sugar skulls!
To do so, use a small frosting spatula to spread a thin layer of the candy coating onto the top of one of the treats. While the coating is still wet (you need to work quickly!), add assorted embellishments as desired. I opted to add rainbow nonpareils and flower sprinkles on the top portion of the skulls…
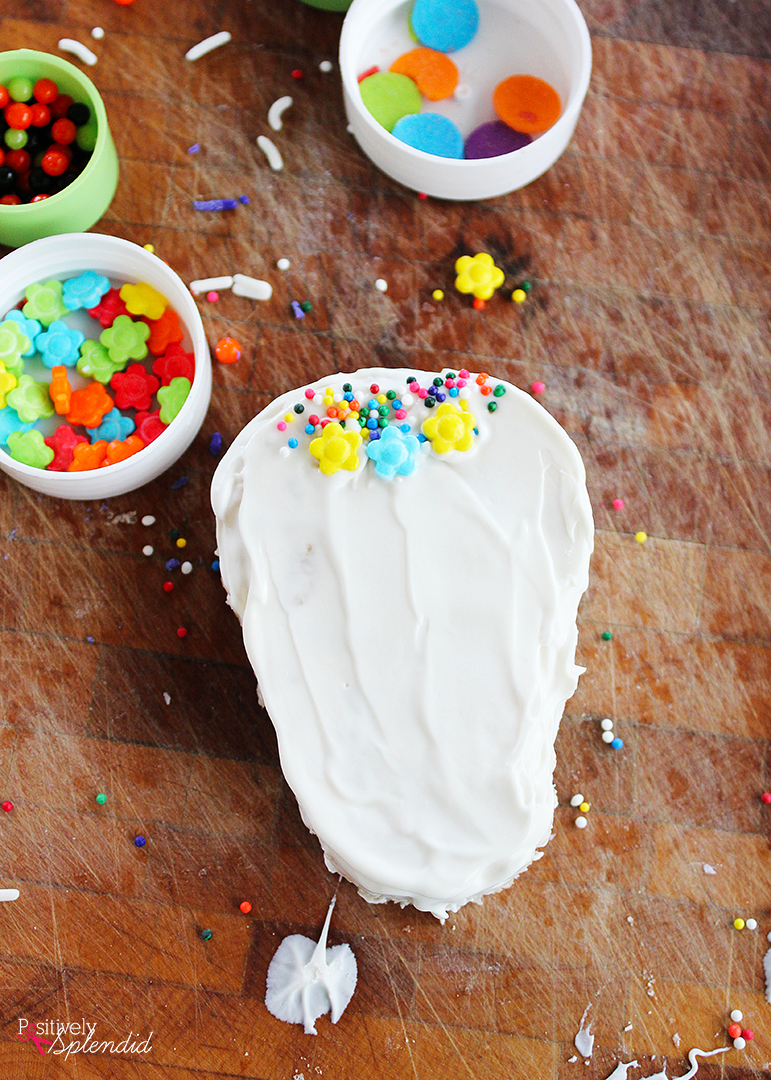
…before adding peppermint candy eyes, two sugar pearls for a nose, a row of white Tic-Tac teeth, and jumbo sprinkles and flower sprinkles for cheeks…
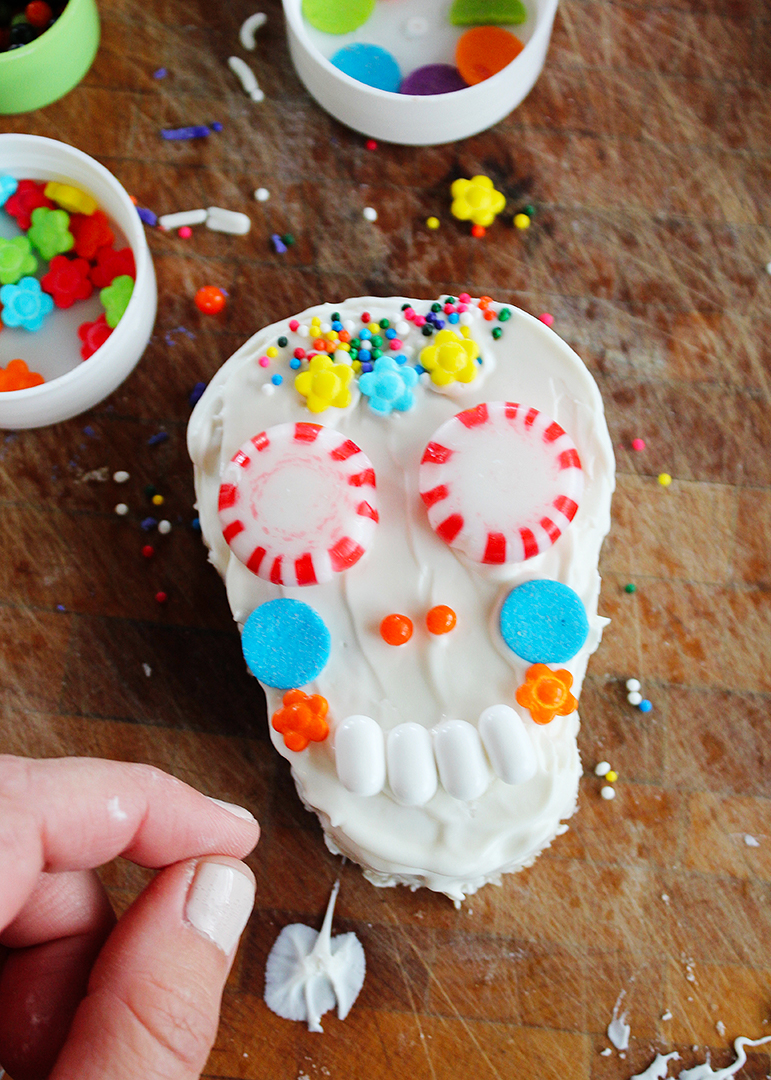
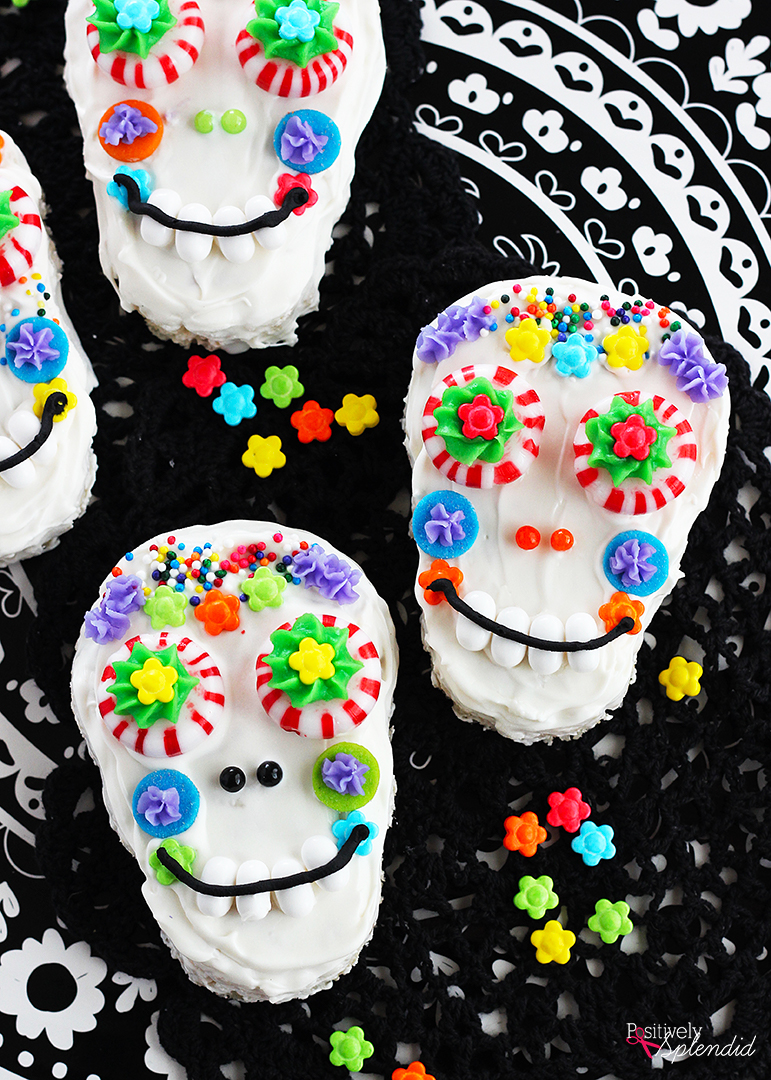
…and then finishing everything off with some piped frosting accents: small purple stars at the top, large green star eyes topped with flower sprinkles, small purple stars on the cheeks, and a black frosting smile to bring it all together!

Of course, this example is just one of countless ways you could decorate these, and there really is no way to go wrong with this! It’s all about making things colorful and fun.
Continue decorating until you have as many festive Day of the Dead sugar skull Kellogg’s® Rice Krispies® treats as desired!
This treat is a fantastic way to teach kids about different holidays celebrated in other parts of the world. And the fact that they are so festive and colorful is an added bonus!
Day of the Dead Sugar Skull Rice Krispies® Treats
Ingredients
- 6 cups Kellogg’s® Rice Krispies® cereal
- 1 10-ounce package miniature marshmallows
- 3 tablespoons butter
- Bright white candy melts
- 2-3 tablespoons shortening
- Frosting in assorted colors: black green and purple are used here
- Assorted candy for decorating: starlight peppermint discs eyes, rainbow nonpareils, flower sprinkles, jumbo confetti sprinkles, sugar pearls, and Tic-Tacs are used here, but you can opt for anything else that suits your fancy!
- Special equipment: skull cookie cutter candy melting pot, piping tips, small frosting spatula
Instructions
- Measure the Kellogg’s® Rice Krispies® cereal into a very large bowl, and set aside.
- Place the marshmallows and butter in a large microwave-safe bowl. Microwave on high in 30 second intervals, stirring after each interval, until mixture is totally melted and fully incorporated. Immediately pour the mixture over the cereal, stirring to combine. Dump the mixture into a greased 9x13x2" pan, pressing evenly. Cool for 30 minutes, or until completely set.
- Invert the pan onto a cutting board. Using the skull cookie cutter, cut out as many skulls as possible from the prepared Kellogg’s® Rice Krispies® treats. (My 3" cutter yielded exactly 12 skulls.)
- Melt the candy melts according to the package instructions, adding 2-3 tablespoons of shortening to the melted candy to achieve a thin enough consistency for dipping. Dip each of the skull shapes into the candy coating, using a small spatula to smooth the coating evenly, if necessary. Reserve any unused candy coating, and keep warm and melted. Place the skull treats on a cookie sheet lined with wax paper and refrigerate for 15-20 minutes, until the candy coating is completely set.
- When the coating is set, it's time for the fun part--turning these plain skulls into festive Day of the Dead sugar skulls!
- To do so, use a small frosting spatula to spread a thin layer of the candy coating onto the top of one of the treats. While the coating is still wet (you need to work quickly!), add assorted embellishments as desired. I opted to add rainbow nonpareils and flower sprinkles on the top portion of the skulls, before adding peppermint candy eyes, two sugar pearls for a nose, a row of white Tic-Tac teeth, and jumbo sprinkles and flower sprinkles for cheeks, and then finishing everything off with some piped frosting accents: small purple stars at the top, large green star eyes topped with flower sprinkles, small purple stars on the cheeks, and a black frosting smile to bring it all together!
To learn more about the Day of the Dead, check out this list of great facts and information.
And for even more great seasonal ideas from Kellogg’s® Rice Krispies®, be sure to check them out on Facebook and Pinterest!
Having grown up in a home brimming with sewing notions and paintbrushes, Amy has a deep love for all things creative. On any given day, you’ll find her knee-deep in her latest creative endeavor, with projects ranging from sewing and crafts to home decor and kid-friendly ideas. Amy believes that everyone, regardless of skill level or experience, possesses the ability to create something beautiful, and Positively Splendid was born of her passion for helping others harness their innate creative potential.