• Skip to primary navigation
  • Skip to main content
  • Skip to primary sidebar

Positively Splendid {Crafts, Sewing, Recipes and Home Decor}

Handcrafted. Splendidly.

  • Home
  • Blog
  • + Handmade
    • Crafts
      • Craft Gift Ideas
      • Holiday Crafts
      • Home Decor Crafts
      • Kids’ Crafts
      • Paper Crafts
      • Quick and Easy Crafts
      • Wearable Crafts
      • Wreaths
    • Gift Ideas
      • Budget-Friendly Gifts
      • Gift Wrapping
      • Gifts for Dads and Grandpas
      • Gifts for Kids
      • Gifts for Men
      • Gifts for Moms and Grandmas
      • Gifts for Neighbors
      • Gifts for Sports Fans
      • Gifts for Teachers
      • Gifts for Women
      • Quick and Easy Gifts
    • Kid-Friendly Projects
    • Sewing
      • Sewing for Children
      • Sewing for Men
      • Sewing for the Home
      • Sewing for Women
      • Sewing Techniques
      • Sewn Accessories
      • Sewn Gifts
  • + Home & Garden
    • DIY Home Decor Projects
    • Helpful Tips
    • Home Decor Crafts
    • DIY
    • Home Tour
    • Mantels and Tablescapes
    • Organization
    • Outdoor and Garden
  • + Holidays & Seasons
    • Spring
    • St. Patrick’s Day
    • Summer
    • Teacher Appreciation
    • Thanksgiving
    • Valentine’s Day
    • Winter
    • Back to School
    • Christmas
    • Easter
    • Fall
    • Fathers’ Day
    • Graduation
    • Halloween
    • Independence Day
    • Mothers’ Day
    • New Year’s
  • + Printables
  • + Recipes
    • Soups and Stews
    • Appetizers and Salads
    • Breads
    • Desserts
    • Food Crafts
    • Main Dish

Printed Twill Ribbon Tutorial

December 14, 2011 By Amy @ Positively Splendid

FacebookTweetPinYummlyPrint
 
 
How to make custom twill tape - perfect for holiday gift wrapping!

Today I’m sharing a quick and easy project idea for really kicking your holiday gift wrapping up a notch with a personal touch: Handmade Printed Twill Ribbon!
For this project, you will need:
Wording PDF files {{free downloads}} OR word processing software
Merry and Bright PDF
Joy to the World PDF
White twill fabric
Freezer paper
Iron
Computer printer
Rotary cutter and mat
Sewing machine and thread or fabric glue
step 1 /  Using your rotary cutter, cut a piece of fabric and freezer paper that is precisely 8.5×11 inches. It is very important that these pieces be cut exactly so that they will run properly through your printer! Use  your iron on a cotton setting with no steam to iron the freezer paper to the back side of your fabric, making sure the shiny side of your freezer paper is touching the fabric.
step 2 / (If using the provided downloadable PDF files, skip ahead to step 3.) Create a document using your word processing software with the wording you wish to appear on your ribbon. Make sure the page has a landscape orientation and that there is a bit of space between each row for trimming. For 1-inch-wide ribbon, you will need 8 rows of wording.

step 3 / Place your assembled fabric/freezer paper piece into your computer printer so that the image will print onto the fabric side of the piece. Print your wording onto your sheet, and leave the freezer paper backing attached.
step 4 /  (This is how the templates I’ve provided should be trimmed. If you’ve created your own, you’ll have to trim according to your particular margins, etc.) Starting at the bottom edge of your page, trim 1/4″ from this bottom edge. Now, trim strips that are 1″ wide, so that your wording is centered in each strip. When you reach the top row of wording, trim the top of this piece so it is precisely 1 inch wide. Remove the freezer paper from the back of your strips.

step 5 / Overlap the ends of your strips and sew together using a zig-zag stitch. For a new-sew option, you can also use fabric glue for this step.


Your ribbon is ready to embellish any package that strikes your fancy!

Something that I think would also be really cute would be to use a pinking blade in your rotary cutter when trimming your strips.
 
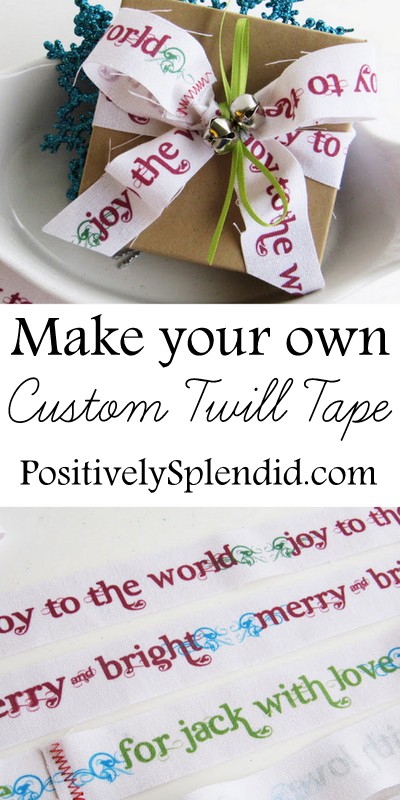
In addition to the ribbon using the provided templates, I also made a personalized version with my son’s name. I love the idea of using this ribbon with each child’s name in lieu of gift tags this year!
 

Have you started wrapping gifts yet?
Photobucket
Linking this to…
Tatertots & Jello
Skip to My Lou

Amy @ Positively Splendid

Having grown up in a home brimming with sewing notions and paintbrushes, Amy has a deep love for all things creative. On any given day, you’ll find her knee-deep in her latest creative endeavor, with projects ranging from sewing and crafts to home decor and kid-friendly ideas. Amy believes that everyone, regardless of skill level or experience, possesses the ability to create something beautiful, and Positively Splendid was born of her passion for helping others harness their innate creative potential.

EVEN MORE GREAT IDEAS JUST FOR YOU!

FacebookTweetPinYummlyPrint

Filed Under: Christmas, Christmas, Craft Gift Ideas, Crafts, Gift Ideas, Gift Wrapping, Holiday, Holiday Crafts, Positively Handmade, Positively Seasons, Sewing, Tutorials Tagged With: Christmas, Christmas Gift Ideas, Gift Wrapping

Previous Post: « 12 Unique Holiday Wreaths
Next Post: Pine Cone Place Card Ornaments »

Reader Interactions

Comments

  1. Robyn Rasmussen says

    December 14, 2011 at 1:46 pm

    So pretty! I love this simple and adorable way to decorate. 🙂
    It’s been Stumbled and I would have pinned it but Pinterest is having hiccups again. . .

  2. Michele {The Scrap Shoppe} says

    December 14, 2011 at 2:41 pm

    This is so cute, Amy! I love that it can be personalized. Great idea!

  3. Amber says

    December 14, 2011 at 3:01 pm

    I’m out of time for this Christmas but will be making this for any occasion. What a great idea!

  4. Kelli @ RTSM says

    December 14, 2011 at 3:13 pm

    Amy this is such a cute idea! I wonder what would happen to the ink if it gets wet…I’m thinking this would be a great way to make a cute Christmas shirt:)

  5. Mary Beth says

    December 14, 2011 at 3:54 pm

    What a great idea and awesome tutorial! I just love it.

    p.s. I have not started wrapping yet…it’s sort of hard to wrap the nonexistent….I have not started shopping yet…. : O

  6. V says

    December 14, 2011 at 4:18 pm

    Love this! I am out of time this Christmas too, but heaven knows I’m still going to try and squeeze this in!! What font is this??

  7. Laura at Ms. Smartie Pants says

    December 14, 2011 at 4:48 pm

    What a fantastic idea! I just love it. I am wondering if it’s easy to find the twill fabric?

  8. tute-bot says

    December 14, 2011 at 6:52 pm

    I love this! I especially like that the stitches are in a color that stands out. It adds a handmade touch. Very cute!

  9. Amanda @ Serenity Now says

    December 15, 2011 at 1:20 am

    Amy, you are so creative!! Just loved this tutorial. Pinned it. 🙂

  10. WhyCuzICan says

    December 17, 2011 at 3:25 am

    What a nice idea to make a package even more special… sweet of you to share your tip/tricks with us 😀

    Visiting via: TT &J linky party,
    Smiles, Suzanne in NW Illinois

  11. Mary-Sweetwater Style says

    December 17, 2011 at 2:07 pm

    This is an amazing idea…I am putting on my pins…Thanks ever so much!

  12. Alison @ Oopsey Daisy says

    December 20, 2011 at 11:09 pm

    GREAT idea… sure wishing my printer could do this! I think I need a new printer! 🙂

  13. Not Your Ordinary Agent says

    December 21, 2011 at 1:43 am

    I love this idea! you could make some serious $$ selling this!! PINNING! Found you through Made by you Monday. New follower!
    Not Your Ordinary Agent
    Not Your Ordinary Recipes
    Clean Gal

  14. Otter says

    December 21, 2011 at 1:09 pm

    This is a fantastic idea! Thank you so much for sharing this! I’ve only had a spare moment to look over two of your tutorials but I have to say I’m seriously impressed and you just gained a new follower! Great ideas!

  15. Attempting Aloha says

    December 21, 2011 at 3:04 pm

    Beautiful job! I love me some printed fabric. Ribbon is an awesome idea!

    Aloha,
    Charlie

  16. Michelle says

    December 26, 2011 at 11:07 pm

    What a great idea, thanks so much for the tute and the files to start me off, I could have myself some fun with this 🙂

Primary Sidebar

PS Search

Search this website

Seasonal Inspiration

Hocus Pocus Wreath
Ghost Plushies
Paper Pumpkins
Fabric Yo-Yo Pumpkins

Copyright © 2025 · Positively Splendid · All Rights Reserved. · Privacy Policy

Privacy & Cookies: This site uses cookies and other tracking technologies to assist with navigation and your ability to provide feedback, analyse your use of our products and services, assist with our promotional and marketing efforts, and provide content from third parties. To find out more, as well as how to remove or block these, see here: Our Cookie/Privacy Policy


Loading Comments...