Hello, everyone! I am so thrilled to be stopping in today so Tam can sneak in as much snuggle time with her new little bundle as she possibly can!
My name is Amy, and my corner of the blogging world is known as

My goal is for my blog to be a little haven of crafting and DIY inspiration, and a place where creative people of all skill levels can come and feel right at home. Because I feel strongly that everyone should be equipped to create something beautiful on their own, each and every project at Positively Splendid is explained to the last detail with step-by-step photo tutorials. I like to think of each tutorial as sitting down with friends to learn something new together! I would love for you to stop in for a visit!
In honor of Tam’s new little guy, today I’m going to share with y’all a quick and inexpensive project that is perfect for a new mom in your life! I am sure those of us with kiddos of our own can all relate to the fact that cooking can become a real chore in the midst of all of the seemingly never-ending diaper changes and feeding sessions following the birth of a new baby. This flip recipe organizer is designed to keep recipes organized so that meal prep takes as little guesswork as possible!

Ready to see how to put this together? Let’s get started!
For this project, you will need…
(1) 5×7″ clear acrylic frame
Painter’s or masking tape
A drill with 1/8″ drill bit
Double-sided patterned paper
Additional patterned paper, letter stickers, rub-ons, and other scrapbooking embellishments
Paper adhesive roller
Paper trimmer
Single hole punch
(2) metal book binding rings
Computer and printer
step 1 / Place a strip of tape on the front and back top edge of your frame. Carefully drill holes 3/4″ down from the top and 1-1/4″ in from each outer edge of your frame. (The tape will minimize the splintering that happens as you do this.)
step 2 / Cut a piece of your double-sided patterned paper that is 5×7″. Embellish the lower front portion of this piece as desired using your scrapbooking supplies.

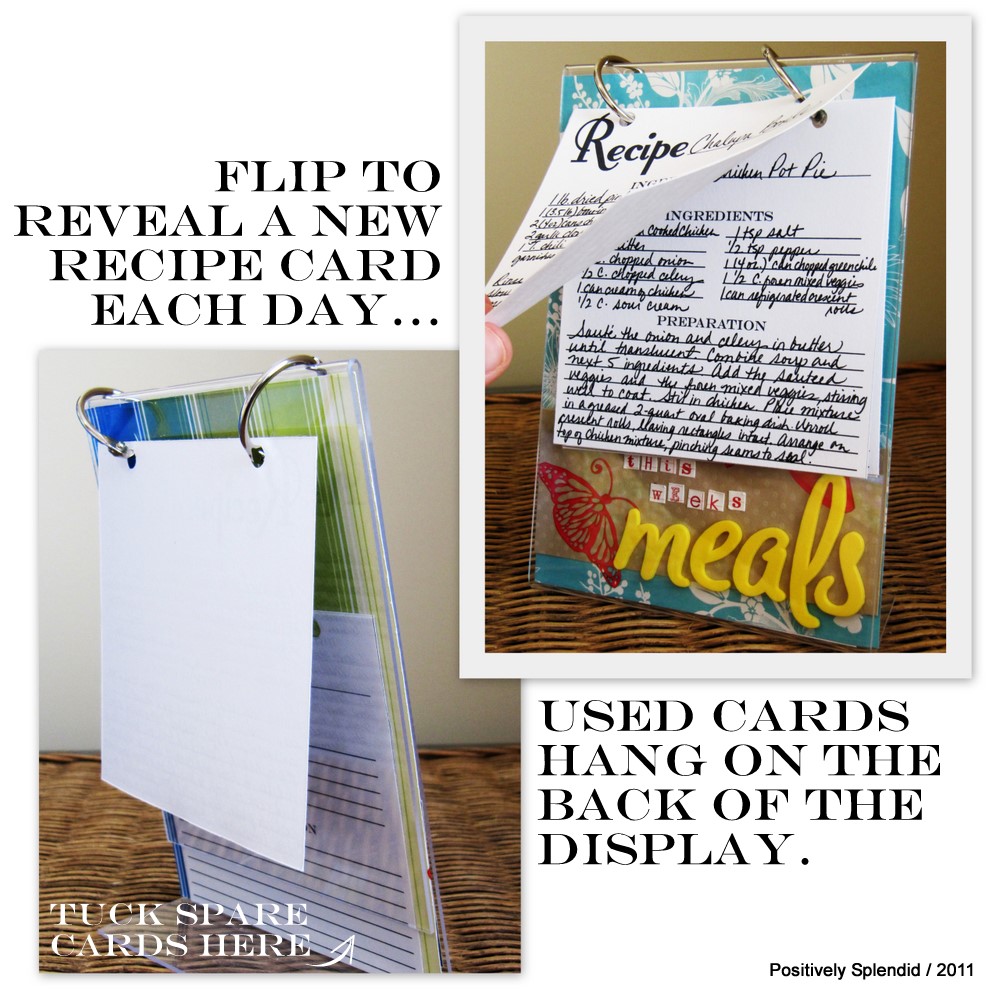
step 3 / Print off your recipe cards, and fill out a number of them with your favorite quick-fix meals. Also print off a number of extra cards (I recommend providing enough cards for at least two weeks’ worth of meals). Trim your cards down with your paper trimmer, and punch holes using the placement guides provided on the cards. Slip your finished embellished paper piece into your frame, making sure it is precisely centered within your frame. Mark the location of the two drilled holes onto your paper, and punch holes at these locations. Replace your paper into your frame, and feed your book binding rings through your drilled holes. Slip your recipe cards onto your rings. You are finished!


As you can see below, the back of the frame is the perfect place to store recipe cards that aren’t in use. If you (or your recipient) prefer, you can also use your own recipe cards with this organizer by punching holes 2-1/2″ inches apart on their top edge. Easy peasy!
Congratulations, Tam, on the birth of little Ryker! May your family be blessed beyond measure during this sweet time! Thanks so much for letting me be a part of it.

Having grown up in a home brimming with sewing notions and paintbrushes, Amy has a deep love for all things creative. On any given day, you’ll find her knee-deep in her latest creative endeavor, with projects ranging from sewing and crafts to home decor and kid-friendly ideas. Amy believes that everyone, regardless of skill level or experience, possesses the ability to create something beautiful, and Positively Splendid was born of her passion for helping others harness their innate creative potential.