• Skip to primary navigation
  • Skip to main content
  • Skip to primary sidebar

Positively Splendid {Crafts, Sewing, Recipes and Home Decor}

Handcrafted. Splendidly.

  • Home
  • Blog
  • + Handmade
    • Crafts
      • Craft Gift Ideas
      • Holiday Crafts
      • Home Decor Crafts
      • Kids’ Crafts
      • Paper Crafts
      • Quick and Easy Crafts
      • Wearable Crafts
      • Wreaths
    • Gift Ideas
      • Budget-Friendly Gifts
      • Gift Wrapping
      • Gifts for Dads and Grandpas
      • Gifts for Kids
      • Gifts for Men
      • Gifts for Moms and Grandmas
      • Gifts for Neighbors
      • Gifts for Sports Fans
      • Gifts for Teachers
      • Gifts for Women
      • Quick and Easy Gifts
    • Kid-Friendly Projects
    • Sewing
      • Sewing for Children
      • Sewing for Men
      • Sewing for the Home
      • Sewing for Women
      • Sewing Techniques
      • Sewn Accessories
      • Sewn Gifts
  • + Home & Garden
    • DIY Home Decor Projects
    • Helpful Tips
    • Home Decor Crafts
    • DIY
    • Home Tour
    • Mantels and Tablescapes
    • Organization
    • Outdoor and Garden
  • + Holidays & Seasons
    • Spring
    • St. Patrick’s Day
    • Summer
    • Teacher Appreciation
    • Thanksgiving
    • Valentine’s Day
    • Winter
    • Back to School
    • Christmas
    • Easter
    • Fall
    • Fathers’ Day
    • Graduation
    • Halloween
    • Independence Day
    • Mothers’ Day
    • New Year’s
  • + Printables
  • + Recipes
    • Soups and Stews
    • Appetizers and Salads
    • Breads
    • Desserts
    • Food Crafts
    • Main Dish

Let It Snow!

November 16, 2010 By Amy @ Positively Splendid

FacebookTweetPinYummlyPrint

Many of y’all probably saw this project posted over at Sew Dang Cute last week to kick off week 4 – Christmas Week – of the Crafting with the Starts competition. I hope you don’t mind me sharing it here, too. I am so tickled with how it turned out! 🙂


Of all of my favorite times of year for flexing my creative muscles, Christmas has to be my absolute favorite. Today I’m going to share with you a fun technique for creating a fun, completely custom snowflake cushion. Remember cutting out snowflakes from folded squares of paper in elementary school? This project uses that super simple technique in a totally fresh way! All set? Let’s get started.

For this project, you will need…

White canvas fabric: (1) square cut to 19×19 inches, and (2) rectangles cut to 19×11 inches
Freezer paper
Scissors
Iron
Acrylic paint
Textile medium for acrylic paint (this turns any ordinary acrylic paint into fabric paint)
Foam paint brush
Marine vinyl
Wash Away Wonder Tape
Leather sewing machine needle
Jeans sewing machine needle
Teflon presser foot (optional)
(3) fabric strips for your ruffles: 6×44 inches (optional)
Dental floss, for ruffling (optional)
(1) 18-inch pillow form
Basic sewing supplies: Machine, coordinating thread, shears, etc.

step 1 Cut (8) 4×4-inch pieces of freezer paper. Fold each piece in half, making sure to precisely match up the corners. Fold in half again, so your piece now looks like a square, as shown below. Fold once more to create a 45-45-90 triangle.

step 2 We’re now going to trim off one of our 45-degree angles so that our finished snowflakes are circular instead of square. Using a rounded edge of some sort (I used a spool of ribbon), trace a mark as shown from the point of the 90-degree angle across to a point about a third of the way down from one of your 45-degree angles. Trim along this line. When you unfold your piece, it should now be a circle.

step 3 Now, the fun part! Use your imagination to snip shapes from your folded pieces. By trimming notches, bracket shapes, half circles and other shapes, each individual snowflake will be different from the rest. This is a terrific activity to do with children! Once all eight of your snowflakes have been trimmed, set them aside to use later on.

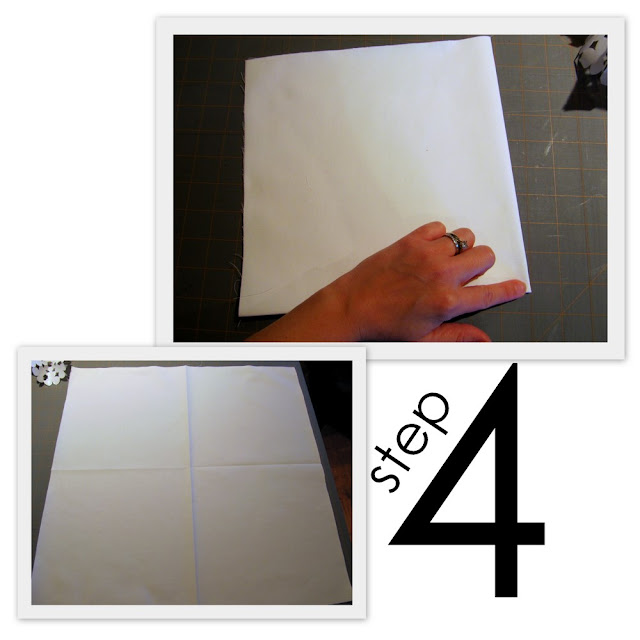
step 4 Take your square fabric piece, and fold it into quarters. Use your fingers to gently press a crease to mark the folding lines. When you unfold your piece, you should be able to clearly see the two lines you just pressed. (You’ll use these to guide you as you iron on your snowflakes.)

step 5 Cut four strips of freezer paper that are as long as the width of the roll (approximately 18 inches) and 3-1/4 inches wide. Iron these strips on the outer perimeter of your square fabric piece, first ironing the top and bottom pieces, and then ironing the left and right pieces. (These strips will overlap at the corners just a bit.) Now, take your snowflakes and place them in rows within the boundaries of the square formed by your strips. (The rightmost space on your bottom row will not have a snowflake.) Arrange and rearrange them until you are satisfied with your pattern. Snap a picture now to refer to later on when you are ironing them into place.

step 6 Starting with the center snowflake, align its folding lines with the intersection of the creases you finger pressed in step 4 to ensure it is exactly centered. Iron it into place. Now, iron the rest of your snowflakes in a similar manner, using the creases and folding lines as necessary so that your columns and rows don’t become crooked as you work. (I found it helpful to first iron the center piece, and then the pieces directly beside, above and below it. I then ironed on the remaining three corners.)

step 7 Mix your fabric medium with your acrylic paint according to the medium’s package instructions. Use a foam brush to paint around your snowflakes, taking care to fill in all of the little nooks and crannies of each snowflake. Note: If using red paint as I did, I highly recommend you do two coats to ensure your color is even. I didn’t do this, but I wish I had! Allow your paint to dry completely before peeling off your freezer paper pieces. 

step 8 Create a template with your word processing software for a number or letter of your choice. (I made this pillow for my mom, so I used her last initial. I used Pickwick font at 375 pixels.) Print this off as a mirror image, then cut your template out and trace it onto the back of your vinyl. Carefully cut your piece out, and then adhere it to the open space in the last row on your pillow from using Wash Away Wonder Tape. With your machine outfitted with a leather needle and a Teflon foot, topstitch all the way around your letter to affix it to your pillow. (Alternatively, you can cover the bottom of your standard foot with a bit of Scotch tape and then spray it with just a touch of non-stick cooking spray. I know it sounds crazy, but it works – trust me!) Set your finished front panel aside.

step 9 Take your two rectangular pieces and create a narrow hem on one of the long edges of each one. (Do this by first folding and pressing 1/4 inch, and then folding and pressing another 1/4 inch, then stitching 1/8 inch from the edge to secure.) If you opt not to have a ruffled edge on your pillow, place your main pillow piece face up on your work surface. Place one of your finished back panel pieces on top of your finished front piece, right sides facing, aligning the edges and top corners. Make sure the hemmed edge of your back piece runs through the middle of your front panel. Now, take your second back panel piece and place it on the lower half, aligning the lower edges and corners, with the hemmed edge in the center. Secure with pins. With a size 16 needle (or a jeans needle), stitch all the way around with a 1/2-inch seam allowance. Clip your corners and turn right-side out.

step 10 If using ruffles, you will do exactly as described in step 9, except you will sandwich your ruffle between your front and back panels before stitching them together. To prepare your ruffles, stitch your ruffle strips together at their short ends with a 1/4-inch seam, stitching the beginning and end together to form a tube. Iron the seams open. Fold your tubes in half lengthwise and press. With your machine set to its widest zig-zag setting, zig-zag over dental floss along the unpressed side as shown to create a gathering mechanism. Gather your tube as necessary so it is the same length as the perimeter of your pillow’s front panel. Pin into place, and then baste stitch 1/4 inch from the edge to secure the ruffle to your pillow front before proceeding to pin your back panel pieces as described in step 9. (Be sure to remove the pins from your ruffled piece before pinning on your back pieces. Broken needles from hitting hidden pins are no fun at all!)


Now, slip your cover onto your pillow form, and step back to enjoy your work! 


Helpful hints and tips:

Not in the market for a new cushion? This freezer paper snowflake technique would be a terrific way to embellish a t-shirt for your child (or yourself!). What a fun way to make a wearable version of your little one’s handiwork!

I opted to create a double ruffle here by also cutting a second, narrower strip of fabric that was precisely the same length as my first ruffle strip. After I sewed this narrow piece into a tube, I serged the edge, and then I aligned the unfinished edge of this tube with my wide tube before I ran my gathering stitches. This allowed me to ruffle both tubes at once, saving precious time in the process!

Needing some pillow forms for this project, but not wanting to spring for the pricey craft store versions? Check out my post here for how to make pillow forms out of a body pillow!

***

I was absolutely tickled last week to have Jen from Tatertots and Jello pick this project during pillow week over at the CSI Project. Thanks so much, Jen!!


And since we’re talking about Christmas…Have y’all ventured over yet to check out the marvelous Pennywise Presents series Beckie has going on right now at Infarrantly Creative? If you are in the market for some budget-friendly handmade gift ideas, this is certainly the place to be! Beckie has lined up a terrific group of talented girls who are sure to wow us with their creations. I’ll be sharing a project during the series, so be on the lookout! I’ll put a permanent link to the button on my sidebar to remind you to venture over and check out all of the goodness.


Photobucket
Photobucket
If you enjoyed this post, subscribe to Positively Splendid 
to receive updates, and join us on Facebook and Twitter!

  Subscribe in a Reader Receive Email Updates Follow on TwitterJoin us on Facebook
Photobucket

Amy @ Positively Splendid

Having grown up in a home brimming with sewing notions and paintbrushes, Amy has a deep love for all things creative. On any given day, you’ll find her knee-deep in her latest creative endeavor, with projects ranging from sewing and crafts to home decor and kid-friendly ideas. Amy believes that everyone, regardless of skill level or experience, possesses the ability to create something beautiful, and Positively Splendid was born of her passion for helping others harness their innate creative potential.

EVEN MORE GREAT IDEAS JUST FOR YOU!

FacebookTweetPinYummlyPrint

Filed Under: Christmas, Positively Home & Garden, Sewing, Tutorials Tagged With: Christmas, Winter

Previous Post: « Previous Post
Next Post: Butterball Tee Templates »

Reader Interactions

Comments

  1. Kelli @ RTSM says

    November 16, 2010 at 1:19 pm

    This is such a pillow! I have been wanting to try freezer paper stencils. Thanks for the step by step…I may have a few new pillows for my front porch soon!

  2. Michele {The Scrap Shoppe} says

    November 16, 2010 at 2:40 pm

    Love this, Amy! An absolutely fabulous design for the freezer paper. And I love the monogram addition!

  3. Infarrantly Creative says

    November 17, 2010 at 5:43 pm

    Adorable. I want one. So sweet. I have got to try that textile medium. I have seen it all over and I have yet to try it out. Do you have a specific brand you like?

  4. gatheredinthekitchen.com says

    August 5, 2011 at 3:00 am

    Very cute! I love that you made this without the a silhouette, cricket, etc (because I don’t have one) …I’m thinking these would make super cute Christmas presents that I could make!!!

  5. lucy's mom says

    September 25, 2012 at 5:39 am

    love this idea will have to try this

  6. Gay Ferland says

    December 4, 2012 at 12:48 pm

    What a neat gift to make and give!!! You are very clever!! Thanks for sharing!!

  7. Dixie n Dottie says

    December 5, 2012 at 12:15 pm

    This is lovely! Great job! Would love if you’d join our Countdown to Christmas link party! Hope to see you there! Have a great week! 🙂
    http://dixie-n-dottie.blogspot.com/2012_12_04_archive.html

Primary Sidebar

PS Search

Search this website

Seasonal Inspiration

Hocus Pocus Wreath
Ghost Plushies
Paper Pumpkins
Fabric Yo-Yo Pumpkins

Copyright © 2025 · Positively Splendid · All Rights Reserved. · Privacy Policy

Privacy & Cookies: This site uses cookies and other tracking technologies to assist with navigation and your ability to provide feedback, analyse your use of our products and services, assist with our promotional and marketing efforts, and provide content from third parties. To find out more, as well as how to remove or block these, see here: Our Cookie/Privacy Policy