Wanting a way to gussy up your holiday gift wrapping that requires a minimal amount of time and effort? These Sparkly Fabric Gift Tags are just the ticket! Each takes only a few minutes to make, yet the statement they make on any wrapped gift will make everyone think you are a gift-wrapper extraordinaire. Today I’m going to show you how easily these little gems come together with the help of a fun new product: Tulip Shimmer Sheets.

For this project, you will need…
- Fabric in assorted patterns and colors
- Double-sided fusible Peltex (a very heavy-weight stabilizer)
- Iron
- Washable ink marker
- Pinking shears (optional; you can also use regular shears)
- Coordinating thread
- Tulip Fashion Glitter Transfer Sheets
- Hole Punch
- Baker’s twine


Now the fun part: embellishing the tags! There is something about the holidays that makes me want to really pull out all of the glittery stops, but I’ll be honest: I am not a fan of the mess of glittered projects, especially with four very curious sets of little hands around. I was really excited, then, when I received two packages of Tulip Fashion Glitter Sheets. These sheets, which come in glittery and holographic styles in an assortment of holiday-worthy colors, allow you to add a glittery or metallic finish to fabric projects without having to deal with the hassle of traditional glitter. Just cut, place on a project, and iron on. I am sold!

I was particularly excited when I saw that the sheets could be cut out with die cutting machines. I decided to use some of my favorite Christmas dies and my manual die cutter to cut out some fun shapes to adhere to my gift tags.

One thing I discovered is that the manual cutter had a hard time cutting all the way through the glitter material, even when I ran it through a couple of times. To remedy this issue, I carefully tore along the lines created by the die cutter to remove my shapes.

For my more detailed shapes, a few of my features fell off as I was separating the shapes from the rest of the sheet. If that happens to you, save all of the pieces, and you can simply join them together before the ironing step later on. Easy solution!

Now, iron the shapes onto your prepared tags according to the product instructions, and then use a hole punch to make a hole at the top of your tag. Thread a piece of twine through the hole, and tie into a bow to secure to the package of your choice.

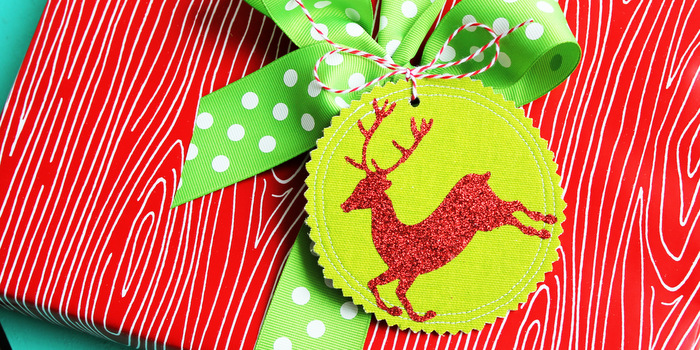
All finished!
These tags make a sparkly statement on wrapped packages, but they would also be great used as Christmas ornaments, too!


Once you see how easy these are to make, you’ll probably want to make enough for all of your packages this year!


Wanting more inspiration? Connect with Tulip at all of the places below!
Web: https://www.ilovetocreate.com/
Facebook: https://www.facebook.com/lovetocreate
Twitter: https://twitter.com/ilovetocreate
Pinterest: https://pinterest.com/ilovetocreate/
Thanks so much for making PS a part of your day!
Linking this to: Tatertots and Jello, Serenity Now, Tidy Mom, Home Stories A to Z, Flamingo Toes, A Glimpse Inside
Disclosure: This is a compensated post written by me on behalf of Tulip. Rest assured that all opinions expressed in this post are entirely my own, and I am dedicated to sharing only products that I feel my readers will benefit from and enjoy.
Having grown up in a home brimming with sewing notions and paintbrushes, Amy has a deep love for all things creative. On any given day, you’ll find her knee-deep in her latest creative endeavor, with projects ranging from sewing and crafts to home decor and kid-friendly ideas. Amy believes that everyone, regardless of skill level or experience, possesses the ability to create something beautiful, and Positively Splendid was born of her passion for helping others harness their innate creative potential.
So cute Amy! I have to ask… where did you get that fantastic wrapping paper?!
Thanks, Rhonda! I found the wrapping paper a few weeks ago at Target. The moment I saw it, I knew I had to have it! 🙂
Adorable, Amy! I love how the tags really show off the gift.
I was going to ask the same thing about the faux bois wrapping paper! I will be keeping an eye out for it now. 🙂
Thanks so much, Michele!
Oh! I love these! I’m going to have to make some of these, too. I love this glitter stuff! Thanks for the great idea!
Thanks, Jamie! So glad you like them. 🙂
These are so cute Amy! Love how they turned out and I too will be keeping an eye out for the wrapping paper. Happy Thanksgiving.
Thank you, Carol! The wrapping paper was on an endcap at our store in the gift wrap section a few weeks ago.
What a great idea for gift tags. Happy Thanksgiving.
Thanks so much, Doreen! Happy Thanksgiving to you, as well. 🙂
These are darling! I absolutely love them! What a great idea!
-Mimi
Thank you, Mimi!
how fun are these? so cute, amy!
SO STINKIN CUTE!!!!!! I seriously love this idea! Thank you for sharing!
Thanks so much!
These certainly make the gift! And what a great ornament they make after they are a gift tag.
Thanks so much, Rachel!
LOVE!!! These are so super cute Amy!! The colors and shapes are so fun and I love the way the glitter looks!
Gorgeous tags, love these
Love these! I’ll be on the look out for these sheets. Thanks for sharing.
Thanks so much! The sheets are so fun to work with.
LOVE your fabric gift tags! What a clever idea!