• Skip to primary navigation
  • Skip to main content
  • Skip to primary sidebar

Positively Splendid {Crafts, Sewing, Recipes and Home Decor}

Handcrafted. Splendidly.

  • Home
  • Blog
  • + Handmade
    • Crafts
      • Craft Gift Ideas
      • Holiday Crafts
      • Home Decor Crafts
      • Kids’ Crafts
      • Paper Crafts
      • Quick and Easy Crafts
      • Wearable Crafts
      • Wreaths
    • Gift Ideas
      • Budget-Friendly Gifts
      • Gift Wrapping
      • Gifts for Dads and Grandpas
      • Gifts for Kids
      • Gifts for Men
      • Gifts for Moms and Grandmas
      • Gifts for Neighbors
      • Gifts for Sports Fans
      • Gifts for Teachers
      • Gifts for Women
      • Quick and Easy Gifts
    • Kid-Friendly Projects
    • Sewing
      • Sewing for Children
      • Sewing for Men
      • Sewing for the Home
      • Sewing for Women
      • Sewing Techniques
      • Sewn Accessories
      • Sewn Gifts
  • + Home & Garden
    • DIY Home Decor Projects
    • Helpful Tips
    • Home Decor Crafts
    • DIY
    • Home Tour
    • Mantels and Tablescapes
    • Organization
    • Outdoor and Garden
  • + Holidays & Seasons
    • Spring
    • St. Patrick’s Day
    • Summer
    • Teacher Appreciation
    • Thanksgiving
    • Valentine’s Day
    • Winter
    • Back to School
    • Christmas
    • Easter
    • Fall
    • Fathers’ Day
    • Graduation
    • Halloween
    • Independence Day
    • Mothers’ Day
    • New Year’s
  • + Printables
  • + Recipes
    • Soups and Stews
    • Appetizers and Salads
    • Breads
    • Desserts
    • Food Crafts
    • Main Dish

Felt Poppy Tutorial (Easy Felt Flowers)

October 15, 2012 By Amy @ Positively Splendid

FacebookTweetPinYummlyPrint

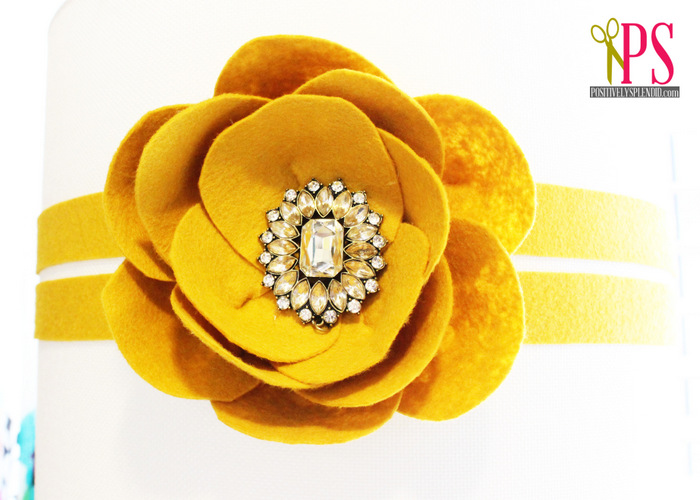
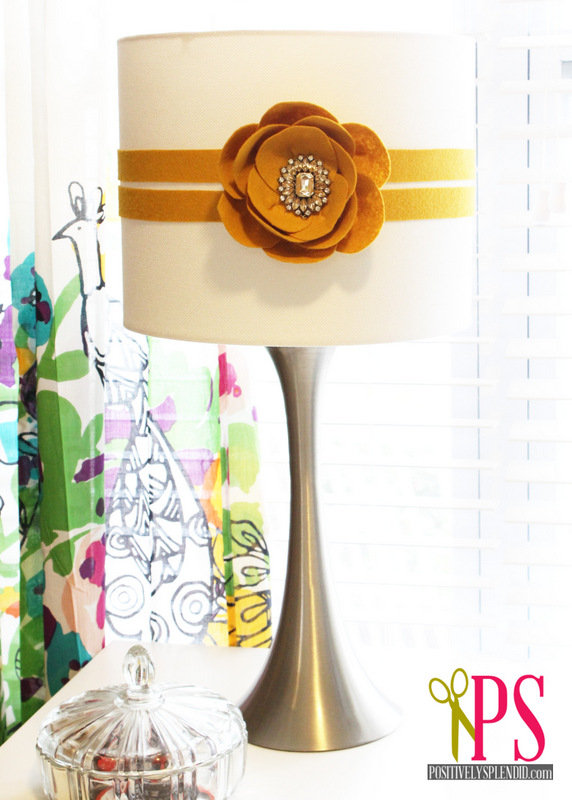
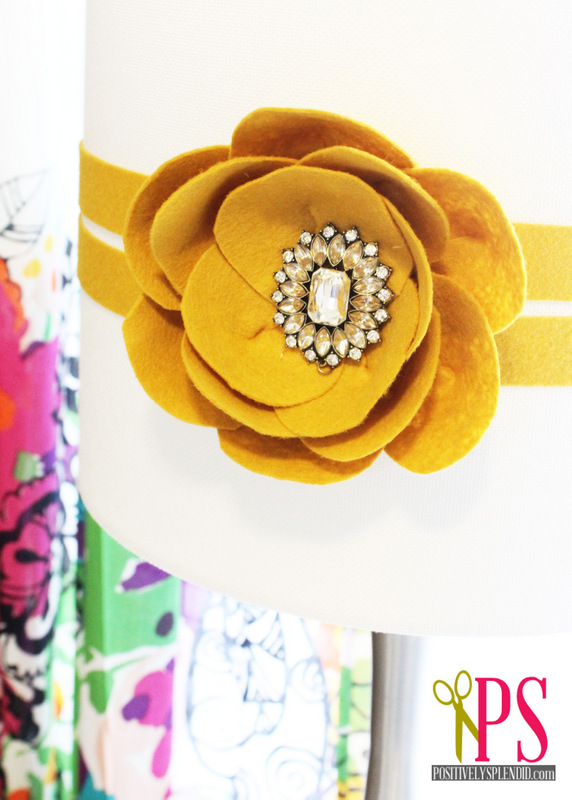
It’s nice to have a go-to flower tutorial for embellishing all sorts of things, from home decor items and wearable accessories to gift wrapping and more. Today’s tutorial for easy handmade felt poppies is one I recently came up with to accent the desk lamp shade in my sewing room and home office, and these flowers are so deceptively easy to make that I know I’ll be using them in many projects to come!

And the best part? These flowers can be made in just a few minutes’ time, with nary a stitch of sewing required. Let me show you how!

For this project, you will need…

  • Felt (I prefer wool felt, but any kind will do)
  • Sewing shears
  • Hot glue
  • Scissors
  • Cardboard
  • Decorative brooch (mine is from Styled by Tori Spelling)
  • Rotary cutter and mat (optional, but recommended)

To begin, cut approximately 15 3-inch squares of felt using your rotary cutter and mat. Working with one felt piece at a time, fold each square into quarters, as shown.

Round off the edge of your folded piece with your shears, making sure to leave the folded corner intact. When you open up your piece, you should have a circle. (Don’t worry if the piece isn’t perfectly symmetrical; absolute precision isn’t necessary here.)
Using your shears, make a snip on your circle, as shown, cutting just to the center of the piece.

Apply a small dab of hot glue to one of the flaps formed by the snip, as shown…

…and then overlap the other flap so that your piece forms a shallow cone. One of your flower petals is now complete! Repeat the above steps with the remaining felt squares to make the rest of your petals.

Use scissors to cut a cardboard circle that is about 3 inches in diameter. (I used a cereal box.) Apply a dab of hot glue to the outer edge of the circle, as shown…

…and then affix one of your petal pieces to the cardboard, so that the snipped portion of the petal is affixed to the cardboard.

Continue affixing the petals to the cardboard base in a similar fashion, overlapping them slightly as you work.

Work until your have an entire ring of petals…

…and then add another layer of petals at the center. When you’re finished, you will have a blank space at the center of the flower where the cardboard base shows through; we’ll cover this up in a moment!

Finish your flower with a decorative brooch adhered to the center with hot glue for a chic statement. I used a brooch from the Styled by Tori Spelling Glitz line for my flower center. I absolutely love how it sparkles!

I opted to secure my flower to a white drum lampshade, along with two 1-inch stripes of felt. I absolutely love the statement this lamp makes in my sewing room/home office space!

Think of all of the possibilities for ways to use these flowers: on handbags, decorative pillows, wreaths, and more! 

Thanks so much for stopping by!
Photobucket
Linking this to…
Skip to My Lou
Serenity Now
Home Stories A to Z
Tidy Mom
Tatertots and Jello
Flamingo Toes
A Glimpse Inside
Disclosure: I received compensation to write this post on behalf of Styled by Tori Spelling. Rest assured that all opinions expressed in this post are entirely my own, and I am committed to sharing only products that I feel my readers will benefit from and enjoy.

Amy @ Positively Splendid

Having grown up in a home brimming with sewing notions and paintbrushes, Amy has a deep love for all things creative. On any given day, you’ll find her knee-deep in her latest creative endeavor, with projects ranging from sewing and crafts to home decor and kid-friendly ideas. Amy believes that everyone, regardless of skill level or experience, possesses the ability to create something beautiful, and Positively Splendid was born of her passion for helping others harness their innate creative potential.

EVEN MORE GREAT IDEAS JUST FOR YOU!

FacebookTweetPinYummlyPrint

Filed Under: Craft Gift Ideas, Crafts, DIY, Home Decor Crafts, Home Decor Crafts, Positively Home & Garden, Quick and Easy Crafts, Tutorials Tagged With: {styled} by Tori Spelling, Felt Flowers, Flowers, Handmade Flowers, Lamps, sewing room, Sewn Accessories

Previous Post: « 9 Creative Food Ideas
Next Post: Creative Outdoor Fall Decor »

Reader Interactions

Comments

  1. Jamie says

    October 15, 2012 at 12:32 pm

    beautiful!!!! I just bought that lamp from Home Goods

  2. southernscraps says

    October 15, 2012 at 1:01 pm

    Wow. Beautiful flower. It makes a striking embellishment for your lamp.

  3. The Bean Sprout Notes says

    October 15, 2012 at 2:10 pm

    Yay! I’ve been waiting for this post ever since you showcased your new crafting space. I love that the tutorial looks easy enough without the results looking easy (if that makes sense – its a compliment 🙂 Thanks for sharing!

  4. Michele Cole says

    October 15, 2012 at 2:30 pm

    Love the flower! It looks wonderful. I am going to pin this so I can try to make a felt flower headband.

    Thank you so much for sharing!

    Michele @ Better Organized Living

  5. Smart! School {House} says

    October 15, 2012 at 2:50 pm

    I would like to steal the entire lamp from you;)
    GORGEOUS!

    Kelly at Smart! School {House}

  6. Crystal says

    October 15, 2012 at 3:46 pm

    So Beautiful!! I love how you added the flower to your lamp. Great idea!!

  7. nest of posies says

    October 15, 2012 at 5:14 pm

    gorgeous, amy! you know i love me some felt flowers! so pretty!

    xo
    kellie

  8. Lizzy Di Marco says

    October 16, 2012 at 1:33 am

    Amy, the flower is just lovely. You said you prefer to work with wool felt. I live in St. Paul and am having trouble finding wool felt. Could you send out a lead as to where you suggest I look?
    Thanks bunches,
    Lizzy

  9. Glamorous Mommy says

    October 16, 2012 at 2:26 pm

    I agree, it’s fantastic!! I’m going to have to give this a try 😉

    -Fotini

  10. Kari the Sweetest Memory says

    October 23, 2012 at 4:45 am

    Gorgeous! And I love it on the lamp shade! I am pinning this and I have to try this.

    Kari

  11. Marie says

    October 29, 2012 at 7:42 pm

    I love this. Fun idea to add it to a lamp!

    • Amy @ Positively Splendid says

      October 30, 2012 at 7:10 am

      Thanks so much, Marie! I truly appreciate you stopping by for a visit!

  12. Jayne says

    November 5, 2012 at 6:34 am

    Loved this tutorial, I have recently had my dad pass away and would like to make a red poppy
    for Rememberance Day this Sunday 11th November.

    When I have achieved the red one Im sure there will be many more for embelishments !

    Thankyou

  13. Hannah says

    November 5, 2012 at 9:20 am

    I LOVE your felt poppy!

    I linked to it on my blog post, here:

    http://welivedhappilyeverafter.blogspot.com/2012/11/35-baby-sewing-tutorials-ideas-found.html

    <3 Hannah

    • Amy @ Positively Splendid says

      November 5, 2012 at 1:25 pm

      Thank you, Hannah!

  14. Ann says

    November 8, 2012 at 7:29 am

    wow i love this! it’s so simple, i’ve been wanting to figure out how to do this for months now 😀 glad i came across this today!

  15. Carrol Mumford says

    November 9, 2012 at 2:56 pm

    Just love this ideal!!

  16. rachel says

    January 5, 2013 at 4:02 pm

    Thank you! I just love the flower. Im going to be making for for my ladies church group.

    • Amy @ Positively Splendid says

      January 8, 2013 at 10:32 am

      Terrific, Rachel! I hope you all enjoy this project.

  17. Christina at I Gotta Create! says

    January 19, 2013 at 9:18 am

    Wow, Amy! I really love this flower and it looks fabulous on the lamp. Pinning!

    <3 Christina @ I Gotta Create!
    Wildly Original link party is open.

  18. Gurpreet singh says

    September 5, 2013 at 8:26 am

    NIce And Thank u for this It really help US.

  19. Linda says

    January 10, 2014 at 10:34 am

    Thanks for the lovely tutorial ♥ http://felting.craftgossip.com/2014/01/10/felt-poppy-no-sew-tutorial-easy-felt-flowers/

Primary Sidebar

PS Search

Search this website

Seasonal Inspiration

Hocus Pocus Wreath
Ghost Plushies
Paper Pumpkins
Fabric Yo-Yo Pumpkins

Copyright © 2025 · Positively Splendid · All Rights Reserved. · Privacy Policy

Privacy & Cookies: This site uses cookies and other tracking technologies to assist with navigation and your ability to provide feedback, analyse your use of our products and services, assist with our promotional and marketing efforts, and provide content from third parties. To find out more, as well as how to remove or block these, see here: Our Cookie/Privacy Policy