• Skip to primary navigation
  • Skip to main content
  • Skip to primary sidebar

Positively Splendid {Crafts, Sewing, Recipes and Home Decor}

Handcrafted. Splendidly.

  • Home
  • Blog
  • + Handmade
    • Crafts
      • Craft Gift Ideas
      • Holiday Crafts
      • Home Decor Crafts
      • Kids’ Crafts
      • Paper Crafts
      • Quick and Easy Crafts
      • Wearable Crafts
      • Wreaths
    • Gift Ideas
      • Budget-Friendly Gifts
      • Gift Wrapping
      • Gifts for Dads and Grandpas
      • Gifts for Kids
      • Gifts for Men
      • Gifts for Moms and Grandmas
      • Gifts for Neighbors
      • Gifts for Sports Fans
      • Gifts for Teachers
      • Gifts for Women
      • Quick and Easy Gifts
    • Kid-Friendly Projects
    • Sewing
      • Sewing for Children
      • Sewing for Men
      • Sewing for the Home
      • Sewing for Women
      • Sewing Techniques
      • Sewn Accessories
      • Sewn Gifts
  • + Home & Garden
    • DIY Home Decor Projects
    • Helpful Tips
    • Home Decor Crafts
    • DIY
    • Home Tour
    • Mantels and Tablescapes
    • Organization
    • Outdoor and Garden
  • + Holidays & Seasons
    • Spring
    • St. Patrick’s Day
    • Summer
    • Teacher Appreciation
    • Thanksgiving
    • Valentine’s Day
    • Winter
    • Back to School
    • Christmas
    • Easter
    • Fall
    • Fathers’ Day
    • Graduation
    • Halloween
    • Independence Day
    • Mothers’ Day
    • New Year’s
  • + Printables
  • + Recipes
    • Soups and Stews
    • Appetizers and Salads
    • Breads
    • Desserts
    • Food Crafts
    • Main Dish

No-Fail Methods for Hanging Wall Art

April 13, 2012 By Amy @ Positively Splendid

FacebookTweetPinYummlyPrint

There are plenty of times when I have come to the end of a wall art project that I am particularly proud of, only to find myself with the conundrum of how to hang my creation. One trip to the picture-hanging hardware section at Lowe’s can only serve to confuse things further: there are so many different products out there, with sawtooth hangers, D-hangers, wire, and more. Today I’m sharing a little cheat sheet with tips about the art-hanging devices I have found to work best across a variety of different situations!

The Art: Large Pieces (Framed or Unframed)
The Hanging Devices: D-Hangers, Picture-Hanging Wire
The Tools: Tape Measure, Pencil, Drill and Bit, Wire Snippers


Measure down 1/3 of the way down from the top edge on either side of the piece and mark that with a pencil.


Align the tops of the D hangers with each of these marks, and then mark the location of the holes in the hangers with a pencil.


Use a small drill bit to drill pilot holes through the marks you just made…


…and then use your drill’s screwdriver bit to carefully affix the hangers to your art piece through these pilot holes. Be sure to use a slow speed to prevent splitting your frame!


Once the hangers are thoroughly tightened, connect the two with a piece of photo-hanging wire. To do this, thread one end of the wire through one of the hangers, looping it through the D portion of the hanger twice before twisting it several times to secure, as shown. 


Then, pull the remaining wire to the hanger on the opposite side, stretching it fairly tightly, so that once the piece is hung on the wall the top of the wire will be 2-3 inches or so from the top of the frame. Snip your wire to the appropriate length, and then twist it through the remaining D-hangers to secure as you did on the other side.

The end result:

Could you just use equally spaced D hangers to hang your pieces without connecting them with wire? Sure. If you’re looking to have something that is completely static once it is hung, taking the time to use the two separate D hangers is definitely the way to go. But if you don’t mind if your piece can move a bit once it’s hung, using the wire eliminates the need to do any leveling, and it also makes hanging a cumbersome object much easier since you don’t have to blindly try to connect each D-hanger with its respective photo hanger. 

***

The Art: Plates and Other Flat Objects
The Hanging Device: DISChangers
The Tools: None

Of any product I’ve discovered over the course of the last couple of years, there are few quite as ingenious as DISChangers. By adhering one of these devices to the back of plates, platters and other flat objects (all you need to activate the adhesive on the hangers is a bit of water), you can hang your items on the wall without having to deal with the mangled, tangled mess of typical plate hangers. I couldn’t live without these!


***

The Art: Lightweight Objects
The Hanging Device: A Pop Tab
The Tools: Hot glue gun

Since I discovered this method on Apartment Therapy, I have used it dozens of times. 

I still don’t fully trust this for breakable objects like plates, but for small, lightweight items like the wreath in my Valentine mantel…

or the quilted letter in my Hallway command center, this trick is perfect!


***
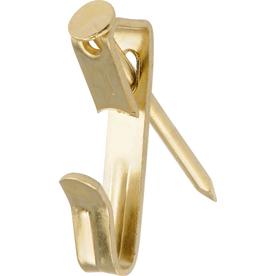
For each of the three categories above, I recommend using a traditional picture hanger like the one pictured below to mount the art on your wall (make sure it is rated for a weight to accommodate your art). These are very inexpensive, and can be found at Walmart, Target or any home improvement store. Why not just use a nail on its own? These hangers do wonders to protect your walls from unsightly damage, and the way they are anchored ensures they won’t eventually be pulled out of the wall by the weight of the artwork.


But what about situations when you want to hang a large, heavy object on a wall in a place where there is no stud to be found, and you know your drywall won’t be strong to enough to hold the piece on its own? I’ve got you covered there, too!


The Art: Heavy Objects (Mirrors, Large Pictures, etc.)
The Hanging Device: No Stud Drywall Picture Hanger
The Tools: Drill and Bit, Hammer

These little gems will hold up to 200 pounds (!!), and they can be installed in just a matter of seconds with basic tools. They bolster the strength of typical drywall so that you can hang your heaviest artwork wherever you please. A fabulous product! 


I used these hangers for the mirror seen in the background of my Easter Vignette…


…and also for my framed kitchen chalkboard.


***

So there you have it: my solutions for just about every art-hanging situation!

Do you have any go-to tricks or methods for hanging artwork?


Photobucket

I have not been compensated in any way to share the products in this post.

Amy @ Positively Splendid

Having grown up in a home brimming with sewing notions and paintbrushes, Amy has a deep love for all things creative. On any given day, you’ll find her knee-deep in her latest creative endeavor, with projects ranging from sewing and crafts to home decor and kid-friendly ideas. Amy believes that everyone, regardless of skill level or experience, possesses the ability to create something beautiful, and Positively Splendid was born of her passion for helping others harness their innate creative potential.

EVEN MORE GREAT IDEAS JUST FOR YOU!

FacebookTweetPinYummlyPrint

Filed Under: DIY, DIY Home Decor Projects, Helpful Tips, Positively Home & Garden, Tutorials Tagged With: Art, Artwork, Helpful Tips, Wall Art, Wall Decor

Previous Post: « 8 Things I’m Loving Right Now
Next Post: Saturday Seven Spotlight »

Reader Interactions

Comments

  1. Kellie says

    April 13, 2012 at 3:05 pm

    Terrific Tips! Many Thanks for Sharing 🙂

  2. Laura Ingalls Gunn says

    April 13, 2012 at 3:09 pm

    A few months ago I hung an entire wall of plates (antique included) with paper clips and hot glue.

    They’re still hangin’ yeah, yeah, yeah!

    Here’s the how to:

    http://decortoadore.blogspot.com/2012/01/how-to-create-wall-of-plates.html

  3. LeighAnn says

    April 13, 2012 at 3:16 pm

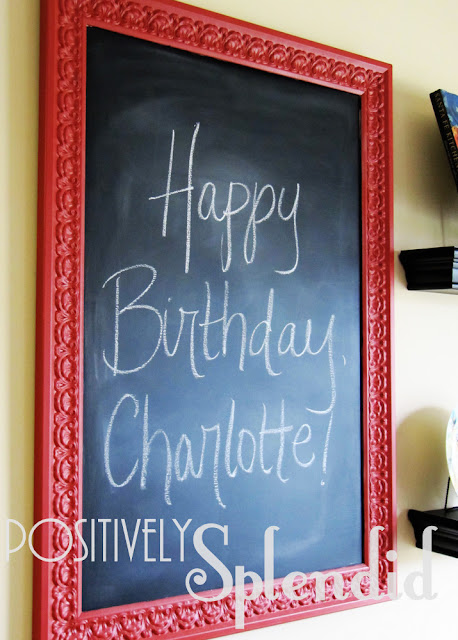
    Job well done! Who needs a man? I need that framed chalkboard for my craft room!

  4. randee says

    April 13, 2012 at 5:08 pm

    thanks for sharing your tips!

    here’s one that works really well if the item is light weight and not breakable – i use real heavy cardboard that comes with packs of paper. i cut it into 1”x1 1/2” rectangles & then bend the bottom 1/2” of the 1 1/2” side. theni punch a hole into the top 1/2” of the 1 1/2” side.

    i mod podge it onto the back trying to only glue the part that had the “fold”. you gotta be a good eye-baller to get it into the middle & on straight, but – boy, oh boy, does it work great! & the cost? free!

    here’s a link to a photo of what it looks like http://randeeparker.blogspot.com/2010/06/mod-podged-plaques-by-hundreds.html (go toward the bottom).

  5. Lori says

    April 15, 2012 at 2:54 pm

    Thanks for posting this! We’ve had some problems with this, so it’s great timing for me!

    Hello from a new follower!

  6. Shaper of Little Souls says

    April 28, 2012 at 7:04 am

    Do you have good tips for hanging art on plaster walls? We rent our house and don’t want to put big chips and holes in the walls. It kills me because I am an artist and all of my paintings have been sitting in a corner for 4 years! Grrr.

  7. gwUrJl says

    July 22, 2013 at 9:03 pm

    809446 337990never saw a site like this, relaly impressed. compared to other blogs with this write-up this was definatly the most effective web site. will save. 729428

Primary Sidebar

PS Search

Search this website

Seasonal Inspiration

Hocus Pocus Wreath
Ghost Plushies
Paper Pumpkins
Fabric Yo-Yo Pumpkins

Copyright © 2025 · Positively Splendid · All Rights Reserved. · Privacy Policy

Privacy & Cookies: This site uses cookies and other tracking technologies to assist with navigation and your ability to provide feedback, analyse your use of our products and services, assist with our promotional and marketing efforts, and provide content from third parties. To find out more, as well as how to remove or block these, see here: Our Cookie/Privacy Policy