Hello Positively Splendid readers! It’s Megan from The Homes I Have Made, and I am really excited to be back this month sharing another tutorial with you!

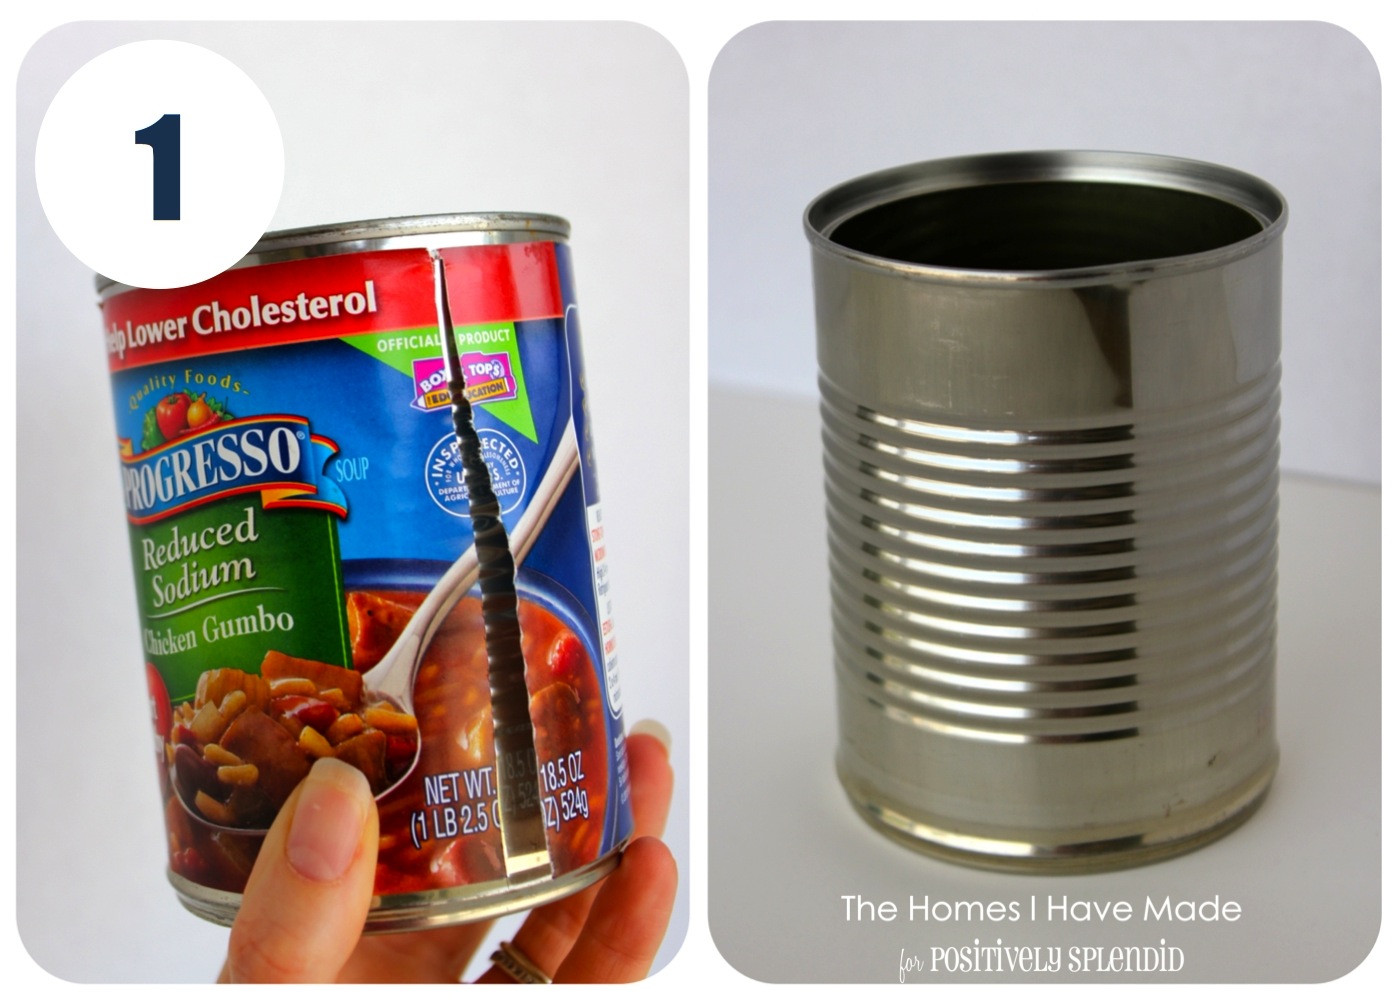
Believe it or not, I started here…with a can of Progressive Soup!


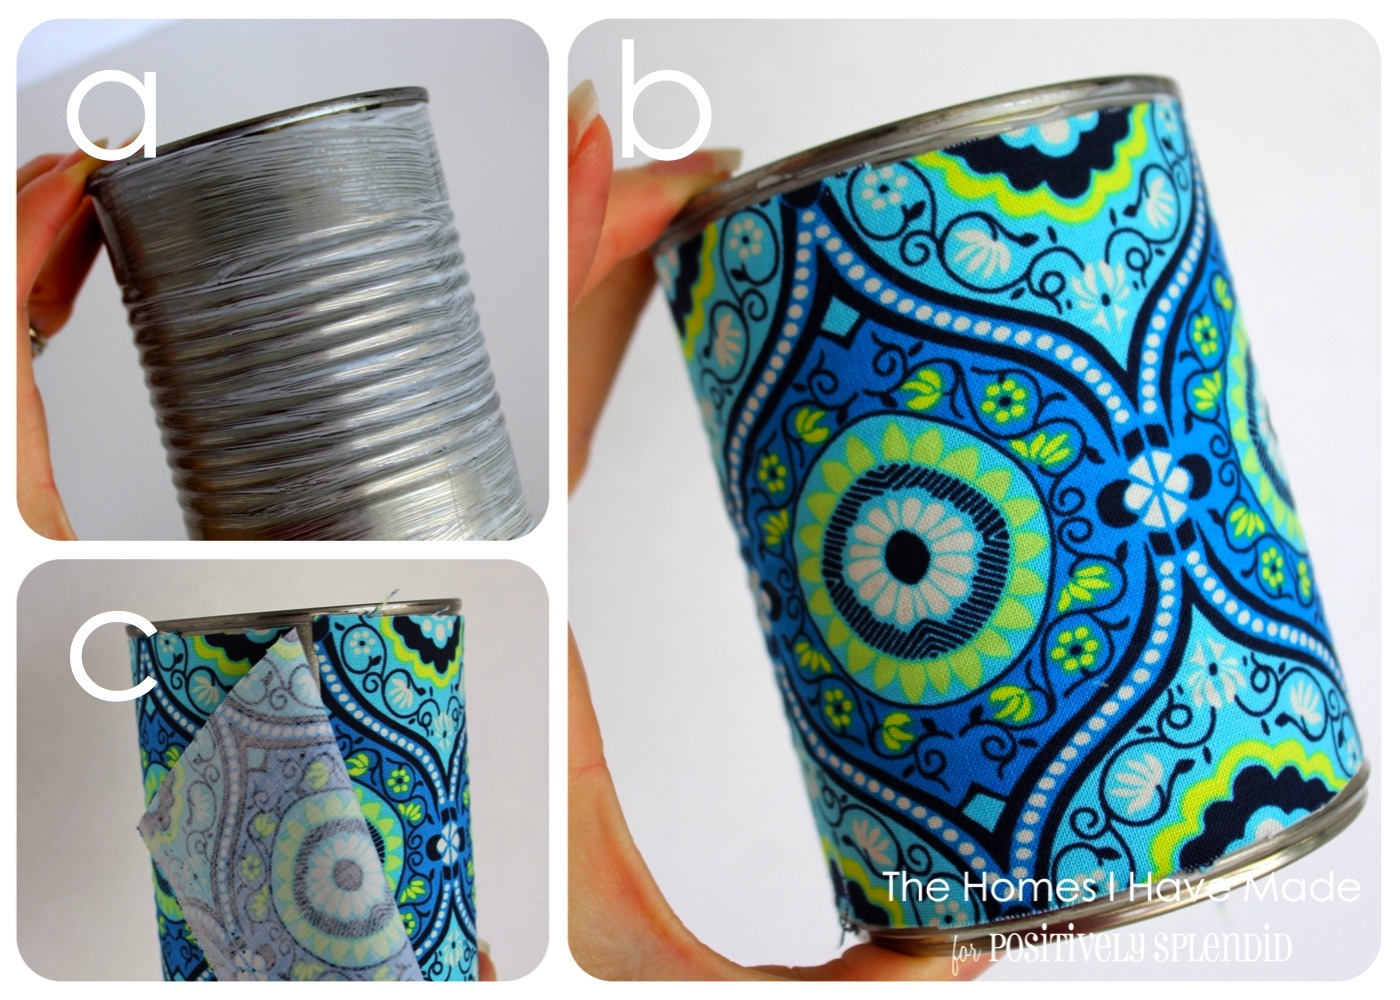
- (a) Cover the outside of the can in Mod Podge (you can use the regular or the Outdoor stuff for this step!)
- (b) Slowly wrap your fabric around the can, smoothing air bubbles as you go.
- (c) When you get back around, trim your fabric so you have a 1/2″ overlap and secure the end with more Mod Podge.
5. Prepare the skinny fabric strip. To take care of that scary edge on the inside top of the can, we are going to cover it with the smaller fabric strip.
- (a) Brush Mod Podge along the entire back of the skinnier fabric strip.
- (b) Fold in half (wrong sides together) and press flat.
- (c) Snip small slits about every 1/2″ or so (this is because we didn’t cut our fabric on the bias. If you want to cut your fabric on the bias or use bias tape, then no snipping is required!)


I digress…onward!

- (a) Twist one bolt about 4″ down the threaded rod.
- (b) Place one washer on top of the bolt.
- (c) Place the can (bottom side down – that’s what the hole was for!) on top of the washer.
- (d) Place the other washer and the other bolt on top of the threaded rod.


- (e) Then flip your can over and tighten the original bolt and washer toward the can. You should end up like this: bolt > washer > bottom of can < washer < bolt.


To pour it in:
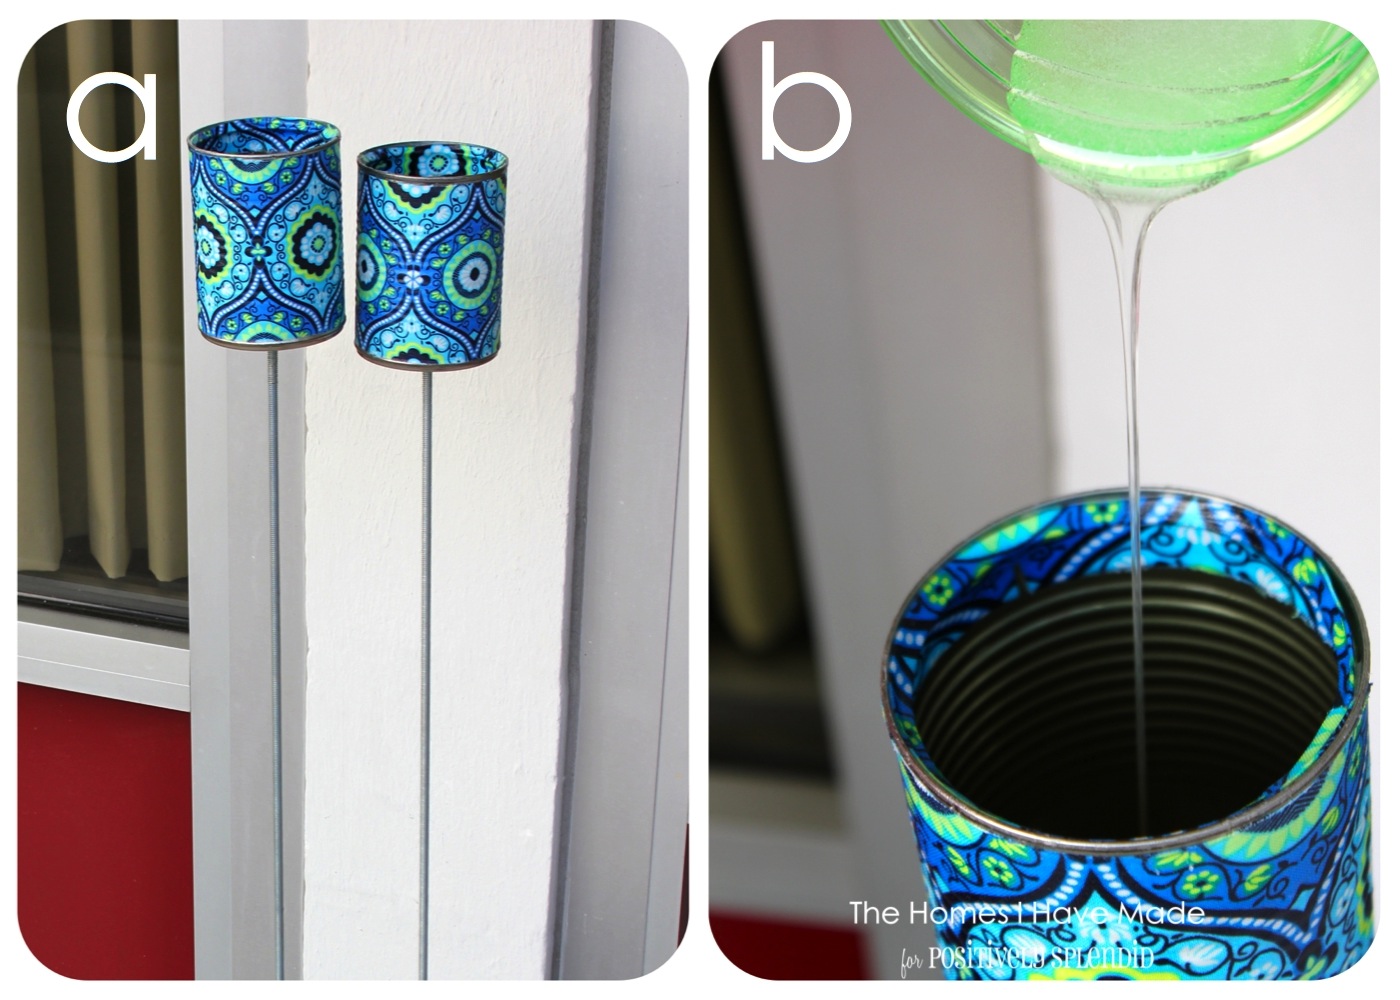
- (a) I stood my two drink holders up in a pot filled with sand and made sure they were as level as I could get them!
- (b) I mixed the resin according to package directions and poured it in the bottoms of the cups…just high enough to cover the washer and bolt.


.jpg)
Megan is an exercise and nutrition professional turned stay-at-home mom and DIY blogger with the arrival of her baby boy in April of 2011. Married to a U.S. Marine, she is currently setting up her 5th home in 8 years! You can follow Megan’s decorating and crafting adventures over at The Homes I Have Made (and here on Pinterest and Facebook) and find lots of ideas, tips, and tricks for making any temporary space a cute, cozy and comfortable home!
Having grown up in a home brimming with sewing notions and paintbrushes, Amy has a deep love for all things creative. On any given day, you’ll find her knee-deep in her latest creative endeavor, with projects ranging from sewing and crafts to home decor and kid-friendly ideas. Amy believes that everyone, regardless of skill level or experience, possesses the ability to create something beautiful, and Positively Splendid was born of her passion for helping others harness their innate creative potential.
Megan – this is SUCH a cute idea! I love it! 🙂
Super fabulous idea. Will have to try this while I’m off this summer. 🙂
That is a genius idea! It would be especially great for the beach! I hate when my water bottle gets all sandy from sitting on the beach blanket.
Totally awesome and PERFECT for the beach! I love it!
Megan, this is such an ingenious idea. L.o.v.e. it! We spend a week at the beach every summer, and I see this as a great craft idea for everyone to create the first day, and by the second day, it will be good to use! Thanks! Pinning it, and now going to visit your blog.
altered-artworks.blogspot.com
LOVE this idea!!! That said, I am now brainstorming ways to allow water to drain so I can leave them out by the chairs around our firepit, so they won’t become mosquito breeding grounds after it rains. Maybe drill a few holes in the bottom after the resin hardens so you get a smooth bottom AND drainage? Thoughts?
How about holes in bottom and instead of resin, aquarium stones to even bottom and drainage. May have to use small screen circle to keep gravel from spilling out. Can’t wait to try this one!
I think if you can make horizontal slits above the bottom rim it will drain ok or put nail holes around the edge of the bottom rim…just a thought.
LOVE this idea!!! That said, I am now brainstorming ways to allow water to drain so I can leave them out by the chairs around our firepit, so they won’t become mosquito breeding grounds after it rains. Maybe drill a few holes in the bottom after the resin hardens so you get a smooth bottom AND drainage? Thoughts?
What a great idea! If you have the Pampered Chef can opener, it doesn’t leave the nasty inside edge, saving a step!
Great idea! Thanks for sharing
So fun and festive!!
what a completely darling project…off to try to find outdoor mod podge – you rock girl!!
That is such a fun easy idea! That would be perfect for the beach. And it’s great to recycle something that would have been thrown away.
Love this project! Have you linked it up with me yet at Wow Us Wednesday?
What fabulous directions! You did a good job with the photos. I feel like I can do this because of being able to SEE each step. I’m a very visual person. Thanks for the project directions!
I agree!! The tutorial is outstanding!! The pictures with step by step directions make this very “user friendly” for someone like me that is new to modge podge, working with drills, and the other hardware used. I’m going to make these bc you made it so easy to follow. Thank you 🙂
What fabulous directions! You did a good job with the photos. I feel like I can do this because of being able to SEE each step. I’m a very visual person. Thanks for the project directions!
How awesome is that! -Marci
I wonder how this would look using the cute decorative duct tape they have these days…no mod podge needed and it would cover the scary edge well too…love your idea about the resin to even out the bottom!!!
What a great idea. Although I was confused there for awhile until I figured it out. What you are calling a bolt is actually a nut.
RaDonna, Thanks for clarifying that. I was about to tell her the same thing.
What a clever idea! I love it.
Great idea – I’d hot glue a koozie along the inside to keep it cool!
Brilliant!! I am so going to make some of these. We are heading to the beach next week and these will be perfect. Thank you for the great tutorial.
http://www.itsybitsypaperblog.com
This comment has been removed by the author.
Where did you Get the resin?
Megan, you.are.a.genius! Super cool and your tut makes it easy to follow.
Love this – I just found it on Pinterest. I just made citronella candles in cans and want to decorate them with fabric now. Thanks for the great idea.
Here are my CANdles if you want another recycling project: http://gardentherapy.ca/diy-citronella-candles/
What a brilliant idea! And so crafty! Pouring resin in the bottom to make it flat is super smart too 🙂 I’d be thrilled if you want to share these over at my current link party so everyone can be inspired! http://practicallyfunctional.net/2012/06/the-fun-in-functional-link-party-5/
hmm left a comment last night and don’t see it today. may have done something wrong.
anyhow i love love love the fabric. Where did you get it? great idea!
thanks
What a really great idea!
These drink holders are darling!!
Just a thought about something that would work better than the resin. How about cutting the bottoms out of some cheap dollar store koozies. They have a hole already for the nut to nest into, and would create a smooth bottom. Just have to cut to size. You could hot glue it in also if you needed to.
This is too nifty! Gteat idea! Dont know why I dint think of it…lol 😉 😉 Thank YOU for thinking of it! Luvit luvit
thank you for this fantastic and such clear direction!
Love this idea…I think I will try this but instead of the resin I am going to try a couple of circles of fun foam with a hole cut out where the nut is… cheaper quicker and less toxic…
thanks for the tutorial!!
Cool idea~ I think I’m gonna skip the smooth bottom part, because ’round these parts, we don’t want outdoor cups that can hold water, or we’d be breeding mosquitos in there. So, I’m thinking add extra nail holes to be sure it drains, and then maybe shove a plastic mesh bag from the tangerines I bought at the store. That would make a nice pillow effect for any sized drink, but still let the water drain out the bottom.
I saw this linked over on Pinterest and fell in love. I made a couple to take to the beach and they worked nicely. Instead of fabric on the outside I sprayed the can with primer, then painted my own designs. Currently working on one out of a tomato sauce can on a slightly larger steel rod. Going to give it to friends who always bring wine with them when they camp.
Hi Cassidy, I was thinking about painting too. Was there a special paint that you used? Something that will hold up to the weather? I just know mine are going to be left outside all summer! 🙂
Also, what about rust? Is there something I can spray to rust proof the whole thing?
Thanks so much for the awesome tutorial! I found this on Pinterest and I had to share it on my website. I run a coupon/frugal blog and I do a daily feature called “Frugal Pin of the Day” and today your drink holders were featured! Here’s a link to the post http://anexerciseinfrugality.com/frugal-pin-of-the-day-8/#more-677 thanks again for the awesome tutorial! Keep up the great work!
Awesme idea from such a creative person! I am going to make a set to give my brother to use at his new camp site in Delaware. It’s a great “new home” gift! Put a small tuna can on instead and you have a candle
holder!
Thanks bunches
Sherry Ash
Blandon, PA
I really liked your idea and the tutorial was very clear. Just an idea if you are going to the expense and time in putting the resin in yhebottom why not mix in some Colorado or maybe even some glitter and you wouldn’t even have yo see the nut and washer in the bottom
so totaly cool
ALso, just thought of something – a slice off of a pool noodle would probably work as a base in the can instead of the resin too! 🙂
Making these with my Girl Scouts at out next campout!
This will be a terrific project for that!
Just found this on pinterest – awesome idea – since I use a side-cut can opener though, I get to skip the cloth on the inside 😉 It’s worth the investment – they are awesome can openers!
This is great – have some purchased ones, but these are much better. An idea for those for beach or leaving out in the rain – instead of resin – drill holes through the bottom and use the mesh for swamp coolers – cut to fit – scooch it to the bottom. Can be taken out and rinsed if need be and should keep the wine glass 🙂 from hitting the bolt/nut. Thanks for the inspiration. Now I gotta go dig into the trash for that can from lungh!!!
A friend of these makes these, out of steel at his fabrication plant, just for his friends.
We call them “Beer Spears”!
They’re less “pretty” but he can laser cut the steel how ever we want so a lot of us girls have intricate lace or chevron patterns, one of the guys has skull and cross bones and another has the Edmonton Oilers logo!
He made his wives with their sons profile <3
would clear nail polish work to seal the can rim?
I honestly am not entirely sure, Enne. The important part is making sure whatever is used is completely rust-resistant. Thanks for stopping in!
I made 4 of these last night as a birthday present for a friend!! They turned out so cute! I can see what you mean about being frustrated with putting in the inner piece of fabric. I used clothes pins to clamp the fabric in place every inch or so. It worked out well. For my next set, though, I will probably be plugging in my glue gun before my hands get modge podge all over them!! Thanks for posting this!! I”ll be making more for our girls weekend at the beach next month.
If you use pliers, you can flatten the inner ridge. If you have a can opener that leaves a sharp edge along the top, you can cut the fabric wide enough to go over the top and into the can a wee bit. Just cut your notches in the fabric beforehand. Marbles in the bottom will give you an even base and you can drill holes for drainage withouth losing your marbles…lol. What about an inch or so wide slot cut down one side to accommodate a mug? So many possibilities. Thankyou for your idea. Can you get steel rods that have pointy ends?
Excellent idea and great instructions! Can’t wait to try it!
Pinning and sharing on my FB page! Awesome idea 🙂
Oh MY GAWWSSHH!!! This is ABSOLUTELY ADORABLE! I am soo making these for our washer games in the back yard! GENIUS!!!
Hi! This is my first visit to your blog! We are a team of volunteers
and starting a new project in a community in the same niche.
Your blog provided us useful information to work on. You have done a outstanding job!
Thanks for the idea, great outdoor project 🙂
When my friends see me buying fabric they are going to think I lost my mind as I have no sewing ability. These are awesome.
This is such a great idea!!! And love the idea of taking it to the beach. Think I would put a round of the fabric in the bottom inside of the can as well, just for extra effect!!!
what a fantastic and fun activity for my next girly get-together! I have a bunch of fat quarts that I bought simply because I love the print, so this will be a great project to show those prints off. Thank you so much for the tutorial. found your blog via pinterest and will follow you!
Great idea. Love the fabric, but I may try using the decorative duck tape that I already have on hand. Also, for the uneven bottoms, you could possibly use coasters? (also I have on hand). I guess I will see if it works? Thanks for sharing your great ideas. Found you Pinterest and will follow from now on!
Will these hold cans? Or only bottles?
I would think these would hold cans with no problem, Jessica. Thanks for stopping in!
I made some today. Easy and I love how they turned out. Pretty inexpensive to make too. I even found large pineapple cans the same size as soup for only $1 each.
This is kinda dumb, but, when it rains it will fill up with water and if you leave them out who knows what might grow in them. Have you ever punched holes in the can? Or do you have a solution for the problem?