• Skip to primary navigation
  • Skip to main content
  • Skip to primary sidebar

Positively Splendid {Crafts, Sewing, Recipes and Home Decor}

Handcrafted. Splendidly.

  • Home
  • Blog
  • + Handmade
    • Crafts
      • Craft Gift Ideas
      • Holiday Crafts
      • Home Decor Crafts
      • Kids’ Crafts
      • Paper Crafts
      • Quick and Easy Crafts
      • Wearable Crafts
      • Wreaths
    • Gift Ideas
      • Budget-Friendly Gifts
      • Gift Wrapping
      • Gifts for Dads and Grandpas
      • Gifts for Kids
      • Gifts for Men
      • Gifts for Moms and Grandmas
      • Gifts for Neighbors
      • Gifts for Sports Fans
      • Gifts for Teachers
      • Gifts for Women
      • Quick and Easy Gifts
    • Kid-Friendly Projects
    • Sewing
      • Sewing for Children
      • Sewing for Men
      • Sewing for the Home
      • Sewing for Women
      • Sewing Techniques
      • Sewn Accessories
      • Sewn Gifts
  • + Home & Garden
    • DIY Home Decor Projects
    • Helpful Tips
    • Home Decor Crafts
    • DIY
    • Home Tour
    • Mantels and Tablescapes
    • Organization
    • Outdoor and Garden
  • + Holidays & Seasons
    • Spring
    • St. Patrick’s Day
    • Summer
    • Teacher Appreciation
    • Thanksgiving
    • Valentine’s Day
    • Winter
    • Back to School
    • Christmas
    • Easter
    • Fall
    • Fathers’ Day
    • Graduation
    • Halloween
    • Independence Day
    • Mothers’ Day
    • New Year’s
  • + Printables
  • + Recipes
    • Soups and Stews
    • Appetizers and Salads
    • Breads
    • Desserts
    • Food Crafts
    • Main Dish

Patriotic Paint Chip Art

June 6, 2013 By Amy @ Positively Splendid

FacebookTweetPinYummlyPrint
Craft patriotic artwork with paint chips to outfit your home in style in summer! PS contributor Megan is here today with all the details.
Hey Everyone! Megan, from The Homes I Have Made, back this month with another tutorial – and this one is fun, easy, and free! We live in a military community where love of country is abundant and overflowing. With Memorial Day behind us and July 4th and Labor Day still to come, I was antsy to start put out some good ol’ red, white and blue around the house! What better way to do it with some whimsical star-infused artwork!


I know paint chip art is nothing new, but I decided to put a different spin on it by cutting my paint chips into lots of little stars and stringing them together in a variety of ways to make some neat patterns! With a handful of patience, you too can take a bunch of paint chips and turn them into art for your walls or holiday mantel!


Let me show you how fun this is!

You don’t need much for this project! Here’s your supply list:

  • A bunch of paint samples in whatever color scheme you want; I wanted a patriotic-themed display so I grabbed a bunch of red and blue hues.
  • A star-shaped punch, an e-cutter or scissors (and a star template would be handy if you’re doing this by hand)
  • Craft glue
  • Scissors and/or paper cutter
  • Cardstock
  • Frames – I used old frames and spray painted them to match!
Start by cutting out your stars. To make my process go quicker, I set up a bunch of paint chips on one sticky mat and cut out several paint chips worth of stars at one time using my Cricut!


I found it easiest to keep my stars organized in piles by color. After a while (and late into the night) all the blues and reds start to look alike so keeping them sorted helped me keep my patterns on track! Plus, all those colors are so fun to look at, aren’t they?!?


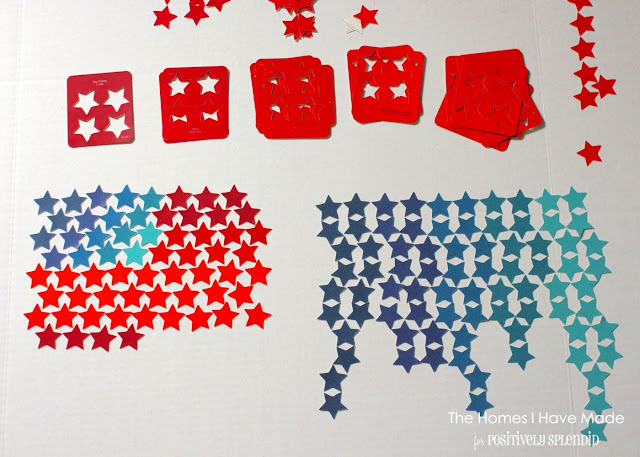
The next step is to just start playing! There are countless ways these shapes and colors can be strung together to create great visual displays! Play with connecting different ends and sides, using a random color scheme or an ombre effect. Really, the possibilities are endless! Here’s two ideas I toyed around with before settling on my final designs!


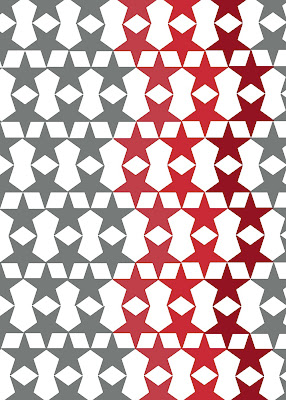
Feel free to come up with your own design – that’s the fun part. But if you’re interested in how I did mine, I’ll walk you through it! Let’s start with the red design! The red artwork used staggered placement of the stars. Stars are just off-set from the one next to it; the red dots indicate where two stars meet.


I started by cutting down an 8.5×11″ piece of cardstock to 8×10″ since I knew that was the size frame I was going to use. (Pst – It helps to find a frame first and then create your artwork to fit it.) Next, use some craft glue to start placing down the stars. For this one, I ended up mixing all my red stars because I wanted the reds to be random, but you can certainly place them however you think is best! Continue connecting and building until most of the sheet filled.

Now it’s tine to take a break from the stars to work on the border. Using the un-used edges of your paint chips, cut down a bunch of 1/4″ “matchsticks” with a paper cutter or scissors.


Then work your way around the border in a brick-laying fashion, cutting down sizes as necessary to fit and create visual interest.


Once the border is in, go back with the remaining stars. Continue the pattern and trim down where the stars meet the brick border.


And that’s it, you’re done!


The blue ombre artwork took a little more thought, patience and concentration!


This one uses tip-to-tip placement, where the stars connect at their sides and feet. If you look at the pair of stars on the left, notice that the top star is right side up and the bottom star is flipped over ( they are placed feet-to-feet). Now if you look closely, the entire design is just a repeat of this same set!


There are a lot of neat effects that can be done with the stars placed like this, for example:

But I thought it created much more interest with two stars removed from every row to create neat little windows. Amazing how the removal of two stars totally changes the pattern, huh?!?


To create this pattern, start by working across the bottom of a sheet of card stock (for this one, I used a 12×12″ sheet of white cardstock), placing stars side by side (like they’re holding hands!). I found it easiest to work across the design, lining up each star in the same direction before moving up a row and starting again – this design is easy to get lost in so staying on one row ensures you know exactly how you’re star should be facing. For this design, it’s really important to keep your colors straight!


When laying out your design, give some thought to how you want it to end. Instead of making my layout perfectly symmetrical, I decided to leave one side open – by not closing off the last set of  “windows” I feel like they are “star-spangled” streamers!
Once your glue is all dry, load your works of art into frames for a clean and finished look – mine are old frames painted glossy white!


This artwork now adorns the little art and play station in my son’s playroom where we already have a Modern Americana theme going! I just love the whimsy and interest it brings to the area in such an fun and free way!


Paint chip projects are really fun because you can soooo get creative – there are no rules and no limits. Just play around until you find something that really works for you! Don’t like what you’ve come up with? Turn your shapes around, reverse your colors, change the background color and try again! Most of all – have fun creating something that is uniquely yours!


I hope you all have a wonderful start to your summer! Be sure to stop by and see me over at The Homes I Have Made – I have lots of home decor projects planned for this summer! Hope you’ll come by and see what I’m working on! See you next month!
***
Megan’s place is always brimming with fantastic ideas. If you haven’t yet, be sure to check out the progress she’s made in her master bedroom. I can’t decide which I like best: this gorgeous painted dresser…
…or this sweet printable based on lyrics from one of my favorite songs by the Lumineers!

Amy @ Positively Splendid

Having grown up in a home brimming with sewing notions and paintbrushes, Amy has a deep love for all things creative. On any given day, you’ll find her knee-deep in her latest creative endeavor, with projects ranging from sewing and crafts to home decor and kid-friendly ideas. Amy believes that everyone, regardless of skill level or experience, possesses the ability to create something beautiful, and Positively Splendid was born of her passion for helping others harness their innate creative potential.

EVEN MORE GREAT IDEAS JUST FOR YOU!

FacebookTweetPinYummlyPrint

Filed Under: Crafts, Holiday Crafts, Home Decor Crafts, Home Decor Crafts, Independence Day, Paper Crafts, Positively Home & Garden, Positively Seasons, Quick and Easy Crafts, Summer, Tutorials Tagged With: Crafts, Paint Chips, patriotic

Previous Post: « Homemade Salsa Recipe
Next Post: How to Hang Pegboard »

Reader Interactions

Comments

  1. Ruth says

    June 6, 2013 at 2:10 pm

    Very pretty art work. I’m having a hard time imagining “taking” all those paint chips from a local store. I know they are free, but it would bother me.

    • Amy @ Positively Splendid says

      June 7, 2013 at 4:02 pm

      Hi, Ruth! To source my paint chip projects, I always ask my local paint stores if they have any outdated samples in the back that I can buy for a nominal fee. A lot of times they will happily give them for free!

      • Ruth says

        June 11, 2013 at 1:16 pm

        Thanks for mentioning that. I hadn’t thought of it. Sorry.

  2. Tasha says

    June 7, 2013 at 10:05 am

    So cute! Pinning now!! I always love your stuff… I think I visit now daily!

    • Amy @ Positively Splendid says

      June 7, 2013 at 3:56 pm

      Thank you so much, Tasha! I am so glad to hear it. 🙂

  3. Crystal says

    June 7, 2013 at 10:45 pm

    Amazing!! I absolutely love it!! What a awesome addition to my wall for July 4th. Can’t wait to make these. Thanks so much for the tutorial!! Love it!!

Primary Sidebar

PS Search

Search this website

Seasonal Inspiration

Hocus Pocus Wreath
Ghost Plushies
Paper Pumpkins
Fabric Yo-Yo Pumpkins

Copyright © 2025 · Positively Splendid · All Rights Reserved. · Privacy Policy

Privacy & Cookies: This site uses cookies and other tracking technologies to assist with navigation and your ability to provide feedback, analyse your use of our products and services, assist with our promotional and marketing efforts, and provide content from third parties. To find out more, as well as how to remove or block these, see here: Our Cookie/Privacy Policy