
In case you missed them last month over at U Create, I thought I’d share my Dress-Up Wall Canvases here today. Enjoy!
Today I’m going to share a tutorial for a set of darling mix-and-match dress-up canvas wall hangings I recently made for my daughter’s room. If you ever loved playing with paper dolls when you were little (or if you still do!), you will absolutely adore this project!
For this project, you will need…
Acrylic paint and foam brushes
Painter’s tape
Ink-jet iron-on transfer sheets
Ink-jet iron-on transfer sheets
Fusible Peltex (a very heavyweight type of interfacing)
Various fabrics
Dress piece templates
Coordinating thread
Basic sewing supplies: machine, shears, etc.
Hot glue
Ribbon, rhinestones, buttons and other embellishments
Prep Work
Paint a 2-inch border around the perimeter of each canvas, making sure to paint on the sides, as well. Use your painter’s tape to ensure nice, crisp lines. Allow your canvases to dry completely.
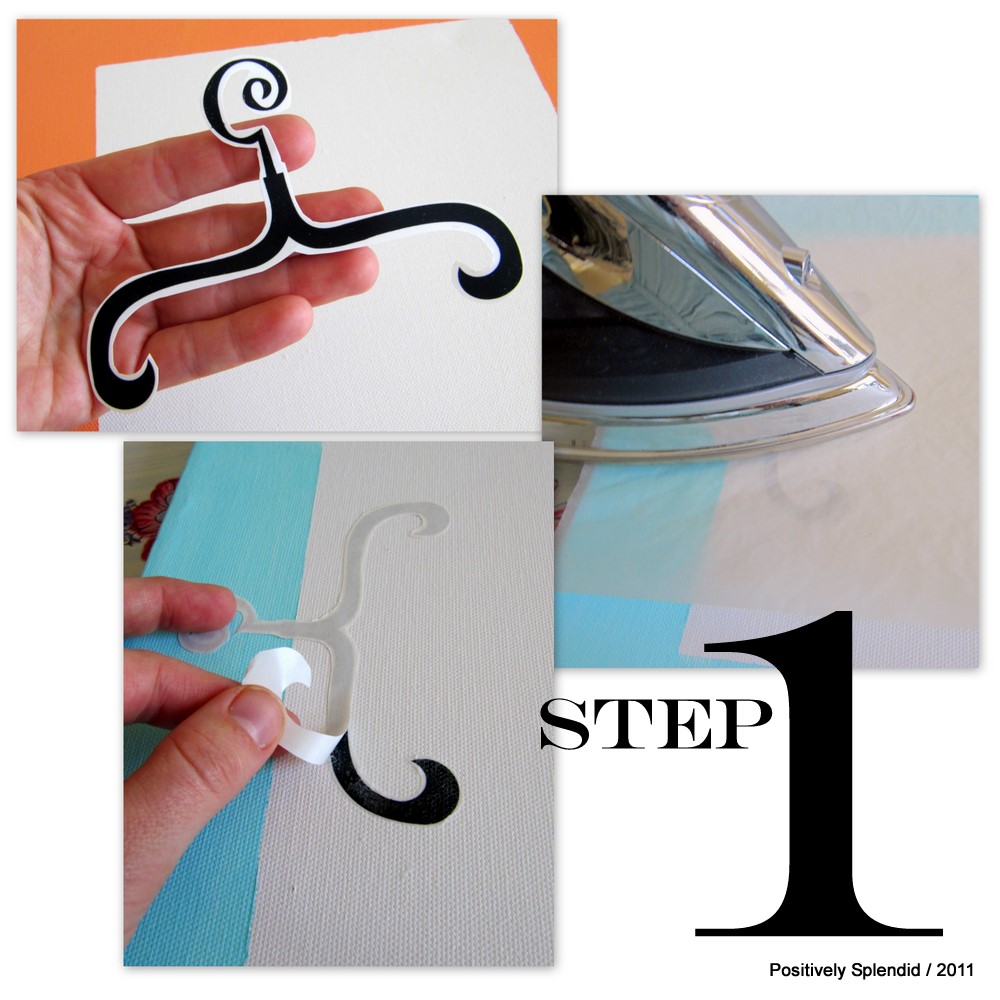
step 1 / Print the hanger printable linked above onto an iron-on transfer sheet. (Consult the product packaging for printer settings.) Now, cut as closely as possible all the way around each of your hanger designs. Position a hanger at the top center of each canvas, and iron each into place. (Be sure to use a pressing cloth to avoid getting paint on your iron.) Peel away the backing paper from your transfers.
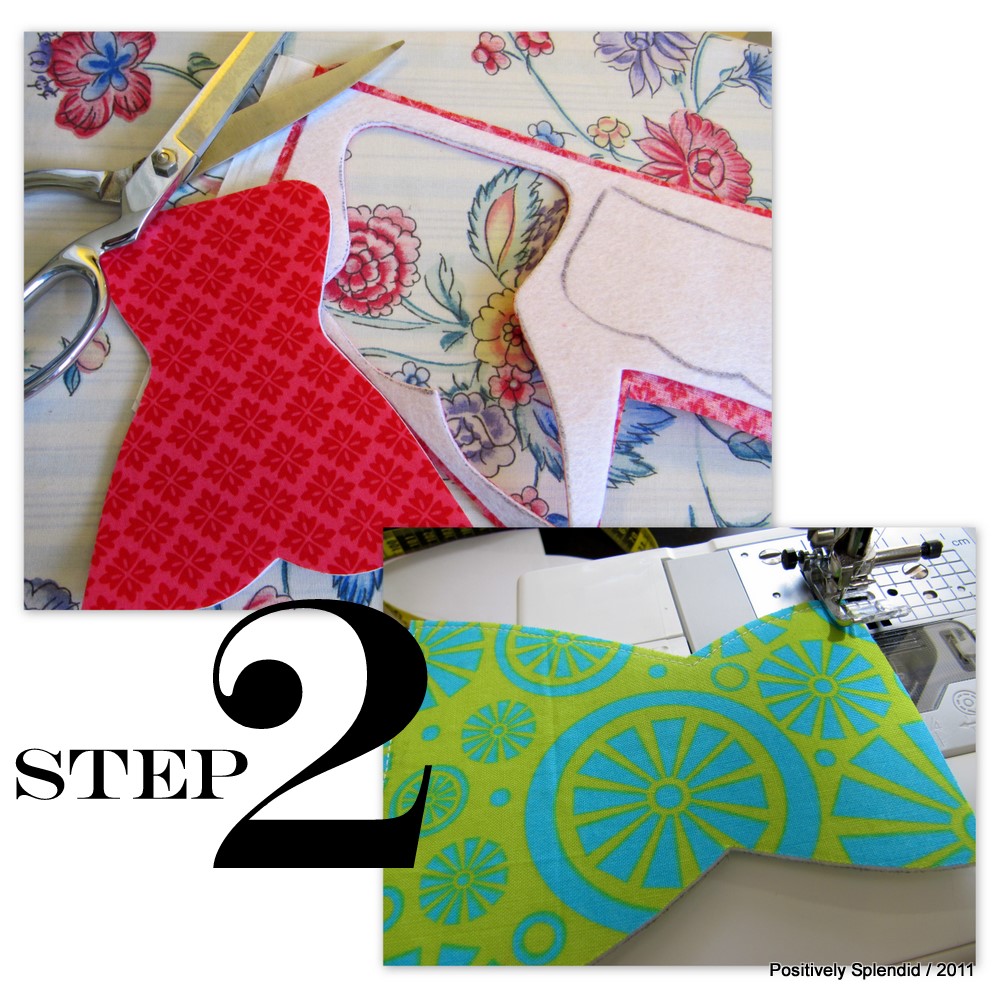
step 2 / Fuse your Peltex to the wrong side of your fabrics according to the product instructions. Trace your dress piece templates onto the interfacing side of your fused fabric. To make three canvases, you will need 6 pieces total: 3 main dress pieces and 3 bottom pieces. Be sure to mix and match the fabrics you use as you are tracing so your dresses turn out nice and vibrant! Cut out all of your dress pieces. Head to your sewing machine and carefully edgestitch all the way around the perimeter of each piece. This stitching is purely decorative, but it really does make this project shine!
step 3 / Now, the dress-up fun really begins! Embellish your dress pieces with ribbon “belts” and buttons, rhinestones, gems, or whatever else suits your fancy. When applying the ribbon, I recommend using hot glue to adhere it to the back of your piece to conceal the raw edges. Use 1/4″ ribbon to make two dress “straps” and adhere them to your canvas with hot glue, as shown. Also hot glue each of the bottom dress pieces to its respective main dress piece. Now, hot glue the entire dress to your canvas with hot glue. You are finished!

I gussied my canvases up even more with a bit of ribbon tied around the top corner of each. The bold, bright colors here make me smile! As I mentioned earlier, I made this set for my daughter’s room, but I think these would be terrific in a sewing/craft room, too!


Having grown up in a home brimming with sewing notions and paintbrushes, Amy has a deep love for all things creative. On any given day, you’ll find her knee-deep in her latest creative endeavor, with projects ranging from sewing and crafts to home decor and kid-friendly ideas. Amy believes that everyone, regardless of skill level or experience, possesses the ability to create something beautiful, and Positively Splendid was born of her passion for helping others harness their innate creative potential.
I LOVE these! Makes me wish I had a little girl (3 boys in the house!).
Amy these are darling! Stumbled!
Jen
Those are so cute!!!
Kelly
So cute and fun, what an awesome idea!
These are so fun! Love them!
Jo-Anna
Oh my goodness! So adorable!! Definitely on the to-do list. Thanks for the tutorial!
Oh, absolutely precious!!! This is something we NEED in my house. 🙂
What a charming project! Love the mix and match fabrics and bright colors… brilliant! 🙂
So. stinkin’. Cute!
Love them!
So creative and fun! These knock my socks off!! I’m sharing your canvases on my crafty facebook page : )
craft-interrupted.blogspot.com
How cute! This is such a creative idea! Beautiful!
Ridiculously cute!!! I’m super inspired – thanks for sharing!!!
These really sparkle! I’m thinking I might use the dress patterns and templates for other things besides just wall hangings. Maybe some cards or scrapbook pages?