• Skip to primary navigation
  • Skip to main content
  • Skip to primary sidebar

Positively Splendid {Crafts, Sewing, Recipes and Home Decor}

Handcrafted. Splendidly.

  • Home
  • Blog
  • + Handmade
    • Crafts
      • Craft Gift Ideas
      • Holiday Crafts
      • Home Decor Crafts
      • Kids’ Crafts
      • Paper Crafts
      • Quick and Easy Crafts
      • Wearable Crafts
      • Wreaths
    • Gift Ideas
      • Budget-Friendly Gifts
      • Gift Wrapping
      • Gifts for Dads and Grandpas
      • Gifts for Kids
      • Gifts for Men
      • Gifts for Moms and Grandmas
      • Gifts for Neighbors
      • Gifts for Sports Fans
      • Gifts for Teachers
      • Gifts for Women
      • Quick and Easy Gifts
    • Kid-Friendly Projects
    • Sewing
      • Sewing for Children
      • Sewing for Men
      • Sewing for the Home
      • Sewing for Women
      • Sewing Techniques
      • Sewn Accessories
      • Sewn Gifts
  • + Home & Garden
    • DIY Home Decor Projects
    • Helpful Tips
    • Home Decor Crafts
    • DIY
    • Home Tour
    • Mantels and Tablescapes
    • Organization
    • Outdoor and Garden
  • + Holidays & Seasons
    • Spring
    • St. Patrick’s Day
    • Summer
    • Teacher Appreciation
    • Thanksgiving
    • Valentine’s Day
    • Winter
    • Back to School
    • Christmas
    • Easter
    • Fall
    • Fathers’ Day
    • Graduation
    • Halloween
    • Independence Day
    • Mothers’ Day
    • New Year’s
  • + Printables
  • + Recipes
    • Soups and Stews
    • Appetizers and Salads
    • Breads
    • Desserts
    • Food Crafts
    • Main Dish

How to Dress Up Furniture with Fabric

February 21, 2012 By Amy @ Positively Splendid

FacebookTweetPinYummlyPrint

After sharing all about George’s nursery last month, I neglected to post about the little side table next to the  upholstered rocker. Thank you so much to the reader who reminded me to do so by sending an email asking about this piece!

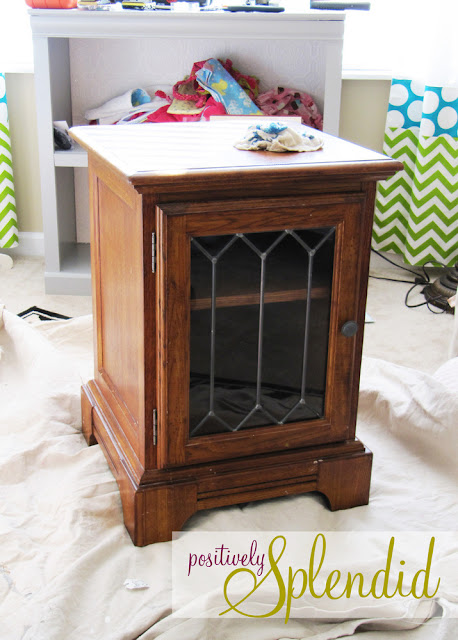
I mentioned before how my goal in planning the nursery was to use as much of our current furniture pieces as possible to keep my expenditures to a minimum. When it came time to find a side table of some sort to go next to the upholstered rocker, I decided to take one of our old living room end tables and transform it into something that would match the nursery decor. 

This little table actually matches the console table I posted about last year when I shared how I replaced the glass doors on that piece with faux hammered copper panels made with paintable wallpaper. I still love how that project turned out! Getting rid of the see-through glass made that piece so much more functional, as I can now stow away all of our games discreetly. 

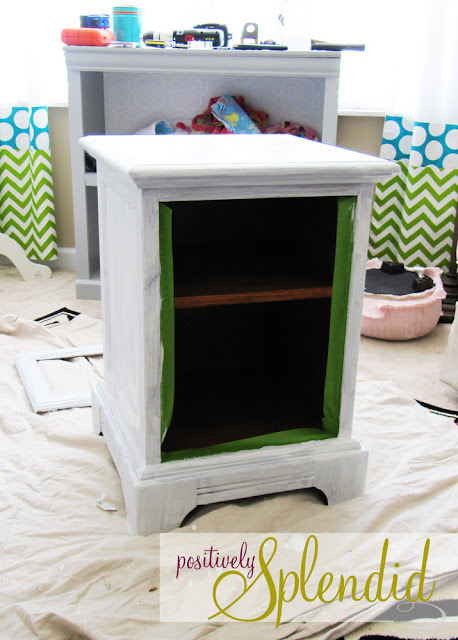
But – back to this table, and the task of turning it into something suitable for George’s bold and bright little room. First things first: paint! I painted this piece using precisely the same steps and supplies I used for his antique dresser, giving everything a light sanding before priming with Zinsser oil-based bond-coat primer and then applying the same Benjamin Moore color, San Antonio Gray. For durability, I finished the piece with a coat of polyacrylic. (See the dresser post for more details about this process.)

Once I had finished painting the piece, I was faced with the same conundrum I experienced with the console table I mentioned a few moments ago: Because I wanted to use the shelves inside this table to store things like extra diapers, wipes and such, I needed to do something with its glass door so that those items wouldn’t be visible from the outside of the piece. My solution? Using some of the fabric I had left over from the bedding and window treatments for the space!

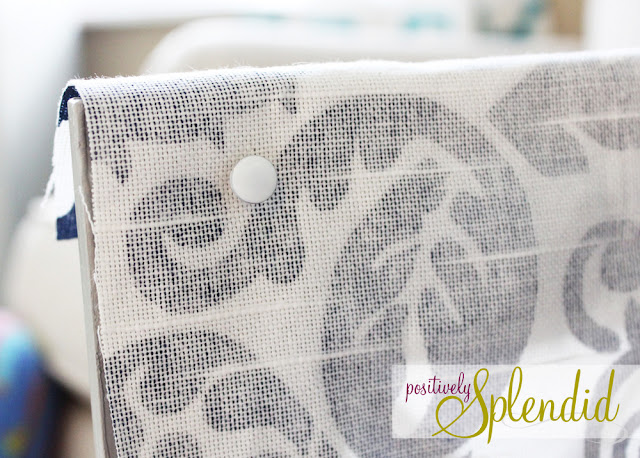
To do so, I cut a piece of fabric to a size large enough to cover the glass opening, plus an inch all the way around to ensure the edge of the fabric wouldn’t be visible through the front of the glass. Then I simply used thumb tacks to affix the fabric to the back of the door so that the design would show through the existing glass front. This way, I can change it out later on if I opt to use the table in a different space, or I can remove it altogether and the piece will be no worse for the wear. I love keeping my options open like that!

From the outside, everything looks nice and polished. No one would ever guess that the fabric isn’t a permanent part of the piece. And I love how that bit of damask fabric transforms an otherwise boring table into something really eye-catching and suitable for this space!

Inspired to try your hand at adding some fabric flair to your furniture? In addition to my idea above, there are so many other terrific ideas for doing so!

For a permanent solution, decoupaging the fabric to your piece is a great option. This tutorial from J Caroline Creative is the best I’ve found for fabric-decoupaged furniture. What a lovely job she did with these matching nightstands!

Using the same decoupage concept, these fabric-lined drawers at Infarrantly Creative are so pretty…
…and these updated kitchen chairs at Crafty Nest are so chic!

I love this idea from HGTV for using DIY upholstered panels to give new life to an old headboard.


This video tutorial from House & Home details how to make a fabric-backed bookshelf with fabric panels and foam core board. Eddie Ross also shared a fabric-backed bookshelf project idea last year using the same concept. This really adds personality to an otherwise boring bookcase!

So what’s your verdict? Would you use or have you ever used fabric to update an old piece of furniture? 

If you found this post helpful, pin it to spread the word! Do so easily by clicking the link below.

Pin It

Thanks so much for stopping in!

Photobucket

Linking this to…
Tatertots and Jello
Serenity Now

Amy @ Positively Splendid

Having grown up in a home brimming with sewing notions and paintbrushes, Amy has a deep love for all things creative. On any given day, you’ll find her knee-deep in her latest creative endeavor, with projects ranging from sewing and crafts to home decor and kid-friendly ideas. Amy believes that everyone, regardless of skill level or experience, possesses the ability to create something beautiful, and Positively Splendid was born of her passion for helping others harness their innate creative potential.

EVEN MORE GREAT IDEAS JUST FOR YOU!

FacebookTweetPinYummlyPrint

Filed Under: DIY, DIY Home Decor Projects, Home Decor Crafts, Positively Home & Garden Tagged With: Baby, Furniture Painting, Nursery

Previous Post: « Book Donation Totes
Next Post: 12 (More) Why Didn’t I Think of That Ideas »

Reader Interactions

Comments

  1. Sonriendo says

    February 21, 2012 at 6:56 pm

    Oh you beauty 🙂 Ihave a very ugly what you would call a hutch and I would call a dresser, that has glass doors and how I was going to curtain them had me completely boggled. How did I never think of thumb tacks (or drawing pins as I say). So simple, so obvious and really unbelievable that I missed it whist thinking of how to do it!! Now, I only need to find my paint colour and it’s off the todo list and time to get started!!

  2. Jenna says

    February 21, 2012 at 7:09 pm

    I was just telling my husband I want to do this to a terribly outdated cabinet. He said he was unsure and would have to see examples. Bingo! Thanks 🙂

    Jenna
    callherhappy.com

  3. kiki comin says

    February 21, 2012 at 7:29 pm

    awesome, amy. love how it turned out. you are amazing.:)

  4. Heidi @ Decor & More says

    February 21, 2012 at 8:05 pm

    What a great solution! I’ve considered doing this with one of my bookcases in the Mom Cave… you’ve reignited my thought process!
    xo Heidi

  5. Beth @ dot...in the city says

    February 21, 2012 at 11:19 pm

    well done! I love the night stand and it’s the perfect solution. I’m pinning this one and hopefully tackling it this summer 🙂

  6. Amanda @ Serenity Now says

    February 22, 2012 at 3:10 am

    I like it!! Looks like a completely different piece now. Oh, the power of paint and fabric. 🙂

  7. Heather says

    February 24, 2012 at 1:39 pm

    Visiting from Serenity Now link party. Saw your link and had to come by for a better look! I am your newest follower. Love your nursery and the side table makeover – you are so talented! Please visit my blog to say hello. I love to make new bloggy friends 🙂 Heather @ settingforfour.blogspot.com

  8. Jen Lossing says

    February 24, 2012 at 6:01 pm

    Wow, What a transformation. It looks so chic and modern now. Great job. I am your newest follower!

  9. Lolly Jane says

    February 24, 2012 at 7:11 pm

    I love how the fabric adds a pop! That room overall is gorgeous, and your new piece adds to it. LOVE!

  10. Shelby @ The Bean Sprout Notes says

    February 24, 2012 at 7:44 pm

    Thank you so much for this VERY helpful post and links!!!

  11. Artsy VaVa says

    February 25, 2012 at 2:31 am

    LOVE the table!!!

  12. Latoya @ The Scott's Crib says

    February 25, 2012 at 3:23 am

    Go on head with your bad self, I love this! I never actually thought of dressing furniture up with fabric before even though it makes total sense. The room is so cute and this is just another great added touch. So glad to have stumbled on it, thanks for inspiring me to do something a little different. I would love if you could share this at my cheap finds and transformations party. I just love it when a good project comes together for very little cost. Here’s the link just in case your’re interested, thanks and have an awesome weekend! http://www.thescottscrib.com/2012/01/lathrifta-strikes-gold-lathriftas-cheap.html

  13. Jill @ KitchenFunWithMy3Sons.com says

    February 25, 2012 at 6:06 pm

    Love it! We have our Kitchen Fun and Crafty Friday Link Party going on now and would love for you to share this! http://kitchenfunwithmy3sons.blogspot.com/2012/02/kitchen-fun-and-crafty-friday-link_23.html

  14. Ruth says

    February 25, 2012 at 8:12 pm

    I love how your table turned out. It looks fantastic with the fabric. Love all the other ideas you shared. I haven’t tried it yet but can’t wait to give it a try.
    Ruth

Primary Sidebar

PS Search

Search this website

Seasonal Inspiration

Hocus Pocus Wreath
Ghost Plushies
Paper Pumpkins
Fabric Yo-Yo Pumpkins

Copyright © 2025 · Positively Splendid · All Rights Reserved. · Privacy Policy

Privacy & Cookies: This site uses cookies and other tracking technologies to assist with navigation and your ability to provide feedback, analyse your use of our products and services, assist with our promotional and marketing efforts, and provide content from third parties. To find out more, as well as how to remove or block these, see here: Our Cookie/Privacy Policy