• Skip to primary navigation
  • Skip to main content
  • Skip to primary sidebar

Positively Splendid {Crafts, Sewing, Recipes and Home Decor}

Handcrafted. Splendidly.

  • Home
  • Blog
  • + Handmade
    • Crafts
      • Craft Gift Ideas
      • Holiday Crafts
      • Home Decor Crafts
      • Kids’ Crafts
      • Paper Crafts
      • Quick and Easy Crafts
      • Wearable Crafts
      • Wreaths
    • Gift Ideas
      • Budget-Friendly Gifts
      • Gift Wrapping
      • Gifts for Dads and Grandpas
      • Gifts for Kids
      • Gifts for Men
      • Gifts for Moms and Grandmas
      • Gifts for Neighbors
      • Gifts for Sports Fans
      • Gifts for Teachers
      • Gifts for Women
      • Quick and Easy Gifts
    • Kid-Friendly Projects
    • Sewing
      • Sewing for Children
      • Sewing for Men
      • Sewing for the Home
      • Sewing for Women
      • Sewing Techniques
      • Sewn Accessories
      • Sewn Gifts
  • + Home & Garden
    • DIY Home Decor Projects
    • Helpful Tips
    • Home Decor Crafts
    • DIY
    • Home Tour
    • Mantels and Tablescapes
    • Organization
    • Outdoor and Garden
  • + Holidays & Seasons
    • Spring
    • St. Patrick’s Day
    • Summer
    • Teacher Appreciation
    • Thanksgiving
    • Valentine’s Day
    • Winter
    • Back to School
    • Christmas
    • Easter
    • Fall
    • Fathers’ Day
    • Graduation
    • Halloween
    • Independence Day
    • Mothers’ Day
    • New Year’s
  • + Printables
  • + Recipes
    • Soups and Stews
    • Appetizers and Salads
    • Breads
    • Desserts
    • Food Crafts
    • Main Dish

Lighted Flower Garland Tutorial

July 18, 2011 By Amy @ Positively Splendid

FacebookTweetPinYummlyPrint

July is the advent of the birthday season in our family, starting with my birthday yesterday (a truly fabulous day – stay tuned for more on that later this week!) and continuing on from there with at least one birthday during each of the months through the end of the year. In honor of these special days, I thought it would be fun to put together a garland to adorn our mantel. Constructed with a strand of twinkle lights, I love the festive feel it gives to our home!

Lifestyle Crafts is unveiling a new line of dies for their Epic Cutting Tool this week that I was fortunate enough to get to try, and the moment I received them, I knew they would be perfect for this project. The Possibilities line is a super fun, highly versatile line of nesting dies ranging in size from .25 to 5.75.” Whether your interest is card making or home decor or anything in between, these dies will be a great addition to your crafting arsenal.

Let’s talk about how to put these dies to use to make a festive lighted flower garland, shall we?

For this project, you will need…

Lifestyle Crafts Epic Die Cutting Tool
Nesting Lace Circles and Nesting Spray Dies
Assorted Coordinating Patterned Papers and Cardstock
Craft Knife
10-Light Battery-Powered Strand of Twinkle Lights (I purchased mine in the wedding section at Hobby Lobby)
Adhesive Runner
Letter Stickers
Ribbon
step 1 / Cut out flower shapes in three descending sizes from your cardstock and patterned papers. You will need 10 flowers of each size. To do this, lay your dies, cutting side up, on your cutting platform, and place your paper on top. Cover with your self-healing cutting mat, and run everything through your machine. (For more details on this process, head here for a full lineup of video tutorials using the Epic machine.)

step 2 / Using your craft knife, carefully cut a small “x” directly at the center of each flower shape. Make sure your cuts aren’t too long – about 3/8″ long for each cut is probably about right – to ensure the flowers will fit properly onto your string of lights later on. Take each flower shape and carefully make a fold where each of the petals meet, as shown, to give everything added dimension.
step 3/ Stack your prepared flowers in groups of three – one large, one medium, and one small. Starting with the largest piece and ending with the smallest, slide your stacked flower groupings onto the lights on your strand. Repeat this step until each light on your strand is adorned with a stacked flower.
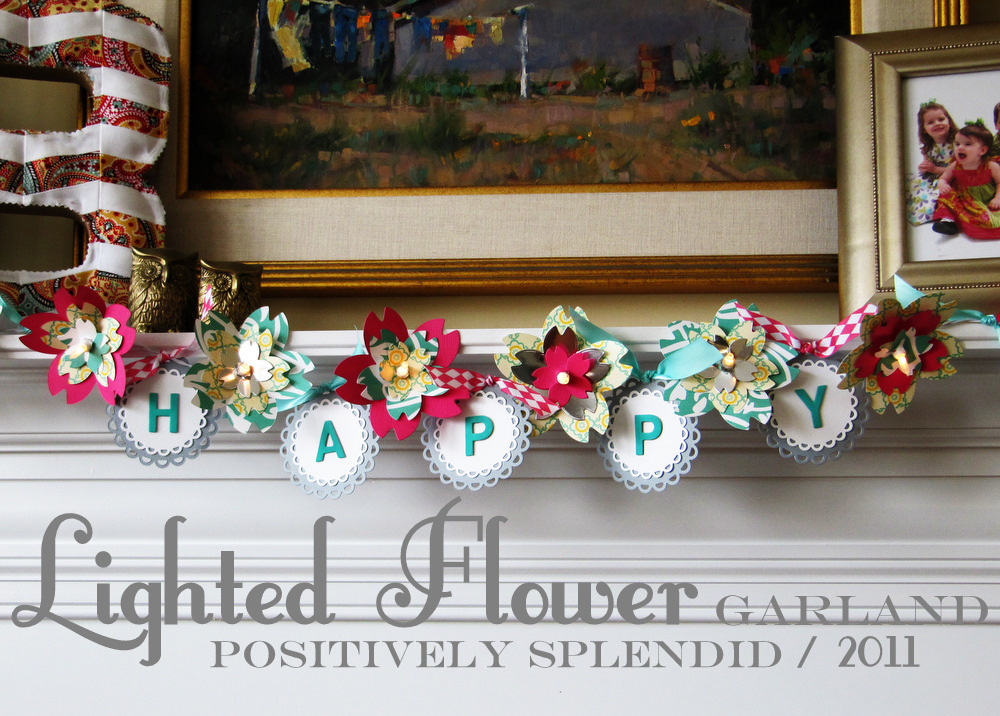
step 4 / Cut out scalloped circles in two descending sizes, one circle in each size for each letter of the sentiment you want your garland to display. Layer your smaller circles on top of your larger circles. Adhere each set together using your adhesive runner, and then place your letter stickers spelling out your desired message on each set, as shown. Cut 4-5″ lengths of ribbon, and thread a length through the top scallop of each circle. Use the ribbon to tie your circles to the wire of your strand of lights to spell out your sentiment or message. Tie other various pieces of ribbon to your garland to conceal any sections of visible wire from your light strand.
You are finished!

For some of the flower layers in my garland, I used silver metallic cardstock. I love the way those pieces reflect the light of the garland!

I am so excited to announce that all Positively Splendid readers are eligible for a 20% discount on Lifestyle Crafts products when you shop on their site, simply by entering the code
SPLENDID
at checkout! The products I used today are just some of the many marvelous goodies they have available, and at 20% off, they are a terrific value!

I hope everyone’s week is off to a marvelous start!

Photobucket

Linking this to…
Skip to My Lou
Home Stories A to Z
Today’s Creative Blog
Tip Junkie
Blue Cricket Design
Somewhat Simple
Tatertots and Jello

Amy @ Positively Splendid

Having grown up in a home brimming with sewing notions and paintbrushes, Amy has a deep love for all things creative. On any given day, you’ll find her knee-deep in her latest creative endeavor, with projects ranging from sewing and crafts to home decor and kid-friendly ideas. Amy believes that everyone, regardless of skill level or experience, possesses the ability to create something beautiful, and Positively Splendid was born of her passion for helping others harness their innate creative potential.

EVEN MORE GREAT IDEAS JUST FOR YOU!

FacebookTweetPinYummlyPrint

Filed Under: Crafts, Home Decor Crafts, Home Decor Crafts, Paper Crafts, Positively Handmade, Positively Home & Garden, Tutorials Tagged With: Birthday, Epic Letterpress, Lifestyle Crafts, Paper Crafts, Party Planning

Previous Post: « Saturday Seven (No. 18)
Next Post: Peach Dumpling Recipe »

Reader Interactions

Comments

  1. Amanda says

    July 18, 2011 at 11:43 am

    This is one of the best things I have seen in ages, love it! Thinking this would look great as a Christmas decoration, thanks for sharing!

  2. Leasa says

    July 18, 2011 at 1:45 pm

    So very cute. I love this idea and for those people that don’t have the Epic die cutter they could use their Cricut or Silhouette. Again so cute!

  3. Kelli @ RTSM says

    July 18, 2011 at 2:19 pm

    What a fun project Amy! And happy belated birthday:) How does it feel to be 30?!?

  4. Amanda @ Serenity Now says

    July 18, 2011 at 2:24 pm

    That is so pretty! 🙂 Love the card stock. What a cool project!

  5. June Scott says

    July 18, 2011 at 2:31 pm

    Happy Birthday! love the garland, great idea to use the lights… I like that this could be done by hand for those of us who don’t have the fancy “epic”! Thanks for the inspiration, Amy!

  6. Cindy Rippe says

    July 18, 2011 at 2:43 pm

    Love the bright colors and the idea of lighting the garland!

  7. alimoll says

    July 18, 2011 at 6:32 pm

    I love it Amy! Super cute!

  8. Kara says

    July 18, 2011 at 7:25 pm

    This is such an awesome idea Amy! I’m thinking it would also be fun with poinsettias for Christmas. You are amazing!

  9. Char @ Crap I've Made says

    July 18, 2011 at 8:07 pm

    You got WAY cooler dies than me!

  10. Michele {The Scrap Shoppe} says

    July 18, 2011 at 10:09 pm

    Such a cute and fun idea! And how wonderful to have a grouping of birthdays until the end of the year. 🙂

  11. Amanda K @ Every Creative Endeavor says

    July 18, 2011 at 10:29 pm

    What a fun idea! I love the lights! I agree with a previous posted and love the idea for Christmas!

  12. Finding Charm says

    July 18, 2011 at 11:56 pm

    What a great idea! I pinned it on Pinterest

  13. lili dAix says

    July 19, 2011 at 3:33 pm

    Très bon anniversaire ! et j’adore cette guirlande !

  14. Q @ JAQS says

    July 25, 2011 at 6:04 pm

    OOO pretty. Nice tool too.

    BTW I’m hosting a 12 FAT quarter Fabric Giveaway. Come by and check it out when you get a chance 🙂

    Q @ http://www.jaqsstudio.com/

  15. mary kathryn @ mathews family happenings says

    July 26, 2011 at 3:09 am

    what a beautiful garland! And totally ‘doable’ even if you don’t have fancy cutters…haha. Thanks so much for sharing how you made this. I’m visiting from Tip Junkie-

  16. Maggie says

    July 26, 2011 at 7:21 am

    I’m inviting you to add this to our linking party at
    http://www.passionatelyartistic.com/2011/07/american-pickers-with-linking-party.html
    Have a great weekend,
    Maggie

  17. Leslie says

    July 27, 2011 at 3:58 am

    Love this…it’s so pretty and fun! I bet I could do that with my Silhouette! Thanks for the great inspiration!

  18. Rosana Garcia Hess says

    July 29, 2011 at 2:45 am

    awesome…I´ll feature on my blog. Hope you don´t mind
    hugs from Brazil

  19. Amanda K @ Every Creative Endeavor says

    July 29, 2011 at 7:08 pm

    I am featuring this today because I love it so dang much!

  20. Sommer says

    July 30, 2011 at 3:31 pm

    Oh Em Gee! That is impressive! I would just love to feature this next week. Please come link up to my party this weekend @ http://designergarden.blogspot.com/2011/07/vip-party-21.html

  21. Jamie says

    August 1, 2011 at 3:13 am

    Those are amazing. I have a party every Monday. I would love for you to stop by and link up your lights and any other projects you would like to share. http://diyhshp.blogspot.com/

  22. The Autocrat: Haley says

    August 1, 2011 at 6:58 pm

    Wow! That is AMAZING! You did an outstanding job!

  23. angie @ the cellar door stories says

    August 4, 2011 at 11:50 pm

    i LOVE this! featuring it on my friday favorites tomorrow!

  24. Crystal says

    January 10, 2012 at 7:58 pm

    Oooooooooooooooooooooooh my gosh this is GORGEOUS!! LOVE LOVE LOVE IT! Saw it at the end of your post today and just had to go hunting the tutorial! Thanks for sharing!!

Primary Sidebar

PS Search

Search this website

Seasonal Inspiration

Hocus Pocus Wreath
Ghost Plushies
Paper Pumpkins
Fabric Yo-Yo Pumpkins

Copyright © 2025 · Positively Splendid · All Rights Reserved. · Privacy Policy

Privacy & Cookies: This site uses cookies and other tracking technologies to assist with navigation and your ability to provide feedback, analyse your use of our products and services, assist with our promotional and marketing efforts, and provide content from third parties. To find out more, as well as how to remove or block these, see here: Our Cookie/Privacy Policy