• Skip to primary navigation
  • Skip to main content
  • Skip to primary sidebar

Positively Splendid {Crafts, Sewing, Recipes and Home Decor}

Handcrafted. Splendidly.

  • Home
  • Blog
  • + Handmade
    • Crafts
      • Craft Gift Ideas
      • Holiday Crafts
      • Home Decor Crafts
      • Kids’ Crafts
      • Paper Crafts
      • Quick and Easy Crafts
      • Wearable Crafts
      • Wreaths
    • Gift Ideas
      • Budget-Friendly Gifts
      • Gift Wrapping
      • Gifts for Dads and Grandpas
      • Gifts for Kids
      • Gifts for Men
      • Gifts for Moms and Grandmas
      • Gifts for Neighbors
      • Gifts for Sports Fans
      • Gifts for Teachers
      • Gifts for Women
      • Quick and Easy Gifts
    • Kid-Friendly Projects
    • Sewing
      • Sewing for Children
      • Sewing for Men
      • Sewing for the Home
      • Sewing for Women
      • Sewing Techniques
      • Sewn Accessories
      • Sewn Gifts
  • + Home & Garden
    • DIY Home Decor Projects
    • Helpful Tips
    • Home Decor Crafts
    • DIY
    • Home Tour
    • Mantels and Tablescapes
    • Organization
    • Outdoor and Garden
  • + Holidays & Seasons
    • Spring
    • St. Patrick’s Day
    • Summer
    • Teacher Appreciation
    • Thanksgiving
    • Valentine’s Day
    • Winter
    • Back to School
    • Christmas
    • Easter
    • Fall
    • Fathers’ Day
    • Graduation
    • Halloween
    • Independence Day
    • Mothers’ Day
    • New Year’s
  • + Printables
  • + Recipes
    • Soups and Stews
    • Appetizers and Salads
    • Breads
    • Desserts
    • Food Crafts
    • Main Dish

DIY Painted Ceramic Tile Tutorial

August 30, 2011 By Amy @ Positively Splendid

FacebookTweetPinYummlyPrint

I absolutely love the vibrant colors found in authentic Mexican Talavera tile, and I have always wanted to find a way to replicate it myself.  I have never tackled a porcelain painting project like this one, primarily because I was always turned off by the high price of the ceramic paints intended for this purpose. As a crafter, I hate investing a fair amount in a product, knowing it will only be able to put to one type of use. I prefer products that know how to multi-task as well as I do!

Enter the new Martha Stewart Crafts Decorative Paint Line by Plaid available now only at Michaels Craft Stores. These paints are incredible: with just one bottle, you can tackle just about any craft project your heart desires. Be the medium fabric, wood, plastic, metal or glass or porcelain, as I’m using here, these paints certainly earn their keep. I love that they can be used indoors or outdoors, and they are top-rack dishwasher safe! And with a color assortment that includes five different finishes (gloss, high gloss, glitter, metallic and pearl, which I’ve used here) in 160 gorgeous hues, you are certain to find just what you’re looking for to create the project you’ve envisioned.

I was recently sent a generous package of goodies from Plaid Crafts to take this new line of Marta Stewart Paint products out for a spin. Be still my crafting heart!!

Just look at those colors, and all of those fabulous tools! I can’t wait to try everything in this arsenal out. The fabric medium and spray painting system (turn any bottle of this paint into spray paint – so cool!) are two of my personal favorites. It was so hard to narrow down which goodies to try first!

For this project, I used the following:

Martha Stewart Crafts™ 2oz Multi-Surface Pearl Acrylic Craft Paint
Martha Stewart Crafts™ Cathedral Lace Laser-Cut Stencils
Martha Stewart Crafts™ Foam Pouncers Set – 6pc
Adhesive Spray
White 4-inch Porcelain Tiles (just 16 cents apiece at Lowe’s!)

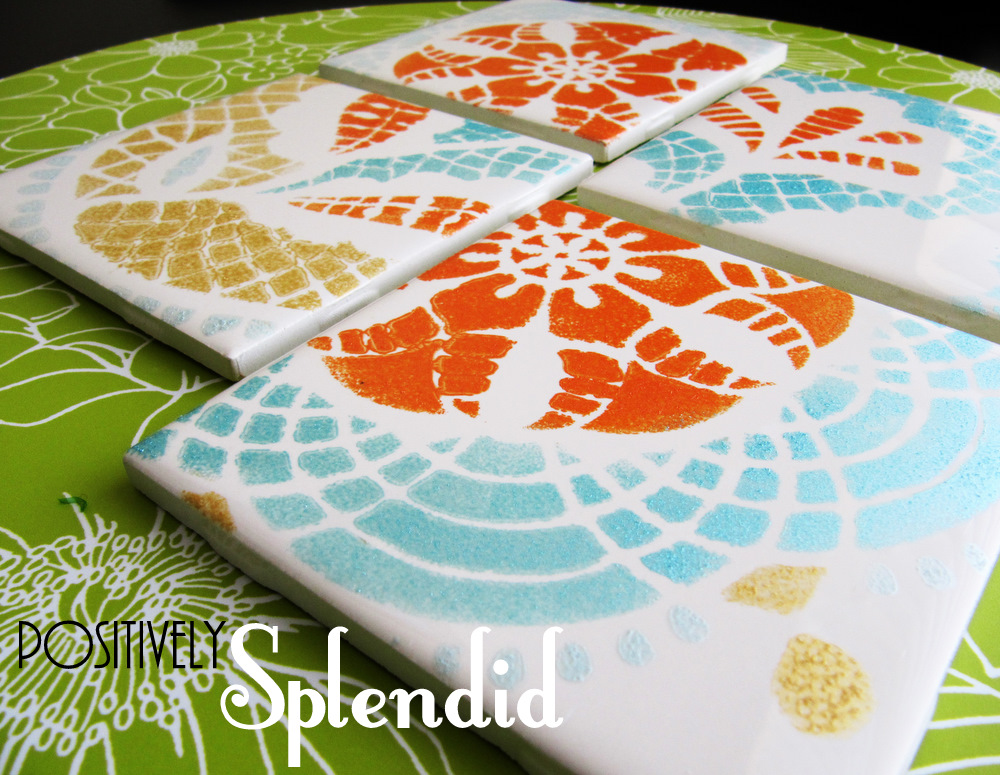
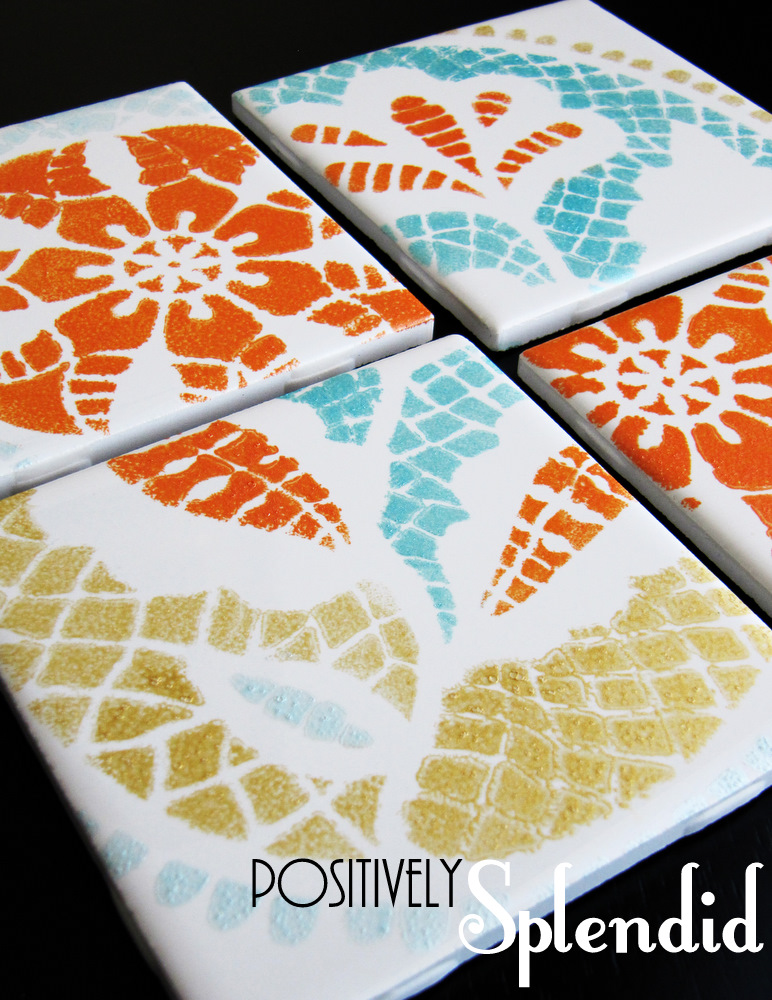
To embellish my tiles, I simply sprayed the back of my stencil with some spray adhesive to hold it in place as I applied the paint with the foam pouncers. I used a variety of colors here: orange, silvery blue, aqua and gold. I wanted these tiles to have a fallish feel.

Once I finished applying my paint, I removed my stencils while the paint was still wet. I placed each of my tiles onto a baking sheet in a 350-degree oven for 30 minutes, and then turned the oven off, leaving the tiles in the oven to cool. 

My tiles are now ready to serve any number of purposes, but I really love the idea of coating them with a layer of polyacrylic and adhering a square of felt on the bottom of each one to make a lovely set of coasters. Another terrific stocking stuffer idea!

Thanks so much for stopping by today!

Photobucket

Full post disclosure here.

Linking this to…
Somewhat Simple
The Shabby Creek Cottage
Tip Junkie
Today’s Creative Blog
Tatertots and Jello

Amy @ Positively Splendid

Having grown up in a home brimming with sewing notions and paintbrushes, Amy has a deep love for all things creative. On any given day, you’ll find her knee-deep in her latest creative endeavor, with projects ranging from sewing and crafts to home decor and kid-friendly ideas. Amy believes that everyone, regardless of skill level or experience, possesses the ability to create something beautiful, and Positively Splendid was born of her passion for helping others harness their innate creative potential.

EVEN MORE GREAT IDEAS JUST FOR YOU!

FacebookTweetPinYummlyPrint

Filed Under: Crafts, Gift Ideas, Home Decor Crafts, Home Decor Crafts, Positively Handmade, Positively Home & Garden, Tutorials Tagged With: Painting

Previous Post: « Pleated Wrist Cuff Tutorial
Next Post: Next Post »

Reader Interactions

Comments

  1. Amanda @ Serenity Now says

    August 30, 2011 at 4:24 pm

    Those are adorable, Amy. Love the orange. Did the spray adhesive come off the back of the stencils easily? When I worked on my project, I was too scared to use spray adhesive b/c I didn’t know how well it would wash off and didn’t want a pile of sticky stencils. Great work!

  2. Jen @ My Own Road says

    August 30, 2011 at 4:31 pm

    So jealous of your prize bundle!! Martha – you can send stuff my way anytime you want to 😉 Love the coasters!

  3. Miss Kitty says

    August 30, 2011 at 4:32 pm

    Those paints look amazing. I just got a 40% off coupon for Martha’s paint at Michaels…I think I’ll go today and try some myself. Thanks so much for sharing your experience with the new paints.

  4. Alicia says

    August 30, 2011 at 4:35 pm

    Great project! Easy gift idea too! Personalizing them for each friend! Love it!

  5. Suzie says

    August 30, 2011 at 4:47 pm

    just curious…are the paints food safe?

  6. Meggan of Lila Grace says

    August 30, 2011 at 5:38 pm

    So pretty!! Love the colors!

  7. Katie says

    August 30, 2011 at 5:56 pm

    I love the stencil and colors you used! I can just imagine making an amazing unique back splash!

  8. Steph says

    August 31, 2011 at 6:25 pm

    Oh what gorgeous colors! And I love how you used parts of the stencil designs on each tile. So creative!

  9. Honey at 2805 says

    September 1, 2011 at 2:03 am

    Your painted tiles are positively splendid!!

    Hope you will bring one of your projects or posts to my Potpourri Friday Party. Link up begins Thursday afternoon. Your participation will help make it a success!

  10. Sara says

    September 1, 2011 at 2:10 am

    Oh my how creative!! Would LOVE it if you would link this up at my turquoise lovin’ party going on right now!! 😉 http://www.sweetlittlegals.com

  11. Tara says

    September 1, 2011 at 12:37 pm

    Those are so cute! I’ve always wanted to try something like this. Thanks for sharing!!

  12. bailey k. says

    September 1, 2011 at 2:49 pm

    gorgeous! thanks for sharing!

  13. Nellene says

    September 1, 2011 at 9:59 pm

    Love your color choices!! Since your posted method requires baking, do you know of another method to paint already installed tiles? How cool to do this to spruce up an old bathroom you can’t afford to demo at the moment…

  14. Mod Podge Amy says

    September 5, 2011 at 1:55 am

    Beautiful color choices! These are awesome.

  15. Rachel says

    September 5, 2011 at 3:01 am

    Gorgeous! I LOVE the design and colors. I would love it if you would stop by and share at the crafty link party going on right now at Lines Across My Face.
    I hope to see you soon,
    Rachel
    http://linesacrossmyface.blogspot.com/2011/09/cure-for-common-monday-7.html

  16. Sara @ Mom Endeavors says

    September 5, 2011 at 3:53 am

    Love this! These would make such great presents! I bet the kiddos would love making something like this for grandparents.
    As Amanda asked, I’m curious about the adhesive spray too! I was nervous to use it on my project. Did it come off the stencils?

  17. betweenarockandahobby says

    September 6, 2011 at 1:44 am

    I want to run to my nearest ReStore and buy some plain tiles and make my own right now! These are great!

  18. Evie says

    September 6, 2011 at 2:02 pm

    So pretty…looks like a really fun project! And what sweet bundle of supplies you were given!!

    evie @ brown paper packages

  19. stinababy says

    September 6, 2011 at 3:16 pm

    WOW!! I saw the Martha Stewart product line at our Michael’s yesterday and was impressed with the selection of colors and other products she had. Now that I’ve seen your creative art I will be heading back to Michael’s to pick up some of Martha’s paints. Thanks for sharing your project with us.

  20. Katie says

    September 8, 2011 at 1:36 am

    This. Is. Genius! I can’t wait to make all kinds of gifts with these! So creative!!

  21. Lowri says

    September 8, 2011 at 7:13 am

    These look fantastic and thanks for the great tutorial!

    Thanks for sharing
    Lowri 🙂
    http://papervinenz.blogspot.com/

  22. paige says

    September 16, 2011 at 4:17 am

    Wow! These tiles are really beautiful! I think they would be perfect for my brand new linky party!

    Creative Genius @ http://www.thecreativepaige.com!

  23. Jenelle says

    September 19, 2011 at 6:06 am

    I am a new follower and couldn’t wait to start this project! a friend and I spent 3 hrs doing these tonight! it was so fun! check out our final products! =) http://jenelle127.blogspot.com/ thanks for posting!

  24. Erin {Lavender and Lemon Drops} says

    September 22, 2011 at 8:08 am

    Cute Cute! I love the colors you used 🙂

  25. Pattie says

    July 27, 2012 at 3:06 pm

    Do you think that these products will work for bland tiles surrounding a fireplace? I will not be able to put them in the oven!

  26. Sabrina says

    July 24, 2013 at 6:37 am

    You can not imagine how happy i am to see that you’ve posted this! Maybe i’m just not searching properly, but this was the only place where i could find out how to paint my own (premade) tiles. All of the other sites only told me how to do it from scratch!
    Sooo THANK YOU!

Primary Sidebar

PS Search

Search this website

Seasonal Inspiration

Hocus Pocus Wreath
Ghost Plushies
Paper Pumpkins
Fabric Yo-Yo Pumpkins

Copyright © 2025 · Positively Splendid · All Rights Reserved. · Privacy Policy

Privacy & Cookies: This site uses cookies and other tracking technologies to assist with navigation and your ability to provide feedback, analyse your use of our products and services, assist with our promotional and marketing efforts, and provide content from third parties. To find out more, as well as how to remove or block these, see here: Our Cookie/Privacy Policy