• Skip to primary navigation
  • Skip to main content
  • Skip to primary sidebar

Positively Splendid {Crafts, Sewing, Recipes and Home Decor}

Handcrafted. Splendidly.

  • Home
  • Blog
  • + Handmade
    • Crafts
      • Craft Gift Ideas
      • Holiday Crafts
      • Home Decor Crafts
      • Kids’ Crafts
      • Paper Crafts
      • Quick and Easy Crafts
      • Wearable Crafts
      • Wreaths
    • Gift Ideas
      • Budget-Friendly Gifts
      • Gift Wrapping
      • Gifts for Dads and Grandpas
      • Gifts for Kids
      • Gifts for Men
      • Gifts for Moms and Grandmas
      • Gifts for Neighbors
      • Gifts for Sports Fans
      • Gifts for Teachers
      • Gifts for Women
      • Quick and Easy Gifts
    • Kid-Friendly Projects
    • Sewing
      • Sewing for Children
      • Sewing for Men
      • Sewing for the Home
      • Sewing for Women
      • Sewing Techniques
      • Sewn Accessories
      • Sewn Gifts
  • + Home & Garden
    • DIY Home Decor Projects
    • Helpful Tips
    • Home Decor Crafts
    • DIY
    • Home Tour
    • Mantels and Tablescapes
    • Organization
    • Outdoor and Garden
  • + Holidays & Seasons
    • Spring
    • St. Patrick’s Day
    • Summer
    • Teacher Appreciation
    • Thanksgiving
    • Valentine’s Day
    • Winter
    • Back to School
    • Christmas
    • Easter
    • Fall
    • Fathers’ Day
    • Graduation
    • Halloween
    • Independence Day
    • Mothers’ Day
    • New Year’s
  • + Printables
  • + Recipes
    • Soups and Stews
    • Appetizers and Salads
    • Breads
    • Desserts
    • Food Crafts
    • Main Dish

Building a Raised-Bed Garden

February 27, 2012 By Amy @ Positively Splendid

FacebookTweetPinYummlyPrint

Great information for anyone wanting to try out raised-bed gardening. Tips for building, budgeting, planting and more!
In January, I shared my 12 major DIY goals for 2012, with a different project designated for each month of the year. So far, things are going great! I shared earlier this month the Hallway Command Center I created to fulfill my February goal (a board and batten hallway), and this weekend, the fam and I wrapped up the construction portion of my March goal, a raised vegetable garden. It feels so good to be ahead of schedule!
Confession time: I have never had any success with gardening. My husband loves to refer to my “black thumb,” and I have to admit that in the 8+ years we’ve been married, that has been a fairly apt description of my gardening prowess. This year, though, I am determined to do things right, and I have found so many incredibly helpful resources to help me along the way! Today I thought I’d pass along a few of the resources that I’ve found particularly helpful in the planning process.
The Construction Process
This tutorial from The Pioneer Woman was the springboard as we began to plan the construction of our beds. We did things slightly differently than is detailed in that tutorial, opting for 2×12’s in lieu of stacked 2×6’s, but overall, the basic process was the same. For each of our beds, we used #2 Southern Yellow Pine (avoid pressure-treated lumber here, as it is laden with chemicals that certainly don’t belong in one’s food supply) cut to the following dimensions:
(2) 2×12’s at 8 feet
(2) 2×12’s at 4 feet
This means our finished beds are 8 feet by 4 feet, which I hope is more than enough space to grow a garden sufficient for our family. If we discover after this summer that we need more space, we’ll build an additional bed (or two) next year. 
One thing we did that the tutorial linked above didn’t mention was to add 2 L-shaped brackets to each of the corners of our beds. This helped immensely in squaring up our boxes and making sure our they were nice and secure.

After the boxes were built, it was time to fill them with dirt! I used this calculator from Gardener’s Supply to figure out how much we would need. It takes a LOT! We opted to purchase our soil in bulk instead of buying bags, since it would’ve taken about eleventy thousand bags to do the job. We called our local nursery and placed our order, and they delivered it within a couple of hours. I imagine our neighbors thought we were totally bonkers when they drove by and saw this in our driveway:

But after a few hours of scooping, hauling and smoothing…

…this was our result! 

(Even Maggie the wonder Beagle was so proud, she had to pose for a picture. 😉
Our beds are now built, filled and ready to welcome their very first crop!
Planning Our Garden
Now that our beds are ready to go, we can get started on the fun part: planning exactly how to fill them! The Garden Planner section at Gardener’s Supply really is unrivaled in terms of its user-friendliness. You simply input the size of your garden, and the garden-building tool will let you pick and choose the different items you want to plant, telling you how much of each type of plant your garden can accommodate. Once you’ve chosen your plant types, the site automatically includes planting instructions for each type. 
Here is a mock-up I made of one of our beds using their system. With square-foot gardening techniques (read: one type of plant per square foot), it is incredible how much you can grow in a relatively small amount of space!

Even easier, you can choose their pre-planned gardens that do all of the planning and plotting for you. So handy!
Another great site I came across recently that I have yet to really explore at length is SproutRobot.com. I love the idea of being able to enter your zip code for personalized planting instructions delivered straight to your inbox!
The Bottom Line
I’ll be honest: This has not been an inexpensive endeavor. I am quickly discovering that building raised beds like this should be considered an investment that pays for itself over the course of two to three seasons and not immediately. 
 
Here’s a breakdown of what we’ve spent so far:
 
$100 for building supplies (Lumber, L brackets, stakes, screws, etc.)
$150 for 2.5 cubic yards of gardening soil and delivery
Time investment: 8+ hours of labor
It is possible that with some sleuthing, these supplies could be purchased at a smaller cost. Obviously, smaller beds will result in lower costs, based on the amount of supplies and dirt necessary. If you are thinking of building your own raised-bed garden, I encourage you to weigh all of your options and pick the best possible options for you!
***
Read more about our vegetable garden journey:

Amy @ Positively Splendid

Having grown up in a home brimming with sewing notions and paintbrushes, Amy has a deep love for all things creative. On any given day, you’ll find her knee-deep in her latest creative endeavor, with projects ranging from sewing and crafts to home decor and kid-friendly ideas. Amy believes that everyone, regardless of skill level or experience, possesses the ability to create something beautiful, and Positively Splendid was born of her passion for helping others harness their innate creative potential.

EVEN MORE GREAT IDEAS JUST FOR YOU!

FacebookTweetPinYummlyPrint

Filed Under: DIY, Outdoor and Garden, Positively Home & Garden, Positively Seasons, Spring Tagged With: Gardening

Previous Post: « Saturday Seven Party {No. 15}
Next Post: Vibrant Spring Mantel »

Reader Interactions

Comments

  1. Sharon says

    February 27, 2012 at 12:09 pm

    I love this! We was just talking about putting in a garden wiht our kiddos this spring too. I think it looks like a lot fun(and work ;))! I will have to show my hubby your raised garden,I would love to give this a try.

  2. Gardener's Supply says

    February 27, 2012 at 1:37 pm

    Glad to know our planner is helpful. It’s especially great to see that you get kids involved in the project.

    Here’s to a great harvest!

    -David Grist, Gardener’s Supply

  3. Jodie says

    February 27, 2012 at 3:49 pm

    I love my raised bed garden. I started some veggies and a couple of flowers with seeds this year. Hope they come up. It’s so fun to see the seeds starting to sprout. I bet your kids are going to love it.

  4. Knitmom5 says

    February 27, 2012 at 4:07 pm

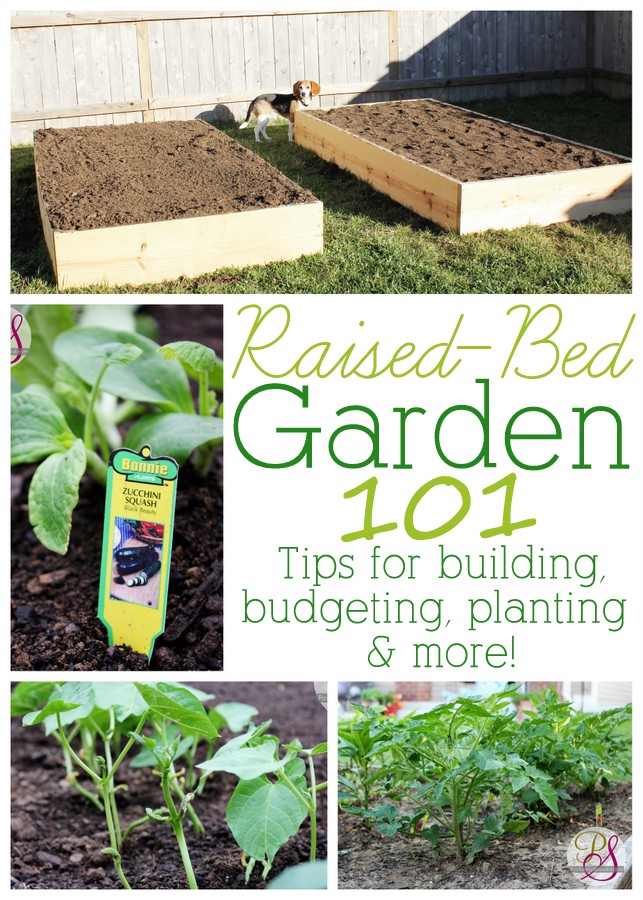
    Love this! However, I noticed you didn’t cover or remove the grass under the beds. Won’t the grass grow up into your veggies or will is just die?

  5. Amy @ Positively Splendid says

    February 27, 2012 at 5:42 pm

    @Knitmom5 – Good question! The first photo was taken just after the beds were built. Before we added the dirt, we removed as much grass as possible with our weed eater and a hoe.

  6. PicturePerfectPixies says

    February 28, 2012 at 12:02 am

    I have been square foot gardening for years. Just a quick suggestion add some peat and vermiculite to your dirt. It will make a world of difference.

    Thanks for the links I can’t wait to check them out.

  7. Christine says

    February 28, 2012 at 2:34 pm

    Ah, this is what my husband and I will be doing in a couple of weeks. My own Maggie the wonder beagle will be there to check it all out I’m sure. 🙂

  8. Nicole says

    February 28, 2012 at 6:07 pm

    I see you have peppers and chilis near each other. when I planted them in close proximity, I had spicy green peppers.
    not sure if it was just a fluke, but you may want to check on that .

  9. JKeener says

    April 1, 2012 at 1:06 pm

    I just got my bed started yesterday. Thank you for the links. I am looking forward to using the sproutrobot. I wish you the best of luck with your gardens! Hope you have a wonderful weekend, Jason.

  10. dave says

    March 20, 2014 at 10:15 am

    how long does the wood last since its not pressure treated?

    • Amy @ Positively Splendid says

      March 20, 2014 at 2:39 pm

      I am uncertain of exactly how long it will last, Dave, although I can attest that our garden held up very well for the two years we remained in the house (we have since moved). I would recommend consulting with a lumber specialist for a better estimate of what to expect. Thanks for stopping in!

  11. kim says

    April 15, 2014 at 12:44 pm

    Amy– thank you for this detailed tutorial. i just moved into a home with raised beds and was wondering where on Earth to begin. This is giving me hope. I have a black thumb too–and wake up happy to see my dog and child every day! 😉

    • Amy @ Positively Splendid says

      April 16, 2014 at 10:56 am

      So glad you have found this post helpful, Kim! Good luck with your garden!

Primary Sidebar

PS Search

Search this website

Seasonal Inspiration

Hocus Pocus Wreath
Ghost Plushies
Paper Pumpkins
Fabric Yo-Yo Pumpkins

Copyright © 2025 · Positively Splendid · All Rights Reserved. · Privacy Policy

Privacy & Cookies: This site uses cookies and other tracking technologies to assist with navigation and your ability to provide feedback, analyse your use of our products and services, assist with our promotional and marketing efforts, and provide content from third parties. To find out more, as well as how to remove or block these, see here: Our Cookie/Privacy Policy


Loading Comments...