• Skip to primary navigation
  • Skip to main content
  • Skip to primary sidebar

Positively Splendid {Crafts, Sewing, Recipes and Home Decor}

Handcrafted. Splendidly.

  • Home
  • Blog
  • + Handmade
    • Crafts
      • Craft Gift Ideas
      • Holiday Crafts
      • Home Decor Crafts
      • Kids’ Crafts
      • Paper Crafts
      • Quick and Easy Crafts
      • Wearable Crafts
      • Wreaths
    • Gift Ideas
      • Budget-Friendly Gifts
      • Gift Wrapping
      • Gifts for Dads and Grandpas
      • Gifts for Kids
      • Gifts for Men
      • Gifts for Moms and Grandmas
      • Gifts for Neighbors
      • Gifts for Sports Fans
      • Gifts for Teachers
      • Gifts for Women
      • Quick and Easy Gifts
    • Kid-Friendly Projects
    • Sewing
      • Sewing for Children
      • Sewing for Men
      • Sewing for the Home
      • Sewing for Women
      • Sewing Techniques
      • Sewn Accessories
      • Sewn Gifts
  • + Home & Garden
    • DIY Home Decor Projects
    • Helpful Tips
    • Home Decor Crafts
    • DIY
    • Home Tour
    • Mantels and Tablescapes
    • Organization
    • Outdoor and Garden
  • + Holidays & Seasons
    • Spring
    • St. Patrick’s Day
    • Summer
    • Teacher Appreciation
    • Thanksgiving
    • Valentine’s Day
    • Winter
    • Back to School
    • Christmas
    • Easter
    • Fall
    • Fathers’ Day
    • Graduation
    • Halloween
    • Independence Day
    • Mothers’ Day
    • New Year’s
  • + Printables
  • + Recipes
    • Soups and Stews
    • Appetizers and Salads
    • Breads
    • Desserts
    • Food Crafts
    • Main Dish

Spring Wreath Tutorial

March 19, 2012 By Amy @ Positively Splendid

FacebookTweetPinYummlyPrint

I absolutely love wreaths, and although I love a traditional flower motif for them, I also adore coming up with fresh wreath ideas that break from the typical mold. Walking through the aisles at Hobby Lobby a few weeks back, I found this fun paintable crafting foam called Smooth Foam in a variety of shapes and sizes, and I knew immediately that the ball shapes would be perfect for punching up a wreath for my front door. 


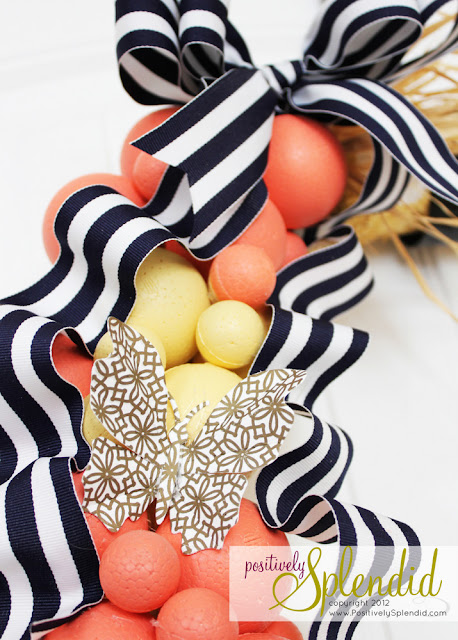
Instead of a cluster of flowers, I adhered a grouping of the foam balls to the front of the wreath. I love the dimension this adds, and even better: it was so easy to do! To further streamline the process for creating this wreath, I opted to paint the wreath form instead of covering it with fabric as I have in many of my past wreath projects. I love how the texture of the straw in the wreath shows through here!


Although this wreath might appear complicated to put together, it really is very straightforward to make. Let me show you how!

For this project, you will need…
A straw wreath form
Spray paint
Acrylic paint
Circle foam pouncers (or, alternatively, a sponge cut into a circle to use as a stamp)
Smooth Foam balls in assorted sizes
Toothpicks
An empty box
Hot glue
Ribbon 
Raffia (optional)
Additional embellishments (optonal)

To begin, spray your wreath form with a few light coats of your chosen color, and allow it to dry completely. When it is dry, use the circle pouncers or your circle stamp to apply your acrylic paint in a polka dot pattern to the front of your wreath, as shown.

Now, spray paint your ball shapes. To easily coat all sides of each one with the paint, prop each ball up on a toothpick stuck into your cardboard box, as shown. This will enable you to keep your hands paint-free! Allow the ball shapes to dry completely.


Now, fire up your hot glue gun. Arrange your foam balls as desired on the front of your wreath, adhering them with hot glue as you work. 


Finish everything with a bow and some tails of ribbon, and some sections of raffia, if desired. 

I also chose to add two butterflies I created using my Epic machine. I first used my blossoms printing plate to create a gold pattern on my paper before cutting out the butterflies with the same butterfly die that I used to make the butterfly ornaments for my the tree in my Easter vignette.


All finished!

Doesn’t this just exude SPRING?

This yellow, coral and navy combo is quickly becoming one of my favorites. I plan to use it for my entire front porch revamp!

If you enjoyed this post, I would love for you to add it to Pinterest! Do so easily by clicking on the link below.

Pin It


Have a great week, everyone!

Photobucket

Linking this to…
Skip to My Lou
Home Stories A to Z
Serenity Now
Tatertots and Jello
Oopsey Daisy
Creations by Kara
Every Creative Endeavor
Lolly Jane
Lil Luna
Centsational Girl

Amy @ Positively Splendid

Having grown up in a home brimming with sewing notions and paintbrushes, Amy has a deep love for all things creative. On any given day, you’ll find her knee-deep in her latest creative endeavor, with projects ranging from sewing and crafts to home decor and kid-friendly ideas. Amy believes that everyone, regardless of skill level or experience, possesses the ability to create something beautiful, and Positively Splendid was born of her passion for helping others harness their innate creative potential.

EVEN MORE GREAT IDEAS JUST FOR YOU!

FacebookTweetPinYummlyPrint

Filed Under: Crafts, DIY, Home Decor Crafts, Home Decor Crafts, Positively Home & Garden, Positively Seasons, Spring, Tutorials, Wreaths Tagged With: Wreaths

Previous Post: « 7 Inspiring SPRING Projects to Make!
Next Post: Chalkboard Playtime Door Hanger »

Reader Interactions

Comments

  1. Abbey D. says

    March 19, 2012 at 3:49 pm

    You always have the cutest projects, I swear. 🙂

  2. Bonnie @ Uncommon says

    March 19, 2012 at 4:06 pm

    Adorable Amy!! LOVE the polkadots! I have never seen a straw wreath painted and this is precious! You always have such cheerful crafts! thanks for sharing! 😉

  3. maddiesplace says

    March 19, 2012 at 5:18 pm

    If you start selling these. I would buy one. Adorable!

  4. twobutterflies says

    March 19, 2012 at 5:20 pm

    I love the idea of using the styrofoam balls – very cute!!

  5. Amanda @ Serenity Now says

    March 19, 2012 at 5:53 pm

    Trés cute! It’s like having 3 dimensional polka dots on your wreath. 🙂 I like the color combo too!

  6. Jennifer Curtis says

    March 19, 2012 at 7:29 pm

    This wreath is gorgeous! Love the colors!

  7. nest of posies says

    March 20, 2012 at 12:13 am

    those darn balls & that black & white stripe ribbon make this so adorable!

    so cute!!!

    xo
    kellie

  8. Two Shades of Pink says

    March 20, 2012 at 1:53 am

    Good Gracious Amy! You make everything so darn CUTE! What a fabulous, inspiring wreath! You even make the prep look pretty!

  9. Alison @ Oopsey Daisy says

    March 21, 2012 at 3:08 am

    Absolutely gorgeous Amy! I love how you made those polkadots!! XO

  10. Debbie {Visual Eye Candy} says

    March 21, 2012 at 2:19 pm

    Oh it’s so adorable. I think the polka dots are my favorite part!

  11. Tenille says

    March 21, 2012 at 2:41 pm

    I LOVE this wreath. The colors are amazing and the polka dots are so cute. Thanks for sharing. I would love it if you could link this up to our linky party going on right now. http://www.junkintheirtrunk.blogspot.com/2012/03/link-it-up-wednesday-21.html

  12. Michelle says

    March 22, 2012 at 6:48 am

    Love this wreath it is so cute, love the black and white ribbon with the bright colours!

  13. Dia Dean says

    March 22, 2012 at 12:16 pm

    Craft fancy 🙂

  14. Jennifer McCormick says

    March 22, 2012 at 7:27 pm

    This is absolutely adorable! I love the color scheme … I think the navy really grounds the pastels. Love it! 🙂

  15. MGal @ WatchMeDIY.com says

    March 22, 2012 at 8:27 pm

    I had to “pin” this! I am working on a navy and coral revamp of my living room and this just got me pumped again!

  16. Renewed Upon a Dream says

    March 22, 2012 at 11:09 pm

    Wow this is super pretty! I love the contrast between the navy & the rest of the colors. Love it!

  17. Kristin says

    March 22, 2012 at 11:43 pm

    Very nice! Love the touches of black and the use of balls instead of flowers. Stopping by from Every Creative Endeavor.

  18. thistlewoodfarm says

    March 24, 2012 at 12:15 am

    Visiting from Centsational Girl. Love the spring decor 🙂 That wreath is so cute, I would have never thought of adding the paint to the actual wreath. Brilliant.

    Have a blessed weekend.
    karianne

  19. Craftberry Bush says

    March 24, 2012 at 4:28 am

    I love that it’s so unique…the color combo is soooo beautiful and the polka dots…what can i say..its perfect…xo

  20. Chrissy says

    March 24, 2012 at 12:37 pm

    This is a beautiful wreath!

  21. Just Jaime says

    March 24, 2012 at 4:19 pm

    Love the colors and the bow!

    We’d love to have you join us at Wayward Weekend, our new link party, http://www.waywardgirlscrafts.com/2012/03/wayward-weekend-9.html if you’re interested =)

  22. Rachel {BubblyNatureCreations.com} says

    March 24, 2012 at 6:53 pm

    This is gorgeous!!! You pick the best color schemes!!! great job! I would love to have think linked up at the project party if you want to join: http://bubblynaturecreations.com/2012/03/project-party-weekend-and-striped-spoons-tutorial-link-up-your-projects-here.html
    I hope you can come! I am your newest follower and will be coming back soon! xoxo – Rachel @ BubblyNatureCreations.com

  23. Sewandthecity says

    March 24, 2012 at 7:56 pm

    This is simply stunning…love the colours.

  24. Lindy@Itsy Bitsy Paper says

    March 25, 2012 at 12:42 am

    This is just amazeballs! I absolutely love how creative and colorful it is. I hope you will link up to my Hippity Hop Easter Project Hop.

    http://www.itsybitsypaperblog.com/2012/03/hippity-hop-easter-project-hop.html

  25. Karah @ thespacebetweenblog says

    March 26, 2012 at 1:54 am

    Beautiful wreath!! I found it on pinterest and love the whole look. Thanks so much for the inspiration. 🙂
    Karah

  26. Navy Wifey Peters says

    March 26, 2012 at 6:51 pm

    Cute Wreath!

  27. Jessica Stoker says

    March 27, 2012 at 2:40 am

    This is really beautiful and inventive. I love the polka dots on the wreath and the foam balls. I would love if you would share this at our link party on Wed. WOW US link party: acoupleofcraftaddicts.blogspot.com

  28. Home-sewer says

    March 29, 2012 at 12:31 am

    Oh my goodness! This is so creative – and so spring-y. You should totally enter this into the craftbaby spring wreath contest: http://www.craftbaby.com/contests/5/spring-diy-wreath-sweeps

  29. Meeha Meeha says

    April 26, 2012 at 5:58 am

    Wow, it’s not everyday that I come across something so original and beautiful at the same time! Love the different size balls and their soft texture against the graphic ribbon! I’m pinning it and I’m also your newest follower – Love your style!

  30. Kim says

    July 10, 2012 at 2:42 pm

    I found your blog yesterday after Googling “wreath ideas.” I loved this one so much… I made a version of it for myself! Mine is turquoise and red. Thank you for the inspiration!

Primary Sidebar

PS Search

Search this website

Seasonal Inspiration

Hocus Pocus Wreath
Ghost Plushies
Paper Pumpkins
Fabric Yo-Yo Pumpkins

Copyright © 2025 · Positively Splendid · All Rights Reserved. · Privacy Policy

Privacy & Cookies: This site uses cookies and other tracking technologies to assist with navigation and your ability to provide feedback, analyse your use of our products and services, assist with our promotional and marketing efforts, and provide content from third parties. To find out more, as well as how to remove or block these, see here: Our Cookie/Privacy Policy