• Skip to primary navigation
  • Skip to main content
  • Skip to primary sidebar

Positively Splendid {Crafts, Sewing, Recipes and Home Decor}

Handcrafted. Splendidly.

  • Home
  • Blog
  • + Handmade
    • Crafts
      • Craft Gift Ideas
      • Holiday Crafts
      • Home Decor Crafts
      • Kids’ Crafts
      • Paper Crafts
      • Quick and Easy Crafts
      • Wearable Crafts
      • Wreaths
    • Gift Ideas
      • Budget-Friendly Gifts
      • Gift Wrapping
      • Gifts for Dads and Grandpas
      • Gifts for Kids
      • Gifts for Men
      • Gifts for Moms and Grandmas
      • Gifts for Neighbors
      • Gifts for Sports Fans
      • Gifts for Teachers
      • Gifts for Women
      • Quick and Easy Gifts
    • Kid-Friendly Projects
    • Sewing
      • Sewing for Children
      • Sewing for Men
      • Sewing for the Home
      • Sewing for Women
      • Sewing Techniques
      • Sewn Accessories
      • Sewn Gifts
  • + Home & Garden
    • DIY Home Decor Projects
    • Helpful Tips
    • Home Decor Crafts
    • DIY
    • Home Tour
    • Mantels and Tablescapes
    • Organization
    • Outdoor and Garden
  • + Holidays & Seasons
    • Spring
    • St. Patrick’s Day
    • Summer
    • Teacher Appreciation
    • Thanksgiving
    • Valentine’s Day
    • Winter
    • Back to School
    • Christmas
    • Easter
    • Fall
    • Fathers’ Day
    • Graduation
    • Halloween
    • Independence Day
    • Mothers’ Day
    • New Year’s
  • + Printables
  • + Recipes
    • Soups and Stews
    • Appetizers and Salads
    • Breads
    • Desserts
    • Food Crafts
    • Main Dish

5 Simple Tips to Improve Your Sewing

May 17, 2013 By Amy @ Positively Splendid

FacebookTweetPinYummlyPrint

What would you say if I told you my best sewing tips are some of the simplest? Today I’m sharing five simple techniques and tricks that will immediately improve the quality of your sewing projects and help you take your sewing to the next level!

5 Simple Tips to Improve Your Sewing :: PositivelySplendid.com
A comment I have been asked many times by PS readers is how to elevate a homemade sewn project from lackluster to fantastic. Aside from a few teaching opportunities here and there with my mom when she comes from out of state to visit, just about everything I know about sewing has come from trial and error, and over time, I have realized that it is often the simplest, smallest steps that can improve a sewn project’s appearance the most. Doing these five simple things over the course of each of your projects will have you well on your way to producing finished items that would look perfectly at home in the pages of your favorite magazines and catalogs!

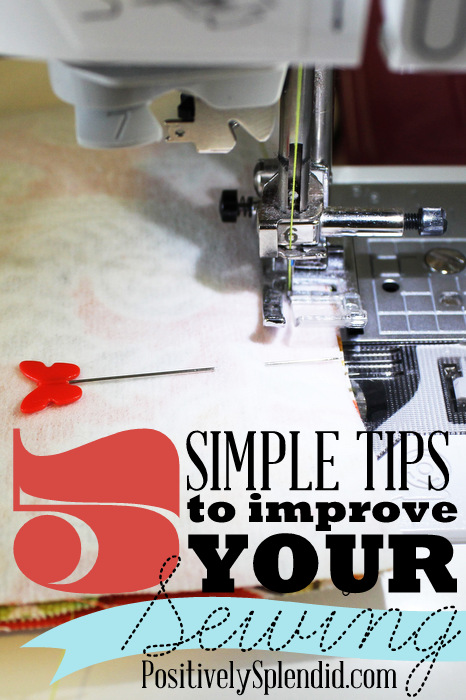
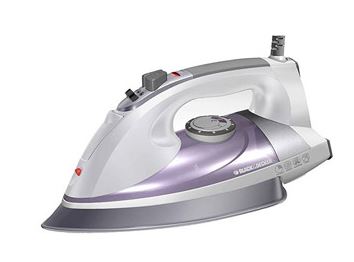
1. Always press as you go.

If you don’t take anything else from this article, I hope I can convince you not to skip this step. I have placed this at #1 because, more than anything else, neglecting to press your seams as you work through a project will take a potentially fabulous project and turn it into something frumpy. The time investment is minimal, but having crisp, sharp seams will elevate an otherwise ordinary project to a professional caliber.
 

To make it even easier to stick with this step, I saw an ingenious idea a couple of years back for placing an ironing board adjusted to waist-level perpendicular to your sewing space. That way, all you have to do is turn in your seat each time it’s time to press without having to get up and down a million times. Handy!
 

My current iron is a very basic model I purchased at Walmart, very similar to this one. I highly recommend never filling your iron with water, instead using a standard spray bottle for steam. This will greatly lengthen the life of your iron!
 

Black & Decker Iron

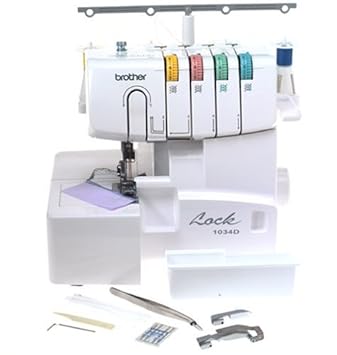
2. Finish your seams.

All of those raw seam edges will turn into a mangled, tangled mess in the wash unless you take time to finish them in some form or fashion. A serger works fabulously for this, but a wide zig-zag stitch or an overlock stitch on a regular machine also does the trick. I absolutely cringe at the projects I completed in years past when I neglected to do this. It is incredible how an extra 5 minutes of effort expended to finish those seams pays dividends considering how much better a garment will hold up over time!
 

I would urge any avid sewist to consider investing in a serger to go along with a standard sewing machine, even if that means saving and budgeting to do so. I have had mine for a couple of years now, and I absolutely couldn’t live without it! My serger is the Brother 1034D, a very basic machine, but I have been very impressed with its functionality and ease of use.
 

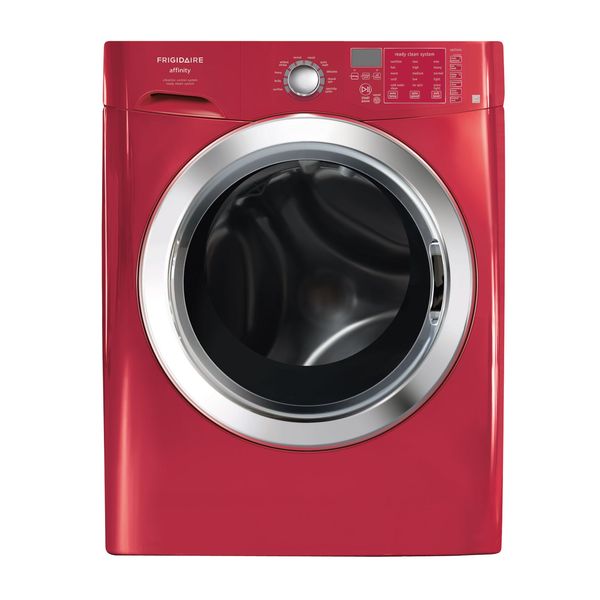
3. Pre-wash your fabrics for items that will be laundered.

Have you ever finished a wearable project you love, only to wash it once and discover that it just doesn’t fit quite right anymore? Chances are that you neglected to pre-wash your fabrics, resulting in shrinkage that alters the entire look of the finished garment. Pre-washing fabrics ensures that any shrinkage will occur before your garment is constructed, so you will never have to worry about this issue again. This is particularly important when you are combining fabrics from different manufacturers or even different collections from the same manufacturer, as the fabric content can vary so much from one fabric to the next, and stitching the different unwashed fabrics together can cause those seams to pucker once they are washed.
Be sure to take into account the temperature settings recommended by the fabric manufacturer before laundering your fabric. And when it doubt, instead of drying your fabric in your clothes dryer, lay it flat to dry. Fabrics hold up much longer this way!
If you’re like me and crave the crisp feel of unwashed fabrics as you sew, I recommend spraying the fabric lightly with spray starch as you press it after it’s come out of the wash.

4. Use the right needle.

All needles are not created equal. There are dozens of different needle sizes and shapes, with specialty needles available for just about any project you can imagine. There are standard, all-purpose sharp needles, of course, which will usually do the trick for run-of-the-mill garment and home dec sewing. But anyone who has ever attempted to sew two particularly heavy fabrics and broken a needle in the process can attest that sometimes a specialty needle is necessary. Aside from preventing needle breakage, using the right needle for a project will allow the needle to glide through the fabric easily, preventing seam puckering and fabric damage. 
 

Some of my favorite specialty needles:

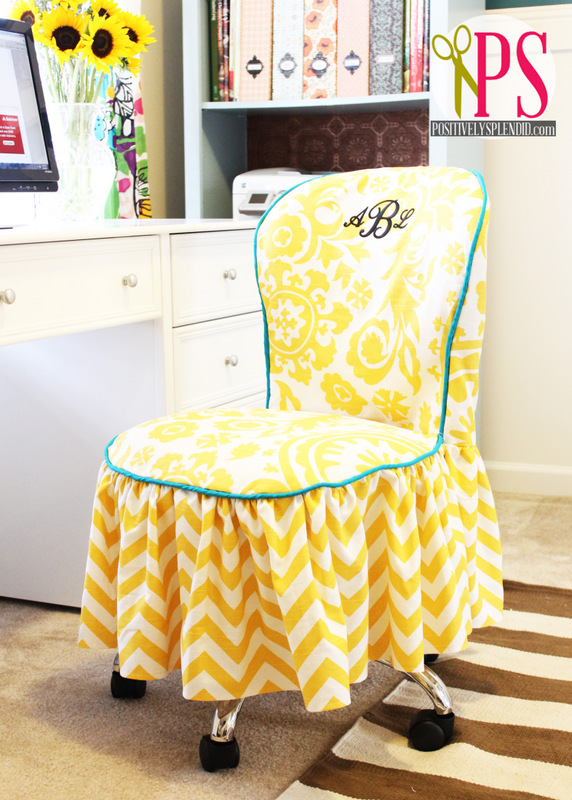
  • Denim/Jeans sewing needles will save you immense frustration when sewing through multiple layers of heavy fabrics like canvas. Remember the slipcover I stitched for my sewing room chair? A denim needle was crucial for that project, as I was sewing through many layers of home dec fabric, plus the piping I inserted in some of the seams.


  • When doing marine vinyl applique on pillows, I couldn’t live without leather needles. The pointed end of these needles is essentially like a little knife of sorts, cutting cleanly and easily through the thickness of the vinyl as you sew. This is the type of needle I used for my monogram pillow covers for my front porch last summer.


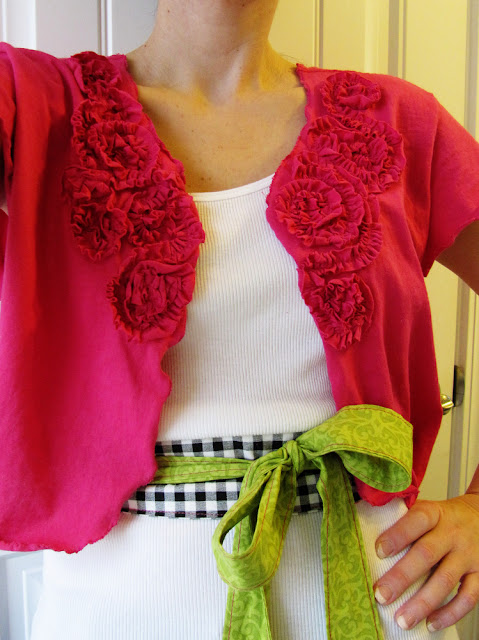
  • When doing t-shirt upcyles like my Ruffled Bolero, ball-point needles are a must, as they prevent runs and damage when sewing jersey knits. The rounded tip of these needles separate the fibers of the knit as you sew without cutting any of the fibers. It is incredibly important, however, to always switch out your ball-point needle for a regular sharp needle when sewing woven fabrics, as ball-point needles can snag and damage these fabrics.

I only use Schmetz needles when I sew. The Schmetz site has a great page detailing all of the different needles they offer.
 

Another needle tip: always start each project with a fresh, new needle. Even if they aren’t broken, needles become dulled and blunted over time by general wear and tear. Using an old needle will result in stitches that aren’t nearly as clean or crisp as they are with a new, undamaged and unworn one. 

5. Clean and maintain your machine.

At Christmas, I was indescribably frustrated when every single one of the gifts I sewed for friends and family was plagued with a tangled mess on the underside of my sewn stitches. I as at a total loss as to why my bobbin thread kept tangling so miserably as I sewed until my sweet mom came to visit the following month and gently inquired how long it had been since I cleaned my machine. Suffice it to say, it had been way too long!
 

As it turned out, the reason for the tangled bobbins threads was a ball of lint that had built up underneath the bobbin case inside my machine. All it took was removing the lint and giving everything a thorough detailing to get my machine back up and running again.
 

I am asked very frequently which type of sewing machine I use. My machine is one I inherited from my mom two years ago, a Brother SE-350.
Brother SE350

I hope you’re inspired to see that just minor changes can make a big difference in the outcome of your sewing projects!

What are your best sewing tips? I would love for you to share!


Amy @ Positively Splendid

Having grown up in a home brimming with sewing notions and paintbrushes, Amy has a deep love for all things creative. On any given day, you’ll find her knee-deep in her latest creative endeavor, with projects ranging from sewing and crafts to home decor and kid-friendly ideas. Amy believes that everyone, regardless of skill level or experience, possesses the ability to create something beautiful, and Positively Splendid was born of her passion for helping others harness their innate creative potential.

EVEN MORE GREAT IDEAS JUST FOR YOU!

FacebookTweetPinYummlyPrint

Filed Under: Crafts, Sewing, Sewing Techniques Tagged With: Sewing, Tips

Previous Post: « Felt Toddler Travel Board
Next Post: Scalloped Sunglasses Case Sewing Pattern & Tutorial »

Reader Interactions

Comments

  1. Gwen says

    May 17, 2013 at 7:37 am

    I was all good until I got down to the last one! I have GOT to get my machine serviced… yikes!

    Great tips!

    • Kristin says

      May 17, 2013 at 9:25 am

      I thought the same thing! I keep getting the bobbin mess too, but kept thinking my tension was out of whack.

    • Loretta Davis says

      May 17, 2013 at 10:16 am

      I have read your complete “Sewing Tips” and as great all of them are- I already do all of them!! I am feeling great about that! Keeping my machine is a must and I do this quite often. With all the items I sew -one right after the other-I must have a clean machine.
      I make my own patterns and I sew them all up and they turn out very well. I create Barbie and Ken outfits so give my website a look and let me know what you think. When I get a reply from all I write to it makes me very happy.
      I have been sewing since age 12 and I am now 73. I have been retired for 15 years due to my health. Many problems. I needed something worthwhile to do in my retirement and deciding on making these tiny outfits came from a granddaughter who absolutely HAD to have them. (ha ha) So in 1991 we created Chaloracrafts. My husband made my website and he works on and fixes computers. So we both have home jobs that are very satisfing to us. When you get older you must keep your brain thinking, your body doing things and you will find serenity in it all.
      Thank you for the Sewing tips.

  2. Michele @ The Scrap Shoppe says

    May 17, 2013 at 8:36 am

    Thanks for these tips, Amy!! I will take any sewing advice I can get. 🙂

  3. Dana says

    May 17, 2013 at 8:48 am

    Great tips!
    I am just beginning to sew clothing. One tip with needles: I often sew sheets of fused plastic together for shopping totes and I’ve found that even though the instinct is to use a denim needle to sew such thick/strong “fabric”, it is actually easier to use a standard needle as the thinner point zips right through the plastic layers.
    Testing out a particular needle for a brand new project is a great idea.

  4. sondra says

    May 17, 2013 at 9:46 am

    Love the tips! I so agree with them all! I am a little out of practice in sewing. This was a great reminder for me! ( And, maybe some incentive to start sewing again soon!) Thanks!

  5. Amanda says

    May 17, 2013 at 9:50 am

    Thanks so much for these tips! I’m a new sewer, so I’m looking for all the help I can get!

    Amanda @ Running In Heels
    amandarollo.blogspot.com

  6. Amber says

    May 17, 2013 at 10:28 am

    Hey these tips are great, however I wanted to let you know that the pop out you have on the right side covered everything on the right side of the post (and this comment) so I had a hard time reading it.

  7. Ashley says

    May 17, 2013 at 11:37 am

    Great tips! I agree pressing should never be skipped, as much as I hate that part and would rather get to the sewing it results in way less ripped seams!

  8. Midsommarflicka says

    May 17, 2013 at 4:13 pm

    Thanks for these tips!
    They are really helpful, as I’m just starting and getting more and more into sewing. I just finished my first bunting, which was as well one of my first real projects on the sewing machine… Right now I’m still struggling with sewing straight lines, but in the (hopefully near!) future, your tips will be great!

    Love, Midsommarflicka

  9. Shirley says

    May 17, 2013 at 4:55 pm

    Great tips! I tried to pin this but when your pins came up I didn’t see this. I admit I just started to Pin and not sure what I am doing. Thanks

    • Shirley says

      May 17, 2013 at 5:16 pm

      OOPS! I think I figured it out. Thanks

  10. Crystal says

    May 17, 2013 at 8:00 pm

    Great tips!! Thanks so much!!

  11. Stephanie says

    May 17, 2013 at 8:08 pm

    Great tips!! I’m not much of a clothing sewer, I just make quilts. Pressing seams is very important! I have also learned that I have to clean out my bobbin case on my machine every time I change my bobbin. It’s a great habit to have.

  12. Bonnie says

    May 17, 2013 at 8:30 pm

    I am a sewing teacher and I can not stress how important these are. One more to add to your list. Take the time to make sure you have placed pattern pieces with the straight grain, the line with the arrow needs to be parallel to the selvedge. This prevents a lot of unwanted stretching and deformity as you sew. Great to see more people learning to sew and making quality projects.

    • Amy @ Positively Splendid says

      May 19, 2013 at 12:41 pm

      Thanks for the tip, Bonnie! It is so true what a difference it makes when pieces are cut out properly! That extra bit of effort pays off in spades.

  13. Mikaela says

    May 17, 2013 at 9:20 pm

    What do you mean finish seams? I’m 21, 6 1/2 months pregnant with a little girl and I’m new at sewing. 🙂

    • Amy @ Positively Splendid says

      May 19, 2013 at 12:41 pm

      Hi, Mikaela! That is a great question. Finishing seams means that once you are finished sewing two pieces of fabric together, you will do something to finish those raw edges in the seam allowance so that they don’t unravel with general wear and tear. To see what I mean, grab a t-shirt from your closet and fold it inside out. See how all of the inner edges have been finished with stitching along the edge? Most store-bought projects are finished with a serger, which creates the overlock stitch you find in ready-made items. (Many home sewists have sergers, too.) You can also finish seams with a wide zig-zag stitch on a regular machine, or even a pair of pinking shears. I hope this helps!

  14. Jannes says

    May 18, 2013 at 9:05 pm

    One tip for sewing a straight line and having the same seam allowance around your pattern is to trace your pattern or free hand with two pens or pencils rubberbanded together!

  15. kirstin @ kojo says

    May 19, 2013 at 3:53 pm

    I love these, friend! Great tips!

  16. Ruth Simpson says

    May 19, 2013 at 7:35 pm

    Great tips! I am just starting to sew and I always skip ironing. I see now in my projects why that is a bad idea. Thanks!

    • Amy @ Positively Splendid says

      May 21, 2013 at 9:26 am

      You’re very welcome, Ruth!

  17. nicia says

    May 19, 2013 at 10:23 pm

    Good advice!

    • Amy @ Positively Splendid says

      May 21, 2013 at 9:26 am

      Thanks so much!

  18. Celeste says

    May 22, 2013 at 9:21 am

    I teach sewing and pressing is the one thing I stress with my students. It does make such a big difference.

  19. Katie says

    May 23, 2013 at 9:19 pm

    I need to make this post in to a to do list! Was wondering how important the pressing as you go thing is…now I know. Making a pressing board out of a tv tray table to sit near my sewing machine is something I want to try this summer.

  20. Barbara mcclanahan says

    June 7, 2013 at 8:46 pm

    I am a retired Home Ec teacher,79 years old. Your hints were very good .they refreshed my memory sometime I may take a short cut and get in trouble.i made all the clothes for my 3. Girls. Now I make quilts for my 14 great grand kids.i am passing my skill on to young people. Some schools do not want skills like cooking and sewing taught in Home Ec any more.Sewing is good therapy.

    • Amy @ Positively Splendid says

      June 19, 2013 at 10:06 am

      Barbara, I couldn’t agree more about sewing being good therapy! On any day, if I am stressed or worried, a bit of time with my machine helps things just feel right again. Thanks so much for stopping by!

  21. Linda says

    June 12, 2013 at 5:43 am

    These are great tips and I totally agree. Here are another couple that I could throw in that I have learned just from experience. 1. When sewing something curved, shorten your stitch length one or two notches. It will help get a smoother seam as you have a better turning radius with the shorter stitches. 2. When topstitching I use a stitch in the ditch or edge joining foot. I set the needle a few clicks off center in whatever direction from the seam I need to go. Then I let the “fin” on the foot ride along the edge of the seam I want to topstitch. It helps keep a nice narrow allowance and helps keep it straight. Just remember to use the same needle setting throughout your project for consistency’s sake and don’t forget to return it to center when you are not topstitching.

    • Amy @ Positively Splendid says

      June 19, 2013 at 10:03 am

      Terrific tips, Linda! Thanks so much for sharing them!

  22. Amy says

    December 11, 2013 at 12:33 pm

    Love these tips! Very helpful! I love the item about pressing your projects, my mom has always told me not to and I have anyways, glad I have!

  23. Kim says

    December 23, 2013 at 7:41 pm

    Have to disagree with the ironing board placement. Convenient yes. Good for you physically no. Stepping up and over to new location to press pieces way better for you physically.

  24. Leslie @ Mama G's Big Crafty Blog says

    January 16, 2014 at 7:55 pm

    Love these tips! All things I need to do. I taught myself to sew and developed a lot of bad habits on the way!!!

Primary Sidebar

PS Search

Search this website

Seasonal Inspiration

Hocus Pocus Wreath
Ghost Plushies
Paper Pumpkins
Fabric Yo-Yo Pumpkins

Copyright © 2025 · Positively Splendid · All Rights Reserved. · Privacy Policy

Privacy & Cookies: This site uses cookies and other tracking technologies to assist with navigation and your ability to provide feedback, analyse your use of our products and services, assist with our promotional and marketing efforts, and provide content from third parties. To find out more, as well as how to remove or block these, see here: Our Cookie/Privacy Policy


Loading Comments...