Hello, Oopsey Daisy readers! My name is Amy, and my home in the blogging neighborhood is known as Positively Splendid.
I am just an average girl striving daily to appreciate the simple pleasures of life by creating something beautiful, meaningful, or delicious. I love to share crafting and sewing tutorials, but I also dabble in cooking, home decorating and organizing. I would absolutely love for you to stop in for a visit sometime!
I truly covet the blogging friendship Alison and I have developed over the course of the last year or so. She is such a gem, and her blog is a true reflection of that! I am so delighted to be posting here today.
There must be something in the air, because where I am, it seems to be raining babies! The cost of baby shower gifts can certainly add up, so today I thought I’d share a little idea to upcycle something you might already have on hand to creative an inexpensive, yet unique and thoughtful gift.
For this project, you will need…
An empty beverage carrier
Coordinating patterned papers
Scrapbooking adhesive and/or glue
Paper trimmer and scissors
Ruler and pencil
Chipboard letters and/or letter stickers
Ribbon
Gift items to fill your finished carrier (see below for some ideas)
step 1 / Measure the length and width of all of the sides of your beverage carrier, and trim pieces of patterned paper to these dimensions. Also measure the length and width of the rectangle surrounding the carrying handle of the your holder, as seen below, and trim 2 pieces of paper to these dimensions, one for the front and the back. If one of the sides if your carrier is oddly shaped as mine was, trace the side onto the back of your patterned paper.
step 2 / Trim the flaps away from the carrying handle of your carrier, as shown. Cut out all of the remaining traced pieces, if you haven’t already.
step 3 / Precisely align one of the small handle rectangles in the handle portion of your carrier, with the right side of your paper facing out. Use a pencil to trace the shape of the handle, and then trim this piece away. Adhere this handle piece to your carrier. Repeat on the side of the handle.
step 4 / Adhere your remaining to paper pieces to your carrier to their respective sides in a similar manner, taking care to ensure all sides are precisely aligned. At this point, you can be finished, or you can continue to step 5 and gussy you carrier up a bit!
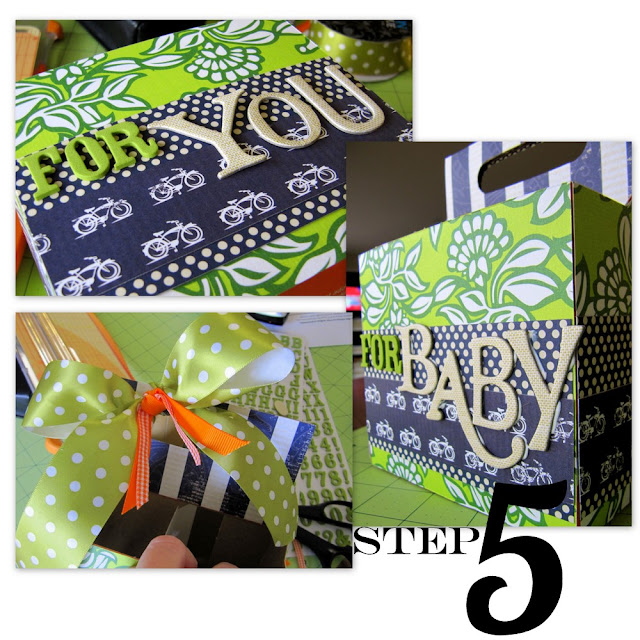
step 5 / Apply strips of coordinating patterned paper to all sides of your carrier, if desired. (Just be sure when using strips that they are all lined up at each corner of your carrier!) Now, apply chipboard letters and/or letter stickers to the front and back of your carrier. Because I wanted one side of the carrier’s content to be filled with items for Mama and the other with items for Baby, I decided to label mine, “For You,” and “For Baby.” Use your imagination! Finish everything up with a bright bow. Your carrier is finished!

Having grown up in a home brimming with sewing notions and paintbrushes, Amy has a deep love for all things creative. On any given day, you’ll find her knee-deep in her latest creative endeavor, with projects ranging from sewing and crafts to home decor and kid-friendly ideas. Amy believes that everyone, regardless of skill level or experience, possesses the ability to create something beautiful, and Positively Splendid was born of her passion for helping others harness their innate creative potential.


