• Skip to primary navigation
  • Skip to main content
  • Skip to primary sidebar

Positively Splendid {Crafts, Sewing, Recipes and Home Decor}

Handcrafted. Splendidly.

  • Home
  • Blog
  • + Handmade
    • Crafts
      • Craft Gift Ideas
      • Holiday Crafts
      • Home Decor Crafts
      • Kids’ Crafts
      • Paper Crafts
      • Quick and Easy Crafts
      • Wearable Crafts
      • Wreaths
    • Gift Ideas
      • Budget-Friendly Gifts
      • Gift Wrapping
      • Gifts for Dads and Grandpas
      • Gifts for Kids
      • Gifts for Men
      • Gifts for Moms and Grandmas
      • Gifts for Neighbors
      • Gifts for Sports Fans
      • Gifts for Teachers
      • Gifts for Women
      • Quick and Easy Gifts
    • Kid-Friendly Projects
    • Sewing
      • Sewing for Children
      • Sewing for Men
      • Sewing for the Home
      • Sewing for Women
      • Sewing Techniques
      • Sewn Accessories
      • Sewn Gifts
  • + Home & Garden
    • DIY Home Decor Projects
    • Helpful Tips
    • Home Decor Crafts
    • DIY
    • Home Tour
    • Mantels and Tablescapes
    • Organization
    • Outdoor and Garden
  • + Holidays & Seasons
    • Spring
    • St. Patrick’s Day
    • Summer
    • Teacher Appreciation
    • Thanksgiving
    • Valentine’s Day
    • Winter
    • Back to School
    • Christmas
    • Easter
    • Fall
    • Fathers’ Day
    • Graduation
    • Halloween
    • Independence Day
    • Mothers’ Day
    • New Year’s
  • + Printables
  • + Recipes
    • Soups and Stews
    • Appetizers and Salads
    • Breads
    • Desserts
    • Food Crafts
    • Main Dish

3D Paper Wall Flowers

May 24, 2012 By Amy @ Positively Splendid

FacebookTweetPinYummlyPrint

Good morning, everyone! I am so incredibly excited to announce that over the next few weeks, I am going to add some new additions to the PS Team. My first splendid contributor to introduce is the incredibly talented Megan from The Homes I Have Made. Her projects have always drawn me in with their incredible use of color (a girl after my own heart!), and I am delighted that she will be sharing her talent with us here at PS!

Welcome, Megan!

***

Hello, Positively Splendid Readers!

My name is Megan, and I blog over at The Homes I Have Made—a blog that chronicles my crafting and decorating adventures as a frequently moving military wife and passionate do-it-yourselfer. Positively Splendid has become my number one go-to place for inspiration and how-to’s, and I am beyond thrilled to be joining Amy’s amazing blog as a regular contributor! Thank you, Amy forthis incredible opportunity. I can’t wait to share some of my projects with your readers. Let’s get to it, shall we?
For the past few months, I have been hard at work making over my 10-year old niece’s bedroom. Although I’ve done all sorts of projects for this transformation, today I am going to show you the absolute “scene stealer” of her entire room…these amazingly simple but oh-so-effective 3D Paper Wall Flowers!

These are so quick and easy to make, I promise you’ll be looking around your home for places to put them! 
Here is what you need to make your own:

Here’s how they go together.

1) Cut out your flowers.  Using either a die-cut machine or the template below, cut TWO flat flowers (same size) for each 3D flower you want to make. In the picture above, the two pink flowers will be for one 3D flower, and the two orange flowers will be for another 3D flower. Make the flowers any size you want! (To cut my flowers, I selected the four-petaled flower on the Home Accents cartridge for my Cricut; I then used the Gypsy to alter the image slightly to allow for one continuous cut. The flowers pictured here are 5” for the pink and 2” for the orange. For the wall, I also made 8” flowers.)   

2) Score your flower. Using either a scoring tool or a ruler with a kitting needle or letter opener, score a center line down the middle of ONE of the flowers. Rotate the flower 90 degrees, and score a center line again. See the template above for clarification.

You should end up with a scored “X” on one of your flowers.

Note – If you find that you have difficulty in step #4, you can also score the diagonals to make folding more
precise. However, I found this an unnecessary step.

3) Fold the flower. Fold your flower in half along the scored line, then UNFOLD the flower. Next, fold the flower along the OTHER scored line, and unfold once more. You will be left with the beginnings of a 3D flower.


4) Pinch the flower. Using the scored lines and already folded creases, now pinch the flower so that all the inner corners meet in the middle, and the tips of the flowers are pointing outward. 

NOTE – there is a right and wrong way to do this! If you fold the wrong edges together it will look like the image on the left (below). Check and make sure your flower looks like the image on the right (below).

You now have one folded flower and one flat flower.

5) Glue the flower. Place a large glob of hot glue in the center of the flat flower. Place the folded flower’s point in the glue, and hold until glue cools and sets.
Repeat and have fun with different colors, patterns, and sizes!

6) Embellish the flower. I thought the centers of the flowers looked plain, so I added a simple rhinestone to the center of each one. Boy, do these make all the difference!

Now that your flowers are done, you can apply them to a wall using tape or some other wall-safe adhesive.

The 3D effect of these flowers is just stunning!

One more thing…If you don’t have a wall to put these flowers on, don’t despair! They can be used on other things too…

Think about adding them to gift boxes or bags, as placecards on tables, to hold m&m’s or jelly beans on a spring tablescape, and so much more!
That’s all I’ve got for you today. I’d love it if you came on over to The Homes I Have Made and say “HI.” See you next month!

***

Megan is an exercise and nutrition professional turned stay-at-home mom and DIY blogger with the arrival of her baby boy in April of 2011. Married to a U.S. Marine, she is currently setting up her 5th home in 8 years! You can follow Megan’s decorating and crafting adventures over at The Homes I Have Made and find lots of ideas, tips, and tricks for making any temporary space a cute, cozy and comfortable home!

Photobucket

Amy @ Positively Splendid

Having grown up in a home brimming with sewing notions and paintbrushes, Amy has a deep love for all things creative. On any given day, you’ll find her knee-deep in her latest creative endeavor, with projects ranging from sewing and crafts to home decor and kid-friendly ideas. Amy believes that everyone, regardless of skill level or experience, possesses the ability to create something beautiful, and Positively Splendid was born of her passion for helping others harness their innate creative potential.

EVEN MORE GREAT IDEAS JUST FOR YOU!

FacebookTweetPinYummlyPrint

Filed Under: Crafts, Home Decor Crafts, Home Decor Crafts, Kid-Friendly Projects, Paper Crafts, Positively Home & Garden, Quick and Easy Crafts, Tutorials Tagged With: Birthday Party Decorations, Flowers, Gift Wrapping, Paper Crafts, Party Decor, Wall Art, Wall Decor

Previous Post: « 5 Things I’m Loving Right Now
Next Post: Saturday Seven Spotlight »

Reader Interactions

Comments

  1. Kara says

    May 24, 2012 at 1:39 pm

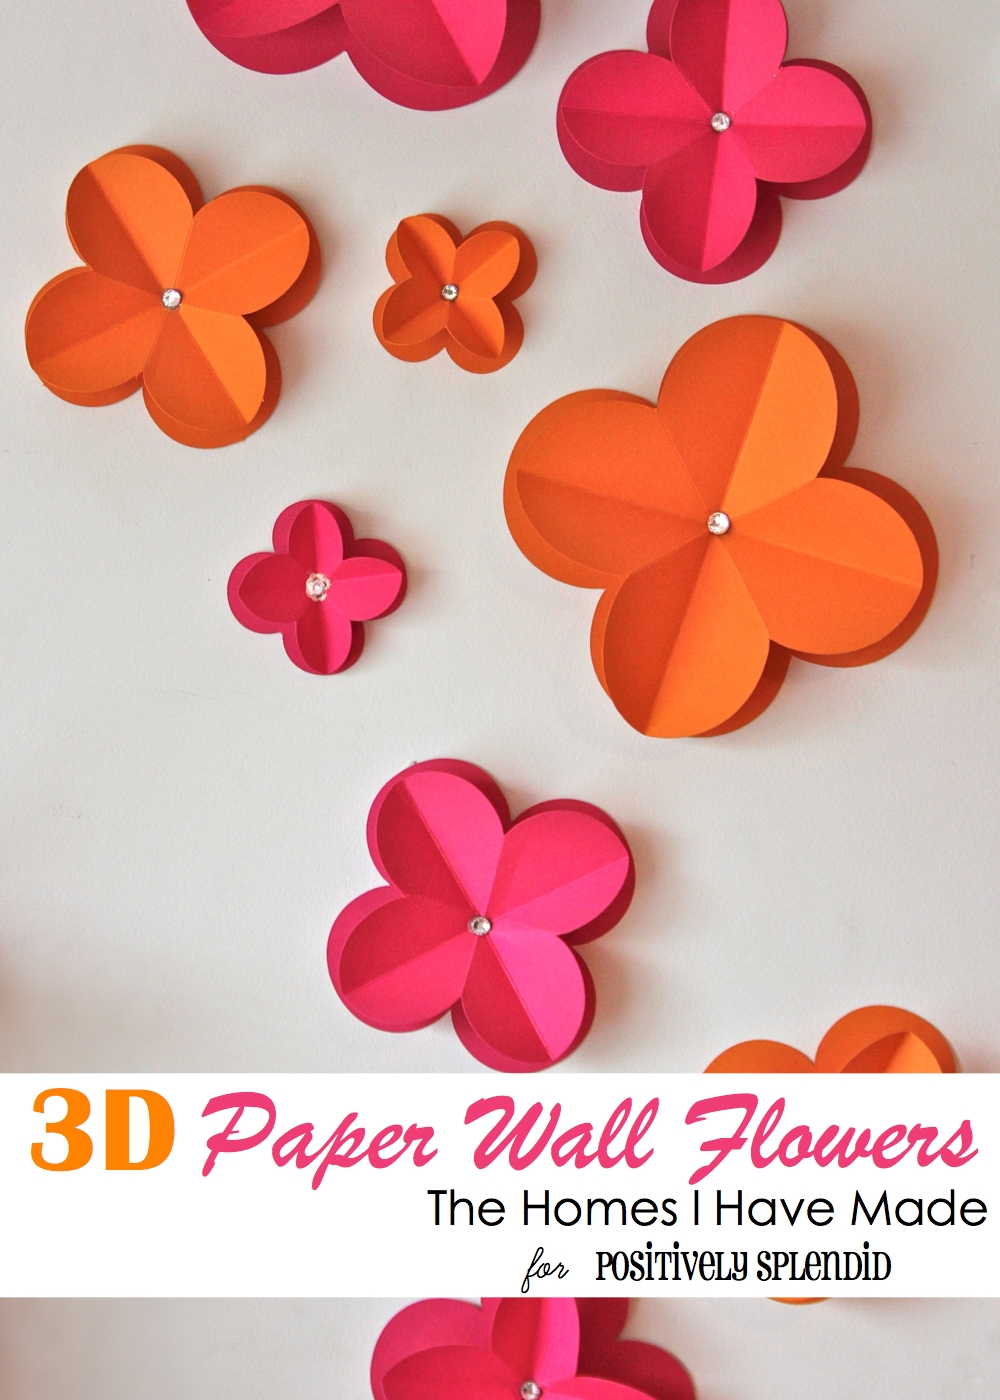
    These are adorable! I love that whole wall arrangement that she put together. Just beautiful!

  2. Bonnie @ Uncommon says

    May 24, 2012 at 3:13 pm

    Super cute! Love that color combo!!! 😉

  3. Shannah @ Just Us Four says

    May 26, 2012 at 12:23 am

    This is a great project! Love the colors and the way it looks on the wall.
    Would you consider linking up to my Pinworthy Projects Party? I hope to see you there!

  4. Margo says

    May 26, 2012 at 2:00 pm

    These look gorgeous and perfect with the wall arrangement!

  5. deidramarie says

    June 9, 2012 at 3:43 am

    My kids did a wonderful job creating this at our home in apartments in scottsdale! Please post some more projects like this.

  6. Inspire Me Heather says

    August 7, 2012 at 1:22 pm

    Great post and wonderful tutorial, thanks! Your flowers turned out lovely and I’ve got this linked to my paper flowers post too today, well done!

Primary Sidebar

PS Search

Search this website

Seasonal Inspiration

Hocus Pocus Wreath
Ghost Plushies
Paper Pumpkins
Fabric Yo-Yo Pumpkins

Copyright © 2025 · Positively Splendid · All Rights Reserved. · Privacy Policy

Privacy & Cookies: This site uses cookies and other tracking technologies to assist with navigation and your ability to provide feedback, analyse your use of our products and services, assist with our promotional and marketing efforts, and provide content from third parties. To find out more, as well as how to remove or block these, see here: Our Cookie/Privacy Policy