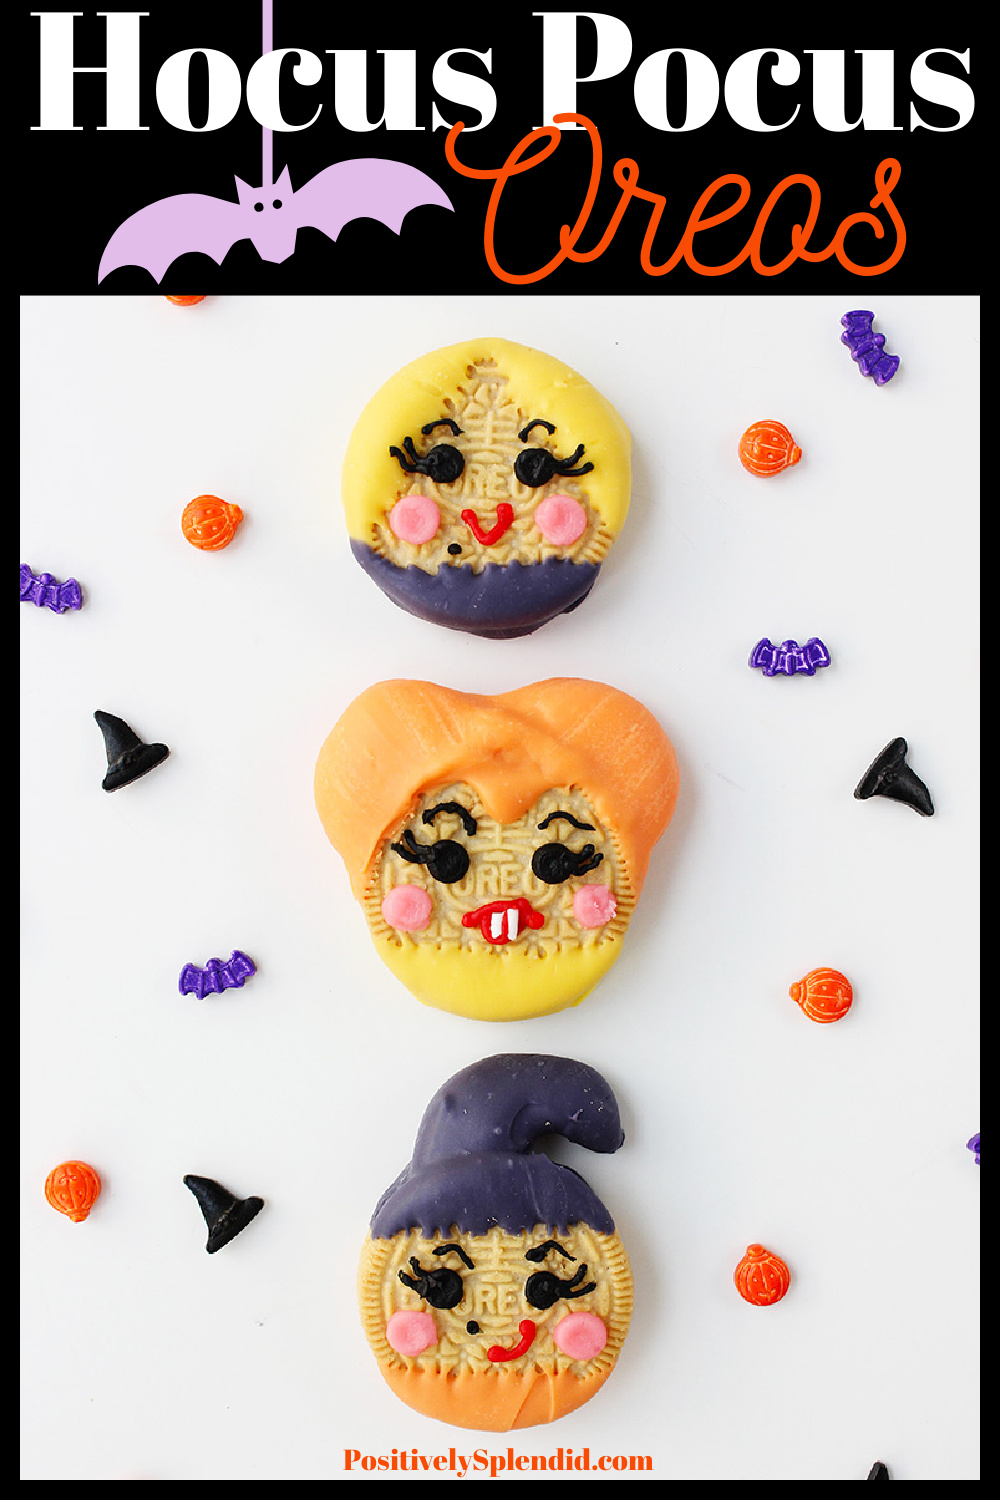
Hocus Pocus is my all-time favorite classic Halloween movie, and I am so excited about the new sequel! These Hocus Pocus Oreos would be the perfect snack for a Hocus Pocus watch party, or for any Halloween gathering. Golden Oreos are the perfect blank slate for creating these adorable cookies that look like the Sanderson sisters (and taste delicious, too). I’ll walk you through all of the easy steps for making this cute Halloween snack that is sure to be the hit of any Halloween party!
Even more fun Halloween project ideas!
Why You’ll Love Hocus Pocus Oreos
- They are downright adorable. Each of the cookies is designed to look just like one of the Sanderson sisters from the Hocus Pocus movie, from the style and color of their hair, to their moles and distinctive smiles!
- They are made with easy-to-find supplies. All of the supplies you need for making Hocus Pocus Oreos can be found at your grocery store, at your local craft store, and/or on Amazon.
- They are perfect for a Hocus Pocus watch party or any other Halloween gathering. Bringing these along to your Halloween parties will earn you some serious Halloween street cred. These would be great for class Halloween parties, since they make a minimal mess but still taste delicious.
Project Tips
- Use non-stick spray on your paring knife when cutting the marshmallow hair shapes. In the first step, jumbo marshmallows are shaped to mimic the look of Winifred and Mary’s hair. To prevent the hassle of the knife sticking as you work, spray it with a touch of non-stick cooking spray to prevent that frustration.
- Use Double Stuf Golden Oreos for this recipe. Golden Oreos come in regular and double-stuffed varieties. I found that the extra cream filling of the double-stuffed cookies helps anchor the marshmallow shapes in place much better than the thin layer of cream in the regular cookies.
- Look for store-brand vanilla sandwich cookies if you can’t find Oreos. My local grocery store and Walmart both have store versions of this type of vanilla sandwich cookie that would work great for this recipe.
- To help the candy coating set faster, pop the dipped cookies in the freezer for a few minutes. To make the process of dipping and decorating the cookies go faster, you can freeze the dipped cookies for about 5 minutes between coats. This can cause some streaking to occur in the color of the dried coating, though, so if you are aiming for perfection, allow the coating to air dry instead.
- Find candy coating at your craft store or online. I purchased all of my candy coating from Michaels. Since there wasn’t a ready-made purple option available, I purchased red and blue to mix and create my own purple color.
How to Make Hocus Pocus Oreos
(A printable version of this tutorial is available for download below.)
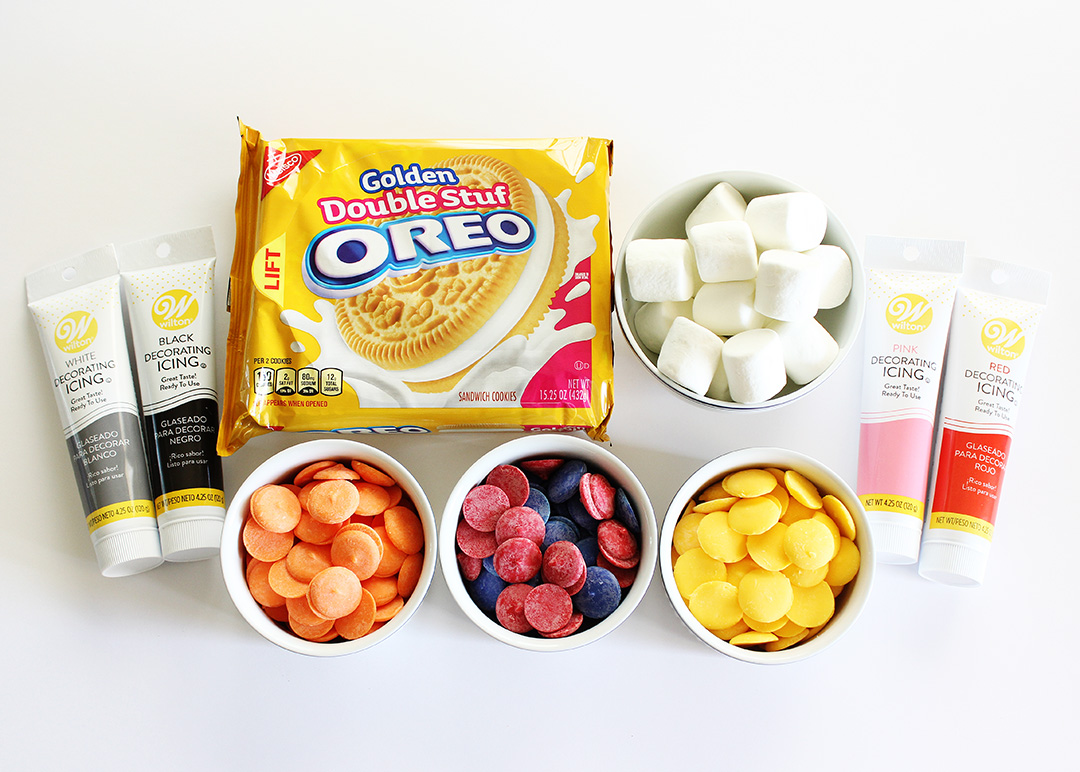
First things first: gather your ingredients and equipment.
Ingredients:
- Double Stuf Golden Oreos (see my note above)
- Jumbo marshmallows
- Candy coating wafers: orange, yellow, and purple (or a mixture of red and blue to create a purple color)
- Ready-made frosting tubes: red, black, and pink (make sure to purchase the tubes that fit a regular-sized piping tip)
- White jimmies sprinkles
Equipment:
- Paring knife
- Round piping tips (recommended sizes 1, 2, 8, and 10)
- Piping tip couplers
- Small microwave-safe bowls for melting the candy wafers
- Parchment paper
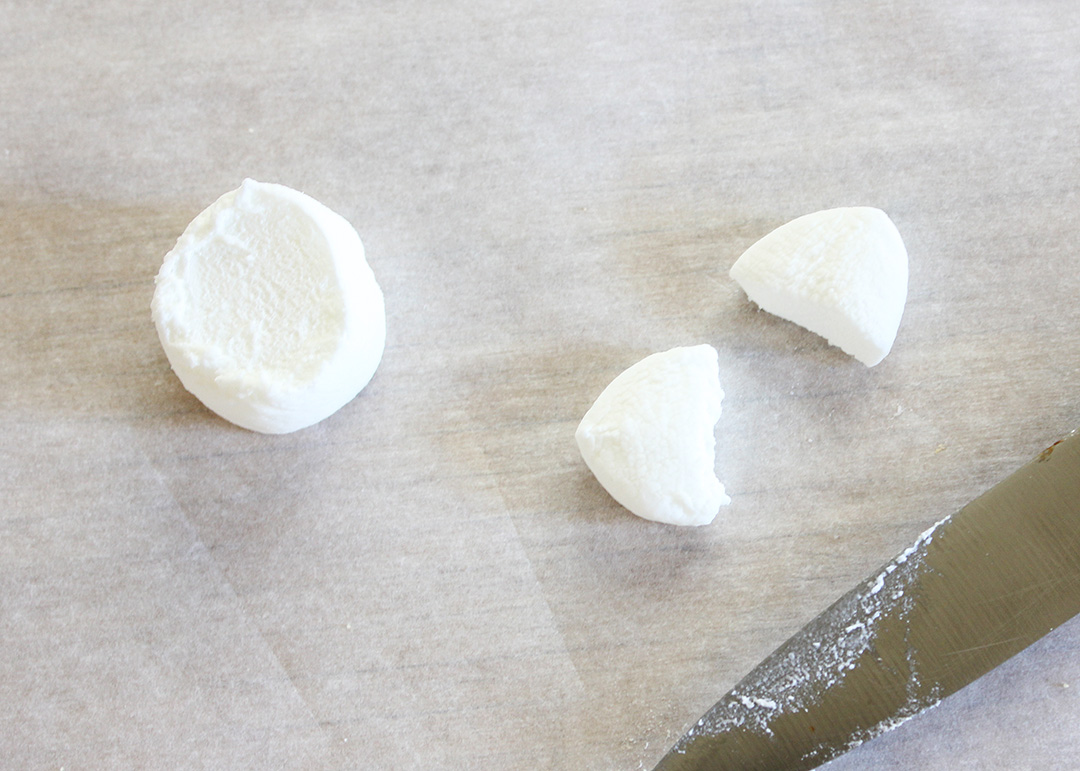
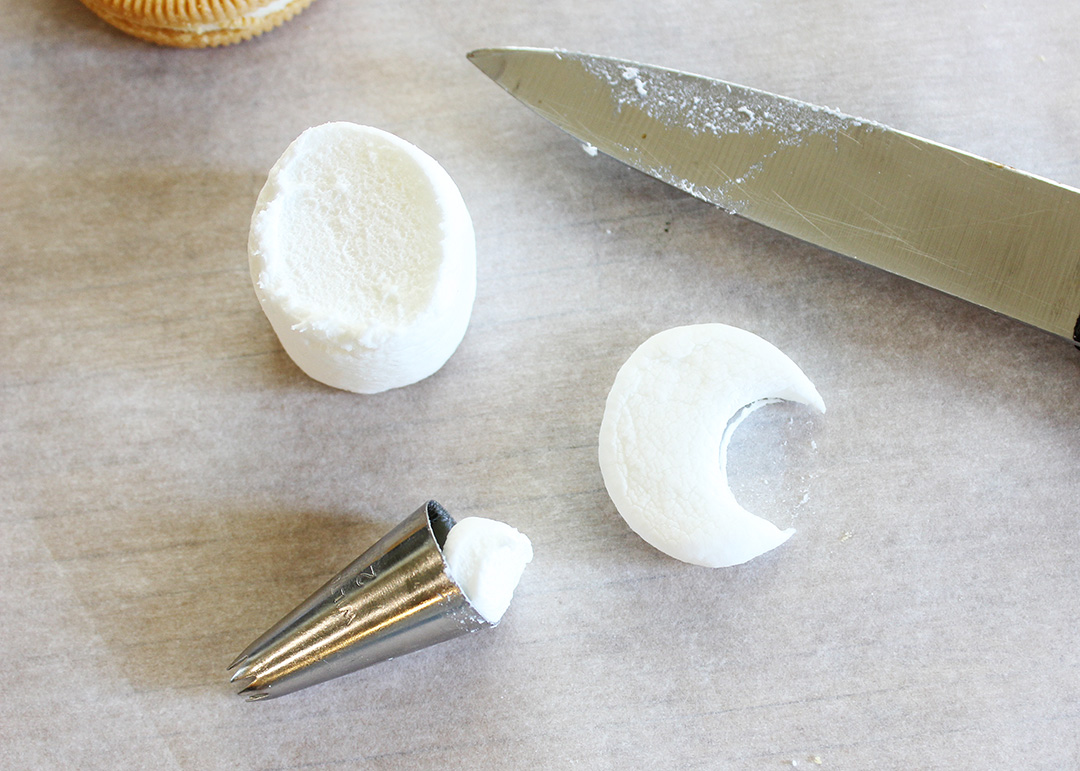
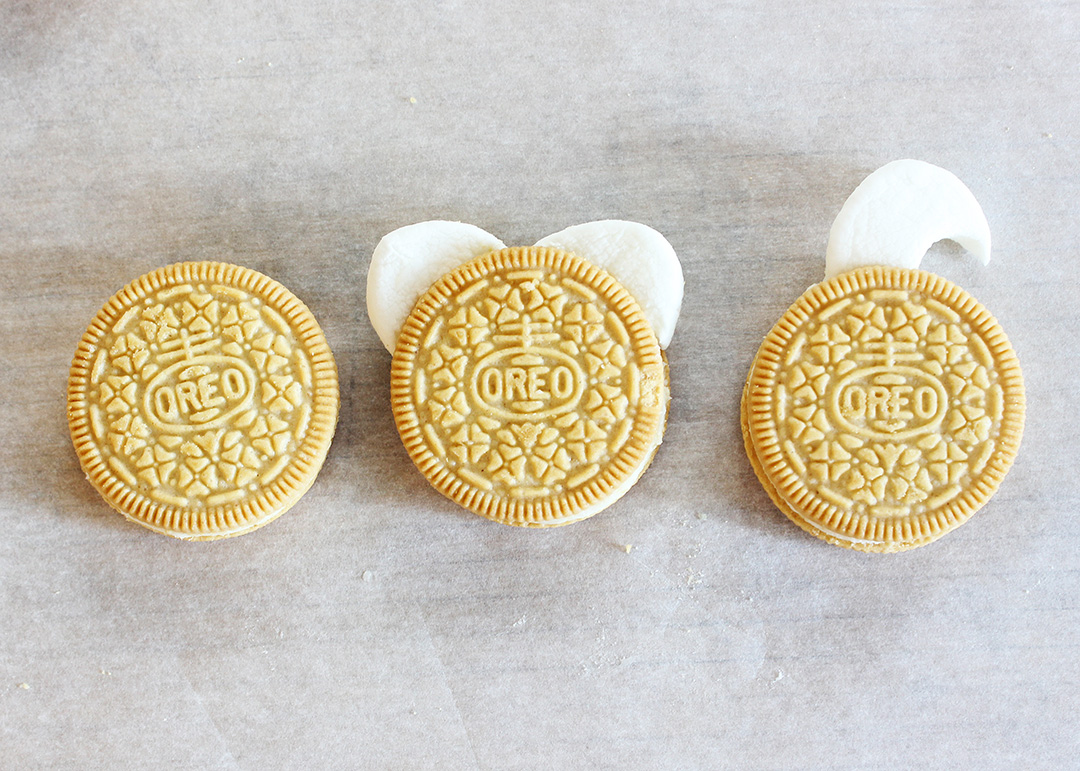
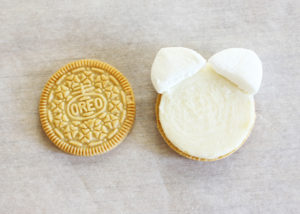
Winifred Cookies: Use a paring knife to trim 1/4″ off of one end of a marshmallow. (See my note above for how to keep the knife from sticking as you work.) Cut that piece in half, and pinch the tips a bit to give them a slightly pointed shape.
Carefully twist an Oreo to separate the cookie sides. Firmly press the shapes into the cream filling to create the shape of Winifred’s hair, as seen below.

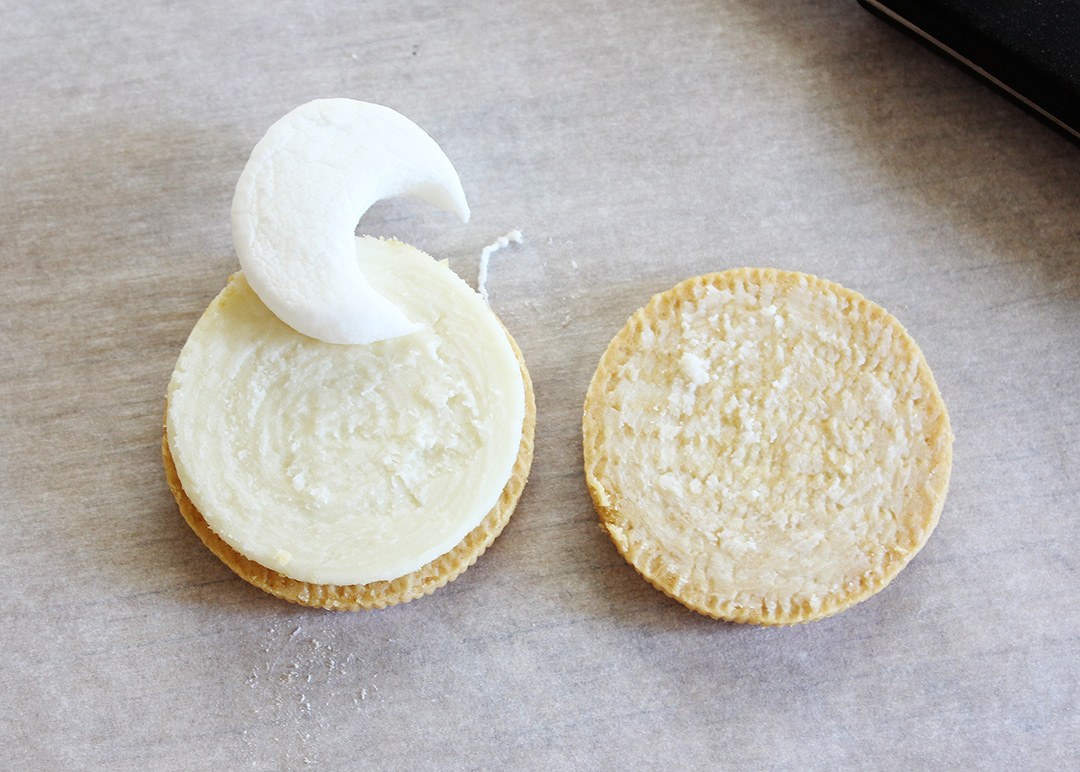
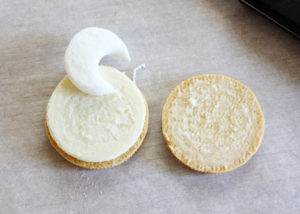
Mary Cookies: Trim a 1/4″ section from the end of one of the marshmallows. Using the large end of one of your piping tips, trim away a portion of the marshmallow from the right side of the circle piece to create a crescent shape, as seen below.
Open one of the Oreos, and press the marshmallow shapes into the cream filling at the top center of the cookie.
Sarah Cookies: Just use the Oreos as-is. Easy peasy!
Now, press the cookie tops on the Winifred and Mary cookies back into place, making sure to press firmly but gently, as the cookies can break easily. The key here is to ensure the marshmallow pieces are anchored firmly in the cream between the cookie layers.
It’s Dipping Time!
Melt the orange, yellow, and purple (or a combo of red and blue) candy wafers in separate small microwave-safe bowls according to the instructions on the product packaging.
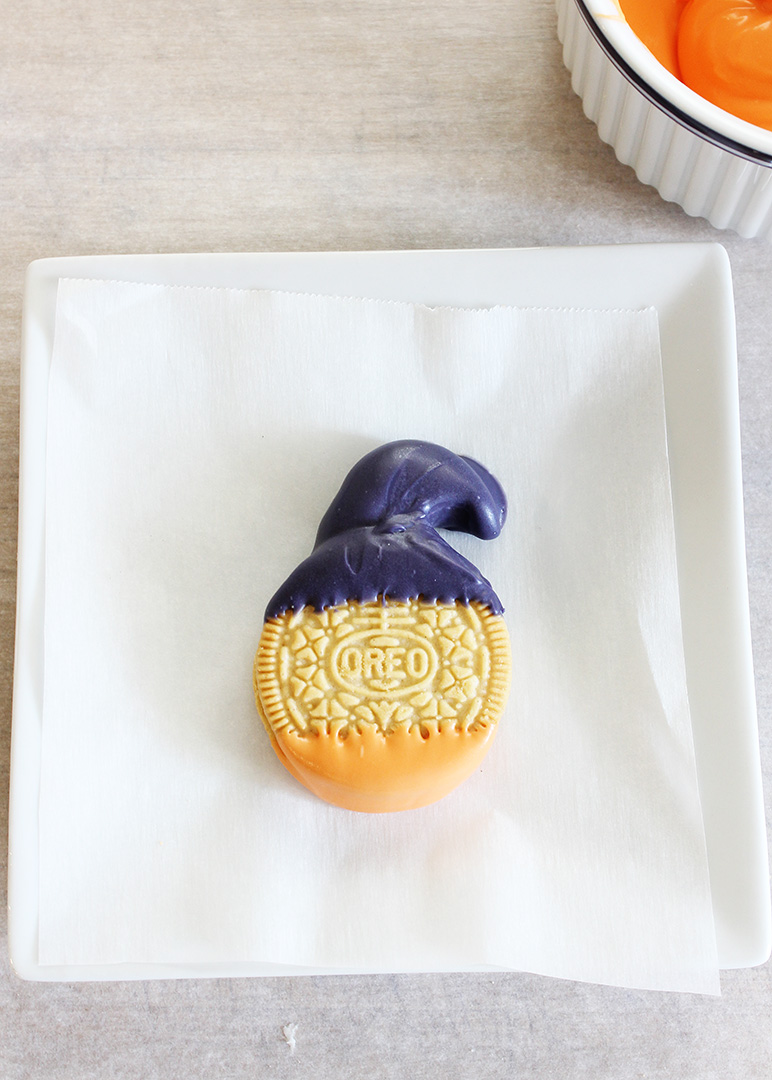
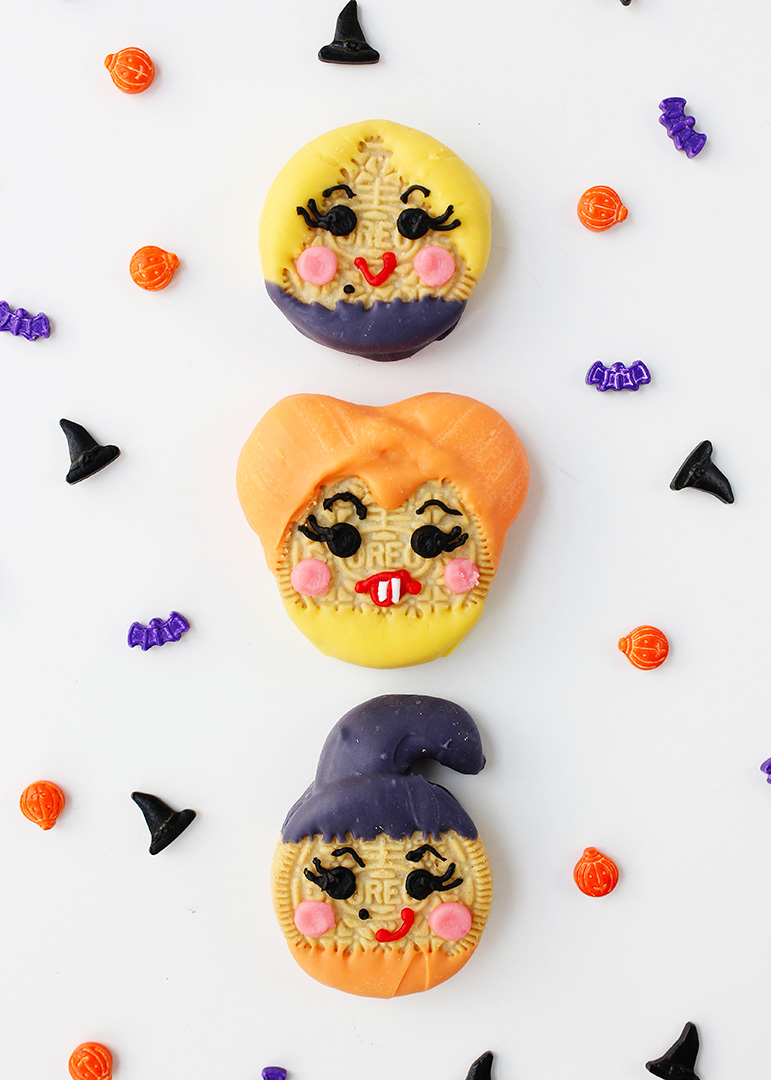
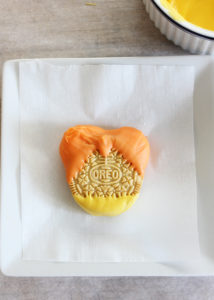
For the Winifred cookies, dip the top portion of the cookie at an angle in the orange candy coating to coat each of the marshmallow pieces, as seen below. Use a spoon to spread out a small bit of the coating to create a little point for a widow’s peak, just like Bette Midler’s character. Allow the orange coating to dry completely (see my note for expediting drying time above). Dip the bottom edge of the cookie in yellow candy coating for Winifred’s dress. Set aside to dry completely.
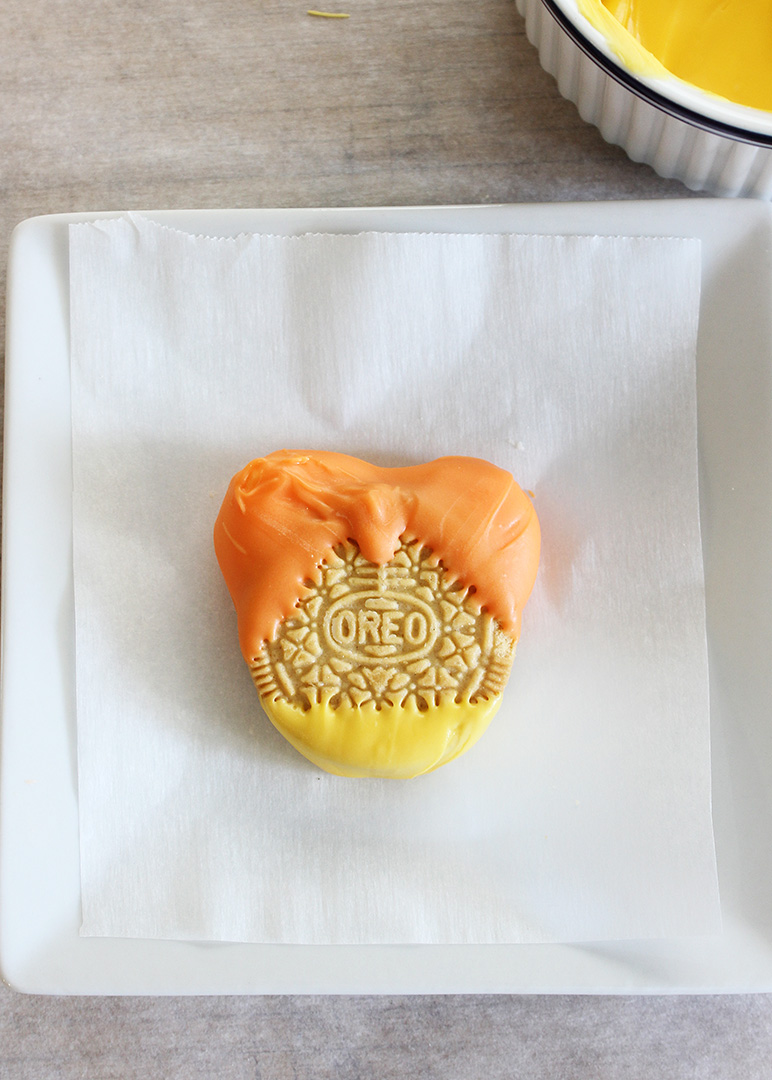
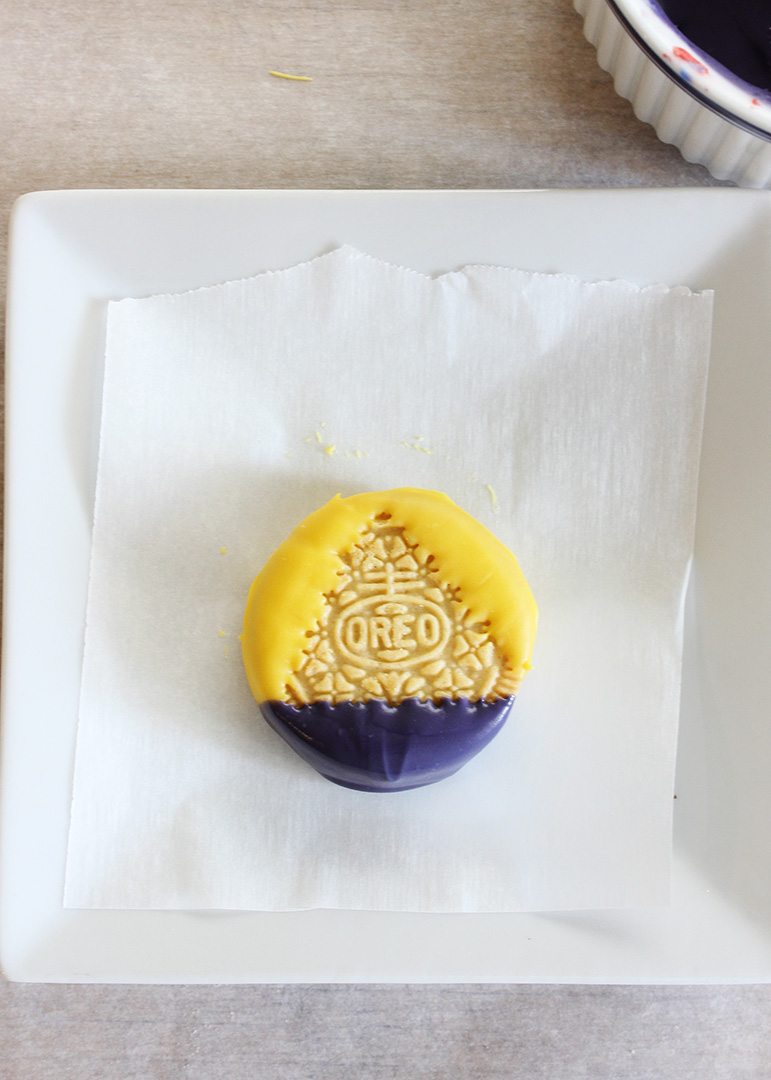
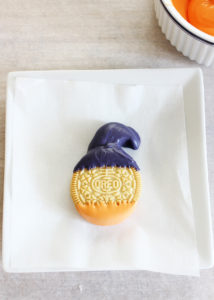
For the Mary cookies, dip the top of the cookie, including the marshmallow crescent shape, in the purple coating so the coating extends about a quarter of the way down the cookie. It can be tricky to get the coating to cover the curve of the marshmallow shape, but using a small spoon or knife to spread the coating into the tight spaces works well. Allow the purple coating to dry until it is firm to the touch, and then dip the lower portion of the cookie in the orange candy coating to create Mary’s dress. Allow the coating to set completely.
For the Sarah cookies, dip the left and right edges into the yellow candy coating to form a “V” shape, as seen below. When the yellow coating is firm to the touch, dip the bottom portion of the cookie into the purple coating for her dress. Allow the candy coating to dry completely before moving on to the next step.
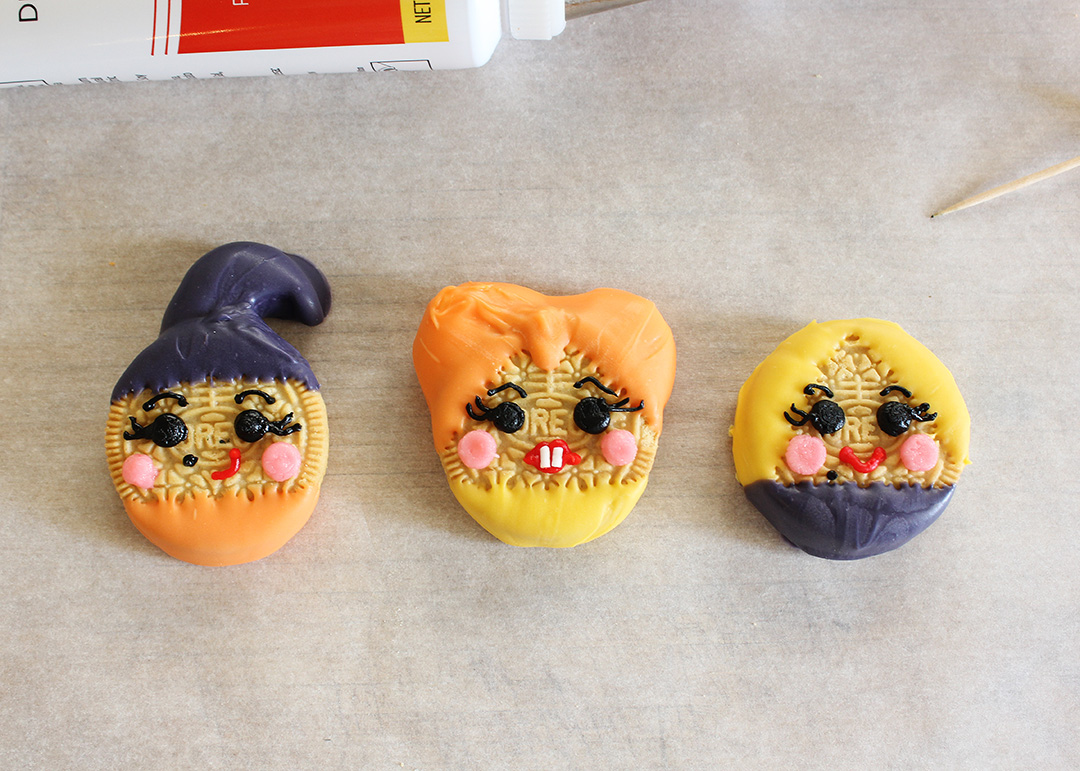
Draw on Facial Features
Use the size 8 round tip to create eyes with black frosting.
Use the size 2 round tip to create mouths with red frosting.
- For Mary, draw the mouth a little bit crooked to reflect her quirky attitude.
- For Winifred, draw the mouth in a typical lip shape (like the logo for the Rolling Stones), and then press on two white jimmies for her trademark teeth.
- For Sarah, draw a simple curved smile.
Use the size 10 round tip to create cheeks with pink frosting
Use the size 1 round tip to create lashes and brows with black frosting, and small moles on Mary and Sarah, as seen below.
Helpful Tip: Don’t worry if your piped frosting eyes and cheeks are “pointy” right off the bat. Give the frosting a chance to set for about 5 minutes or so, and then use your finger to gently press the frosting point down to give the features a rounded shape.
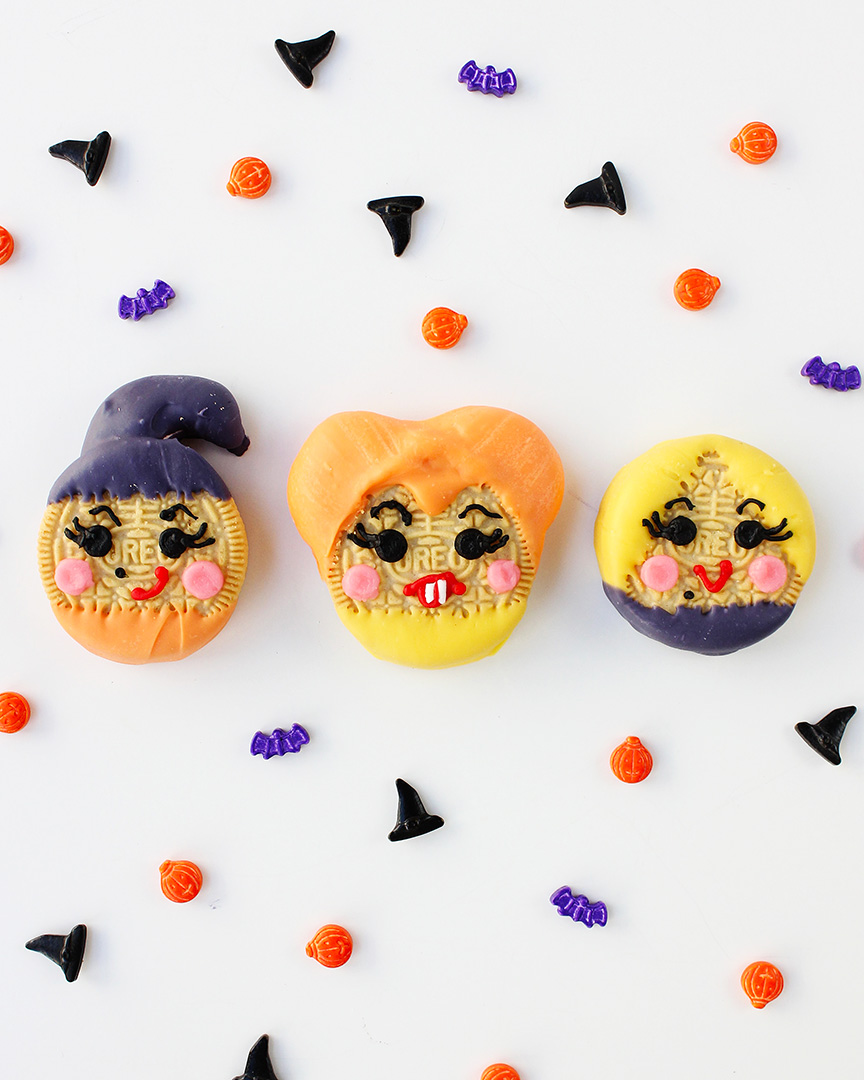
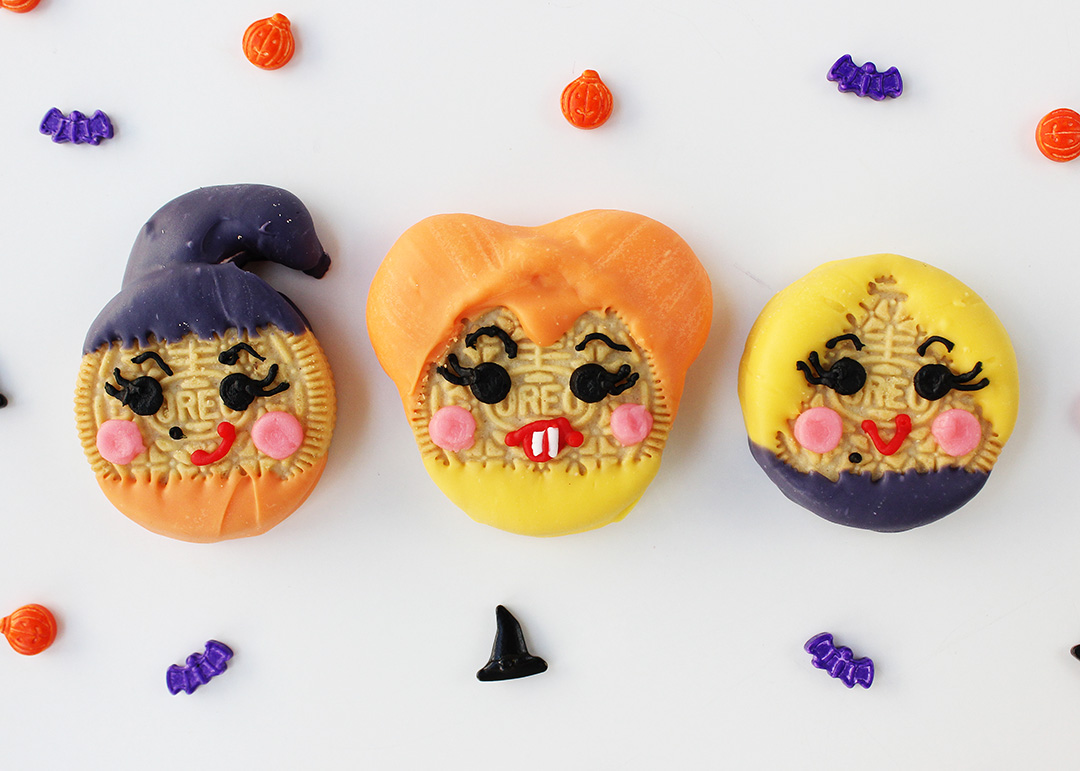
Your adorable Hocus Pocus Oreos are complete!
From left to right: Mary, Winifred, and Sarah Sanderson!
I can’t wait to make some of these just in time to watch Hocus Pocus 1 and 2 this Halloween!
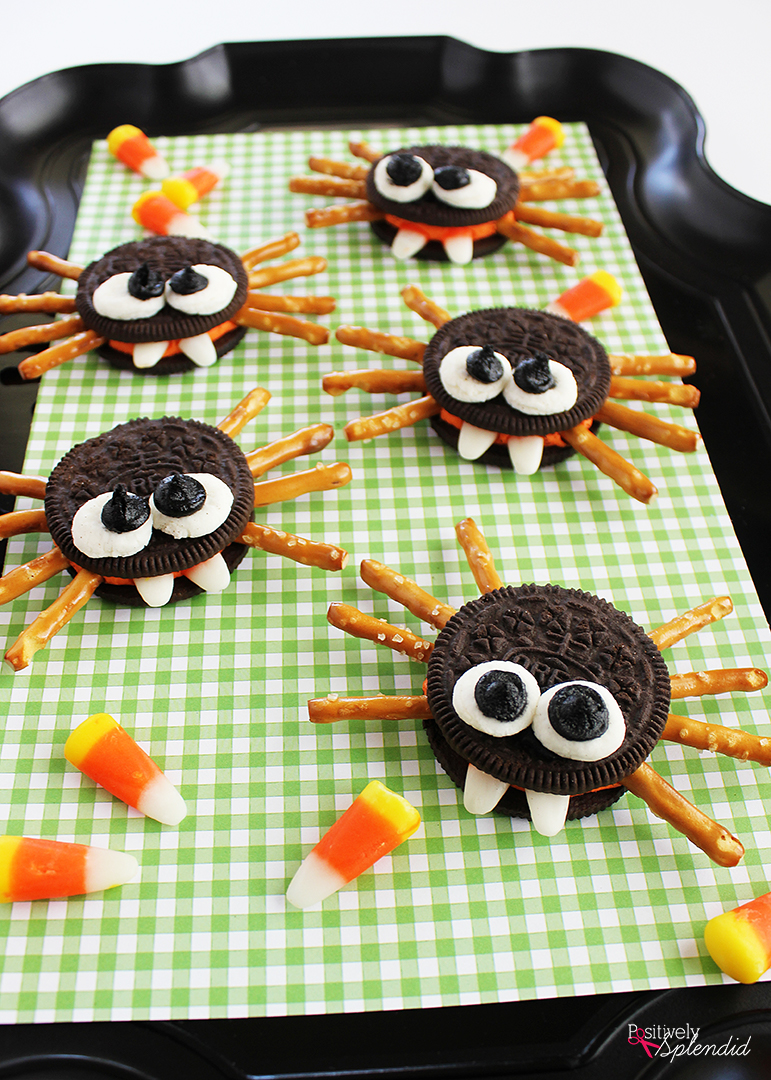
If you love these Hocus Pocus Oreos, don’t miss my Oreo Cookie Spiders, which are perfect for Halloween, too!
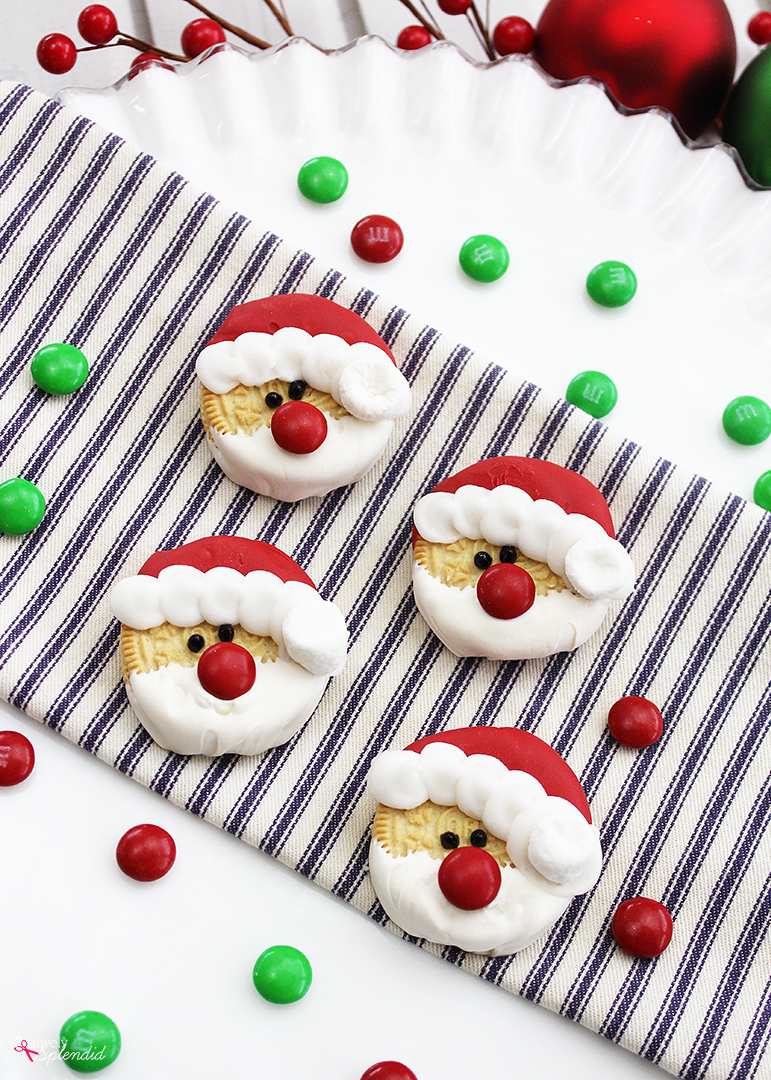
And make sure to bookmark my Santa Oreos for Christmastime!
Hocus Pocus Oreos
Equipment
- Paring knife
- Round piping tips (recommended sizes 1, 2, 8, and 10)
- Piping tip couplers
- Small microwave-safe bowls for melting the candy wafers
- Parchment paper
Ingredients
- Double Stuf Golden Oreos see my note in the original post
- Jumbo marshmallows
- Candy coating wafers: orange yellow, and purple (or a mixture of red and blue to create a purple color)
- Ready-made frosting tubes: red black, and pink (make sure to purchase the tubes that fit a regular-sized piping tip)
- White jimmies sprinkles
Instructions
- Winifred Cookies: Use a paring knife to trim 1/4" off of one end of a marshmallow. Cut that piece in half, and pinch the tips a bit to give them a slightly pointed shape. Carefully twist an Oreo to separate the cookie sides. Firmly press the shapes into the cream filling to create the shape of Winifred's hair.
- Mary Cookies: Trim a 1/4" section from the end of one of the marshmallows. Using the large end of one of your piping tips, trim away a portion of the marshmallow from the right side of the circle piece to create a crescent shape, as seen below. Open one of the Oreos, and press the marshmallow shapes into the cream filling at the top center of the cookie.
- Sarah Cookies: Just use the Oreos as-is. Easy peasy!
- Now, press the cookie tops on the Winifred and Mary cookies back into place, making sure to press firmly but gently, as the cookies can break easily. The key here is to ensure the marshmallow pieces are anchored firmly in the cream between the cookie layers.

- Melt the orange, yellow, and purple (or a combo of red and blue) candy wafers in separate small microwave-safe bowls according to the instructions on the product packaging.
- For the Winifred cookies, dip the top portion of the cookie at an angle in the orange candy coating to coat each of the marshmallow pieces, as seen below. Use a spoon to spread out a small bit of the coating to create a little point for a widow's peak, just like Bette Midler's character. Allow the orange coating to dry completely. Dip the bottom edge of the cookie in yellow candy coating for Winifred's dress. Set aside to dry completely.
- For the Mary cookies, dip the top of the cookie, including the marshmallow crescent shape, in the purple coating so the coating extends about a quarter of the way down the cookie. It can be tricky to get the coating to cover the curve of the marshmallow shape, but using a small spoon or knife to spread the coating into the tight spaces works well. Allow the purple coating to dry until it is firm to the touch, and then dip the lower portion of the cookie in the orange candy coating to create Mary's dress. Allow the coating to set completely.
- For the Sarah cookies, dip the left and right edges into the yellow candy coating to form a "V" shape, as seen below. When the yellow coating is firm to the touch, dip the bottom portion of the cookie into the purple coating for her dress. Allow the candy coating to dry completely before moving on to the next step.

- Use the size 8 round tip to create eyes with black frosting.
- Use the size 2 round tip to create mouths with red frosting. For Mary, draw the mouth a little bit crooked to reflect her quirky attitude. For Winifred, draw the mouth in a typical lip shape (like the logo for the Rolling Stones), and then press on two white jimmies for her trademark teeth. For Sarah, draw a simple curved smile.
- Use the size 10 round tip to create cheeks with pink frosting.
- Use the size 1 round tip to create lashes and brows with black frosting, and small moles on Mary and Sarah.

Having grown up in a home brimming with sewing notions and paintbrushes, Amy has a deep love for all things creative. On any given day, you’ll find her knee-deep in her latest creative endeavor, with projects ranging from sewing and crafts to home decor and kid-friendly ideas. Amy believes that everyone, regardless of skill level or experience, possesses the ability to create something beautiful, and Positively Splendid was born of her passion for helping others harness their innate creative potential.