• Skip to primary navigation
  • Skip to main content
  • Skip to primary sidebar

Positively Splendid {Crafts, Sewing, Recipes and Home Decor}

Handcrafted. Splendidly.

  • Home
  • Blog
  • + Handmade
    • Crafts
      • Craft Gift Ideas
      • Holiday Crafts
      • Home Decor Crafts
      • Kids’ Crafts
      • Paper Crafts
      • Quick and Easy Crafts
      • Wearable Crafts
      • Wreaths
    • Gift Ideas
      • Budget-Friendly Gifts
      • Gift Wrapping
      • Gifts for Dads and Grandpas
      • Gifts for Kids
      • Gifts for Men
      • Gifts for Moms and Grandmas
      • Gifts for Neighbors
      • Gifts for Sports Fans
      • Gifts for Teachers
      • Gifts for Women
      • Quick and Easy Gifts
    • Kid-Friendly Projects
    • Sewing
      • Sewing for Children
      • Sewing for Men
      • Sewing for the Home
      • Sewing for Women
      • Sewing Techniques
      • Sewn Accessories
      • Sewn Gifts
  • + Home & Garden
    • DIY Home Decor Projects
    • Helpful Tips
    • Home Decor Crafts
    • DIY
    • Home Tour
    • Mantels and Tablescapes
    • Organization
    • Outdoor and Garden
  • + Holidays & Seasons
    • Spring
    • St. Patrick’s Day
    • Summer
    • Teacher Appreciation
    • Thanksgiving
    • Valentine’s Day
    • Winter
    • Back to School
    • Christmas
    • Easter
    • Fall
    • Fathers’ Day
    • Graduation
    • Halloween
    • Independence Day
    • Mothers’ Day
    • New Year’s
  • + Printables
  • + Recipes
    • Soups and Stews
    • Appetizers and Salads
    • Breads
    • Desserts
    • Food Crafts
    • Main Dish

Antique Dresser Transformation + Embellishing Furniture with Vinyl

September 19, 2011 By Amy @ Positively Splendid

FacebookTweetPinYummlyPrint

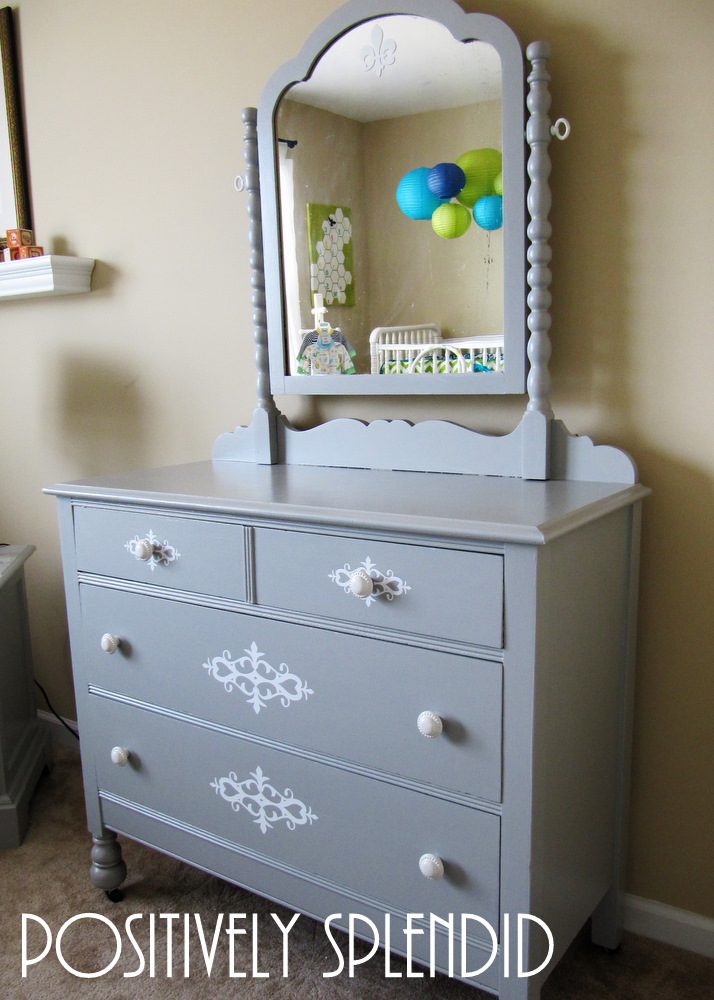
Of all of the projects I’ve tackled thus far in the nursery, this dresser is, by far, my proudest. It was also my greatest labor of love! When I happened upon the listing on Craig’s List for this diamond in the rough, I knew it was just the piece I needed for the space. I loved the spindled mirror and the shapely elevated feet, and the dimensions were ideal for the piece to double as a changing table.

So, like a mama bear on the hunt, I swooped in and got it!

My sweet hubs is a very supportive enabler of my DIY addiction. But when it came time to unload this untouched beauty, he had some very – um – frank comments. “Um, Tootie? Did you happen to drag this thing behind you all the way down I-40?” Thanks for the vote of confidence, hon. 😉

In his defense, this was the most ambitious furniture rehab project I have ever in my life tackled. As you can see, the piece had more than its fair share of imperfections and cosmetic issues, and the last owner’s shoddy staining job was going to be a real chore to mitigate. But I was ready!
Everything I know about painting furniture, I owe to Kate of Centsational Girl. When I first read this post on her blog earlier this year, it immediately became one of my favorite pages on the web. Kate has done the hard part of whittling down the best products for the job for me, so all I had to do was follow her lead and use the products she specifies. If you ever have any aspirations to paint a piece of wood furniture, this is a post you absolutely must read!
I started by using my trusty sander to get rid of years (and years) of ugly. I followed that with Kate’s recommended series of steps: a coat of Zinnser bond-coat primer (oil-based, with the brown label), a light sanding, two coats of paint, and then a coat of polyacrylic. For this project, I used Benjamin Moore Natura No-VOC Paint, because once the sanding and priming was done, this pregnant mama wanted to be able to paint in the air-conditioned indoors without worrying about fumes and other nastiness.

I have to say that I absolutely adore the color I used for this project: San Antonio Gray. It is the perfect neutral backdrop against the bold, bright colors in the rest of the nursery.
Once I had given everything a chance to dry completely (3 excruciating days!), I added some white knobs I bought at Hobby Lobby for 50% off, which brought them to less than $2 apiece. Not too shabby! I adore the juxtaposition of bright white against grey, and when I saw that the piece still needed a little something once the knobs were in place, my first inclination was to try my hand at stenciling the drawers. I honestly wanted to cry, though, when I thought about breaking out the paint supplies again, so I opted to take a different route: adhesive vinyl!
I purchased the perfect design from the Silhouette online store, and I cut out four of the designs in the appropriate sizes using my Silhouette. All that was left at that point was to place them where I wished. So easy, and I adore how it turned out!

FYI: did you know that if you don’t have any transfer paper on hand, the perfect substitute is repositionable contact paper? A very cost-effective alternative!
I honestly cannot say enough how much I adore this piece now. This project admittedly did take quite a bit of elbow grease, but this dresser truly is the star of this space!

(Oh, hello, Amy’s elbow!)

Thanks so much for reading!

Photobucket

Linking this to…
Skip to My Lou
Sumo’s Sweet Stuff
Home Stories A to Z
Today’s Creative Blog
Tip Junkie
Tatertots and Jello

Amy @ Positively Splendid

Having grown up in a home brimming with sewing notions and paintbrushes, Amy has a deep love for all things creative. On any given day, you’ll find her knee-deep in her latest creative endeavor, with projects ranging from sewing and crafts to home decor and kid-friendly ideas. Amy believes that everyone, regardless of skill level or experience, possesses the ability to create something beautiful, and Positively Splendid was born of her passion for helping others harness their innate creative potential.

EVEN MORE GREAT IDEAS JUST FOR YOU!

FacebookTweetPinYummlyPrint

Filed Under: DIY Home Decor Projects, Positively Home & Garden Tagged With: Baby, Furniture, Furniture Painting, Nursery, Painting, Silhouette SD, Vinyl

Previous Post: « Previous Post
Next Post: Festive Holiday Gift Tags (New Lifestyle Crafts!) »

Reader Interactions

Comments

  1. K-E Kreations says

    September 19, 2011 at 11:07 am

    Beautiful! You did a great job.

  2. Samantha says

    September 19, 2011 at 11:11 am

    This is stunning! What a transformation x

  3. Daneilia @ Anchors Away says

    September 19, 2011 at 11:57 am

    It reminds me of a piece of furniture that my grandma has. It’s one of my faves & I like how yours turned out 😉

  4. Annabel says

    September 19, 2011 at 12:02 pm

    It looks great! What a job that has been, but with a lovely result.

  5. Terrie Mathison says

    September 19, 2011 at 12:18 pm

    It’s beautiful!!!

  6. To The Moon and Back says

    September 19, 2011 at 4:04 pm

    Stunning!

  7. Jenna says

    September 19, 2011 at 4:48 pm

    Beautiful! I am loving gray right now, especially with white and yellow! I actually just did something similar with a free dresser I acquired. It was so 1970’s brassy looking, and a fresh coat of paint really moderned it up!

    Jenna
    momofmanyhats.blogspot.com

  8. Finding Charm says

    September 19, 2011 at 5:15 pm

    What a great piece. It had so much potential. This nursery has come out very unique.

  9. Vanessa says

    September 19, 2011 at 5:49 pm

    So pretty!! I would love for you to link this up at my weekly Do Something Crafty party: http://vanessascraftynest.blogspot.com/search/label/Do%20Something%20Crafty%20Friday

  10. Amanda @ Serenity Now says

    September 19, 2011 at 5:49 pm

    Positively Lovely. 😉 It is fabulous, and you did a great job, Amy. I can’t imagine how long it must have taken to get that piece ready to paint. Now you have a masterpiece. 🙂

  11. Julia @ 551Eastdesign says

    September 19, 2011 at 7:18 pm

    I adore this! The mirror is my favorite part, I love the spindles! I’m a new follower!

  12. Steph @ Crafting in the Rain says

    September 19, 2011 at 8:19 pm

    The embellishment is perfect! I just finished a dresser too, and it’s so satisfying!
    http://craftingintherain.blogspot.com/2011/09/dressed-up-dresser.html

  13. Centsational Girl says

    September 20, 2011 at 12:23 am

    Gorgeousness my friend. That vinyl detail makes me swoon, such a lovely revamp, be proud and enjoy for years to come!
    xo
    Kate

  14. scrapmebaby says

    September 20, 2011 at 1:36 am

    I think it is beautiful and I love that you saw the potential! My hubby has had a few comments for me in the past, and now he just usually rolls his eyes but stays pretty quiet! I think your nursery is very classy and super pretty. Nice job:)

  15. Kahli says

    September 20, 2011 at 2:20 am

    I love gray! This dresser looks beautiful. Great job!

  16. Alison@Oopsey Daisy says

    September 20, 2011 at 3:31 am

    Amy! This is looking so gorgeous! Love the color of that dresser, and the vinyl is the perfect touch! That is one lucky babe you have!

  17. Madigan at madiganmade says

    September 20, 2011 at 10:46 am

    What a pretty, soft gray. And I love the white accents. I need to check out Kate’s tips for painting… thanks for that tip!

  18. Jenny says

    September 20, 2011 at 2:11 pm

    This looks so great — I love it!

    Jenny
    http://www.simcoestreet.blogspot.com

  19. Emily says

    September 20, 2011 at 5:24 pm

    I can’t even tell you how much I love this! I’m feeling a bit jealous now and I don’t even need a new dresser. Absolutely beautiful!!

  20. Tam @ Sew Dang Cute says

    September 20, 2011 at 10:08 pm

    BEAUTIFUL! You did such an amazing job. I like the elbow, but when do we get to see the belly? Also, I love the paper lanterns. I did some of those in my baby’s room, too!

  21. Alison@Oopsey Daisy says

    September 21, 2011 at 9:26 pm

    Amy, this nursery is incredible! I love LOVE LOVE it! I just featured your dresser today. Here is the link:

    http://www.oopseydaisyblog.com/2011/09/wednesdays-wowzers-3.html

    Thanks for inspiring!
    ~Alison

  22. Heidiopia says

    September 21, 2011 at 11:44 pm

    One of my favorite projects EVER! Gorgeous. :

  23. Jackie says

    September 28, 2011 at 1:46 am

    love this project. I found a fab-fine on craigslist too – $40. It awesome and i altered it all for my scraproom. I did my on vinyl designs and i’m proud of it. Yours is super awesome! Love seeing projects like this.

  24. Mels says

    December 27, 2011 at 5:13 am

    Please do post on your paper lanterns that you used like a mobile. So cute!! I’d love to know where you got your lanterns and how you hung them.

  25. George Smith says

    March 27, 2012 at 6:28 am

    The vinyl embellishment made it look like an authentic french furniture piece. You did an awesome job with the colors.

    computer desks

Primary Sidebar

PS Search

Search this website

Seasonal Inspiration

Hocus Pocus Wreath
Ghost Plushies
Paper Pumpkins
Fabric Yo-Yo Pumpkins

Copyright © 2025 · Positively Splendid · All Rights Reserved. · Privacy Policy

Privacy & Cookies: This site uses cookies and other tracking technologies to assist with navigation and your ability to provide feedback, analyse your use of our products and services, assist with our promotional and marketing efforts, and provide content from third parties. To find out more, as well as how to remove or block these, see here: Our Cookie/Privacy Policy