• Skip to primary navigation
  • Skip to main content
  • Skip to primary sidebar

Positively Splendid {Crafts, Sewing, Recipes and Home Decor}

Handcrafted. Splendidly.

  • Home
  • Blog
  • + Handmade
    • Crafts
      • Craft Gift Ideas
      • Holiday Crafts
      • Home Decor Crafts
      • Kids’ Crafts
      • Paper Crafts
      • Quick and Easy Crafts
      • Wearable Crafts
      • Wreaths
    • Gift Ideas
      • Budget-Friendly Gifts
      • Gift Wrapping
      • Gifts for Dads and Grandpas
      • Gifts for Kids
      • Gifts for Men
      • Gifts for Moms and Grandmas
      • Gifts for Neighbors
      • Gifts for Sports Fans
      • Gifts for Teachers
      • Gifts for Women
      • Quick and Easy Gifts
    • Kid-Friendly Projects
    • Sewing
      • Sewing for Children
      • Sewing for Men
      • Sewing for the Home
      • Sewing for Women
      • Sewing Techniques
      • Sewn Accessories
      • Sewn Gifts
  • + Home & Garden
    • DIY Home Decor Projects
    • Helpful Tips
    • Home Decor Crafts
    • DIY
    • Home Tour
    • Mantels and Tablescapes
    • Organization
    • Outdoor and Garden
  • + Holidays & Seasons
    • Spring
    • St. Patrick’s Day
    • Summer
    • Teacher Appreciation
    • Thanksgiving
    • Valentine’s Day
    • Winter
    • Back to School
    • Christmas
    • Easter
    • Fall
    • Fathers’ Day
    • Graduation
    • Halloween
    • Independence Day
    • Mothers’ Day
    • New Year’s
  • + Printables
  • + Recipes
    • Soups and Stews
    • Appetizers and Salads
    • Breads
    • Desserts
    • Food Crafts
    • Main Dish

Burlap & Felt Flower Brooch Tutorial

April 6, 2011 By Amy @ Positively Splendid

FacebookTweetPinYummlyPrint


Around here, I am in full Creative Estates planning mode. I can’t believe I leave tomorrow! In typical last-minute fashion (read up in this post for the full lowdown on my procrastinating ways), I decided yesterday one of my outfits needed a little “something.” And thus the idea for these flowers was born!

These are a quick-and-easy project that is totally doable in a half hour or less. I just love the juxtaposition of the felt and burlap textures here!

For this project, you will need…

Burlap
Felt in various colors
Thread
Hot glue
Pin backs
Basic sewing supplies: machine, shears, etc.

Prep Work

Cut out your fabric strips. For each flower, you will use the following dimensions:

Large flowers: 
1 center piece, cut to 2 x 5 inches
1 petal piece, cut to 3 x 12 inches

Small flowers:
1 center piece, cut to 1.5 x 3.5 inches
1 petal piece, cut to 2.5 x 8 inches

Note: Be sure to cut 1 piece from each fabric type for each flower. For example, if your center piece is felt, make sure to use burlap for the petal piece, and vice versa.

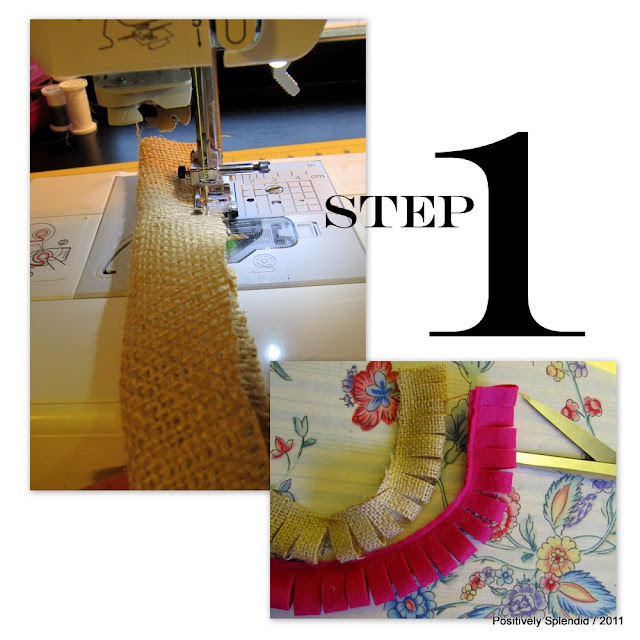
step 1 / Fold your petal piece in half lengthwise, and, using a 1/8-1/4″ seam, sew the open side shut. Use your shears to snip your pieces, as shown, cutting as closely as possible to your line of stitching as you can without cutting any of your stitching. Note: For large flowers, make snips about 1/2″ apart; for small flowers, make snips about 3/8″ apart.

 step 2 / Take your center piece and dab three dots of hot glue along one of the long edges, as shown. Fold the piece in half lengthwise, and press. Starting at one of the narrow ends, start rolling your piece up. When you get to the end, place a dab of hot glue at the end to secure your roll.
 step 3 /  Across the seam where your roll is glued together, place a small line of hot glue along the raw (unfolded) edge of your rolled piece. Starting at this point, adhere the end of your petal piece and start wrapping it around your center piece, adding small dabs of hot glue every so often to keep things nice and secure. When you get to the end of your petal piece, secure the end with a dab of hot glue. 
step 4 / Complete the above steps until you complete your desired number of flowers. Then, place a generous amount of hot glue on the back of each flower, and adhere it on top of a piece of felt. Trim away the excess felt so that none of it is visible from the front of your flower. Adhere one of your pin backs to the felt backing with hot glue.
All done!
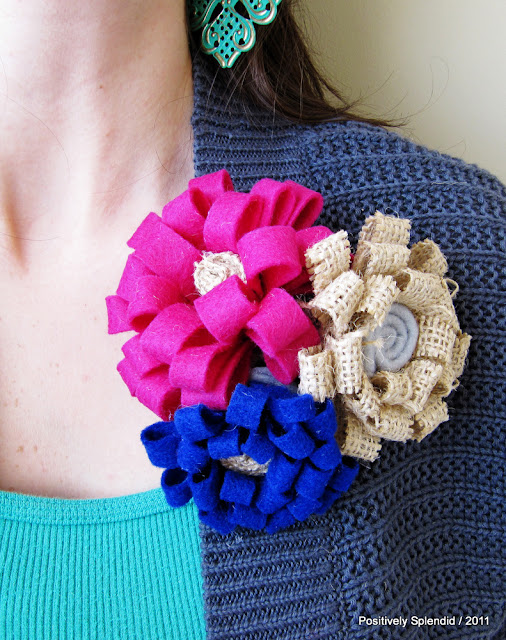
Note: To complete my look below, I actually pinned three individual brooches in a cluster.

These flowers would also be great for a number of purposes: wearable items, home decor items, and so much more. Be sure to check back in Friday when I’ll be sharing a fun gift idea that incorporates these blooms!

Photobucket

Linking this to…
The CSI Project

Amy @ Positively Splendid

Having grown up in a home brimming with sewing notions and paintbrushes, Amy has a deep love for all things creative. On any given day, you’ll find her knee-deep in her latest creative endeavor, with projects ranging from sewing and crafts to home decor and kid-friendly ideas. Amy believes that everyone, regardless of skill level or experience, possesses the ability to create something beautiful, and Positively Splendid was born of her passion for helping others harness their innate creative potential.

EVEN MORE GREAT IDEAS JUST FOR YOU!

FacebookTweetPinYummlyPrint

Filed Under: Crafts, Positively Handmade, Quick and Easy Crafts, Tutorials, Wearable Crafts Tagged With: Flowers

Previous Post: « Meaningful, Edible Easter Treats
Next Post: It’s an Elmer’s Party – and You’re Invited! »

Reader Interactions

Comments

  1. nikkijoy says

    April 6, 2011 at 7:41 pm

    Oh they’re cute!!! I especially love the hessian one, very classy =) x

  2. reasonstoskipthehousework says

    April 6, 2011 at 8:11 pm

    So creative! Come link up – pretty please! 🙂
    Smiles,
    Melanie
    Reasons To Skip The Housework
    Tuesday Time Out Link Up Party

  3. Rebecca @ My Girlish Whims says

    April 6, 2011 at 9:00 pm

    i love these! they are all so cute 🙂

  4. My Oatmeal Kisses says

    April 6, 2011 at 9:28 pm

    Yum! These are great eye candy! Great idea!

  5. Jessie says

    April 6, 2011 at 9:38 pm

    Love those brooches! They are so cute and pretty. You are so crafty and talented.

    Jessie
    http://www.mixandchic.com

  6. Holly Kennedy says

    April 7, 2011 at 12:34 pm

    So cute! Great job!

  7. Laura at Ms. Smartie Pants says

    April 7, 2011 at 2:35 pm

    Amy, I have been working on an idea for a wreath, you have inspired me! I am going to have to do a little redesign. Thanks for a great tutorial, yours always look so nice!
    Have fun on your trip!

  8. Kayla says

    April 7, 2011 at 11:09 pm

    Super super cute! I am putting this on my list of things to make. Thanks for the great idea.

    follow me at [email protected]

  9. casserole says

    April 9, 2011 at 1:28 pm

    These are so pretty! And perfect for early spring!

    I linked to your tutorial on Craft Gossip Sewing:
    http://sewing.craftgossip.com/tutorial-burlap-and-felt-flower-brooches/2011/04/09/

    –Anne

  10. zumrana says

    April 11, 2011 at 2:17 pm

    Hello, Wonderfull flowers.
    I linked your tutorial here :

    http://zumranam.blogspot.com/2011/04/cuval-bezinden-cicek-yapls.html

  11. Laura at Ms. Smartie Pants says

    April 27, 2011 at 2:59 pm

    I told you I loved these and you inspired me, I am showing off my wreath and linking back to you today, come and check it out. Who created your blog design? It has to be one of my favs!

  12. House Revivals says

    May 2, 2011 at 2:04 am

    So cute! Great minds definitely think alike — I did burlap flowers for a lampshade a few weeks ago. Love, love your rolled centers — I may have to steal that idea 🙂 Thanks for the inspiration!
    ~Amanda
    http://houserevivals.blogspot.com/2011/03/couple-of-months-ago-i-posted-about.html

  13. Abby Anderson says

    August 29, 2012 at 9:16 pm

    I love these! Thank you for sharing!!

Primary Sidebar

PS Search

Search this website

Seasonal Inspiration

Hocus Pocus Wreath
Ghost Plushies
Paper Pumpkins
Fabric Yo-Yo Pumpkins

Copyright © 2023 · Positively Splendid · All Rights Reserved. · Privacy Policy

Privacy & Cookies: This site uses cookies and other tracking technologies to assist with navigation and your ability to provide feedback, analyse your use of our products and services, assist with our promotional and marketing efforts, and provide content from third parties. To find out more, as well as how to remove or block these, see here: Our Cookie/Privacy Policy