When I think back to the friends I’ve made since I first began my blogging journey last year, sweet Alison from Oopsey Daisy is one of the first who come to mind. I am so thrilled she can be here today to share a Christmas wall hanging project with us for today’s Swell Noel idea!
***
Hello friends!

My name is Alison, and my little blogging home is called Oopsey Daisy.
At Oopsey Daisy, I share my latest creative project–everything from holiday decor to kids crafts; from sewing projects to gift ideas!
I am thrilled to be a part of Amy’s “A Swell Noel” series–the name of the series alone demonstrates Amy’s clever creativity. Amy has been my long-time blogging buddy, and I am so tickled for her newest addition, sweet Baby George!
This spring, I shared my spring flower wall art here at Positively Splendid. As I considered what project I wished to share with you this Christmas, I decided to do a little spin-off of this original project.
Tis the season!
Here is my Christmas tree wall art!
It’s a festive touch to the same exact frame!
I had so much fun putting this project together.
Come along to see how to create your very own…
I began by taking these little lovelies out of their frame. I love these colorful flowers! They add so much pizzazz to my craft room.
I used the flowers as a guide to cutting my burlap for this project. I set them in the middle of a piece of burlap, and cut a piece with plenty of extra fabric for wrapping around the back. I cut mine plenty large because I am infamous for making oopsey daisies!
Again, I used the flower wall art as my guide. I used Mark-B-Gone to give myself an outline of the portion of the burlap that would be seen in the frame. This gave me some parameters as I was sewing along.
I have been loving red and aqua this Christmas! I snagged several different Christmas-ey fabrics during JoAnn’s latest sale to create the Christmas trees.
I created a simple cardstock triangle as a pattern, and cut out a tree from each fabric. I created the stems using ricrac and ribbon.
Now here is a very pathetic confession:
I have had a brand new sewing machine sitting in my craft room for 4 months. Rather than learn my own sewing machine, I have been driving to my parent’s house and using my Mom’s machine to sew! Well, this was my very first time using my new sewing machine. I must say I love it!
I sewed everything with a 1/4-inch seam allowance.
Once I had sewn everything to the burlap, it was time to make some messes in my craft room. I dug out some ribbon, ricrac, buttons, beads, etc. I had way too much fun decorating each Christmas tree a bit differently.
I hot glued all of the embellishments into place.
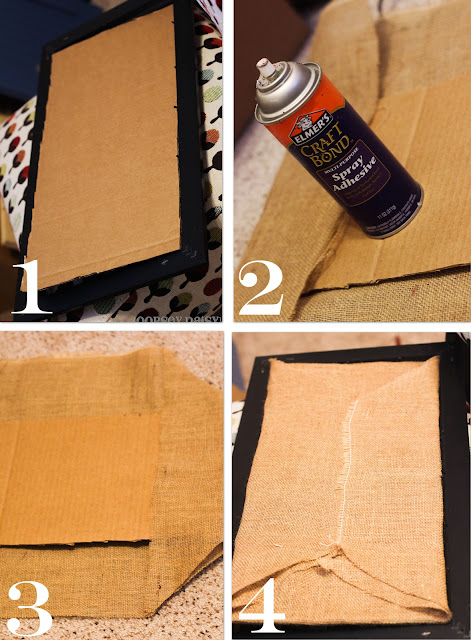
To prepare the frame…
1. I cut a piece of cardboard that would fit the frame. I just used a cardboard box that I found in the basement.
2. I have found that spray adhesive works the best to hold burlap in place. With the Christmas trees on the front, I used this spray adhesive to fold the extra burlap around the back.
3. I cut the corners of the burlap and wrapped it around the cardboard like a present, stretching it tight.
4. I slid the cardboard into the frame!
Done!
These Christmas trees will bring a little holiday spirit into my craft room!
Christmas is definitely my favorite time of year!
I love how they look with my JOY-ful Christmas display.
Amy, thanks so much for making me a part of your Swell Noel!
I hope you will come stop by Oopsey Daisy and say hello!
You’re always welcome!
***
Alison, I love how you used the same frame for these projects to maximize your crafting budget. So smart, festive and fun!
Happy Friday, everyone!

Having grown up in a home brimming with sewing notions and paintbrushes, Amy has a deep love for all things creative. On any given day, you’ll find her knee-deep in her latest creative endeavor, with projects ranging from sewing and crafts to home decor and kid-friendly ideas. Amy believes that everyone, regardless of skill level or experience, possesses the ability to create something beautiful, and Positively Splendid was born of her passion for helping others harness their innate creative potential.


Precious project, Alison! Love the simplicity and the “fun” factor– wouldn’t this be so cute for my preschool classroom?
Happy Friday, ladies!
xo Heidi
So adorable! As per usual, I adore the fabrics that Alison is able to get her hands on. These little trees are the perfect holiday spin off to the spring flowers! 🙂
This idea is really sweet! your getting me in the Holiday mood!!:) Thanks so much! From the “NEWBIE” on the block, Deidre~
LOVE LOVE LOVE… so getting this project going for the weekend!!! thanks for sharing! 🙂
I LOVE THIS! Thinking of making for holidays and for the nursery!
I love hanging art and these are just so adorable. I really like the simplicity of your designs.