• Skip to primary navigation
  • Skip to main content
  • Skip to primary sidebar

Positively Splendid {Crafts, Sewing, Recipes and Home Decor}

Handcrafted. Splendidly.

  • Home
  • Blog
  • + Handmade
    • Crafts
      • Craft Gift Ideas
      • Holiday Crafts
      • Home Decor Crafts
      • Kids’ Crafts
      • Paper Crafts
      • Quick and Easy Crafts
      • Wearable Crafts
      • Wreaths
    • Gift Ideas
      • Budget-Friendly Gifts
      • Gift Wrapping
      • Gifts for Dads and Grandpas
      • Gifts for Kids
      • Gifts for Men
      • Gifts for Moms and Grandmas
      • Gifts for Neighbors
      • Gifts for Sports Fans
      • Gifts for Teachers
      • Gifts for Women
      • Quick and Easy Gifts
    • Kid-Friendly Projects
    • Sewing
      • Sewing for Children
      • Sewing for Men
      • Sewing for the Home
      • Sewing for Women
      • Sewing Techniques
      • Sewn Accessories
      • Sewn Gifts
  • + Home & Garden
    • DIY Home Decor Projects
    • Helpful Tips
    • Home Decor Crafts
    • DIY
    • Home Tour
    • Mantels and Tablescapes
    • Organization
    • Outdoor and Garden
  • + Holidays & Seasons
    • Spring
    • St. Patrick’s Day
    • Summer
    • Teacher Appreciation
    • Thanksgiving
    • Valentine’s Day
    • Winter
    • Back to School
    • Christmas
    • Easter
    • Fall
    • Fathers’ Day
    • Graduation
    • Halloween
    • Independence Day
    • Mothers’ Day
    • New Year’s
  • + Printables
  • + Recipes
    • Soups and Stews
    • Appetizers and Salads
    • Breads
    • Desserts
    • Food Crafts
    • Main Dish

Felt Flower Scarf

January 12, 2011 By Amy @ Positively Splendid

FacebookTweetPinYummlyPrint

 Thank you so much for bearing with me as I’ve gotten my act together in putting together this tutorial! We are going on snow day 3 here in our neck of the woods, something we never dealt with in Little Rock. People keep assuring me that it’s never like this in the winter here, but I am starting to have the sneaking suspicion those same folks might work for the local chamber of commerce. 😉

In case you missed it, here is my blurb from the post on SYTYC last week…

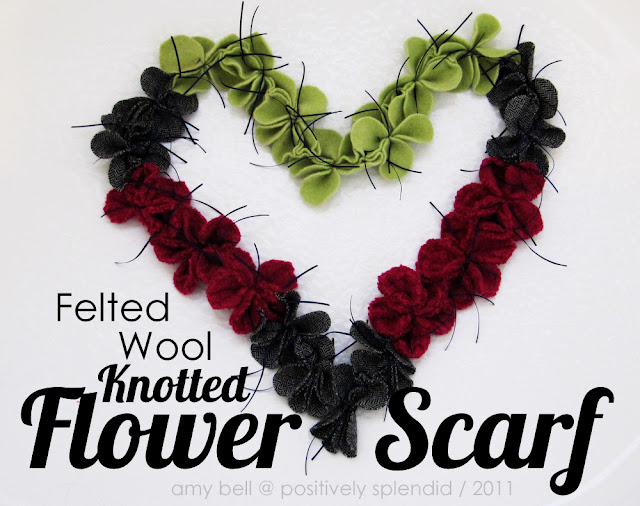
While I was out Christmas shopping last week, I saw a woman standing in line who was wearing one of the most unique scarves I’ve seen in a long while: a pieced series of funky flowers that looked to be made of felted wool. I immediately fell in love with it, and I knew I would have to try my hand at creating my own version.

I love the look and feel of wool felt, but it can sometimes be hard to come by, and it tends to be rather pricey. To make this particular scarf, though, I knew no other medium would do. Did you know that you can easily create your own wool felt for pennies on the dollar? That is exactly what I did here, using a few clothing items I found on the 99-cent rack at my local thrift store. I would love to share with you exactly how I did it. And for the sewing novices out there, you’ll be thrilled to hear that if you can cut circles and tie knots, you have all the skills required to tackle this project!
All set? Let’s get started!
For this project, you will need…
2-3 wool sweaters (at least 60% wool by content; be sure to look at your labels!)
1/16″ satin ribbon (depending upon the length of your scarf, you might need two spools)
An embroidery needle (make sure the eye is big enough to accommodate your ribbon)
Shears
A 2-inch circle template (I actually used my 2-inch biscuit cutter)
Washable ink marker
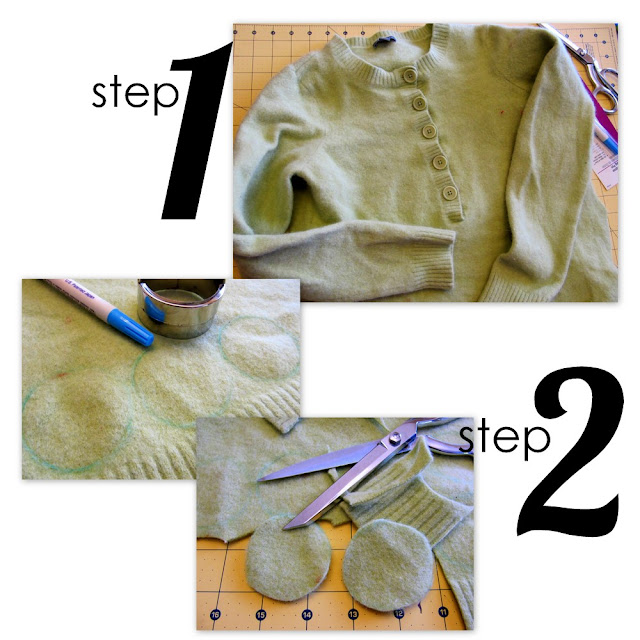
step 1 / felt your sweaters     Toss your sweaters into your machine without any detergent, and launder them on hot. When I said felting couldn’t be simpler, I meant it: once your sweaters come out of the wash, the amazing felt transformation will be complete. Now, if you still want a bit more felting to occur, toss the wet sweaters into your dryer (sans a dryer sheet) and dry on the hottest setting. Otherwise, lay your sweaters flat to dry completely.
step 2 / cut your circles     Take your circle template, and use it to trace circles onto your dry felted sweaters.  The number of circles you need will depend on your desired finished length for your scarf. You will need 5 circles per flower. My finished scarf was 21 flowers long, so I needed 105 total circles. Once you’re done tracing circles, use a sharp pair of shears to cut them out.
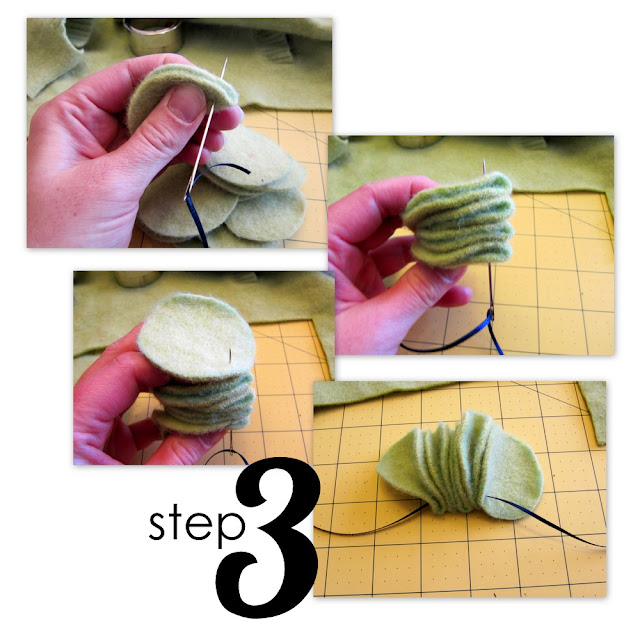
step 3 / assemble your flowers     For each flower, take 5 of the circles you cut out in step 2. Thread your embroidery needle with your ribbon, leaving one end the ribbon uncut from the roll. (I found this helped minimize the amount of wasted ribbon.) Fold 4 of your circles in half (like a taco), and stack them together. Insert your threaded needle through one of the pointed ends of your stack, and pull the ribbon through, as shown. Now, take your remaining circle, and thread the needle through the bottom edge from the back. You should now have a connected row of 4 joined folded circles and 1 unfolded circle.


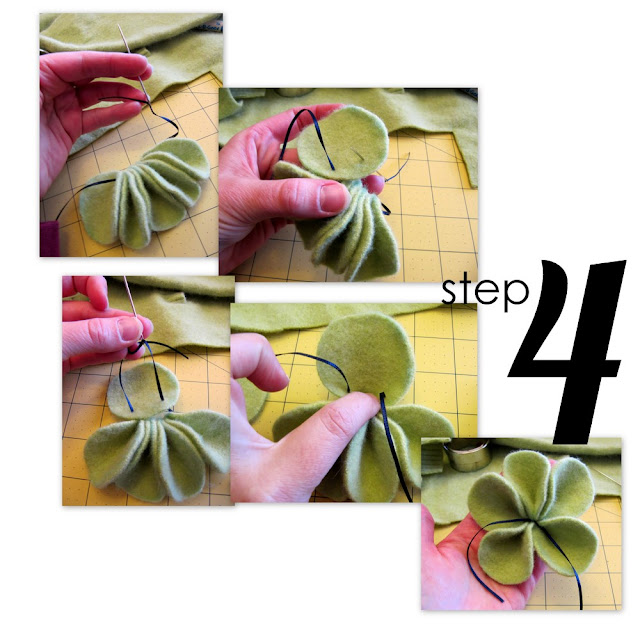
step 4 / finish your flowers     Unthread your embroidery needle, and slide your row of joined circles down the length of your ribbon, toward the cut end, leaving a 4-inch tail. Now, snip the other end of your ribbon from the roll, so a tail of 4 inches remains on that side as well. Thread this end of the ribbon (the end you just cut from the ribbon roll) through your embroidery needle. Remember that unfolded circle you joined to your row in step 3? You are now going to thread your needle up through the back of that circle, about 3/4-inch away from the point where the other strand of ribbon comes through. You should now have two ribbon tails coming through the front of that unfolded circle. Now, tighten those tails, making sure the circle folds in half like the others as you tighten. (You might need to tuck the point of that circle down inside the center of the flower with your finger to ensure it folds properly.) Tie the tails in a very tight knot, knotting at least 3 times to ensure it stays secure. You have completed one flower! Now, repeat steps 3 and 4 to complete the rest of your flowers for your scarf.
step 5 / assemble your scarf    (Because this step is a bit difficult to describe in words, I opted to do a video to show the process. See below.)  Line up your completed flowers in your desired configuration. To join each flower to the next, you will use 2 tied off ribbon loops through their adjoining petals. To do this, stagger the petals of two flowers so one petal of one flower is tucked neatly between two petals of the other. Thread your ribbon onto your embroidery needle, leaving the end uncut from the roll. Stitch the ribbon down and then back up through one of the inside joining points of your petals; trim your ribbon from the roll, leaving two approximately 3-inch tails on either side. Tie these tails in knots securely, as you did when you assembled your flowers. Now, rotate your flowers slightly so the next petal on your first flower can be nestled between the next two petals on your second flower. Stitch through the inside joining points of these flowers and secure with knots as you did before. Repeat these steps to connect your flowers until your scarf is the desired length. 
All done!

Suffice it to say, the shots I have of myself modeling this project are a bit, ahem, lacking. It is very difficult having a picture taken of oneself in a scarf while also leaving your identity a mystery (all of the SYTYC projects are anonymous until after voting has ended). The next two will show you how hard pressed I was to find a decent shot. I think giving Mr. Splendid a directive to take pictures of “just my chest” was my first mistake. 😉 The next was choosing to wear the rattiest looking black shirt in my closet. Geesh!

Project notes…

I actually used a pair of wool blend slacks for the grey herringbone flowers in my scarf. Think outside the box when it comes to materials! I think creating frayed versions of these flowers with quilting cotton would be darling!

I can’t stress enough the importance of tying very tight knots! I learned that the hard way after a couple of my flowers initially fell off the end of my scarf. Whoops!

***

As always, please don’t hesitate to let me know if you have any questions at all! And, if you haven’t already, I would truly appreciate it if you could head over to fill out the reader survey I posted yesterday. Thank you so much to those of you who have already done so. I have already garnered so much invaluable insight from reading through them!

Photobucket

Linking this to…

Visit thecsiproject.com
Tidy Mom I'm Lovin It Fridays

Photobucket
If you enjoyed this post, subscribe to Positively Splendid 
to receive updates, and join us on Facebook and Twitter!

  Subscribe in a Reader Receive Email Updates Follow on TwitterJoin us on Facebook
Photobucket

Amy @ Positively Splendid

Having grown up in a home brimming with sewing notions and paintbrushes, Amy has a deep love for all things creative. On any given day, you’ll find her knee-deep in her latest creative endeavor, with projects ranging from sewing and crafts to home decor and kid-friendly ideas. Amy believes that everyone, regardless of skill level or experience, possesses the ability to create something beautiful, and Positively Splendid was born of her passion for helping others harness their innate creative potential.
EVEN MORE GREAT IDEAS JUST FOR YOU!

FacebookTweetPinYummlyPrint

Filed Under: Crafts, Positively Handmade, Positively Seasons, Sewn Accessories, Tutorials, Wearable Crafts, Winter Tagged With: Scarves, Winter

Previous Post: « Reader Survey
Next Post: Next Post »

Reader Interactions

Comments

  1. Mommy Minded says

    January 12, 2011 at 11:03 pm

    Love it!

  2. Alison says

    January 13, 2011 at 12:12 am

    You are 100% Amy! I don’t think anyone could imitate your style!! I love this, and I love the vibrant colors! How do you have time for this after just moving?! Very impressive!

  3. Mel says

    January 13, 2011 at 1:03 am

    Stunning! I must attempt this and your instructions are magnificant.

    I didn’t notice your nostrils at all 🙂 I was staring at those long eyelashes.

  4. K-E Kreations says

    January 13, 2011 at 1:22 am

    Thanks so much for the great tutorial.

  5. Blessed Mommy of 2 says

    January 13, 2011 at 3:18 am

    LOL! Amy you crack me up! I never even noticed your nostrils. Your eyes are beautiful in this picture and that was what I saw until I read your comment. =) Lovely scarf btw!

  6. Michele {The Scrap Shoppe} says

    January 13, 2011 at 3:54 am

    Great tutorial, Amy! I love the extra ribbon you left from tying the flowers together. Great pic of you modeling it, too!

  7. Kelli @ RTSM says

    January 13, 2011 at 2:44 pm

    Such a pretty scarf!

  8. CREATIVE MIND says

    January 13, 2011 at 4:34 pm

    This is really nice..very well tutorial..thankssssss a lot….

  9. Rene says

    January 14, 2011 at 12:46 am

    I love it! Thanks for sharing how to make the flowers.

    -Rene

  10. Heather says

    January 14, 2011 at 1:51 pm

    I love, love, love this! Going to the thrift store tomorrow to find me some sweaters! New follower as well!

    Heather @ The Other White House

  11. red says

    January 14, 2011 at 1:53 pm

    I love it. It’s great, to think it just made out of those unused clothes! Thanks for sharing!

    Grow your eyelashes longer with Bimatoprost!

  12. Beverly @ FlamingoToes.com says

    January 15, 2011 at 2:38 am

    I saw your scarf on SYTYC and fell in love!! Thanks so much for sharing your tutorial! The scarf is so so cute.

  13. Krista says

    January 15, 2011 at 3:09 am

    This is really amazing. You are so clever!!

  14. Laura Sennott says

    January 16, 2011 at 3:38 am

    I just love this but wool sweaters are difficult to come by in Texas. Great idea!

  15. Chiara says

    January 16, 2011 at 3:51 am

    Creative and beautiful project. Thank you for the tutorial! I have never visited your blog–it is always fun finding a new, fun blog!

  16. Brandi says

    January 16, 2011 at 5:55 pm

    Gorgeous!

  17. Katie's Nesting Spot says

    January 16, 2011 at 10:14 pm

    Oh WOW I LOVE it!

  18. Lisa Brown says

    January 17, 2011 at 4:37 am

    LOVE this! Thanks for the great tutorial!

  19. The Tootsie Wootsie says

    January 17, 2011 at 5:06 am

    This Scarf is really cute!

    Please come by and link this to my party!

    http://WWW.TOOTSIEWOOTSIEBOUTIQUE.BLOGSPOT.COM

    And i have a great Giveaway going one for ITHINKSEW.COM!

    -THE TOOTSIE WOOTSIE 🙂

  20. Lou says

    May 21, 2011 at 4:49 pm

    I came across your site after searching for ‘felt patterns.’ Thank you so much for sharing the details of your scarf creation- it looks beautiful and the instructions are so clear.

Primary Sidebar

PS Search

Search this website

Seasonal Inspiration

Hocus Pocus Wreath
Ghost Plushies
Paper Pumpkins
Fabric Yo-Yo Pumpkins

Copyright © 2025 · Positively Splendid · All Rights Reserved. · Privacy Policy

Privacy & Cookies: This site uses cookies and other tracking technologies to assist with navigation and your ability to provide feedback, analyse your use of our products and services, assist with our promotional and marketing efforts, and provide content from third parties. To find out more, as well as how to remove or block these, see here: Our Cookie/Privacy Policy