• Skip to primary navigation
  • Skip to main content
  • Skip to primary sidebar

Positively Splendid {Crafts, Sewing, Recipes and Home Decor}

Handcrafted. Splendidly.

  • Home
  • Blog
  • + Handmade
    • Crafts
      • Craft Gift Ideas
      • Holiday Crafts
      • Home Decor Crafts
      • Kids’ Crafts
      • Paper Crafts
      • Quick and Easy Crafts
      • Wearable Crafts
      • Wreaths
    • Gift Ideas
      • Budget-Friendly Gifts
      • Gift Wrapping
      • Gifts for Dads and Grandpas
      • Gifts for Kids
      • Gifts for Men
      • Gifts for Moms and Grandmas
      • Gifts for Neighbors
      • Gifts for Sports Fans
      • Gifts for Teachers
      • Gifts for Women
      • Quick and Easy Gifts
    • Kid-Friendly Projects
    • Sewing
      • Sewing for Children
      • Sewing for Men
      • Sewing for the Home
      • Sewing for Women
      • Sewing Techniques
      • Sewn Accessories
      • Sewn Gifts
  • + Home & Garden
    • DIY Home Decor Projects
    • Helpful Tips
    • Home Decor Crafts
    • DIY
    • Home Tour
    • Mantels and Tablescapes
    • Organization
    • Outdoor and Garden
  • + Holidays & Seasons
    • Spring
    • St. Patrick’s Day
    • Summer
    • Teacher Appreciation
    • Thanksgiving
    • Valentine’s Day
    • Winter
    • Back to School
    • Christmas
    • Easter
    • Fall
    • Fathers’ Day
    • Graduation
    • Halloween
    • Independence Day
    • Mothers’ Day
    • New Year’s
  • + Printables
  • + Recipes
    • Soups and Stews
    • Appetizers and Salads
    • Breads
    • Desserts
    • Food Crafts
    • Main Dish

DIY Beaded Necklaces

August 13, 2013 By Amy @ Positively Splendid

FacebookTweetPinYummlyPrint
Hello PS Readers! I am so excited to be back today to share this quick, fun and easy tutorial with you! I am not a huge jewelry wearer (you can more often find me in workout clothes and headbands ;); but when I do, I like my necklaces to be bold, simple and colorful. When I spotted some simple lacquer bobble necklaces in a boutique for upwards of $20, I knew I could DIY my own version for much cheaper! Not only are these a fun project to fill an afternoon, but you can likely make them using supplies you have on hand (if you don’t have them in your stash, they’re super inexpensive!), AND you can make them to match every outfit in your wardrobe!


These are super quick and simple to pull together! Here’s what you need:


  1. Wooden beads in a variety of sizes (I used two sizes in my necklaces)
  2. A safety pin (for stringing your beads)
  3. Two 1″ wide x 30″ long (you can always make them shorter at the end!) strips of knit fabric in your preferred color or pattern (this is a perfect project to use up those scraps!) Knit is my choice here because it doesn’t fray, it’s soft and simple, comes in a variety of colors, and can stretch as needed.
  4. Playdough (optional) – for painting
  5. Toothpicks (optional) – for painting
  6. Acrylic paint (in a matching/coordinating color) and a paint brush
When I first set out to do this project, I had a tough time finding wooden beads. Sure enough, I found them in Hobby Lobby for just a few dollars. Here are the ones I used – I got two necklaces out of these 20 beads.


I wanted to paint my beads all in one shot, so I used play dough and toothpicks to help me out!
  • Roll your play dough into tiny balls that can fit into your beads.
  • Stuff the play dough into the hole of the beads.
  • Insert a toothpick into the play dough.


Now, holding onto the toothpick, paint your beads with the acrylic paint and paint brush.


To allow your beads to dry without having to place them down onto a flat surface, insert the toothpicks into some Styrofoam (I used a wreath form I picked up from the Dollar Store ages ago). Once your paint is dry, give your beads a few light coats of clear gloss spray. This makes the paint finish harder and more durable, and gives your beads that “lacquered” look!


Once your beads are dry, remove the play dough and toothpicks. Now it’s time to string them up and make a necklace!


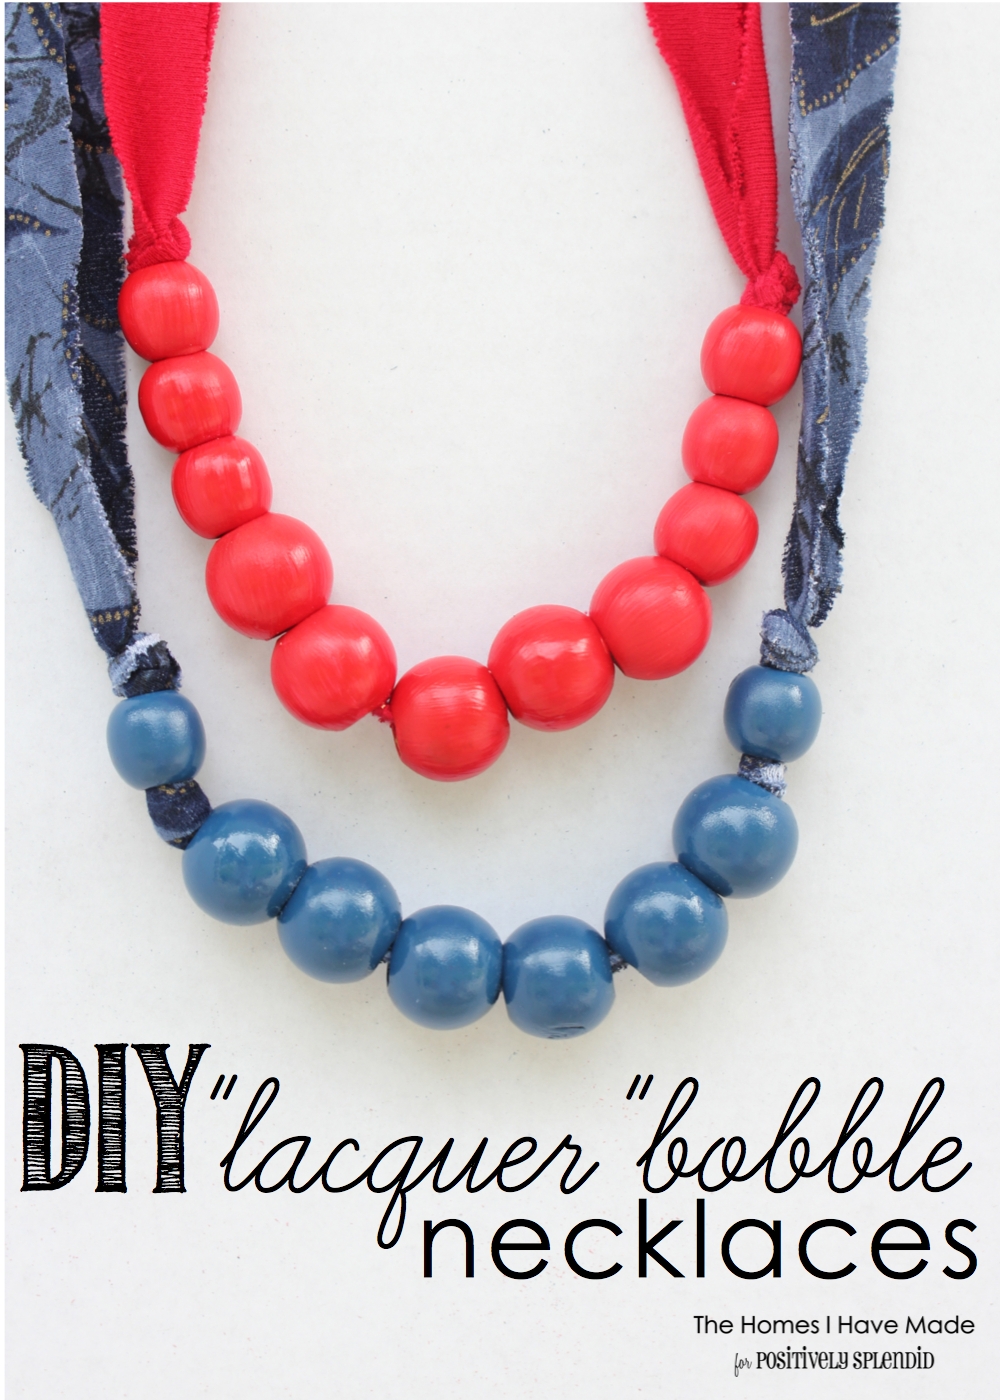
  • I used two knit strips for my necklaces to make them a little more durable and to make my knots a little bigger on each end of the bobbles.
  • First, stack the knit strips on top of each other and pin them together with a safety pin.
  • Then, string the beads onto the knit using the safety pin as a needle. My “pattern” was 3 small beads > 5 big beads > 3 small beads. I knotted off the ends of the beads by tying my two knit strips together into knots.


Now your necklace is done! Such a simple project and fun fashion statement!


For the navy blue necklace, I wanted to try a different paint method. I placed my leftover beads onto a slab of wood and gave them several light coats of blue spray paint. Once they were fully dry, I flipped the beads over and repeated on the other side.


Once the beads were fully dried and cured, I repeated the same process to make the necklace. This time I tied a knot > one small bead > another knot > 5 large beads > knot > small bead > knot.


Two very simple necklaces that cost just a few dollars to make using supplies I mostly had on hand!


I like keeping the strings long so I can customize the length of my necklace based on my outfit. To wear the necklace, just knot it off at the length you like!


As always, thanks to Amy for having my stop by today. If you haven’t yet, I’d love it you came over to visit me at The Homes I Have Made and follow along in my decorating and crafting adventures! Hope you all have a great end to the summer!

Amy @ Positively Splendid

Having grown up in a home brimming with sewing notions and paintbrushes, Amy has a deep love for all things creative. On any given day, you’ll find her knee-deep in her latest creative endeavor, with projects ranging from sewing and crafts to home decor and kid-friendly ideas. Amy believes that everyone, regardless of skill level or experience, possesses the ability to create something beautiful, and Positively Splendid was born of her passion for helping others harness their innate creative potential.

EVEN MORE GREAT IDEAS JUST FOR YOU!

FacebookTweetPinYummlyPrint

Filed Under: Crafts, Gift Ideas, Gifts for Women, Quick and Easy Crafts, Quick and Easy Gifts, Tutorials, Wearable Crafts Tagged With: Crafts, jewelry, Sewn Accessories

Previous Post: « My Favorite Projects from Our Previous Home
Next Post: Custom Monogram Key Chains »

Reader Interactions

Comments

  1. Jenni says

    August 13, 2013 at 5:11 am

    Thanks for the ingenious way to paint beads! The necklaces are really cute. I have some wooden beads waiting for some activity!

  2. Crystal says

    August 13, 2013 at 9:26 pm

    Super cute!! I love the beaded necklace!! Thanks for the tutorial!!

  3. Jennifer @ Decorated Chaos says

    August 13, 2013 at 10:53 pm

    Very cool. Both necklaces look great!

  4. Home Coming says

    August 19, 2013 at 2:25 pm

    Beautiful job! I’d love if you’d link up to The DIY’ers. http://homecomingmn.blogspot.com/2013/08/the-diyers-and-our-country-weekend.html

Primary Sidebar

PS Search

Search this website

Seasonal Inspiration

Hocus Pocus Wreath
Ghost Plushies
Paper Pumpkins
Fabric Yo-Yo Pumpkins

Copyright © 2023 · Positively Splendid · All Rights Reserved. · Privacy Policy

Privacy & Cookies: This site uses cookies and other tracking technologies to assist with navigation and your ability to provide feedback, analyse your use of our products and services, assist with our promotional and marketing efforts, and provide content from third parties. To find out more, as well as how to remove or block these, see here: Our Cookie/Privacy Policy