• Skip to primary navigation
  • Skip to main content
  • Skip to primary sidebar

Positively Splendid {Crafts, Sewing, Recipes and Home Decor}

Handcrafted. Splendidly.

  • Home
  • Blog
  • + Handmade
    • Crafts
      • Craft Gift Ideas
      • Holiday Crafts
      • Home Decor Crafts
      • Kids’ Crafts
      • Paper Crafts
      • Quick and Easy Crafts
      • Wearable Crafts
      • Wreaths
    • Gift Ideas
      • Budget-Friendly Gifts
      • Gift Wrapping
      • Gifts for Dads and Grandpas
      • Gifts for Kids
      • Gifts for Men
      • Gifts for Moms and Grandmas
      • Gifts for Neighbors
      • Gifts for Sports Fans
      • Gifts for Teachers
      • Gifts for Women
      • Quick and Easy Gifts
    • Kid-Friendly Projects
    • Sewing
      • Sewing for Children
      • Sewing for Men
      • Sewing for the Home
      • Sewing for Women
      • Sewing Techniques
      • Sewn Accessories
      • Sewn Gifts
  • + Home & Garden
    • DIY Home Decor Projects
    • Helpful Tips
    • Home Decor Crafts
    • DIY
    • Home Tour
    • Mantels and Tablescapes
    • Organization
    • Outdoor and Garden
  • + Holidays & Seasons
    • Spring
    • St. Patrick’s Day
    • Summer
    • Teacher Appreciation
    • Thanksgiving
    • Valentine’s Day
    • Winter
    • Back to School
    • Christmas
    • Easter
    • Fall
    • Fathers’ Day
    • Graduation
    • Halloween
    • Independence Day
    • Mothers’ Day
    • New Year’s
  • + Printables
  • + Recipes
    • Soups and Stews
    • Appetizers and Salads
    • Breads
    • Desserts
    • Food Crafts
    • Main Dish

Bead-Embellished DIY Cake Stands

February 7, 2013 By Amy @ Positively Splendid

FacebookTweetPinYummlyPrint
The talented Megan from The Homes I Have Made is here today to share a terrific how-to for DIY cake stands. These can be made so inexpensively, you’ll want to make some for every room in the house! Take it away, Megan!


Hello PS Readers! This is Megan from The Homes I Have Made, and I am so excited to be back on Amy’s team for another round of fun and fresh projects and crafts! Guest posting here on Amy’s fantastic blog is the highlight of my month, and I am really excited to share my latest project with you all.


Over the last week or so, I’ve been busy sprinkling our house with heavy doses of pink and red, hearts and flowers…all in anticipation of Valentine’s Day! When my holiday mantel was looking a little one dimensional, I knew this was the perfect opportunity to try and re-create a cake stand I had seen at a flee market a few weeks back. Using some really affordable materials from the craft and hardware store, I created these two adorable cake stands that not only provide some fun levels for my Valentine’s display, but can also be used year round in a variety of ways!


These were really easy and really fun…let me show you how I did it!

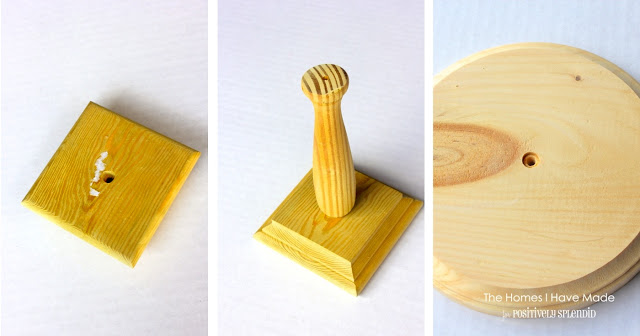
I picked up all my supplies at Michaels and Lowes; everything was really inexpensive, each finished plate cost me about $10! Here are your raw materials:
  1. Un-finished wood staircase spindle ($1.97)
  2. Beads in a variety of sizes ($0.99/strand)
  3. Wooden rounds ($2-$4)
  4. Fence post toppers ($0.97)
You’ll also need some basic supplies (not pictured): wood saw, wood screws, drill and drill bit, wood filler, hot glue and hot glue gun, spray primer, spray paint, and clear protective poly spray.


Okay, start by cutting down the staircase spindle to more manageable lengths. I chose to use the spindle because it was a lot cheeper than fancy unfinished table legs (which you could also use if you don’t have the means to cut down the wooden spindle). But I also liked that by cutting the leg down in various locations, you end up with very different looks for each cake stand. (NOTE – If you are cutting these yourself, make sure your cuts are straight and level – this will dramatically effect the levelness of your plate in the end!) You can cut your’s anywhere you want, here’s where I cut mine:


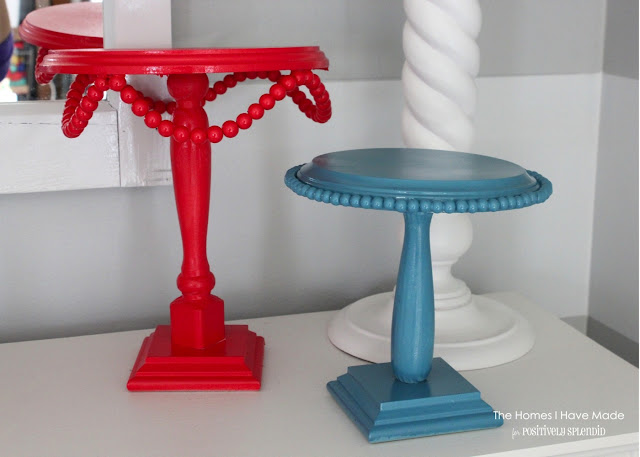
When deciding how long to cut your pieces, take into account the finished height you want your stand to be as well as the size of your top platform. My larger cake stand got a taller post, while the smaller cake stand got a shorter post. Below, you can see the various elements that went into each stand!


For the small stand, I used a 7″ round, a standard fence post topper, a 5.5″ cut spindle, and 2 12″ lengths of small beads.


For the larger stand, I used a 9″ round, a standard fence post topper, a 8.5″ cut spindle, and 4 6″ strands of larger beads.


Next, assemble your stand. Using a drill and appropriate size drill bit for your wood screws, pre-drill holes in the center of each stand piece, and screw one section to the next as you go.


Both in the very bottom and on the very top, countersink your screws so they are more-than-flush with the wood surface. You don’t need to worry about the screw on the bottom, but to create an even surface on the top of your plate, fill the hole with wood filler and sand smooth.


Both of my plates were assembled in the exact same fashion. Once you have your plate put together exactly as you want it, it’s time to embellish it. For the smaller plate, I simply glued the string of beads (exactly as I bought them) to the edge of the wood round using hot glue. Try to be “clean” with your glue and use as little as necessary (while still keeping everything firmly attached) because although clear now, once sprayed, you can see the glue a lot more!


For the larger cake stand, I wanted to do a swag effect. My 6″ strands weren’t going to work individually, so I re-strung them onto fishing line to make one long string of beads.


Next, I hot glued the beads at regular intervals on the underside of the wooden round. This may take some trial and error and some tweaking to get your spacing just right.


Here are my plates all ready for their finishing paint job!


I am a big fan of primer – I find that a well-primed surface ensures nice and even paint coverage! As such, I started by spraying both plates with Zinsser 123 Primer.


I then followed up with several light coats of red and turquoise spray paint.


Lastly, I gave them each a coat of Rustoleum clear gloss for final protection!


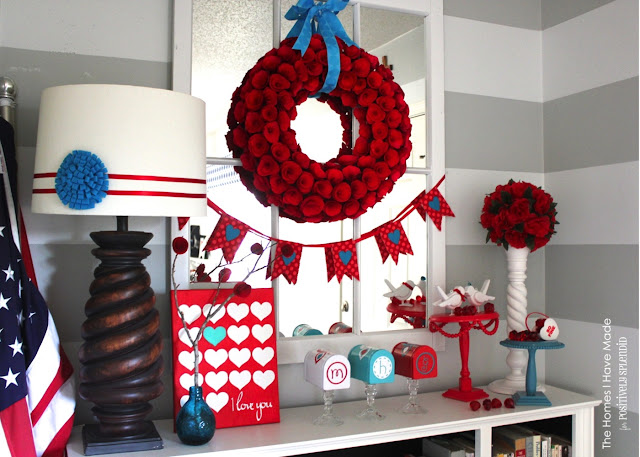
And that’s it!!!!  Now you can use your cake stands however you wish. Mine were brought right inside and put on my Valentine’s Day mantel!

Although they can hold there own without anything on top, I wanted to use the stands for more display surfaces:


The big plate holds two “Love Birds”… (come on over and visit me HERE and I’ll show you how I made them 🙂


While the smaller blue plate holds a “conversation heart” bucket full of rubies!


Together, they create a fun and festive display for Valentine’s Day!


These stands can be assembled in so many different ways and colors – the possibilties really are endless. And whether you need them for displaying treats or decor, or even to adorn a bookcase, they are such a fun accessory to have on hand!

As always, a big thanks to Amy for having me stop by today. I hope you all have a fantastic Valentine’s Day! I’d love it if you hopped on over to say “HI” to me HERE…and please follow along in my crafting adventures!


Follow Megan on her Blog :: Pinterest :: Facebook :: Google+


Amy @ Positively Splendid

Having grown up in a home brimming with sewing notions and paintbrushes, Amy has a deep love for all things creative. On any given day, you’ll find her knee-deep in her latest creative endeavor, with projects ranging from sewing and crafts to home decor and kid-friendly ideas. Amy believes that everyone, regardless of skill level or experience, possesses the ability to create something beautiful, and Positively Splendid was born of her passion for helping others harness their innate creative potential.

EVEN MORE GREAT IDEAS JUST FOR YOU!

FacebookTweetPinYummlyPrint

Filed Under: Crafts, Home Decor Crafts, Positively Seasons, Tutorials, Valentine's Day Tagged With: Cake Stands, Crafts, House and Home, Positively Home & Garden, Valentine's Day

Previous Post: « The Inspiration Board
Next Post: Ruffled Heart Valentine Wreath (February Silhouette Promotion) »

Reader Interactions

Comments

  1. Lisa~ says

    February 7, 2013 at 9:42 am

    These are super cute! Very similar to something I sell on my etsy shop, but I never thought of the beads….genius! Lisa~

  2. Crystal says

    February 7, 2013 at 10:46 am

    Love it!! I can’t believe you made it. It sooo pretty and fun! I love the beads on both of them…it adds a decorative touch! Your mantle looks incredible!! Thanks for the tutorial!

  3. Rhonda says

    February 7, 2013 at 12:40 pm

    Too cute!!! LOVE these.

  4. Irene says

    February 7, 2013 at 4:27 pm

    Me encanta la idea! La utilizaré para exponer bisutería en mi tienda!

    • Amy @ Positively Splendid says

      February 8, 2013 at 7:27 am

      Tu idea es fantastica Irene! Gracias por compartirla!

  5. Kara says

    February 7, 2013 at 4:35 pm

    These are so pretty! And I love that you can make them any height you like. Love the mantel too! 🙂

Primary Sidebar

PS Search

Search this website

Seasonal Inspiration

Hocus Pocus Wreath
Ghost Plushies
Paper Pumpkins
Fabric Yo-Yo Pumpkins

Copyright © 2023 · Positively Splendid · All Rights Reserved. · Privacy Policy

Privacy & Cookies: This site uses cookies and other tracking technologies to assist with navigation and your ability to provide feedback, analyse your use of our products and services, assist with our promotional and marketing efforts, and provide content from third parties. To find out more, as well as how to remove or block these, see here: Our Cookie/Privacy Policy