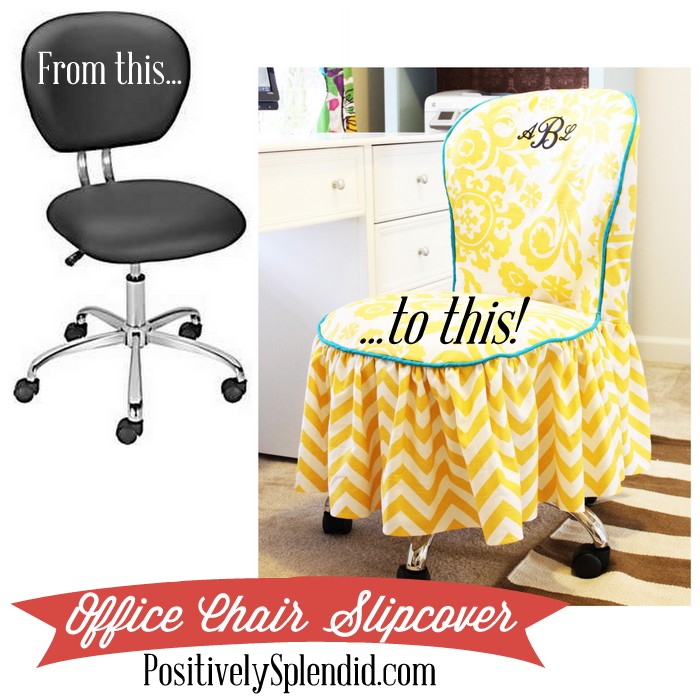
Transform an unsightly office chair into something with panache with a custom-fit DIY slipcover! If you have never attempted a slipcover project of any sort, this is a great way to get your feet wet with the process. Let me show you how it’s done!
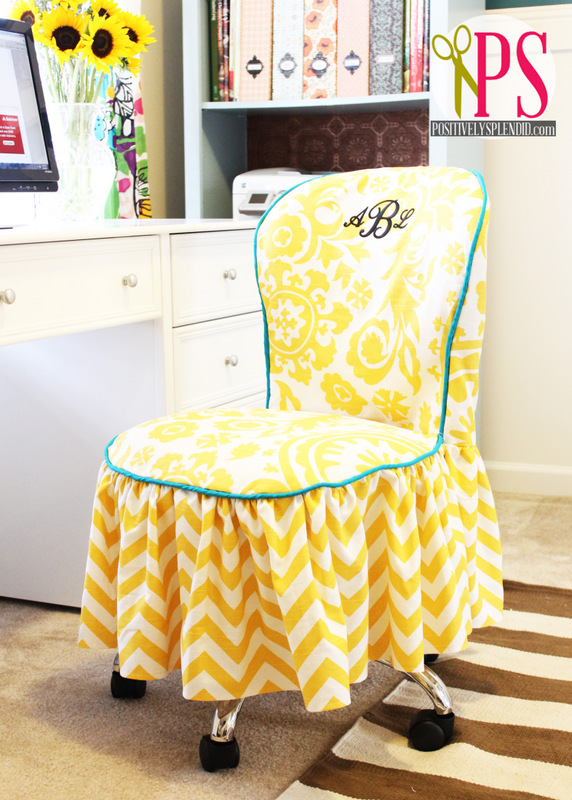
When I completed my sewing room/home office last year, I knew I needed a comfortable chair for sewing, and one that was preferable on wheels and had no arms. After much consideration, The chair I opted to work with was the Islie office chair from Staples. At under $50, it was a great value, and I have to say that after months of use, it is incredibly comfortable to use for sewing, crafting and computer work. (Note: This exact chair is evidently no longer available.)

As you can see, though, this chair, even with all of its great features, really isn’t much to look at! Armed with a desire to make it fit seamlessly into my room’s decor, I set to work on my very first slipcovering project. The end result was better than I could ever have dared hope for!
The process for making a slipcover like this one is done in two phases: drafting the slipcover pattern and sewing the slipcover. Today’s post will explain how to do all of that from start to finish!
Drafting the Slipcover Pattern
Note: For this portion of the project, I highly recommend using muslin or a section of fabric you don’t particularly care about. See my notes below.
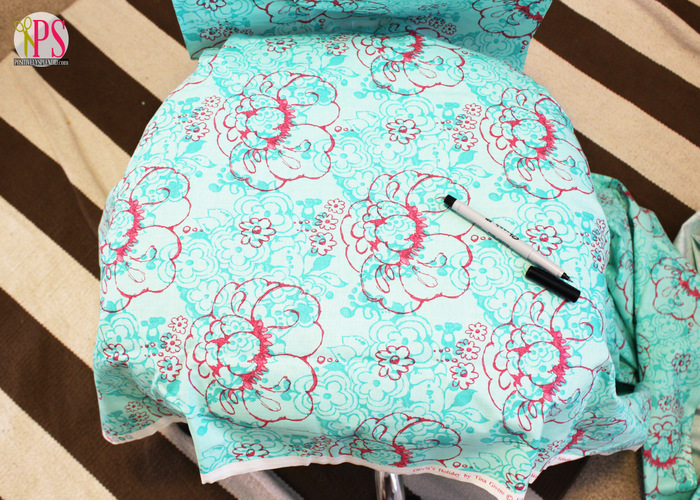
With the front of the chair facing you, lay a section of fabric over the front side of the seat back, and use painter’s tape or packing tape to anchor the fabric to the chair. (This will enable you to trace a steady line, even if you are working alone.)
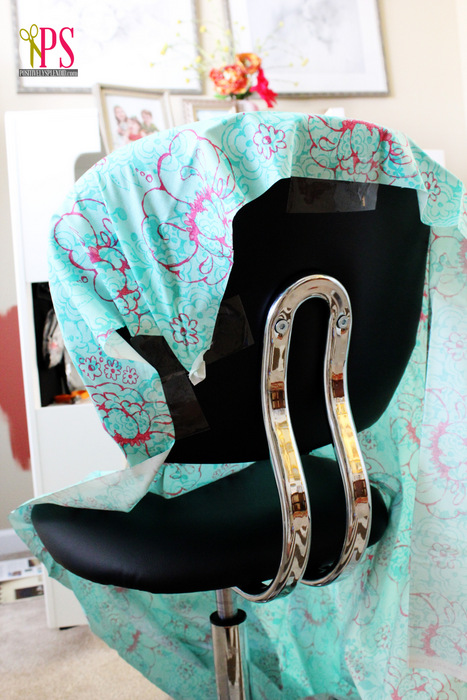
Starting along the top edge of the chair, carefully trace the contour of the top and sides of the chair back. My chair’s back rest is connected to the seat with a metal bar, so to create the illusion that the back is all one piece, I extended the side line all the way to the point at which it meets the seat bottom, curving it slightly for a shapely look. When you reach the seat portion of the chair, trace along the contour of the seat bottom to connect the left and right lines and form a continuous outline of the front seat back piece. Cut 1/2″ all the way around the outline you drew. (The 1/2″ is for seam allowance.) Label this piece “Front Seat Back,” and set it aside for now.
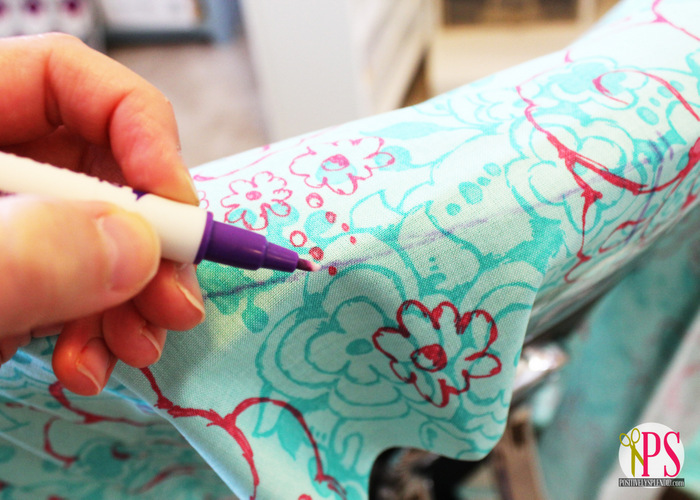
Now, lay the fabric over the seat portion of the chair, and use a marker to trace the shape of this section, tracing all the way around the perimeter of the section. Important: Make sure to clearly label the back edge of the piece. Cut 1/2″ all the way around the line you drew. Label this piece “Seat Bottom,” and set it aside for now.
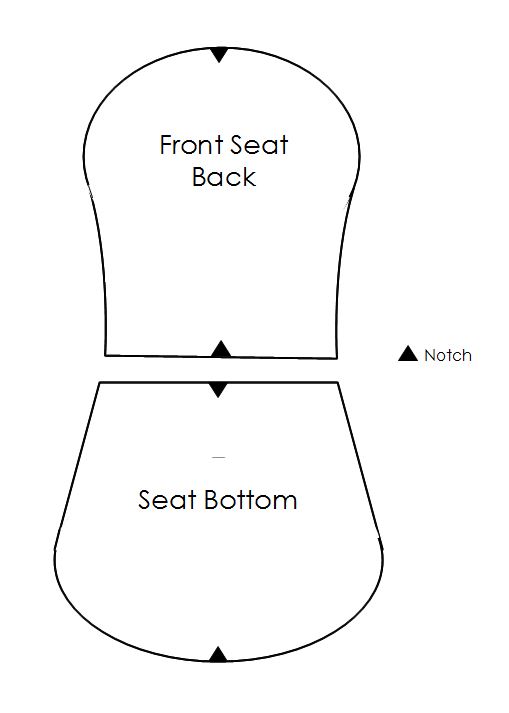
Fold each of the above pieces in half width-wise to ensure they are as symmetrical as possible, making minor adjustments to each side as necessary. With each piece folded in half, make a small snip at the top and bottom of the fold to clearly mark the top and bottom center of each piece. (Refer to the diagram below.)
Place the lower edge of the front seat back piece and the back edge of the seat bottom piece together, right sides facing, aligning the notches you made in the previous step. Stitch together with a 1/2″ seam allowance. Place the assembled piece on the chair, anchoring it with tape if necessary. Take a step back. Does it look pleasantly proportioned? Are there any areas you would like to tweak? If so, make those adjustments now. These two pieces will form the overall silhouette for the slipcover, so it is very important that you get things just right! When the adjustment process is finished and the pieces are exactly as you want them, remove the section from the chair and set it aside.
With the back of the chair facing you, affix another large section of fabric to the chair back with tape. Make a large mark at the top center of the chair back. Trace all the way around the perimeter of the chair back, drawing a straight line across the bottom a few inches below where the chair back meets the chair seat. Cut 1/2″ around the perimeter of the section you just traced. Label this piece “Seat Back Piece,” and set it aside for now.
Place the assembled seat front piece face up on a large work surface, so that the seat bottom portion is folded down and out of the way. Place the seat back section face down on top of the front seat back section, aligning the top center marks. Pin all the way around the outer edges of the pieces. Following the contour of the front seat back piece, stitch the pieces together with a 1/2″ seam allowance. If you discover that the seat back piece has far more than a 1/2 seam allowance after you stitch, trim away any excess that remains on the seat back piece after this step, so that the front seat back and the seat back have precisely the same contour.
Now, fit the slipcover onto the office chair. Is it extremely likely that at this point, you will have a great deal of excess fabric on the seat back piece. We will eliminate this by creating a button placket. I made a quick video to show you how to do so.
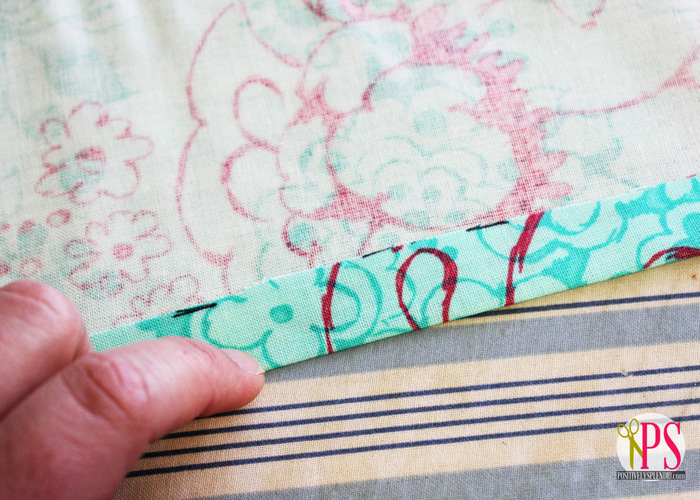
Fold the center edge of each back piece under 3/4″; press. Fold under another 3.4″; press. Stitch to form a hem.
Place the seat front piece face up on a work surface. Fold the seat portion of the piece down and out of the way. Align the left back panel at the center of the front chair back piece, right sides facing, pinning along the contour of their outer edges. Overlap the right back panel on top of the left panel, and pin it along the opposite side in the same manner. Stitch the sections together with a 1/2″ seam allowance.
Slip the cover back onto the chair, and pin the placket shut. Does the silhouette of the slipcover look proportioned? Are you satisfied with the contour of the cover, or are there any adjustments that need to be made? If so, tweak and adjust until you are completely satisfied.
You are almost finished! Now you just need to measure for our slipcover skirt pieces. To do so:
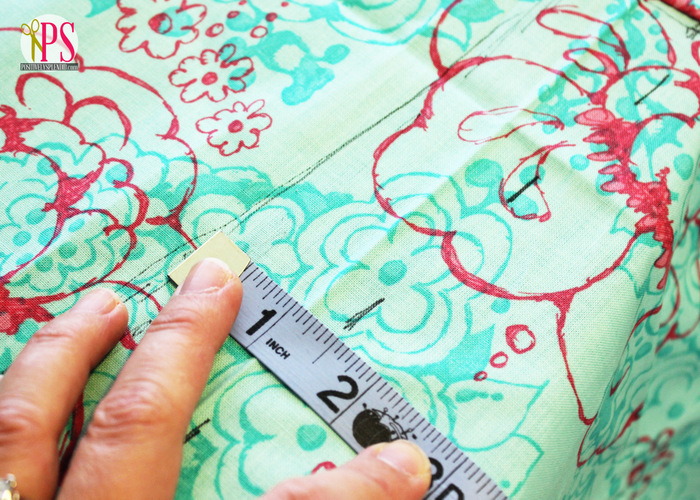
- Measure all the way around the seat bottom portion of the cover. Double this number. Write down this measurement, labeling it X.
- Measure from the center (placket) edge of one of the back pieces to the outer edge. Double this number. Write down this measurement, labeling it Y.
- Measure how long you wish the chair skirt to be, and add 1/2″ for seam allowance. Write down this measurement, labeling it Z. Keep in mind that if your chair has the ability to lift up and down, your skirt will need to be measured for the chair at its lowest position.
Congratulations! The difficult portion of the process is complete! You now have an office slipcover pattern that can be used again and again.
Sewing the Slipcover
With the pattern pieces drafted, you can now cut slipcover pieces from your chosen fabric. I recommend using high-quality home decorator fabric for this purpose, as chairs like this one will receive a lot of wear and tear over time.
You will need:
- 1 Front Seat Back Piece
- 1 Seat Bottom Piece
- 2 Seat Back Pieces (Make sure when cutting out the seat back pieces that you cut two pieces that mirror each other, so that you will have a left and and right flap.)
- 1 Front Skirt Piece that is X” x Z”. (Refer to the measurements you calculated above.)
- 2 Back Skirt Pieces that are Y” x Z”.
To sew the slipcover:
- Stitch together the Front Seat Back piece and the Seat Bottom piece together as you did in the pattern-drafting step.
- Fold the center edge of each Back Piece under 3/4″; press. Fold under another 3.4″; press. Stitch to form a hem.
- Place the seat front piece face up on a work surface. Fold the seat portion of the piece down and out of the way. Align the left back panel at the center of the front chair back piece, right sides facing, pinning along the contour of their outer edges. Overlap the right back panel on top of the left panel, and pin it along the opposite side in the same manner. Stitch the sections together with a 1/2″ seam allowance.
- Use a narrow hem to finish one of the long edges and each of the short edges of the skirt pieces.
- Run a line of gathering stitches along the raw edge of each skirt piece, and pull the threads to gather each piece.
- Pin the Front Skirt Piece to the Seat Bottom section, right sides facing, adjusting the gathers in the skirt piece as necessary. Stitch with a 1/2″ seam allowance.
- Pin one of the Back Skirt Pieces to the left back flap, right sides facing, adjusting the gathers in the skirt piece as necessary. Stitch with a 1/2″ seam allowance. Repeat with the remaining Back Skirt Piece.
- Make button holes along the back placket and attach buttons for a closure. (Or, if preferred, sew Velcro onto each side of the placket for a closure, and then glue buttons to the outside of the placket to give the appearance of a real button closure.)
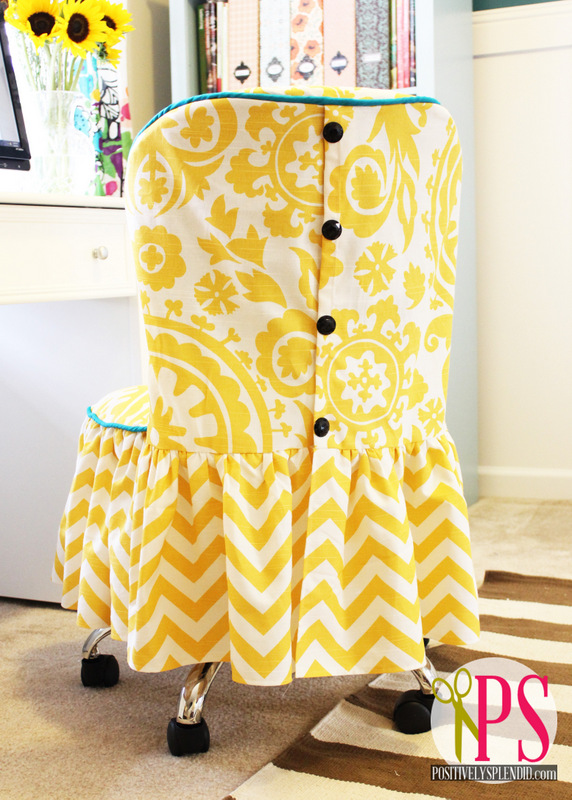
I opted to increase the appeal of my slipcover by inserting piping between the seat bottom and the ruffle, as well as the seat front and back pieces. (If you aren’t familiar with piping, I shared a great piping tutorial last year.) I also added an iron-on set of monogram letters to the front seat back. Love!
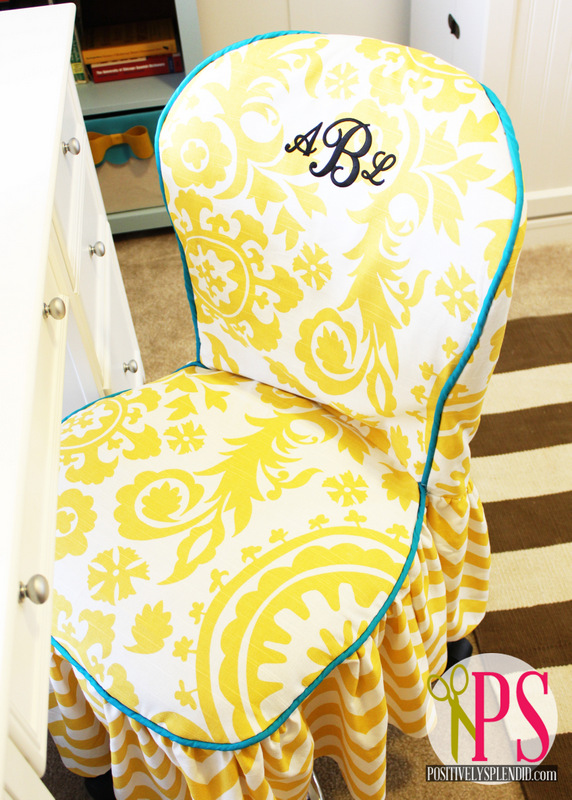
One of my favorite parts of the entire cover is the sweet button placket at the back. Using contrasting, showy buttons really is a nice touch on this cover.
This was my very first foray into slipcovering, and as I worked on this project, I learned a number of things:
- Slipcovering can be a somewhat tedious process, as it requires measuring, tracing, cutting and adjusting many times in order to achieve just the right look. Patience is a must!
- DO NOT cut into your final fabric before you have had a chance to develop a trustworthy pattern from other fabric! I recommend using a muslin or fabric you don’t love for the pattern-drafting step.
- If possible, when selecting an office chair for slipcovering, select one without arms. Armless office chairs offer a nice, straightforward surface to work with, and the overall lines don’t have to be terribly exact for the entire project to turn out looking fabulous.
- Inserting piping between a ruffled layer is very, very tricky, and requires a ton of patience and a workhorse of a machine! When I make a cover again, I might consider making a 1.5″ apron strip to place between the skirt and the seat bottom portions of the cover.
Thanks so much for stopping by, and happy sewing!
Having grown up in a home brimming with sewing notions and paintbrushes, Amy has a deep love for all things creative. On any given day, you’ll find her knee-deep in her latest creative endeavor, with projects ranging from sewing and crafts to home decor and kid-friendly ideas. Amy believes that everyone, regardless of skill level or experience, possesses the ability to create something beautiful, and Positively Splendid was born of her passion for helping others harness their innate creative potential.
Wow — absolutely beautiful — great job. I have covered side chairs (which was hard) but never thought of my office chair. My current chair has arms that swing up and I love it — will have to think it through, but I love this. Thanks for the tutorial! Love the button placket.
This is an awesome tutorial! I really love your page and look forward to exploring more! I’m about to start some sewing projects, and I’m glad to have your site as a reference!
Love this! I now want to slipcover my chair in my office at work. I also need to buy a new chair for my sewing room (my back needs it!) and I haven’t because I didn’t like the look of the plain black with my turquoise, pink, and orange room. Now I can make it look however I want. Thank you!
This turned out great! Thanks for the very detailed tutorial 🙂
What a beautiful place to put your rump! I am really impressed! You have convinced me that making a slip cover isn’t totally out of the realm of possibility.
This looks great! I pinned it since I don’t have time to read the whole thing now. Thank you! My office chair could use a makeover!
Fantastic!
Really nice and a bit on the happy/frilly/sunny side! I bet this will boost the moral when things go wrong(they do from time to time, don’t they? When you have to unpluck a yard of stitches, for example…).
Great fun to see all of your monogramming, you have the excact same initials as my daughter!
So neat to hear I share a monogram with your daughter! It appears they are great initials indeed. 🙂 Thanks so much for stopping in!
What a lovely way to brighten up your workspace! Now your chair looks downright royal.
Love, love, love it!! It is so cute and fun!! Love it!!
Thank you so much this is an amazing post about slipcovers. I will surly try this. If you have any post on computer slipcovers. So please share with me.
Thank you so much for the tutorial! This is my next project in making over my crafting room – and I only had a vague idea of how to do this. I only hope mine turns out nearly as lovely as yours.