• Skip to primary navigation
  • Skip to main content
  • Skip to primary sidebar

Positively Splendid {Crafts, Sewing, Recipes and Home Decor}

Handcrafted. Splendidly.

  • Home
  • Blog
  • + Handmade
    • Crafts
      • Craft Gift Ideas
      • Holiday Crafts
      • Home Decor Crafts
      • Kids’ Crafts
      • Paper Crafts
      • Quick and Easy Crafts
      • Wearable Crafts
      • Wreaths
    • Gift Ideas
      • Budget-Friendly Gifts
      • Gift Wrapping
      • Gifts for Dads and Grandpas
      • Gifts for Kids
      • Gifts for Men
      • Gifts for Moms and Grandmas
      • Gifts for Neighbors
      • Gifts for Sports Fans
      • Gifts for Teachers
      • Gifts for Women
      • Quick and Easy Gifts
    • Kid-Friendly Projects
    • Sewing
      • Sewing for Children
      • Sewing for Men
      • Sewing for the Home
      • Sewing for Women
      • Sewing Techniques
      • Sewn Accessories
      • Sewn Gifts
  • + Home & Garden
    • DIY Home Decor Projects
    • Helpful Tips
    • Home Decor Crafts
    • DIY
    • Home Tour
    • Mantels and Tablescapes
    • Organization
    • Outdoor and Garden
  • + Holidays & Seasons
    • Spring
    • St. Patrick’s Day
    • Summer
    • Teacher Appreciation
    • Thanksgiving
    • Valentine’s Day
    • Winter
    • Back to School
    • Christmas
    • Easter
    • Fall
    • Fathers’ Day
    • Graduation
    • Halloween
    • Independence Day
    • Mothers’ Day
    • New Year’s
  • + Printables
  • + Recipes
    • Soups and Stews
    • Appetizers and Salads
    • Breads
    • Desserts
    • Food Crafts
    • Main Dish

Easy Family Superhero Costumes

October 25, 2012 By Amy @ Positively Splendid

FacebookTweetPinYummlyPrint
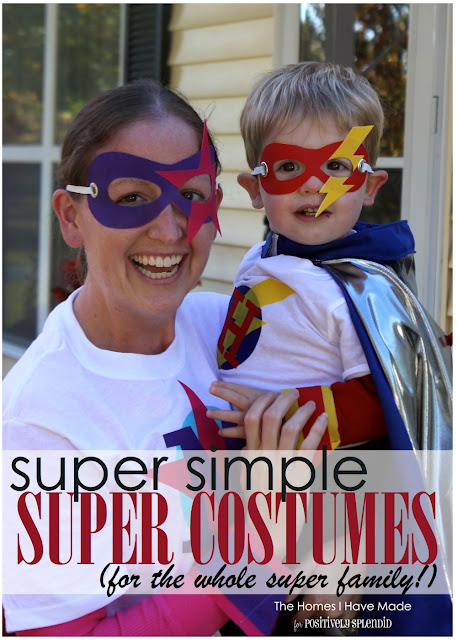
Who can believe Halloween is less than one week away? If you’re at a loss for a quick and easy costume idea suitable for everyone in your family, PS contributor Megan is ready to come in for the rescue!
***
Happy Halloween, PS Readers! I’m excited to be back this month with a super quick, super easy and super fun last-minute Halloween costume idea for your little one, as well as the whole family!


Lately, I’ve been pouring all my crafting time and creative energies into our home. As a result, Halloween completely snuck up on me, and I found our family needing costumes in a hurry. After some brainstorming, our own family of Super Heroes was the winning idea; and I set off to design and assemble coordinating costumes for our little bunch.
Simple yet eye-catching graphics combined with some basic notions make these a super fast, little-to-no sew costume option that you can easily pull together in one night (like the night before Halloween if necessary 😉
Our family costumes include t-shirts, masks, and cuffs in three different but coordinating sets.


I have all the instructions and downloadable templates for you after the jump!

To make this truly a quick project, I have all the design elements ready for you to download, print and use! If you need extra super heroes, simply use the basic design elements I provided but add other graphics that resonate with your little super hero. (Some other ideas are a heart, crown, diamond, exclamation point, etc). What’s fun about these costumes is that you can make them just like ours’ OR you can take the basic concept and customize them to fit your family just right (for example, use the same color scheme for each family member but different logos; or use the same logos for each family member but in different colors!)

Now that you have your templates downloaded, print out all the pages onto cardstock. Because there are a lot of colors and design elements to keep straight, I found it helpful to print out the pages on to matching colored cardstock. Once printed, cut out all the different pieces.


Using colored paper is especially helpful if you are designing your own logos. With your paper elements, you can fidget with your designs and colors to get the combinations just right before you start cutting everything out of fabric.


Okay, time to gather your supplies! Here’s what you’ll need:

  • Cotton solids in your desired colors
  • Heat-n-Bond Ultrahold – this stronger stuff helps to keep things from fraying and ensures you don’t have to sew things into place!
  • T-shirts
  • Grommets (optional) and grommet tool
  • Elastic


Okay…let’s get started with the No-Sew Super T-Shirts!

Follow these basic instructions for EVERY design element for all your different logos:

  1. Iron Heat-N-Bond to the wrong side of your fabric.
  2. Place your template face down onto the paper side of the Heat-n-Bond.
  3. Trace around your template with a pencil.
  4. Cut out the graphic with a scissors.
Set that element aside and repeat until you have all your pieces bonded and cut.


The t-shirts come together as easy as 1, 2, 3! Find the center of your t-shirt (to get the placement just right, have your Super Hero try on the t-shirt and mark the location with a fabric pen). First iron down the circle, then iron on the graphic, and finally, iron on the initial. That’s it! Repeat the process for all your Super Heroes.

Just a NOTE – our shirts are only meant for one night so I wasn’t too concerned about durability. If you want these to be a little more durable (and washing machine safe), sew around the entire image using a sewing machine.


Okay, now let’s make the masks.

These are really quick to make and don’t require any sewing!

1.  Iron the Heat-n-Bond to the wrong side of your fabric.

2.  Trace the mask template outline onto the paper side of the Heat-n-Bond.

3.  Cut out the outline of the mask with a scissors.

4.  Repeat the process for the graphic that will go on to the mask.


Quick tip!! If you’re like me and bought cheap fabric for this project, you might have some problems with the bottom color showing through the top color once they’re ironed together. To fix this problem, cut out your graphic (in the photo, the star) from your colored fabric with the Heat-n-Bond. Then bond the star to some white fabric (also already bonded with Heat-n-Bond), then cut out the star again. Now you can fuse the star, with the extra layer of white fabric, to your mask!


5. Now you should have a (bonded) mask cut out, a (bonded) shape cut out, and a third piece of scrap fabric (not bonded).
6. Iron the mask to the wrong side of the scrap fabric.
7. Iron the graphic to the top of the mask.
8. Now, cut out the entire mask+graphic bonded to the scrap fabric.
9. This is what the back will look like.
10. Using your mask template again, trace the eye holes onto the back of the mask.
11. Using a scissors, cut out the eye holes.
12.  Using a heavy-duty hole punch, punch holes into each side of your mask.
13.  (optional) Add grommets to each hole using a grommet tool. (If you don’t have one, no biggie…the holes should be fine on their own!)

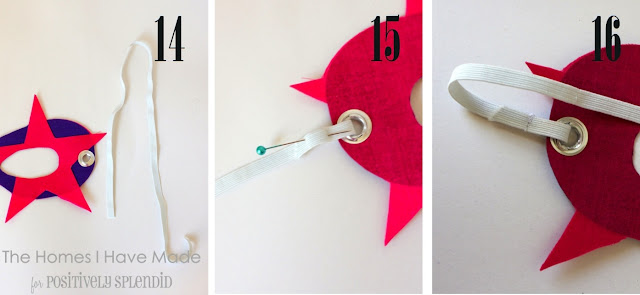
14. The last step is to add elastic. Measure from ear-to-ear (around the back of the head) to determine elastic length.

15. Loop the elastic through the holes/grommets and pin in place.

16. Sew, safety pin, or knot the elastic in place.


Repeat with the different fabrics and designs to make a mask for each of your Super Heroes!


Okay, last part: the Super Cuffs!


These can be sew or no-sew, depending on how you do the final step. Either way, they are pretty simple!

1. Fuse the Heat-n-Bond to the wrong side of your accent fabric (purple).

2. Cut 2 strips of your base fabric (3″ wide) and 2 strips of your accent fabric (2″ wide).

3. Fuse your accent strip (purple) to the center of your base strip (pink)

4. Fold the strip in half (wrong sides facing) and place the strip around your wrist.

5. To determine the appropriate measurement for the cuff seam, make sure you can easily pull your

hand out of the cuff and pinch the cuff in the right location.

6. Mark the seam location with a pin.

7. Sew the cuff shut (wrong sides together). (This can also be done with a safety pin in a pinch!)

8. Trim the cuff (after the seam) on a 45 degree angle.

9. Repeat with the other strip to make the second cuff.


And there you have it! Super quick and super easy Super Costumes for your whole family!!!!


Oh, one more thing!!!! Certainly every little Super Hero needs a cape. This cape was quick and easy too! Fly on over to see me at The Homes I Have Made and I’ll share the link for the pattern I used!


I hope everyone has a great Halloween! As always, a big thanks to Amy for having me stop by today to share this project with you! And if you like what you see here, be sure to follow me along in my crafting adventures!


Pinterest button  facebook button  Google plus button  email button  New Blog Design-002

I am linking this post to:
The 36th Avenue ~ Tatertots & Jello ~ Positively Splendid


Amy @ Positively Splendid

Having grown up in a home brimming with sewing notions and paintbrushes, Amy has a deep love for all things creative. On any given day, you’ll find her knee-deep in her latest creative endeavor, with projects ranging from sewing and crafts to home decor and kid-friendly ideas. Amy believes that everyone, regardless of skill level or experience, possesses the ability to create something beautiful, and Positively Splendid was born of her passion for helping others harness their innate creative potential.
EVEN MORE GREAT IDEAS JUST FOR YOU!

FacebookTweetPinYummlyPrint

Filed Under: Crafts, Halloween, Holiday Crafts, Positively Seasons, Sewing, Sewing for Children, Sewing for Men, Sewing for Women, Sewn Accessories Tagged With: Contributor, Costumes, Crafts, DIY, Halloween, Tutorials

Previous Post: « Indian Corn Wreath (Fall Wreath Tutorial)
Next Post: Pumpkin Bean Bag Toss Game »

Reader Interactions

Comments

  1. Kelli says

    October 25, 2012 at 8:18 am

    Those costumes are absolutely adorable!

  2. Crystal says

    October 25, 2012 at 9:53 am

    So cute!!! Your family looks ready to save the world!!!

  3. Sarah G. says

    October 25, 2012 at 10:30 am

    This is great! Not just for halloween, but for dress up and pretend play. My son is going to LOVE these! Thank you for sharing!

  4. Nicole says

    February 5, 2013 at 5:22 pm

    Love these! Is there any way that I can access the download. Thanks

    • Amy @ Positively Splendid says

      February 11, 2013 at 5:14 pm

      Hi, Nicole! The download box should display at the bottom of the post. If you are experiencing any issues, though, don’t hesitate to let me know so that I can email them to you!

      • Cathy Brown says

        March 21, 2013 at 3:24 pm

        Hi there,
        I love this post and really really want to make these cute superhero bits, but I can’t seem to find a download button… probably me being a technophobe, but hoping you can help me!

  5. Love Z. says

    July 8, 2013 at 1:35 pm

    I followed your tutorial and produced capes for my own kiddos. I have to admit, they are gorgeous!!! Thanks for the great step-by-step instructions, pictures, and ideas!

  6. Linda says

    September 24, 2013 at 11:52 am

    What a cute idea! And so simple. Thanks for the Halloween costume idea.

  7. Danielle says

    October 23, 2013 at 1:39 pm

    I can’t see the download box can you send them to me please?

  8. efi says

    November 26, 2013 at 7:56 am

    this is lovery!!! TOTALLY amazing. thank you for sharing 🙂

Primary Sidebar

PS Search

Search this website

Seasonal Inspiration

Hocus Pocus Wreath
Ghost Plushies
Paper Pumpkins
Fabric Yo-Yo Pumpkins

Copyright © 2023 · Positively Splendid · All Rights Reserved. · Privacy Policy

Privacy & Cookies: This site uses cookies and other tracking technologies to assist with navigation and your ability to provide feedback, analyse your use of our products and services, assist with our promotional and marketing efforts, and provide content from third parties. To find out more, as well as how to remove or block these, see here: Our Cookie/Privacy Policy