• Skip to primary navigation
  • Skip to main content
  • Skip to primary sidebar

Positively Splendid {Crafts, Sewing, Recipes and Home Decor}

Handcrafted. Splendidly.

  • Home
  • Blog
  • + Handmade
    • Crafts
      • Craft Gift Ideas
      • Holiday Crafts
      • Home Decor Crafts
      • Kids’ Crafts
      • Paper Crafts
      • Quick and Easy Crafts
      • Wearable Crafts
      • Wreaths
    • Gift Ideas
      • Budget-Friendly Gifts
      • Gift Wrapping
      • Gifts for Dads and Grandpas
      • Gifts for Kids
      • Gifts for Men
      • Gifts for Moms and Grandmas
      • Gifts for Neighbors
      • Gifts for Sports Fans
      • Gifts for Teachers
      • Gifts for Women
      • Quick and Easy Gifts
    • Kid-Friendly Projects
    • Sewing
      • Sewing for Children
      • Sewing for Men
      • Sewing for the Home
      • Sewing for Women
      • Sewing Techniques
      • Sewn Accessories
      • Sewn Gifts
  • + Home & Garden
    • DIY Home Decor Projects
    • Helpful Tips
    • Home Decor Crafts
    • DIY
    • Home Tour
    • Mantels and Tablescapes
    • Organization
    • Outdoor and Garden
  • + Holidays & Seasons
    • Spring
    • St. Patrick’s Day
    • Summer
    • Teacher Appreciation
    • Thanksgiving
    • Valentine’s Day
    • Winter
    • Back to School
    • Christmas
    • Easter
    • Fall
    • Fathers’ Day
    • Graduation
    • Halloween
    • Independence Day
    • Mothers’ Day
    • New Year’s
  • + Printables
  • + Recipes
    • Soups and Stews
    • Appetizers and Salads
    • Breads
    • Desserts
    • Food Crafts
    • Main Dish

DIY Pillow Forms

June 29, 2010 By Amy @ Positively Splendid

FacebookTweetPinYummlyPrint

Two things you might not already know about me:

#1) I like to save money, but I like to do it in style.
#2) When I don’t feel like hauling my crew over the river and through the woods for close to a half hour each way, my only option for craft supplies is Super Wal-mart.

It is those two facts above that lead me to come up with today’s tutorial. Last week as I was gearing up to make the Patriotic Outdoor Pillows I shared yesterday, I found myself short of the pillow forms and I needed to get the job done. It has been hot. Oh so hot. And I didn’t have it in me to make a trip to Joann or Hobby Lobby with all three monkeys in tow. So what is the girl who finds herself in such a pickle to do? She improvises!

I headed to Wal-mart to look at their supply of pillow forms, which, sadly, was quite lacking. (If only they had put a fabric section in our new store!) I ventured to the home decor aisle. Nothing for less than $9/apiece, which I simply wasn’t willing to pay for this project. (Refer to #1 above.) I was about to suck it up and head into town when I walked past an endcap advertising body pillows marked down to $8 apiece. Eureka! I could dismantle one of these beauties to create three pillow forms on my own. Here’s how I did it.

Supplies:
1 20 x 54″ body pillow
Marking pen
Shears
Sewing machine
Thread
Rotary cutter and mat
Various sewing notions and supplies: measuring tape, ruler, pins, etc.


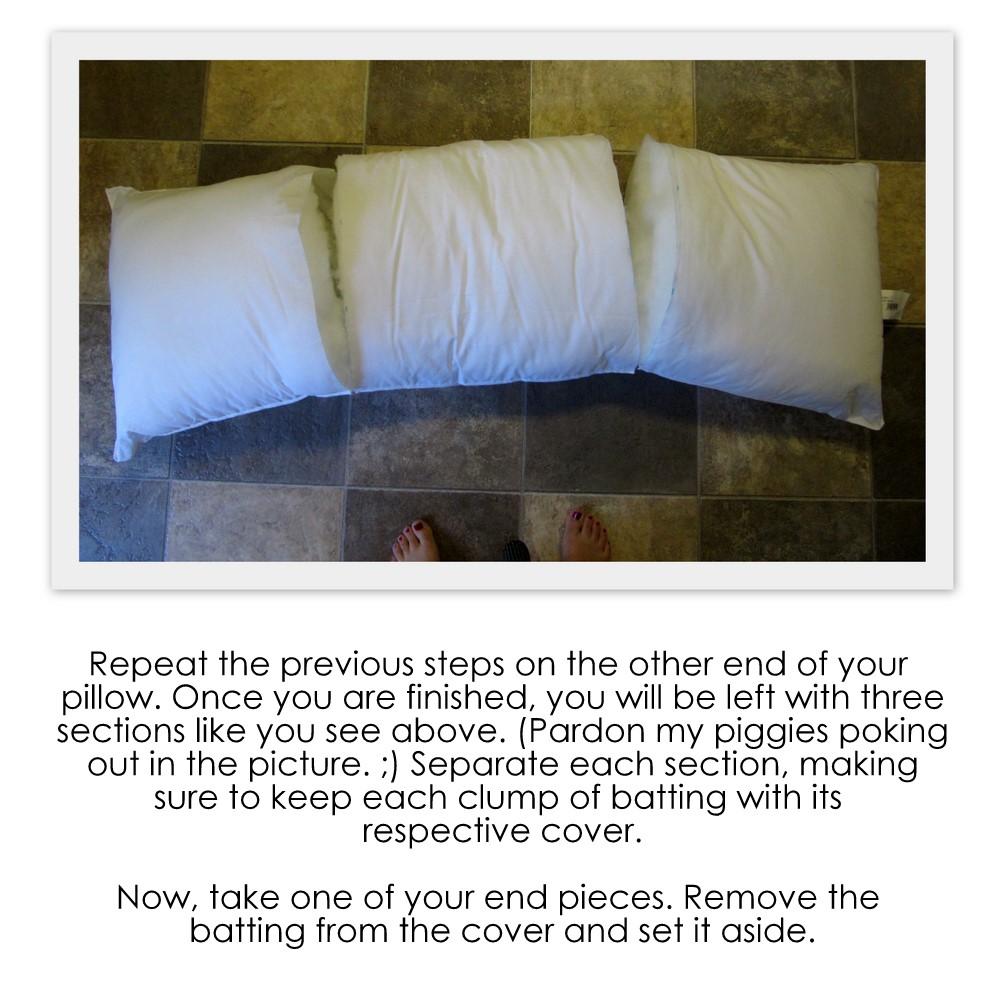
Repeat the above steps with your other end section. Now, let’s finish up your middle section, the one with two open sides instead of just one.

To make a rectangle with this section as I have done, use a rotary cutter to straighten your top and bottom edges (the edges you trimmed in the first step to separate your sections). I trimmed off enough so that my piece was 16″ wide, leaving the sides with the factory serged seams untrimmed. (From serged seam to serged seam, this side measured 20″.) After everything has been trimmed, pin open edges together with serged seams on the outside, and sew each side shut with a 1/2-inch seam, leaving a 6-inch opening on one side for turning. (Pivot at the opening as you did before to make turning your pillow right-side out easier.) Finish as you did the other two pillows.

For $8 and about an hour’s worth of work, I was able to procure the pillow forms I needed for my project. I will certainly be using this trick in the future!

Helpful hints and tips:

  • Trying to use only what you have on hand? An extra king-sized pillow would work great to make two square pillows. 
  • Body pillows like these make regular thrift store appearances. Pick one up, give it a good washing, and set to work!
  • If you would rather, you can certainly trim down your middle section to make an additional square pillow. It is completely up to you!

To ingenuity!
Photobucket

Linking this to…

Show and Tell Green

Join  us Saturdays at tatertotsandjello.com for the weekend wrap up    party!


Photobucket
If you enjoyed this post, subscribe to Positively Splendid 
to receive updates, and join us on Facebook and Twitter!

  Subscribe in a Reader Receive Email Updates Follow on TwitterJoin us on Facebook
Photobucket

Amy @ Positively Splendid

Having grown up in a home brimming with sewing notions and paintbrushes, Amy has a deep love for all things creative. On any given day, you’ll find her knee-deep in her latest creative endeavor, with projects ranging from sewing and crafts to home decor and kid-friendly ideas. Amy believes that everyone, regardless of skill level or experience, possesses the ability to create something beautiful, and Positively Splendid was born of her passion for helping others harness their innate creative potential.

EVEN MORE GREAT IDEAS JUST FOR YOU!

FacebookTweetPinYummlyPrint

Filed Under: DIY Home Decor Projects, Easy Sewing Projects, Positively Home & Garden, Sewing, Sewing for the Home, Tutorials Tagged With: Naptime Projects, Outdoor decor, Quick Tips, Upcycling

Previous Post: « Patriotic Outdoor Pillows
Next Post: Slow as molasses! »

Reader Interactions

Comments

  1. BJ_Mama says

    June 29, 2010 at 9:36 am

    You, my friend, just made my WHOLE WEEK! I’m off to grab a body pillow! LOVE U! LOVE U! LOOOOOOOOVEEE YOUUUUUUU!

  2. Michele {The Scrap Shoppe} says

    June 29, 2010 at 2:18 pm

    Wow! How very industrious of you! I *never* would have thought of this. And buying a body pillow is so much cheaper than buying 3 square pillows!! Thanks, Amy!

  3. Williams Family says

    June 29, 2010 at 5:05 pm

    A seriously brilliant idea. You deserve some type of bloggie award for this – talk about creative and incredibly useful!! Well done, Miss Amy!

  4. The Design Confidential says

    June 29, 2010 at 8:05 pm

    now that is super smart, and i NEVER would have thought of it! thanks for this post, luv it!

  5. Amanda Dale says

    June 29, 2010 at 8:55 pm

    Great idea and big time money saver! Just left you an award on my blog! http://www.twoby2.wordpress.com

  6. Heather says

    June 30, 2010 at 2:37 am

    How creative!!!

    I too miss the fabric department at our local Walmart. It wasn’t the best selection, but it was nice to have it to save a trip to Hobby Lobby or JoAnn.

  7. malia says

    June 30, 2010 at 3:57 pm

    amazing idea amy! love it

  8. BJ_Mama says

    July 1, 2010 at 1:49 pm

    I DID IT!!!! I’d love if you’d come check them out 🙂 THANKS again!

    http://forwhatitsworth-ornot.blogspot.com/2010/07/scrap-happy-pillows.html

  9. Heather says

    July 2, 2010 at 7:54 pm

    I would just love for you to come link this up to Fabulous Friday! Love the frugality & functionality…now if I can just learn to sew….
    Heather @ http://www.savingmoneylivinglife.com

  10. CraftyMummy says

    July 3, 2010 at 6:12 am

    I can sooo relate to you not wanting to shop with little ones – that’s me all the time! Clever tip!

  11. Kristen says

    July 3, 2010 at 10:24 am

    I am so so happy you shared this. My body pillow is sitting in my craft room waiting for me to attack. I was going to use it to make my dogs a new bed, but this is an even better idea!!! LOVE IT!!

    Found you over at Tatortots and Jello…

  12. Laura Ingalls Gunn says

    July 3, 2010 at 4:53 pm

    Oh I adore this project. It is going in my style file for sure!

    Happy 4th of July!

  13. edeenut says

    July 3, 2010 at 5:54 pm

    great idea!
    I just did something similar this week with my patio chair pillows.I had two brand new bed pillows that I bought but they ended up being too full for us so I used them for the stuffing.

    I hate using the store bought pillow forms anyway, they are just too thin and I like big plump toss pillows so I always make my own.

  14. Star @ A Load Of Craft says

    July 5, 2010 at 4:17 am

    What a great idea. Thanks so much! I love saving money like this and will definately use this trick in the future. Also, that line you made before backtacking… so smart, thank you!!

  15. [email protected] says

    July 6, 2010 at 12:12 am

    Whoa… that is so smart! I love this idea! Thanks so much, I’ll be linking.

  16. Jenna says

    July 7, 2010 at 5:21 am

    what a great idea! i hate forking out so much money for pillow forms, even with a coupon. definitely gonna try this next time. 🙂

  17. ShellyRaeWood says

    September 24, 2010 at 6:15 am

    Amy! You are Brilliant!! DH just thrifted me a HUGE box of upholstery samples and is buying my new sewing machine next week. I wanted to make pillows but was discouraged with the cost! You, my friend, are a lifesaver!! :::Smiles::: Thanks so much for sharing!!

  18. Sabra Shapiro says

    March 3, 2011 at 10:04 pm

    wondeRful idea. I also look for really ugly pillows on clearance and recover those!

  19. Tiffany Noth says

    July 27, 2011 at 11:54 am

    I love this! I may go ahead and try this one. Seems like something I could do!

    … and Sabra that’s a great idea! I love doing things like that with clearance items or yard sale items.

  20. Ione says

    October 23, 2012 at 7:25 pm

    You are soooo smart. Thank you for your ideas. Will be watching for more.

    • Amy @ Positively Splendid says

      October 24, 2012 at 12:14 am

      Thank you so much, Ione! I hope you’ll stop in again soon!

  21. Annette says

    November 1, 2012 at 5:32 pm

    Hi Amy,

    I had this idea today. I just felt guilty about cutting a pillow in half! LOL!!! What I plan on doing, which is a bit different than your instructions, is to make a slit in the edge of the pillow case and remove all the stuffing. Then, I will cut the different size pillows I need. After I get them cut and stitched, I’ll add back the stuffing. It’s easier for me that way. But, thank you for your tutorial! I signed up to follow you.

    • Amy @ Positively Splendid says

      November 2, 2012 at 6:34 am

      I’m glad you were inspired by my project! I say whatever works best for you, run with it! 🙂

  22. Karen says

    November 7, 2012 at 8:30 pm

    I was just at Wal-Mart today looking for pillow forms. I saw the body pillows and didn’t even think about using them for pillow forms. This is a fabulous idea.

    • Amy @ Positively Splendid says

      November 7, 2012 at 8:39 pm

      Thanks, Karen! It’s amazing what a money-saver this is.

  23. Kitty says

    September 2, 2013 at 2:27 pm

    I wish I would have seen this before I made my disappointing trip to walmart! But I happen to have a couple of bed pillows stuffed in a closet because they are not as fluffy as they once were. They are about to get a makeover into giraffe print throw pillows!! You are fabulous!!!!

Primary Sidebar

PS Search

Search this website

Seasonal Inspiration

Hocus Pocus Wreath
Ghost Plushies
Paper Pumpkins
Fabric Yo-Yo Pumpkins

Copyright © 2025 · Positively Splendid · All Rights Reserved. · Privacy Policy

Privacy & Cookies: This site uses cookies and other tracking technologies to assist with navigation and your ability to provide feedback, analyse your use of our products and services, assist with our promotional and marketing efforts, and provide content from third parties. To find out more, as well as how to remove or block these, see here: Our Cookie/Privacy Policy