
There is a brief window each day while my kiddos nap that I try to seize whenever possible to work on a craft or sewing project. Nothing is more satisfying to me during that time than to tackle an entire project from start to finish! The project I’ll be sharing with y’all today is absolutely doable when time is of the essence. I was able to complete four of these little beauties in well under an hour – and that includes clean-up time!
I am in the process of finishing up the décor for the café table on our deck, and in planning that space, I knew I wanted to include a table runner or placemats of some sort that were made of materials that would enable me to leave them outdoors for long periods without having to worry about them. I happened upon some non-skid, waffle-weave placemats at the dollar store last week, and I immediately knew they would be perfect to serve that purpose. They would have been perfectly functional straight from the store, but in typical Amy fashion, I just couldn’t bear to leave them unaccessorized. 😉 With a few extra placemats in various colors, some burlap and some scrap fabric and buttons, I was able to make some easy stacked flowers to adhere to my mats. There was really nothing to it, but the end result is downright fun!
Supplies
4 coordinating non-skid, waffle-weave placemats
Additional waffle-weave placemats in various colors for flowers (or, if you have some extra waffle-weave shelf liner on hand, that will work, too)
Burlap
Scrap fabric
Scissors
Pinking shears (optional, but you might like to use these to cut out your fabric as an added decorative touch)
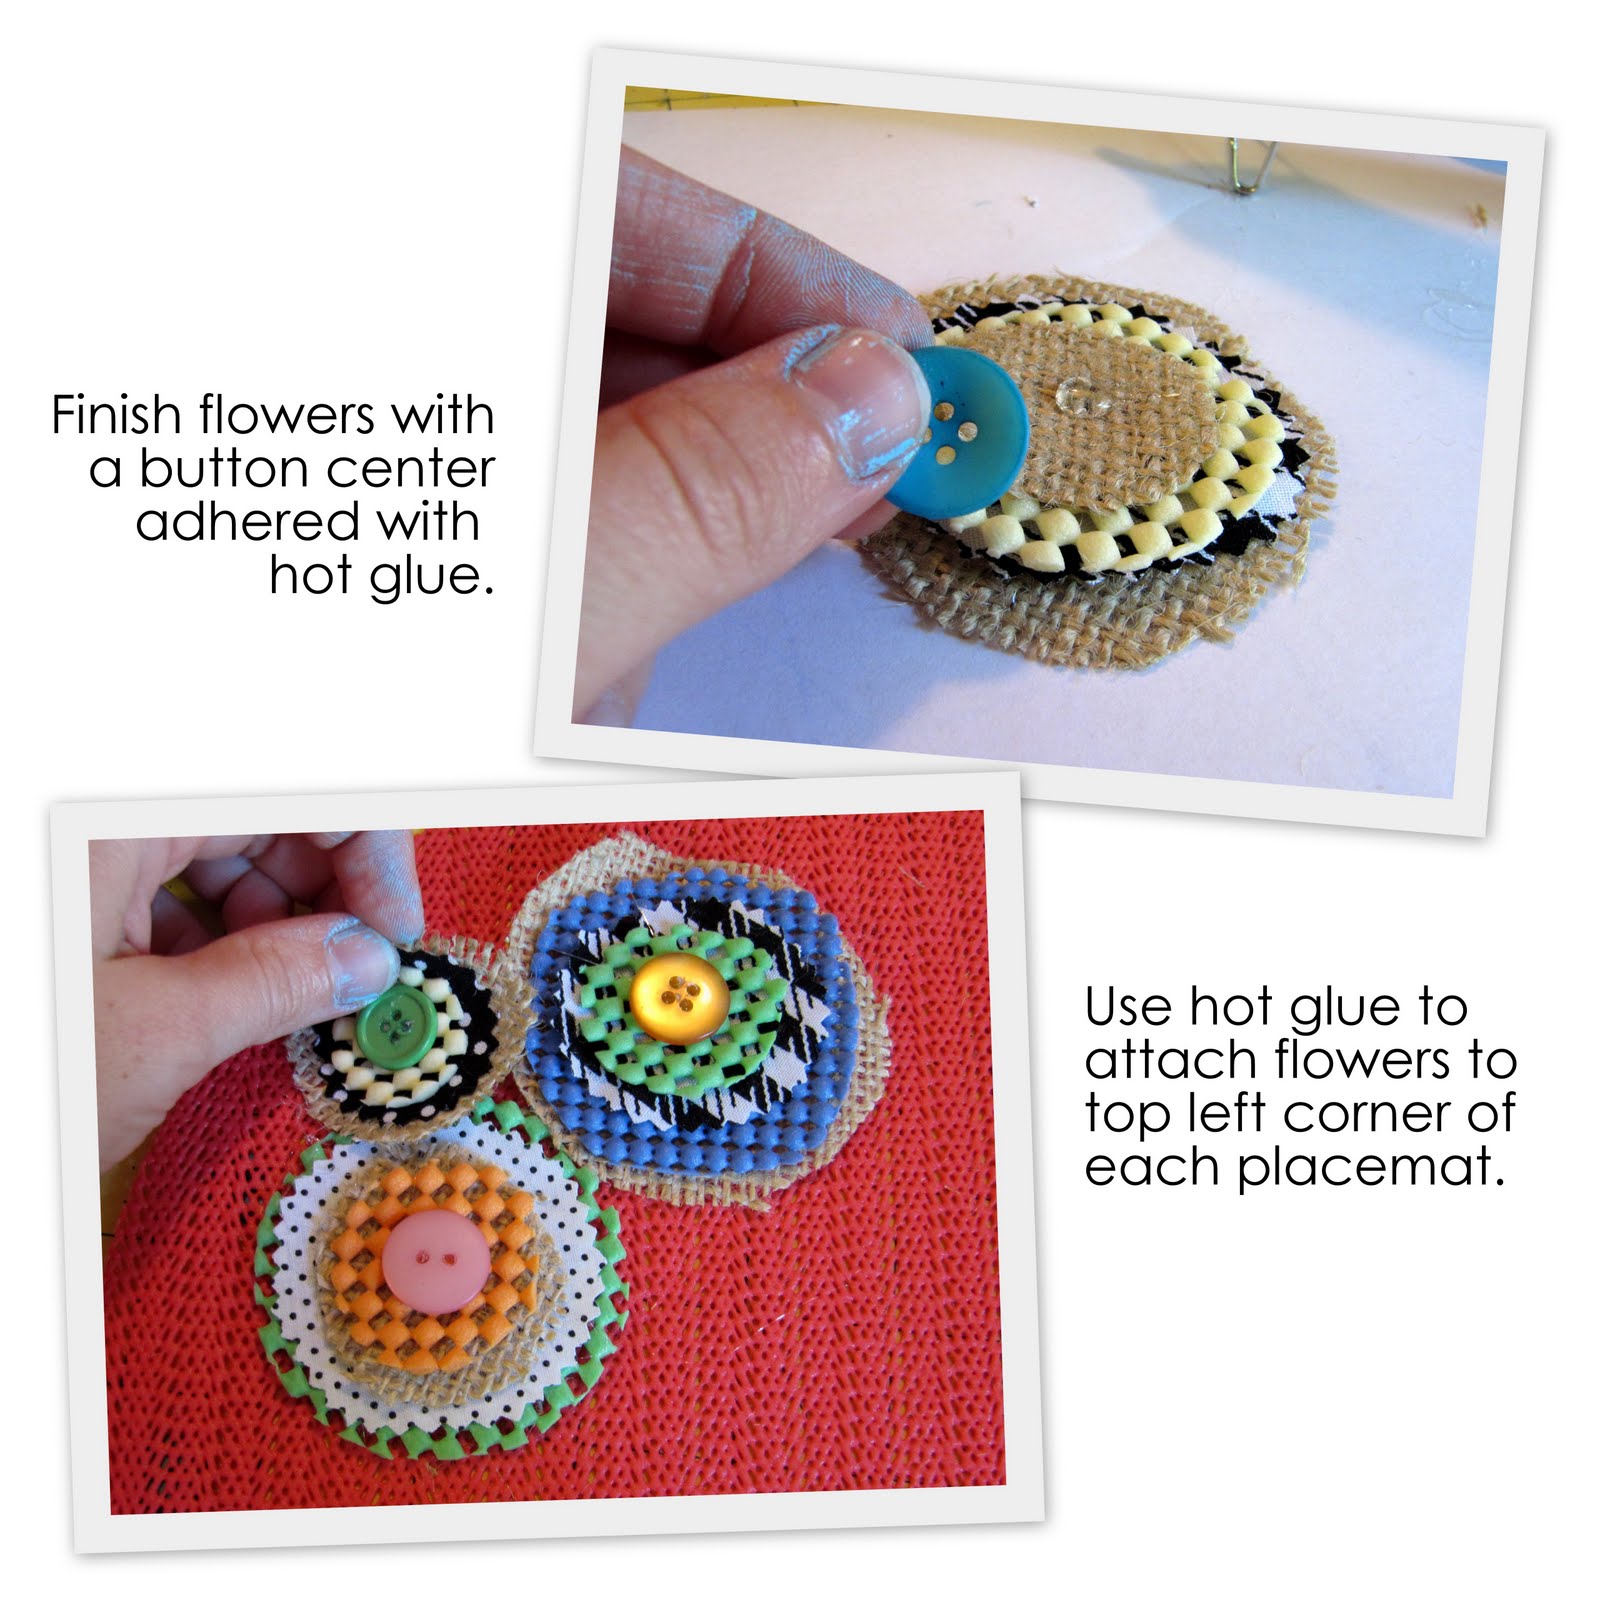
Hot glue gun/glue
Buttons


- Use a warm iron to press your burlap and fabric circles before gluing your flowers together so they lie flat on your mats.
- Because hot glue will seep through your mats when you adhere your flowers, be sure to protect your work surface. I like to use freezer paper for this purpose.


Having grown up in a home brimming with sewing notions and paintbrushes, Amy has a deep love for all things creative. On any given day, you’ll find her knee-deep in her latest creative endeavor, with projects ranging from sewing and crafts to home decor and kid-friendly ideas. Amy believes that everyone, regardless of skill level or experience, possesses the ability to create something beautiful, and Positively Splendid was born of her passion for helping others harness their innate creative potential.
Hi Amy. What a great giveaway. I will be sure and enter.
Thanks for visiting me over at Pittypat Paperie. Come again anytime.
What a super CUTE idea! A great way to dress up a patio table. I love, love, love it! I’m heading to the dollar store today. Fun… 🙂 Have a great day!
Amazingly cute! Hoping I can find some of those place mats around here and follow your lead! Thanks Amy!
another awesome idea… and it’s so nice to do a project you can finish before the kids take over again (-:
Amy, these are too fun! Another one of your projects to put on my do list.
this is so easy and cute! i am definitely going to try this.
Super cute! And looks pretty easy so it’s def on my to do list! Thanks for sharing!
So cute! If only my table wasn’t covered with muddy handprints:)
These are Awesome! I want to make some with red white and blue for this weekend!
Thank you so much for sharing.
These are genius! Thanks for sharing!
okay, these are just downright fabulous and cute as a button! so darn adorable i want them inside too! but perfect for the outdoors! glad i came over from tip junkie because i am definitely gonna have to make some of these! awesome idea!
Too cute!! I love these!!
~Morgan
Meet Virginia!
Meet Virginia!!
Meet Virginia!!!
Those flowers are just the greatest! I totally love ’em!
What a great idea! And simple too. I love naptime projects!
Amy, I was inspired by your tiered planter! I made one last week and LOVE it. Thanks! I just posted about it:
http://brandyscrafts.blogspot.com/2010/05/terracotta-planter.html
Take Care! Brandy
Those are so cute! I love crafts! You have a new follower!
Come visit Mama’s Little Chick.
Mama Hen
http://www.mamaslittlechick.com
Super cute! Thanks for sharing!
~Liz
Ooh that is such a good idea! I love the material and the flower accents. Thanks so much for the how-to, I’ll be linking.
These turned out great! I loved the way it dressed up these little placemats.
These are so, so, so cute!!
What a cute idea to use those non-skid thingies, love the texture those add. Great project!!
Brooke @ Crafting Chicks
never seen this before. Great idea!
Thank you for your comment on my blog 🙂 So glad you live by Heifer head quarters and see the good work they do 🙂
Have a great day 🙂
XOXO
Frenchy
These are SO cute! It’s so hard to find placemats that aren’t ugly or cheesy, so it’s great that you were able to come up with a cute & stylish design!
L ove the flowers. They are awesome!
okay, I have to tell you…the bad thing about coming to your blog…is it always makes me HUNGRY!!!! LOL! Love this super cuteness! Now, I need something to eat! xoxo
That is a fabulous way to dress up those waffle weave place mats..too cute!
Seriously! How cute are these! Adding this to my project file. Thank you so much for sharing!
These are SO adorable! I just love this project – I will have to keep my eye out for some scrap supplies to make these sweet flowers. Thanks for linking up to Be Inspired last week.
Chelsea
Found you from RTI. I kept wondering what could be done with those plastic mat things. You’ve done it! This is so stikin’ cute!
Amy you’ve got some great stuff on this blog and i am loving these placemats!!! my mom uses these waffleweave white ones for a holiday and i always think they are so blah. i think they are about to get dressed up!
Ooohhh! Love the look of these! Great job and super colors!
I am going to run and get the stuff to make these! Great job!
Waffleweave has never been so cute to me. I love this idea!