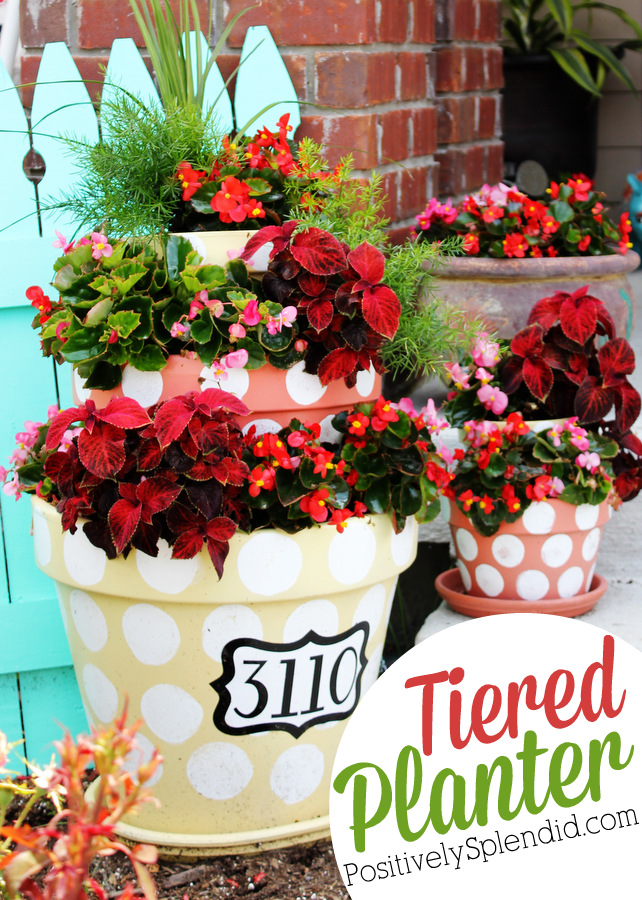


- I sanded the surface of the old pots to remove all of the peeling paint before spraying each one with two coats of Zinsser spray primer. After they had dried completely, I sprayed each one with 2-3 coats of paint (Krylon Coral Isle and Meringue).
- When the pots were all dry, I used some white latex paint and my circle foam pouncers (love these!) to paint polka dots on each pot before spraying everything with a coat of polyurethane sealer.

- I then cut out a decorative address label from outdoor-grade adhesive vinyl using my Silhouette. I loved that the original planter doubled as a house number sign, and I wanted to be sure to do that again with this one!
- After all of the painting and embellishing, all that was left to do was to construct my stacked planters. Check out the original post for the play-by-play for exactly how to do that.


In case you’re thinking you don’t have room for such a large planter, take heart: I used this technique to make a miniature version that looks just as great as its larger counterpart! The only difference was that I used a large rock instead of a brick to boost the smaller pot in the display, and I didn’t have to use the empty cans as space fillers.

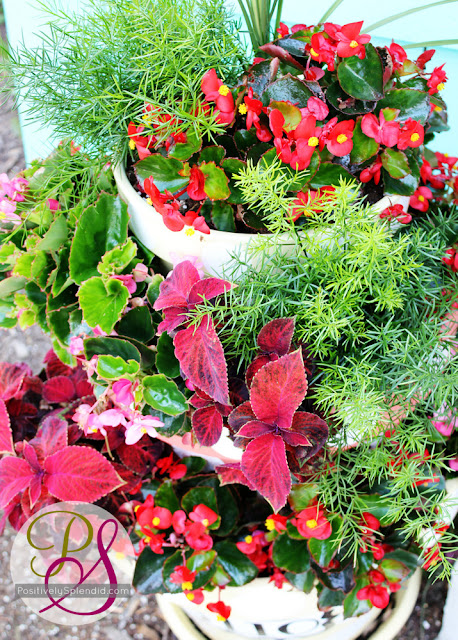
It’s amazing what a difference a little bit of time makes. Just look at all of the gorgeous fullness of the plants after a few weeks of beautiful sunshine!

- Even if you’re working with brand-new pots, I recommend priming your pots before painting. Spray primer makes this incredibly easy to do, and it will save you the frustration of having to apply a ton of coats to ensure even coverage!
- Seal your painted pots with polyurethane spray. After two years, my pots were definitely in need of some TLC (the paint was chipping badly in certain areas), and I’m hoping the spray sealer will mitigate some of that this time around.
- When filling your planter with flowers, start planting on the top tier and work your way down. That way, you won’t fling potting soil on top of the plants in the lower levels as you work your way up.


Having grown up in a home brimming with sewing notions and paintbrushes, Amy has a deep love for all things creative. On any given day, you’ll find her knee-deep in her latest creative endeavor, with projects ranging from sewing and crafts to home decor and kid-friendly ideas. Amy believes that everyone, regardless of skill level or experience, possesses the ability to create something beautiful, and Positively Splendid was born of her passion for helping others harness their innate creative potential.
I love all the polka dots! really pretty way to add some character to the front of a house (especially here in Tennessee where it’s horribly hot and I can never get anything to grow in this soil! Maybe this would work better for me 🙂
Oh my goodness, this is such a great idea, they look great!
Love these! I have tons of terra cotta pots sitting in my garage…can’t wait to get started on mine!
Jessica @ Mom 4 Real
I love yours!! I just showed my hubby the picture of one similar I pinned. He thinks we can do it! I am so on the lookout for pots! Thanks for inspiring with your fun colors! I’m pinning this too!
Very cute! Love that you put the house number on them too! 🙂
SO CUTE! I have been double stacking my big front urns for a few years but I never triple stacked my Terra Cotta post before. So cute! Love the project it is darling and so fun with the Summery paint job.
Oh I love this! I have had something similar pinned on pinterest for a few weeks & have been contemplating making my own. I love how colorful yours is now with the refinishing!
love the way yours turned out! gonna have to go back to michael’s and get some this week… 🙂
This comment has been removed by the author.
Adorable!! LOVE the polka dots!!
Dying over here! So cute! Polka dots are a fav 🙂
xo Jess
I’m loving the pots within a pot! The way you decorated them is too cute:)
btw: where is the blue pig statue from????
I borrowed your original idea last year and I think I might again this year. I love the little blue pig as well. I think it deserves it’s own little post. 🙂
Amy, I am in love with those planters. I’m always in awe of your creativity! I wish I lived next door so I could come over and craft with you. 😉 Great job…I’m inspired to get started on a Mother’s Day project I’ve been thinking about!
You know I LOVE your planters! I totally copied you 2 years ago! I desperately want to make more this year, but we are moving cross-country in a few months…in the dead of summer…so it will have to wait until next spring!
These are so beautiful, as were your other ones!
Brandy
Gluesticks
These are so amazing!!! Question…what size pots did you use for your large, 3 tiered planter? THANKS sooooo much!
So, so cute!! I love the polka dots and the address label. We still have frost here so no plants yet! I’ll definitely remember this in a month or so though!
Jenn 🙂
Love the new version! And totally stealing it! 🙂 thanks for the idea
Jen
Girl, you are rocking those polkadots!!
I love this! Can’t wait to do this for my porch 🙂
What a fabulous idea. I love how they turned out. And they go perfect with your adorable wreath. Thanks for sharing. I would love it if you could link this up to our linky party going on right now.
http://www.junkintheirtrunk.blogspot.com/2012/03/link-it-up-wednesday-22.html
Great idea! Love this, the repainted pots look so cheery!
I did this planter years ago with the terracotta…and still have it…pokadots will be a great update for the tired look…thanks for sharing a great ideal
love these! can’t wait to get some flowers on my porch-have to check out my pots and see if i have enough for these planters 🙂 i pinned these and they have gotten tons of repins 🙂
I just found this post on Pintrest and love the idea of this! My mom loves flowers, this is definitly going to be her Mother’s Day gift this year!! Great work!
http://cupsbykim.blogspot.com
Hi Amy love this post and pin it before your saying:)…they look so lovely and easy to do…Thanks a lot for sharing your cutest pots…I will try soon some… I am your new follower too…
Hope you will enjoy a visit at
http://craftaworld.blogspot.com/
With love
Farah
That is too cute..and I love polka dots. I’m glad I found your blog at the Creations by Kara party. I’m a new follower too, so I can keep in touch. I would love if you stopped by and followed back on LF and GFC. Nice to meet you, Lori
Beautiful, beautiful, beautiful! I love the polka dots and the tiers add such a fresh take to terra cotta pots. Thank you for all the tips!
Claire @ alittlesomethinginthemeantime.blogspot.com
I love these, I can’t wait to make them 🙂
I LOVE THESE!!! Polka dots steal my heart! 🙂 Great Job!!!
Heather
SweetNumber9.blogspot.com
I saw tiered pots on Pinterest somewhere and have it on my MUST TRY list. These polka dot pots reminded me how much I want them! I have to do this. I am going to Home Depot this weekend for some plants… might as well grab some pots!
Great idea…adore the polkas!
I would love if you came by my Creative Inspirations party to link it up! I would love to see you there!
Stacey of Embracing Change
http://staceyembracingchange.blogspot.com
I’ve been looking for something like this for the front porch of my new home – just love this! I pinned it on Pinterest from your link and more than 50 people have repinned it!!! It’s a definite winner! Can’t wait to make this!!
I LOVE all things Polka Dots! These are wonderful….
I did stacked tipsy pots in polka dots a couple of years ago and also get compliments from the neighbors..LOL
Now I want to make another set:-)
LOVE your polka dot planters!! Toooo cute!!
Jill
http://www.jillifyit.com
This is fabulous! I was just beginning to think of what to put on my porch and I love this idea! It will give my plants height without having to put a pot on some kind of table 🙂 yay!
New follower too!
We featured you on our blog…
http://interiordesignhq.com/2012/04/more-diy-projects-for-your-crafting-pleasure/?preview=true
Great job on this DIY!
AMY I stinkin L O V E these!! Don’t be surprised when you see a copycat on Lolly Jane 😉 Oh, and when you see them featured at tonights link party!
XOXO
I LOVED this idea so much I did one myself! I deviated a little bit from how you did yours, but they are basically the same. I also posted them on my blhttp://sugarnspicemakeseverythingnice.wordpress.com/2012/04/17/polka-dot-tiered-planter/og! Thanks for the idea!
Your pots are just too cute – I MUST make some too! I’ve got this linked to my planters post as well today, it’s a keeper!
You *totally* inspired me! I made my smaller version of this and it’s all planted and on my porch. Thank you!!
I forgot to add that I linked to you in my blog – not that anyone reads it! But just wanted to let you know.
🙂
I love this idea. I have just discovered your blog and have been looking for some ways to add a bit of character to the front of my house! I will definitely be coming back here. 🙂
I love this idea. I have just discovered your blog and have been looking for some ways to add a bit of character to the front of my house! I will definitely be coming back here. 🙂
I love this idea. I have just discovered your blog and have been looking for some ways to add a bit of character to the front of my house! I will definitely be coming back here. 🙂
I love this idea. I have just discovered your blog and have been looking for some ways to add a bit of character to the front of my house! I will definitely be coming back here. 🙂
I love this idea. I have just discovered your blog and have been looking for some ways to add a bit of character to the front of my house! I will definitely be coming back here. 🙂
Wonderful idea. We are changing our curb appeal and this is a great way to pop color into the front yard. Thanks so much for the inspiration and tips.
I think I am going to use this idea but plant herbs in the pots.
I just wanted to let you know I featured you on Blissful and Domestic today. Stop by and check it out.
Danielle @ Blissful and Domestic
http://www.blissfulanddomestic.com
Love it and did mine! http://insideandoutnd.blogspot.com/2012/06/painting-planters.html
When I saw these, I just loved them! I had a bunch of old plastic pots of various sizes in my backyard that were getting a little worse for wear. I bought a can of the spray paint for plastic and revitalized them. I then did your stacking idea, and it looks AMAZING! I did a little collection of them in front of my house, and I couldn’t be happier! Thanks for the great idea!
Amy I just wanted to thank you for this wonderful idea! I found it on Pinterest and made it mine!
http://joaniesbalonie.blogspot.com/2012/07/my-tiered-planter.html
Love it, great job! I made a tiered planter too, but it’s not as cute as yours. My Tiered Planter
Amy
your original post keeps saying page not found and i am looking for the steps on how to assemble it all together. can you share the steps for putting this together please!!!!!!
Hi, Julie! I recently moved from Blogger to WordPress, and some links got broken in the process. I’ve corrected the link to the original project, and here is the direct link: http://www.positivelysplendid.com/2010/05/tiered-terracotta-planter.html Thanks so much for your patience! 🙂
Thank you so much!
Hi!
I just wanted to let you know that I LOVE your blog! Today I did a post on my blog about DIY projects for spring and I included a link to this project! Love the polka dots! A nice touch.
Thanks for sharing!
Caroline
Thank you so much, Caroline! I truly appreciate it!
these are so cute! I want to do them for my yard…did you use flat spray paint or gloss??
I used satin finish Krylon paint for this project. Thanks for stopping by, Karri!
I love this. Could you use plastic pots? Thats all i seem to find. Or is the ceramic better?
I think plastic pots would work just fine.
Hi! I LOVE these and plan on making them as soon as I have free time. How did you do your address like that?
Hi, Megan! I cut the address using outdoor vinyl and my CAMEO.