• Skip to primary navigation
  • Skip to main content
  • Skip to primary sidebar

Positively Splendid {Crafts, Sewing, Recipes and Home Decor}

Handcrafted. Splendidly.

  • Home
  • Blog
  • + Handmade
    • Crafts
      • Craft Gift Ideas
      • Holiday Crafts
      • Home Decor Crafts
      • Kids’ Crafts
      • Paper Crafts
      • Quick and Easy Crafts
      • Wearable Crafts
      • Wreaths
    • Gift Ideas
      • Budget-Friendly Gifts
      • Gift Wrapping
      • Gifts for Dads and Grandpas
      • Gifts for Kids
      • Gifts for Men
      • Gifts for Moms and Grandmas
      • Gifts for Neighbors
      • Gifts for Sports Fans
      • Gifts for Teachers
      • Gifts for Women
      • Quick and Easy Gifts
    • Kid-Friendly Projects
    • Sewing
      • Sewing for Children
      • Sewing for Men
      • Sewing for the Home
      • Sewing for Women
      • Sewing Techniques
      • Sewn Accessories
      • Sewn Gifts
  • + Home & Garden
    • DIY Home Decor Projects
    • Helpful Tips
    • Home Decor Crafts
    • DIY
    • Home Tour
    • Mantels and Tablescapes
    • Organization
    • Outdoor and Garden
  • + Holidays & Seasons
    • Spring
    • St. Patrick’s Day
    • Summer
    • Teacher Appreciation
    • Thanksgiving
    • Valentine’s Day
    • Winter
    • Back to School
    • Christmas
    • Easter
    • Fall
    • Fathers’ Day
    • Graduation
    • Halloween
    • Independence Day
    • Mothers’ Day
    • New Year’s
  • + Printables
  • + Recipes
    • Soups and Stews
    • Appetizers and Salads
    • Breads
    • Desserts
    • Food Crafts
    • Main Dish

Quick and Easy Framed Love “Equation”

February 10, 2011 By Amy @ Positively Splendid

FacebookTweetPinYummlyPrint

In case you missed it, I shared this tutorial last week over at The CSI Project for their typography week. This was such a fun, quick  and easy project – totally doable in the span of an hour! 

The inspiration for this Framed Love Equation actually came from a note one of my little friends wrote in my autograph book (am I the only nerd who had one of those in elementary school?) back in the second grade:

Dear Amy,
You are
2 sweet + 2 be = 4 gotten
Love ya!

This is the perfect last-minute addition to your Valentine’s Day decor, but I intentionally used a color scheme in mine that will allow me to leave it out for a while after the holiday has passed. I think it might find a permanent home in my older monkeys’ bedroom!


For this project, you will need…
Word processing software and printer
Heavyweight fusible interfacing
Fabric (I recommend a something solid, like the denim I used here)
Disappearing ink marker
Coordinating thread
One 8×10-inch frame
One 12×12-inch piece of scrapbook paper
Adhesive vinyl and transfer paper
A die cutting machine
Dimensional foam adhesive dots
Ribbon (optional)
Other: Basic sewing supplies (machine, shears, etc.)
step 1 Make templates to use for your numbers (2 and 4) using your word processing software and print them out. (I used Rockwell Extra Bold font at 300 pixels.) Cut your templates out, and set them aside.
step 2 Cut three pieces from your fabric that are just larger than your templates. Iron your interfacing to the back of each of these pieces according to the product instructions. Using a disappearing ink marker, trace your templates onto the back of these pieces (trace a number 2 on two of the pieces, and a number 4 on the remaining piece), making sure to trace the reverse of each number so it is properly aligned when you cut it out. (See photos below.) Cut your numbers out, and then carefully stitch a couple of times around the outer perimeter of each for added interest. Set your pieces aside.

step 3 Use your die cutting machine to format the following lettering and symbols to cut from your vinyl:

sweet
be
gotten
a plus sign (+)
a line to represent the equals sign for your “equation”

Play around with different sizing and fonts until you achieve a look your like. The fun here comes in mixing and matching different typefaces! I used Courier New (sweet), Engravers (be), and Lobster (gotten). Once you are satisfied, refer to your respective machine’s instruction manual for the appropriate settings to cut your lettering from your vinyl.

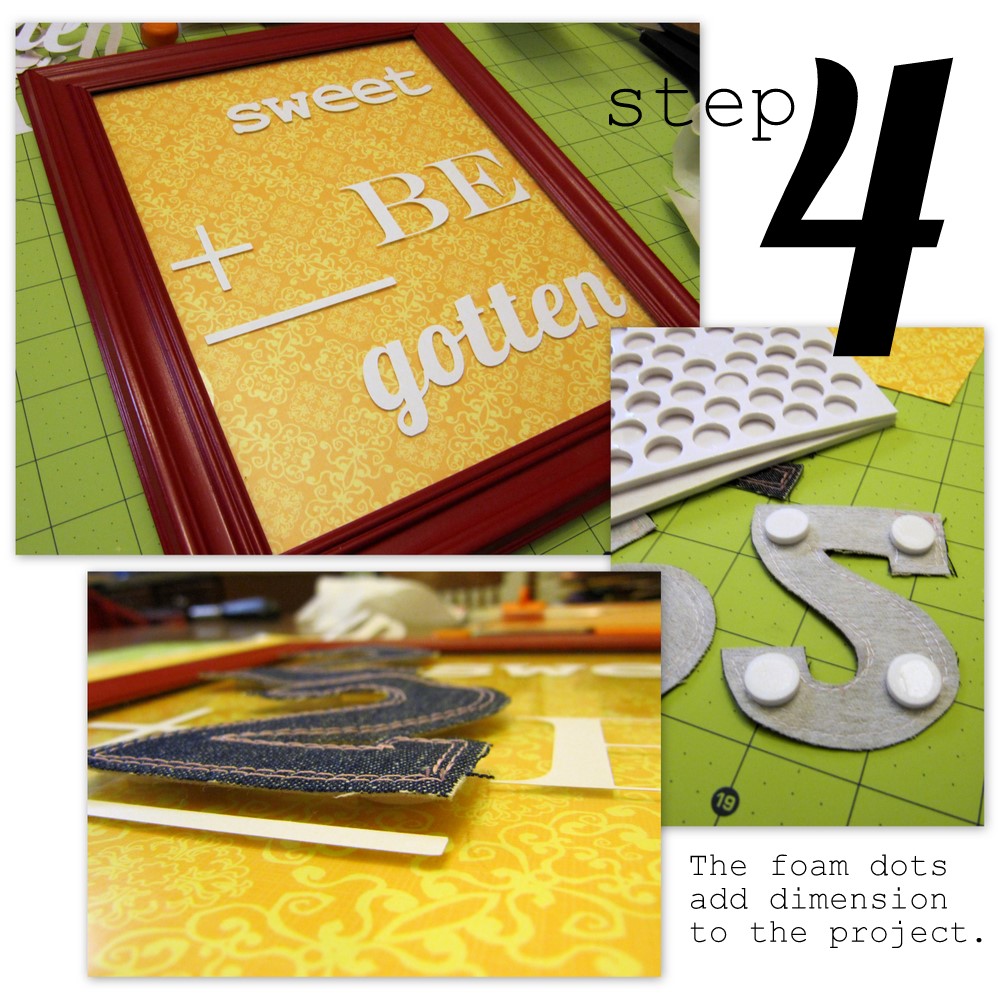
step 4 Cut your patterned paper down to 8×10, and place it in your frame. Use your transfer paper to adhere your vinyl lettering and symbols to the glass front of your frame as shown. Place foam dots on the back of your fabric numbers, and adhere them as shown. For added dimension, I stacked two layers of dots on the back of the number four to give it an extra boost. Now, tie a bow from a length of ribbon, and adhere it with foam dots to the top corner of your frame.

All finished!
Project notes… 
Any time you are looking to really make a project like this one pop, consider using the foam dots as I’ve done here to elevate certain design elements. The added dimension will take your creation to the next level!
Take care!

Photobucket

Amy @ Positively Splendid

Having grown up in a home brimming with sewing notions and paintbrushes, Amy has a deep love for all things creative. On any given day, you’ll find her knee-deep in her latest creative endeavor, with projects ranging from sewing and crafts to home decor and kid-friendly ideas. Amy believes that everyone, regardless of skill level or experience, possesses the ability to create something beautiful, and Positively Splendid was born of her passion for helping others harness their innate creative potential.

EVEN MORE GREAT IDEAS JUST FOR YOU!

FacebookTweetPinYummlyPrint

Filed Under: Tutorials Tagged With: Paper Crafts, Valentine's Day, Vinyl

Previous Post: « Previous Post
Next Post: Blog Swapping with Not JUST a Housewife »

Reader Interactions

Comments

  1. Brianna! says

    February 10, 2011 at 1:11 pm

    this is ABSOLUTELY precious
    to say the least
    I WANT WANT WANT

    Thanks for sharing dear

    xoxo
    bB

  2. Jello says

    February 10, 2011 at 5:40 pm

    OMG! i love this! this is a really cool frame. thanks!

  3. Kelli @ RTSM says

    February 10, 2011 at 7:16 pm

    Such a cute project Amy!

  4. Alison says

    February 11, 2011 at 9:46 pm

    Such a fun project, Amy! I love everything about it!

  5. Alison says

    February 16, 2011 at 8:38 pm

    Hey darlin! I featured this on my blog today:

    http://oopsey-daisy.blogspot.com/2011/02/wednesdays-wowzers-already.html

    Thanks for inspiring!
    ~Alison

Primary Sidebar

PS Search

Search this website

Seasonal Inspiration

Hocus Pocus Wreath
Ghost Plushies
Paper Pumpkins
Fabric Yo-Yo Pumpkins

Copyright © 2023 · Positively Splendid · All Rights Reserved. · Privacy Policy

Privacy & Cookies: This site uses cookies and other tracking technologies to assist with navigation and your ability to provide feedback, analyse your use of our products and services, assist with our promotional and marketing efforts, and provide content from third parties. To find out more, as well as how to remove or block these, see here: Our Cookie/Privacy Policy