• Skip to primary navigation
  • Skip to main content
  • Skip to primary sidebar

Positively Splendid {Crafts, Sewing, Recipes and Home Decor}

Handcrafted. Splendidly.

  • Home
  • Blog
  • + Handmade
    • Crafts
      • Craft Gift Ideas
      • Holiday Crafts
      • Home Decor Crafts
      • Kids’ Crafts
      • Paper Crafts
      • Quick and Easy Crafts
      • Wearable Crafts
      • Wreaths
    • Gift Ideas
      • Budget-Friendly Gifts
      • Gift Wrapping
      • Gifts for Dads and Grandpas
      • Gifts for Kids
      • Gifts for Men
      • Gifts for Moms and Grandmas
      • Gifts for Neighbors
      • Gifts for Sports Fans
      • Gifts for Teachers
      • Gifts for Women
      • Quick and Easy Gifts
    • Kid-Friendly Projects
    • Sewing
      • Sewing for Children
      • Sewing for Men
      • Sewing for the Home
      • Sewing for Women
      • Sewing Techniques
      • Sewn Accessories
      • Sewn Gifts
  • + Home & Garden
    • DIY Home Decor Projects
    • Helpful Tips
    • Home Decor Crafts
    • DIY
    • Home Tour
    • Mantels and Tablescapes
    • Organization
    • Outdoor and Garden
  • + Holidays & Seasons
    • Spring
    • St. Patrick’s Day
    • Summer
    • Teacher Appreciation
    • Thanksgiving
    • Valentine’s Day
    • Winter
    • Back to School
    • Christmas
    • Easter
    • Fall
    • Fathers’ Day
    • Graduation
    • Halloween
    • Independence Day
    • Mothers’ Day
    • New Year’s
  • + Printables
  • + Recipes
    • Soups and Stews
    • Appetizers and Salads
    • Breads
    • Desserts
    • Food Crafts
    • Main Dish

See-Through Zipper Pouches

July 16, 2013 By Amy @ Positively Splendid

FacebookTweetPinYummlyPrint
If you are on the prowl for a way to keep purses, backpacks and more nice and organized, you won’t want to miss today’s sewing tutorial from PS contributor Megan. These see-through zipper pouches are a great organization project that can be used for any number of purposes, and you’ll be shocked when you see how easy they are to stitch up. And, with back-to-school time just around the corner (believe it or not!) sewing these would be a great way to prepare for the school year to come. Take it away, Megan!
***
Hi Everyone! This is Megan, visiting today from The Homes I Have Made, with a really fun, quick, and easy sewing project! Don’t let the zipper and the bias tape in these cute little purse pouches scare you away – I promise, these are easier than you think. Plus, they come together in a jiffy; are great for using up scraps and extra notions you might have laying around the house; AND can be used in all sorts of ways to keep your purse, diaper bag, backpack (or anything!) tidy and organized!


In addition to the clear vinyl front and zipper access (making it super easy to see and grab what’s inside!), my favorite part of these little pouches is that you can use two coordinating fabrics on the front and back to give them an extra dose of cuteness!


Here’s what you need to whip up your own pouches!

To make one:

  1. 1 or 2 coordinating fabric prints, enough to cut two 9″ squares (one from each print if you choose two fabrics)
  2. Coordinating thread (and a sewing machine, not pictured)
  3. A 7″ zipper
  4. Color coordinated double fold bias tape
  5. Clear vinyl, any gauge will do
  6. Heat-n-bond
(Also not pictured, scissors, rotary cutter, cutting mat, and ruler.)


Start by cutting ONE of your prints down to a 9″x9″ square. Do the same with your Heat’n’Bond. Don’t bother measuring/cutting your second fabric, we’ll get to it in the next step!


Next, you’re going fuse your two fabrics together using the Heat’n’Bond.
  • a) Iron your Heat’n’Bond (paper side up) ontoย the WRONG side of your other fabric.
  • b) Remove the paper backing from the Heat’n’Bond.
  • c) Iron your 9″ square of coordinating fabric (RIGHT side UP) onto the area that has the Heat’n’Bond.


With your two fabrics secured, wrong sides together, cut out the 9″ square with a scissors, using the top square as your guide (bottom left). When you’re done with this step, you should have a 9″ square with patterned fabrics facing out on both sides (bottom right)! Set this square aside.


Next, cut the vinyl into two rectangles, each measuring 4.5″x8″.

Now it’s time to install the zipper. Don’t panic – this is going to be a lot easier than you think!

  • a) Pin the zipper (FACE DOWN) onto one edge of the vinyl (keep thinking: wrong sides together).
  • b) Using a zipper foot, sew the vinyl to the zipper as close to the zipper teeth as you can get.
  • c) Flip the zipper right-side-up and fold/bend the vinyl open, just like you would with a fabric seam.


Next, to help the vinyl/zipper lay flat, top stitch back down the length of the zipper (still using your zipper foot), right next to (or on top of) your original line of stitching.


Repeat the exact same steps on the other side of the zipper with the other vinyl rectangle. When you are done, it should look like this:

Now it’s time to bring your two squares together!


Decide which fabric you want to face up (as in, through the vinyl window) and place it facing you on your work surface. Next, center your zipper/vinyl square onto the fabric square RIGHT SIDE UP (as in, the zipper pull should be out facing you). Pin the two squares together to hold everything in place (bottom left). Using a scissors, trim the excess fabric around the vinyl square to ensure you have matching edges all the way around.


Since vinyl is too bulky to sew/flip right-side-out/press, as you would a normal seam with fabric, we are going to sew the two squares together and finish the edges all in one step using bias tape. Simply pin your bias tape all the way around the square, with the edges of the square tucked all the way up inside the fold of the tape. If you used my same measurements, the bias tape should come right down to the zipper stops (bottom left). When you get back to the beginning, you can sew your bias tape together the fancy way (bottom right) or just fold your ends under and sew one on top of the other.


Here’s the pouch with the bias tape pined down all the way around, ready for sewing. To keep my corners clean, I folded the bias tape at 90 degree angles instead of easing it around the bends (which would result in a more circular shape in the end). I found this quicker, easier, and cleaner, but to each his/her own ๐Ÿ™‚ You could also miter your corners if you have the patience!


With a slow and steady stitch, machine sew all the way around the square at the very edge of your bias tape. Once you make it all the way around, you’re all done! No flipping, no pressing…


…just un-zip and fill the pouch with all those things that fall to the bottom or your purse/diaper bag, in my case: snacks, gum, a pen, and Chapstick!

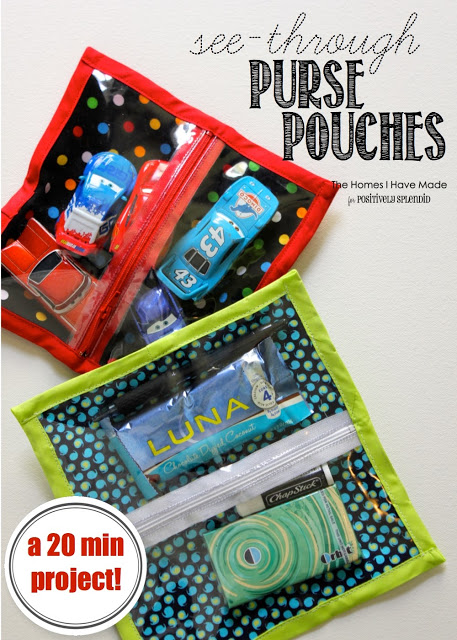
Other items I am constantly fishing out of my purse are cars for my Cars-loving two-year-old. We can’t go anywhere without one (or five!). To keep them corralled and at the ready, I made a special pouch to hold Lightening McQueen and his friends!


I’m kind of addicted to making these, as I can now think of a million uses for them. And what a fun way to use up some of my fat quarters and notion leftovers from other projects! Most of all, I love that they are a fun and cute way to keep my purse organized–no more digging around for a piece of gum or whatever else I may need at a moment’s notice!


Hope everyone is having a great summer! See you back here soon next month!!


Amy @ Positively Splendid

Having grown up in a home brimming with sewing notions and paintbrushes, Amy has a deep love for all things creative. On any given day, you’ll find her knee-deep in her latest creative endeavor, with projects ranging from sewing and crafts to home decor and kid-friendly ideas. Amy believes that everyone, regardless of skill level or experience, possesses the ability to create something beautiful, and Positively Splendid was born of her passion for helping others harness their innate creative potential.

EVEN MORE GREAT IDEAS JUST FOR YOU!

FacebookTweetPinYummlyPrint

Filed Under: Back to School, Crafts, Organization, Positively Seasons, Sewing, Sewn Accessories, Tutorials Tagged With: Organization, Sewing, Tutorials

Previous Post: « Clay and Spaghetti Hedgehog Kids’ Craft
Next Post: Birthday Wishes »

Reader Interactions

Comments

  1. Sandy says

    July 16, 2013 at 7:57 am

    Thanks for this tutorial. I am definitely going to make one for my purse, but I also need to make one for another reason. Hubby and I are planning on going to a pro football game this year, and the NFL has banned standard sized purses from all stadiums. A small clutch no larger than a person’s hand is OK. A large freezer bag passes, too. But anything else must be made of a clear material, such as plastic, and must not be larger than 12 x 6 x 12. I will be making one of these to take with me to the game!

    • Amy @ Positively Splendid says

      July 20, 2013 at 9:27 am

      Great tip, Sandy! These will work perfectly for that. Enjoy the game!!

  2. Anne says

    July 16, 2013 at 10:36 am

    So cute!! And so practical, too! I’ve scheduled a post on Craft Gossip for later this evening that links to your tutorial. When it goes live, you can see it here: http://sewing.craftgossip.com/tutorial-see-through-zippered-purse-pouch/2013/07/16/
    –Anne

    • Amy @ Positively Splendid says

      July 20, 2013 at 9:26 am

      Thank you so much, Anne! I hope you are doing well. ๐Ÿ™‚

  3. Amanda says

    July 16, 2013 at 9:14 pm

    It’s times like these I wish I could sew. I need these so badly! What a great idea, they are SO cute!

    • Ellen Bray says

      September 18, 2013 at 10:20 am

      Amanda check with your nearest school, the students might like these and might make you one, if not e-mail me and I’ll make one for you.

  4. Norma from Florida says

    July 17, 2013 at 8:21 am

    Great zip bag. Do you have a pdf that I can save?

    • Denise says

      September 6, 2013 at 7:19 am

      Ooh, I would love a pdf also! ๐Ÿ˜€

  5. Mingshu says

    July 17, 2013 at 8:47 am

    Cute and practical! It’ll be great for beach too.

  6. Ramona Royse says

    July 22, 2013 at 10:42 am

    These would be great in any size, especially when traveling through busy airport security checkpoints. It would have saved me so much frustration zipping and unzipping small bags in my luggage for the searches! Great instructions, BTW. One question?… I noticed you used NO-SEW adhesive, at least in the picture, did you find it gums up your needle at all?…I’ve always been scared to use it…even though it is usually the strongest!

  7. Dee Wolters says

    August 4, 2013 at 5:18 pm

    Love this project. I am always looking for cute projects to make for gifts. One question, you used heat bond. I am trying to save money and use scraps, so it is really necessary? It is to give body to the pouch? Or just to put the 2 pieces of fabric together? Can I use interfacing scrap to add body and just sew around the 2 squares? Thanks

  8. marie sierra says

    September 6, 2013 at 6:56 am

    THIS IS A-MAZING! thank you so much for the step by step “tute” ..xox marie

  9. lucinda says

    September 6, 2013 at 7:51 am

    very good project see-through zipper pouch, since my sewing studio is organized with see through items where everything can be seen, why not keep my purse organize too, thank u very much for a cute sewing idea.

  10. Melisa H says

    September 6, 2013 at 8:39 pm

    Great idea!!!
    I’m going to make mine a bit larger…say 12×12 and add a couple of “puckers/gathers” to each side…in order to make the inside have a bit more room…otherwise you can only fit flat items in these!

    Can’t wait to try it!!

    Melisa H.

  11. Beverly says

    April 18, 2014 at 4:29 pm

    I love this project. I think I’ll go work on one, but I was thinking of making it 2 sided, by putting a second sheet of plastic and zipper on the other side of the fabric. Thanks for the tutorial.

Primary Sidebar

PS Search

Search this website

Seasonal Inspiration

Hocus Pocus Wreath
Ghost Plushies
Paper Pumpkins
Fabric Yo-Yo Pumpkins

Copyright © 2023 · Positively Splendid · All Rights Reserved. · Privacy Policy

Privacy & Cookies: This site uses cookies and other tracking technologies to assist with navigation and your ability to provide feedback, analyse your use of our products and services, assist with our promotional and marketing efforts, and provide content from third parties. To find out more, as well as how to remove or block these, see here: Our Cookie/Privacy Policy