• Skip to primary navigation
  • Skip to main content
  • Skip to primary sidebar

Positively Splendid {Crafts, Sewing, Recipes and Home Decor}

Handcrafted. Splendidly.

  • Home
  • Blog
  • + Handmade
    • Crafts
      • Craft Gift Ideas
      • Holiday Crafts
      • Home Decor Crafts
      • Kids’ Crafts
      • Paper Crafts
      • Quick and Easy Crafts
      • Wearable Crafts
      • Wreaths
    • Gift Ideas
      • Budget-Friendly Gifts
      • Gift Wrapping
      • Gifts for Dads and Grandpas
      • Gifts for Kids
      • Gifts for Men
      • Gifts for Moms and Grandmas
      • Gifts for Neighbors
      • Gifts for Sports Fans
      • Gifts for Teachers
      • Gifts for Women
      • Quick and Easy Gifts
    • Kid-Friendly Projects
    • Sewing
      • Sewing for Children
      • Sewing for Men
      • Sewing for the Home
      • Sewing for Women
      • Sewing Techniques
      • Sewn Accessories
      • Sewn Gifts
  • + Home & Garden
    • DIY Home Decor Projects
    • Helpful Tips
    • Home Decor Crafts
    • DIY
    • Home Tour
    • Mantels and Tablescapes
    • Organization
    • Outdoor and Garden
  • + Holidays & Seasons
    • Spring
    • St. Patrick’s Day
    • Summer
    • Teacher Appreciation
    • Thanksgiving
    • Valentine’s Day
    • Winter
    • Back to School
    • Christmas
    • Easter
    • Fall
    • Fathers’ Day
    • Graduation
    • Halloween
    • Independence Day
    • Mothers’ Day
    • New Year’s
  • + Printables
  • + Recipes
    • Soups and Stews
    • Appetizers and Salads
    • Breads
    • Desserts
    • Food Crafts
    • Main Dish

Shanty 2 Chic Guest Post

July 29, 2011 By Amy @ Positively Splendid

FacebookTweetPinYummlyPrint

Hello, everyone! 
My name is Amy, and my blogging home is Positively Splendid, a little creative haven where you’ll find everything from simple craft ideas to sewing projects, and just about everything in between. 

My goal is for my blog to be a haven of crafting and DIY inspiration, and a place where creative people of all skill levels can come and feel right at home. Because I feel strongly that everyone should be equipped to create something beautiful on their own, each and every project at Positively Splendid is explained to the last detail with step-by-step photo tutorials. I like to think of each tutorial as sitting down with friends to learn something new together! I would love for you to stop in for a visit!
I am so excited to be guesting here at Shanty 2 Chic today! This was one of the first blogs that truly wowed me when I first started my blogging journey last year. These girls are amazing, aren’t they?
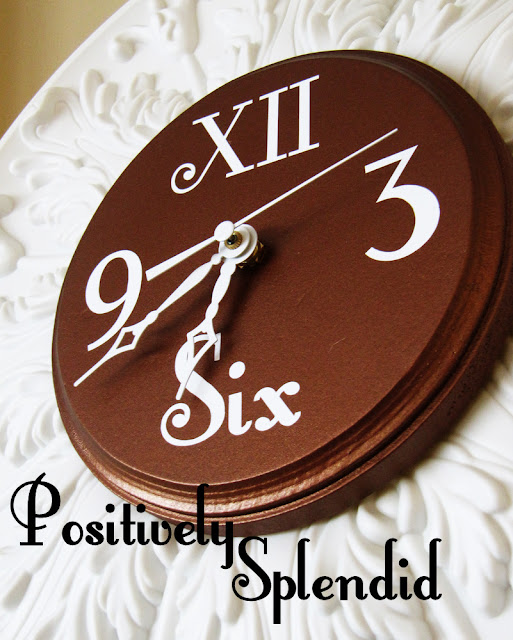
Today I’m going to share a tutorial for how to create this deceptively easy wall clock using a ceiling medallion. All set to see how it’s done? Let’s get started!

For this project, you will need…

A 16-inch ceiling medallion (found in the lighting section of your home improvement store)
Clock movement set (found in craft stores)
1 7-inch beveled wood plaque
Fine-grit sand paper
Power drill and bit
Spray primer (optional) and paint
Adhesive vinyl and die cutting machine (I used my Silhouette)
3/4″ wood spools
Heavy-duty glue (I like E6000)
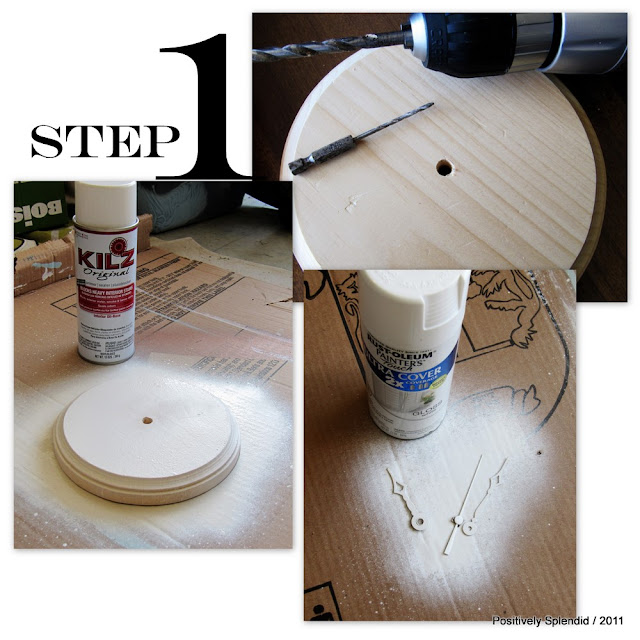
step 1 / Mark the center of your wood plaque. Drill a small guide hole through your center mark using a small bit. (This will keep your drill from bouncing around when you drill your final hole.) Using a bit large enough to accommodate your clock movement (I used a 1/4″ bit), drill a hole through your plaque. Sand your plaque smooth, if necessary. Spray with primer, if desired, and allow to dry before spraying with your desired shade of paint. Set plaque aside to dry completely. If you wish, spray paint your clock hands and allow them to dry completely.

step 2 / Use your die cutter to cut numbers from your vinyl. (If you don’t own a cutting machine, you can use stencils and paint or pre-cut vinyl stickers, found in most craft stores.) Adhere the numbers to your clock face, making sure to carefully position them in just the right place. I chose to place numbers only at 12, 3, 6, and 9 to avoid having my clock face become too cluttered.

step 3 / Position your wooden spools around the inside rim of your ceiling medallion, as shown, and adhere them using your strong glue. Allow the glue to set for a half hour or so, so that your spools don’t shift during the next step. Once they are set, place a ring of glue on the top of each spool, as shown.

step 4 / Position your clock face on top of your glue-covered spools, carefully centering it on your medallion. Set aside to dry completely. Once the glue is dry, slide your clock movement piece up through the hole your drilled in step one, so that the hanger on the back of the movement piece is precisely aligned with the 12 position on your clock face. (Notice how the spools allow the clock movement to be flush with the back of your medallion? This will allow you to hang your clock flat on the wall.) Now, follow the package directions for your clock movement to position the fasteners and hands in the appropriate configuration.

You are finished!

I envision the final spot for my clock to be in my kitchen, but for now she’s hanging out on my mantel.

Thanks so much, Ashley and Whitney, for having me over today! I hope y’all will stop by Positively Splendid sometime soon. You can also find me hanging out on Facebook, Twitter, and Pinterest!

Photobucket

Amy @ Positively Splendid

Having grown up in a home brimming with sewing notions and paintbrushes, Amy has a deep love for all things creative. On any given day, you’ll find her knee-deep in her latest creative endeavor, with projects ranging from sewing and crafts to home decor and kid-friendly ideas. Amy believes that everyone, regardless of skill level or experience, possesses the ability to create something beautiful, and Positively Splendid was born of her passion for helping others harness their innate creative potential.

EVEN MORE GREAT IDEAS JUST FOR YOU!

FacebookTweetPinYummlyPrint

Filed Under: Uncategorized

Previous Post: « Previous Post
Next Post: Sew Sweet Patterns Giveaway! »

Primary Sidebar

PS Search

Search this website

Seasonal Inspiration

Hocus Pocus Wreath
Ghost Plushies
Paper Pumpkins
Fabric Yo-Yo Pumpkins

Copyright © 2025 · Positively Splendid · All Rights Reserved. · Privacy Policy

Privacy & Cookies: This site uses cookies and other tracking technologies to assist with navigation and your ability to provide feedback, analyse your use of our products and services, assist with our promotional and marketing efforts, and provide content from third parties. To find out more, as well as how to remove or block these, see here: Our Cookie/Privacy Policy