• Skip to primary navigation
  • Skip to main content
  • Skip to primary sidebar

Positively Splendid {Crafts, Sewing, Recipes and Home Decor}

Handcrafted. Splendidly.

  • Home
  • Blog
  • + Handmade
    • Crafts
      • Craft Gift Ideas
      • Holiday Crafts
      • Home Decor Crafts
      • Kids’ Crafts
      • Paper Crafts
      • Quick and Easy Crafts
      • Wearable Crafts
      • Wreaths
    • Gift Ideas
      • Budget-Friendly Gifts
      • Gift Wrapping
      • Gifts for Dads and Grandpas
      • Gifts for Kids
      • Gifts for Men
      • Gifts for Moms and Grandmas
      • Gifts for Neighbors
      • Gifts for Sports Fans
      • Gifts for Teachers
      • Gifts for Women
      • Quick and Easy Gifts
    • Kid-Friendly Projects
    • Sewing
      • Sewing for Children
      • Sewing for Men
      • Sewing for the Home
      • Sewing for Women
      • Sewing Techniques
      • Sewn Accessories
      • Sewn Gifts
  • + Home & Garden
    • DIY Home Decor Projects
    • Helpful Tips
    • Home Decor Crafts
    • DIY
    • Home Tour
    • Mantels and Tablescapes
    • Organization
    • Outdoor and Garden
  • + Holidays & Seasons
    • Spring
    • St. Patrick’s Day
    • Summer
    • Teacher Appreciation
    • Thanksgiving
    • Valentine’s Day
    • Winter
    • Back to School
    • Christmas
    • Easter
    • Fall
    • Fathers’ Day
    • Graduation
    • Halloween
    • Independence Day
    • Mothers’ Day
    • New Year’s
  • + Printables
  • + Recipes
    • Soups and Stews
    • Appetizers and Salads
    • Breads
    • Desserts
    • Food Crafts
    • Main Dish

Spiderweb Pillow Tutorial

October 8, 2012 By Amy @ Positively Splendid

FacebookTweetPinYummlyPrint

I am the type of person who tends to fall in love with a particular supply and then stick with it over and over again. Case in point: these fun felt spiderwebs that I picked up at the dollar store.

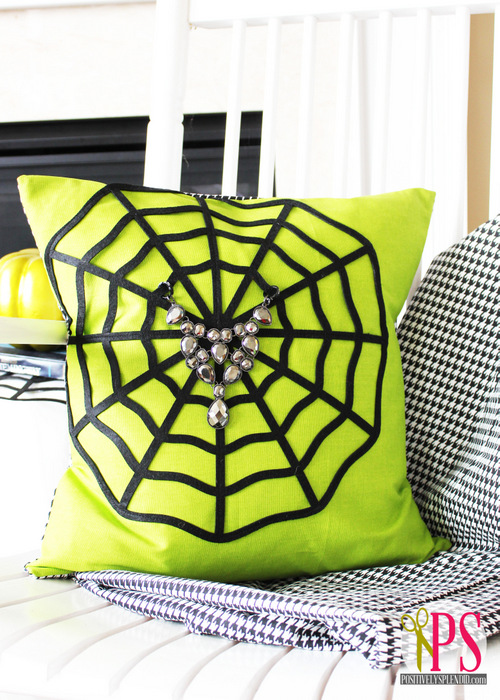
You might remember that I used them in my Halloween mantel. I loved the whimsical touch they added to that display so much, I decided to use one of them to punch up a simple throw pillow, along with some pretty baubles from Styled by Tori Spelling. From start to finish, this was a 30-minute project. Let me show you how I did it!

For this project, you will need…

  • 18-inch pillow form
  • Lime green twill fabric
  • Black and white houndstooth fabric
  • Black thread
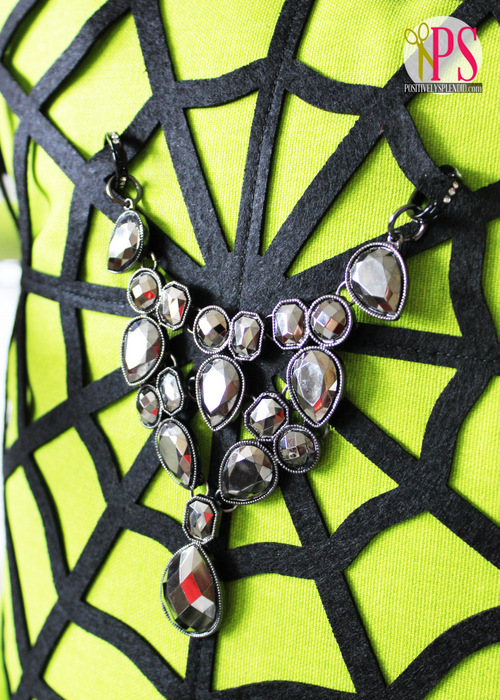
  • Felt spiderweb decoration
  • Styled by Tori Spelling necklace bottom and connector pieces
  • Basic sewing supplies: machine, shears, pins, etc.
  • Optional, but recommended: Rotary cutter and mat
To begin, make your cuts.
  • From the lime green twill: (1) piece at 18×18″
  • From the black and white houndstooth: (2) pieces at 12×18″
Pin the felt spiderweb to the top left corner of your lime green square, as shown.
Stitch around the entire outer perimeter of the felt piece to secure it to the pillow front.
Stitch down two of the inner lines of the pieces, as well, to ensure the piece doesn’t sag on the finished pillow. Set this pillow front piece aside for now.
Using a narrow hem, finish one of the long edges of each of the back rectangle pieces (the black and white houndstooth pieces). For a narrow hem, fold under the edge by 1/4″; press. Fold under another 1/4″, press, and stitch into place. (Alternatively, you can use a serger to finish each of these edges.)
Lay the assembled front panel face up on your work surface, so that the spiderweb is on the top left. Place one of the back panel pieces face down on top of the front panel, so that the right sides of each panel are facing, and the long raw edge of the back panel piece is aligned with the top edge of the front piece. Carefully align each of the corners and all of the raw edges, so that the seamed edge of the back panel piece runs through the center of the front piece; pin into place.
Now, position your other rectangle piece on the bottom portion of your pillow front piece in a similar manner. Pin. Note: The hemmed edges of your back panel pieces will overlap by a few inches at the center of your pillow.
Using a 1/2″ seam, stitch all the way around the outer perimeter of your pinned pieces. Finish the seams by zig-zagging or serging, if desired, before clipping your corners and turning the cover right-side out.
Although the pillow looks cute at this point in its own right, for a real wow factor, I opted to use some Styled by Tori Spelling connector pieces…
…and an elegant, ornate necklace bottom from their Noir line that I thought fit the spiderweb motif beautifully!
To attach the necklace bottom to the pillow, I simply looped the connector pieces through the spiderweb on my pillow. The beauty of this is that I can still use the jewelry pieces for a wearable project if I decide to go in a different direction!
I absolutely love how using the necklace bottom here gave this pillow such a glitzy sparkle, and this lime green and black color combo really pops!
Thanks so much for stopping in!

Photobucket
Disclosure: I received compensation to write this post on behalf of Styled by Tori Spelling. Rest assured that all opinions expressed in this post are entirely my own, and I am committed to sharing only products that I feel my readers will benefit from and enjoy.

Amy @ Positively Splendid

Having grown up in a home brimming with sewing notions and paintbrushes, Amy has a deep love for all things creative. On any given day, you’ll find her knee-deep in her latest creative endeavor, with projects ranging from sewing and crafts to home decor and kid-friendly ideas. Amy believes that everyone, regardless of skill level or experience, possesses the ability to create something beautiful, and Positively Splendid was born of her passion for helping others harness their innate creative potential.

EVEN MORE GREAT IDEAS JUST FOR YOU!

FacebookTweetPinYummlyPrint

Filed Under: Crafts, Halloween, Holiday Crafts, Home Decor Crafts, Positively Home & Garden, Positively Seasons, Sewing, Sewing for the Home, Tutorials Tagged With: Fall, Halloween, Pillow Covers, Pillows, Sewn Home Decor

Previous Post: « Saturday Seven Party {No. 45}
Next Post: Embellished Paper Mache Witch Hat »

Reader Interactions

Comments

  1. Richella says

    October 8, 2012 at 7:07 pm

    It’s wonderful, Amy! The spider webs are cool and Halloweeny (is that a word?) without being too creepy or spooky. I like that. And the jewelry piece in the middle adds a cool bit of glam. I just love the bright green you’re using with black and white and grey this fall–such fun!

  2. Heather - Dollarstorecrafts.com says

    October 11, 2012 at 4:12 pm

    I love that spider web pillow! Great use of it! I love the glam you added to it, too.

  3. Classy Clutter says

    October 14, 2012 at 1:15 am

    Love it Amy! I love the bling you added!

    I’d LOVE if you’d link this up to my link party going on now!

    XOXO, Mallory @ Classy Clutter

    http://www.classyclutter.blogspot.com/2012/10/spotlight-saturday-34.html

  4. Sugarr2518 says

    October 14, 2012 at 3:11 am

    I’m loving this pillow! The lime green against the black is perfect. What a creative ay to add a jewerly piece to the pillow:)

Primary Sidebar

PS Search

Search this website

Seasonal Inspiration

Hocus Pocus Wreath
Ghost Plushies
Paper Pumpkins
Fabric Yo-Yo Pumpkins

Copyright © 2025 · Positively Splendid · All Rights Reserved. · Privacy Policy

Privacy & Cookies: This site uses cookies and other tracking technologies to assist with navigation and your ability to provide feedback, analyse your use of our products and services, assist with our promotional and marketing efforts, and provide content from third parties. To find out more, as well as how to remove or block these, see here: Our Cookie/Privacy Policy