• Skip to primary navigation
  • Skip to main content
  • Skip to primary sidebar

Positively Splendid {Crafts, Sewing, Recipes and Home Decor}

Handcrafted. Splendidly.

  • Home
  • Blog
  • + Handmade
    • Crafts
      • Craft Gift Ideas
      • Holiday Crafts
      • Home Decor Crafts
      • Kids’ Crafts
      • Paper Crafts
      • Quick and Easy Crafts
      • Wearable Crafts
      • Wreaths
    • Gift Ideas
      • Budget-Friendly Gifts
      • Gift Wrapping
      • Gifts for Dads and Grandpas
      • Gifts for Kids
      • Gifts for Men
      • Gifts for Moms and Grandmas
      • Gifts for Neighbors
      • Gifts for Sports Fans
      • Gifts for Teachers
      • Gifts for Women
      • Quick and Easy Gifts
    • Kid-Friendly Projects
    • Sewing
      • Sewing for Children
      • Sewing for Men
      • Sewing for the Home
      • Sewing for Women
      • Sewing Techniques
      • Sewn Accessories
      • Sewn Gifts
  • + Home & Garden
    • DIY Home Decor Projects
    • Helpful Tips
    • Home Decor Crafts
    • DIY
    • Home Tour
    • Mantels and Tablescapes
    • Organization
    • Outdoor and Garden
  • + Holidays & Seasons
    • Spring
    • St. Patrick’s Day
    • Summer
    • Teacher Appreciation
    • Thanksgiving
    • Valentine’s Day
    • Winter
    • Back to School
    • Christmas
    • Easter
    • Fall
    • Fathers’ Day
    • Graduation
    • Halloween
    • Independence Day
    • Mothers’ Day
    • New Year’s
  • + Printables
  • + Recipes
    • Soups and Stews
    • Appetizers and Salads
    • Breads
    • Desserts
    • Food Crafts
    • Main Dish

Ruffled Turkey Tee

November 8, 2010 By Amy @ Positively Splendid

FacebookTweetPinYummlyPrint

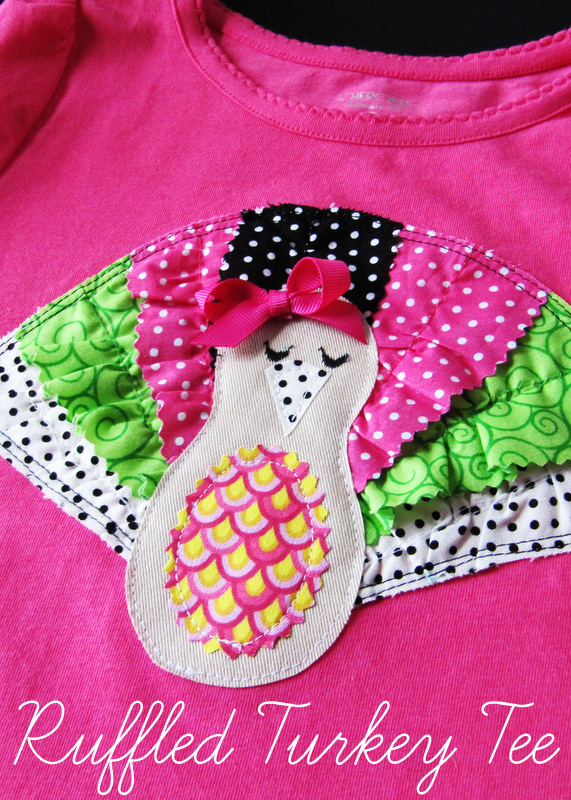
Sew a cute t-shirt for a little girl in your life to wear this Thanksgiving. This ruffled turkey tee is so easy to stitch up. Let’s get started!

This Thanksgiving ruffled turkey tee at Positively Splendid is absolutely darling! And easy to make, too. 

I love creating seasonal shirts for my kiddos, and this little turkey tee was borne of my latest ruffling obsession. What a fun way to celebrate Thanksgiving in style!
Before continuing reading about this project, check out this post on a super easy ruffling method I use that makes ruffling your strips a breeze.
For this project, you will need…
Fabric in various patterns
Fusible web (I use Heat and Bond Lite)
Light- or medium-weight fusible interfacing
Washable ink pen
Basic sewing supplies: Coordinating thread, machine, shears, etc.
Optional: Ribbon, pinking shears
step 1 Create your turkey templates by sketching a bowling pin shape, an oval for the tummy section, and a cone shape for the beak. (The size of these templates will depend on your personal preference.) Cut pieces of your chosen fabric just larger than your templates, as shown. Adhere fusible web to the back of each fabric piece, then trace each of your templates onto the paper backing of its respective fabric piece. Cut your shapes out (I used pinking shears to cut out the tummy piece for added interest), and set the tummy and beak pieces aside.

step 2 Using your machine’s scallop stitch, use a scrap piece of fabric until you find a scallop size that you can use for your turkey’s eyelashes. Measure the width of this scallop, and then use a washable ink pen to mark the width of your scallop on your main body piece for each of your turkey’s eyes, as shown. Use these marks as guides to stitch a scallop for each eye. (You should start precisely at the rightmost mark for each eye, and end at the left mark.)
step 3 Position your tummy and beak pieces on your main body piece. Remove the paper backing, and iron them into place according to the fusible web package instructions.

step 4 For your tail, sketch a template for your individual tail pieces that is more narrow at the bottom than it is at the top. Round the top and bottom edges slightly, as shown. Your template should be about one and a half times as long as your main body piece. (The pieces will be the shape of a megaphone.) See diagram below.


Cut your template out; trace onto the back of your turkey tail fabric with a washable ink marker, and cut the pieces out. (I used pinking shears to keep the pieces from unraveling excessively during washing.) You will need 7 tail pieces total. Using the ruffling method linked above, ruffle each of your tail pieces, starting at the narrow end and working to the top.
step 5Arrange your ruffled pieces as shown on your piece of interfacing. (They will come together to look like a fan.) Trim the interfacing so it is just larger than the perimeter of your fan.

step 6 Starting with the outermost tail pieces, pin them into place as shown. Starting at the wide end of one of your pieces, stitch directly over your ruffling stitches to affix the ruffle to your interfacing. When you reach the point formed by the two pieces, pivot, then continue stitching up the center of the next tail piece to secure it as well.

step 7Pin your next ruffle pieces in the same manner, overlapping the edges slightly with the preceding tail pieces, as shown. Stitch as you did in step 6. Continue pinning and stitching in this manner until all of your tail pieces are secured. (Your final piece should fall directly at the center of your tail and be straight up and down, as shown.)

step 8 Stitch all the way around your tail in a fan shape, about 1/8″ from the outer edge. Carefully trim just outside of this stitching, taking care not to snip any of the threads as you go.

step 9 Iron your tail piece onto your top, positioning it as desired. Stitch a scant 1/8″ inside of the stitching you did in step 8 to secure your tail to your top. Position your turkey body on top of your tail, and iron it into place. Stitch to secure the body to your top, making sure to stitch around the body, tummy and beak pieces so they don’t lift up later on. If desired, accessorize your turkey with a bow.

Isn’t she a beauty?? I am loving those lashes! Admittedly, she looks a bit like a peacock, but I suppose that just means Charlotte will get more mileage out of this shirt even after Thanksgiving has come and gone. 😉

Helpful hints and tips:
To wash your tee, turn inside out and launder using a delicate cycle. Lay flat to dry.
No scallop stitch on your machine? Hand-stitch little “v’s” with embroidery floss instead.
Wanting a more polished look for your ruffles? Use a rolled hem to finish the edges, either with a serger or using my faux rolled hem method.
Gobble, gobble!
P.S. Looking for a fun project for the little guys in your life? Don’t miss my I Heart Turkey Tee!
This I (heart} turkey tee at Positively Splendid is so adorable! Perfect for little boys!

Amy @ Positively Splendid

Having grown up in a home brimming with sewing notions and paintbrushes, Amy has a deep love for all things creative. On any given day, you’ll find her knee-deep in her latest creative endeavor, with projects ranging from sewing and crafts to home decor and kid-friendly ideas. Amy believes that everyone, regardless of skill level or experience, possesses the ability to create something beautiful, and Positively Splendid was born of her passion for helping others harness their innate creative potential.

EVEN MORE GREAT IDEAS JUST FOR YOU!

FacebookTweetPinYummlyPrint

Filed Under: Crafts, Holiday Crafts, Positively Handmade, Positively Seasons, Sewing, Sewing for Children, Thanksgiving, Tutorials, Wearable Crafts Tagged With: Autumn, Fall, Ruffles, Thanksgiving

Previous Post: « Weekly Preview
Next Post: Lucky Winners! »

Reader Interactions

Comments

  1. ellie g says

    November 8, 2010 at 10:14 pm

    This is AWESOME, Amy. I love the choices for material on the tail. I’m really into Thanksgiving without Thanksgiving colors this year. He is just great!! (as are you!)

  2. Ellen says

    November 8, 2010 at 11:05 pm

    He’s too cute! Or is it a she? Love your butterfly pins too.

  3. Lorie says

    November 9, 2010 at 1:39 am

    SO cute! My girls would love those! I am going to share a link on my blog tomorrow!

  4. Michele {The Scrap Shoppe} says

    November 9, 2010 at 3:41 am

    Very cute!! I love the bright colors for the turkey. Definitely perfect for a little girl!

  5. Amy says

    November 9, 2010 at 1:59 pm

    Oh! I wish I had a little girl so I could make that! So cute!

  6. Liberty says

    November 10, 2010 at 3:17 am

    Fabulously Divine!!! Thanks for the tutorial!!

    xxoo,
    Liberty

  7. Angie says

    November 14, 2010 at 8:09 pm

    Absolutely adorable!!

  8. Country Mouse says

    November 15, 2010 at 3:16 pm

    I’m going to have to try this one!!! It’s so cute!!! I love it! Thanks for sharing your easy tutorial!!!!:)

  9. Anonymous says

    November 16, 2010 at 2:37 pm

    Great information! I’ve been looking for something like this for a while now. Thanks!

  10. Beth @ Sand To Pearl says

    November 18, 2010 at 7:46 pm

    Love the girly take on this.

  11. she wears flowers says

    November 21, 2010 at 6:36 pm

    This is ADORABLE! I saw it on Somewhat Simple and had to jump over here immediately to bookmark it for next year. Thanks for sharing!!

Primary Sidebar

PS Search

Search this website

Seasonal Inspiration

Hocus Pocus Wreath
Ghost Plushies
Paper Pumpkins
Fabric Yo-Yo Pumpkins

Copyright © 2023 · Positively Splendid · All Rights Reserved. · Privacy Policy

Privacy & Cookies: This site uses cookies and other tracking technologies to assist with navigation and your ability to provide feedback, analyse your use of our products and services, assist with our promotional and marketing efforts, and provide content from third parties. To find out more, as well as how to remove or block these, see here: Our Cookie/Privacy Policy


Loading Comments...