• Skip to primary navigation
  • Skip to main content
  • Skip to primary sidebar

Positively Splendid {Crafts, Sewing, Recipes and Home Decor}

Handcrafted. Splendidly.

  • Home
  • Blog
  • + Handmade
    • Crafts
      • Craft Gift Ideas
      • Holiday Crafts
      • Home Decor Crafts
      • Kids’ Crafts
      • Paper Crafts
      • Quick and Easy Crafts
      • Wearable Crafts
      • Wreaths
    • Gift Ideas
      • Budget-Friendly Gifts
      • Gift Wrapping
      • Gifts for Dads and Grandpas
      • Gifts for Kids
      • Gifts for Men
      • Gifts for Moms and Grandmas
      • Gifts for Neighbors
      • Gifts for Sports Fans
      • Gifts for Teachers
      • Gifts for Women
      • Quick and Easy Gifts
    • Kid-Friendly Projects
    • Sewing
      • Sewing for Children
      • Sewing for Men
      • Sewing for the Home
      • Sewing for Women
      • Sewing Techniques
      • Sewn Accessories
      • Sewn Gifts
  • + Home & Garden
    • DIY Home Decor Projects
    • Helpful Tips
    • Home Decor Crafts
    • DIY
    • Home Tour
    • Mantels and Tablescapes
    • Organization
    • Outdoor and Garden
  • + Holidays & Seasons
    • Spring
    • St. Patrick’s Day
    • Summer
    • Teacher Appreciation
    • Thanksgiving
    • Valentine’s Day
    • Winter
    • Back to School
    • Christmas
    • Easter
    • Fall
    • Fathers’ Day
    • Graduation
    • Halloween
    • Independence Day
    • Mothers’ Day
    • New Year’s
  • + Printables
  • + Recipes
    • Soups and Stews
    • Appetizers and Salads
    • Breads
    • Desserts
    • Food Crafts
    • Main Dish

Whimsical Christmas Stocking Pattern and Tutorial

December 14, 2010 By Amy @ Positively Splendid

FacebookTweetPinYummlyPrint

 
These whimsical Christmas stockings are inspired by the pages of the Ballard Designs catalog, but my DIY version is easy to stitch up and fully customizable to fit your decorating tastes! Read on the for the full pattern and tutorial for how these Christmas stockings come together.
These whimsical Christmas stockings at Positively Splendid are so fun! Full pattern included.
These were my audition project for So You Think You’re Crafty, Season 6.

 
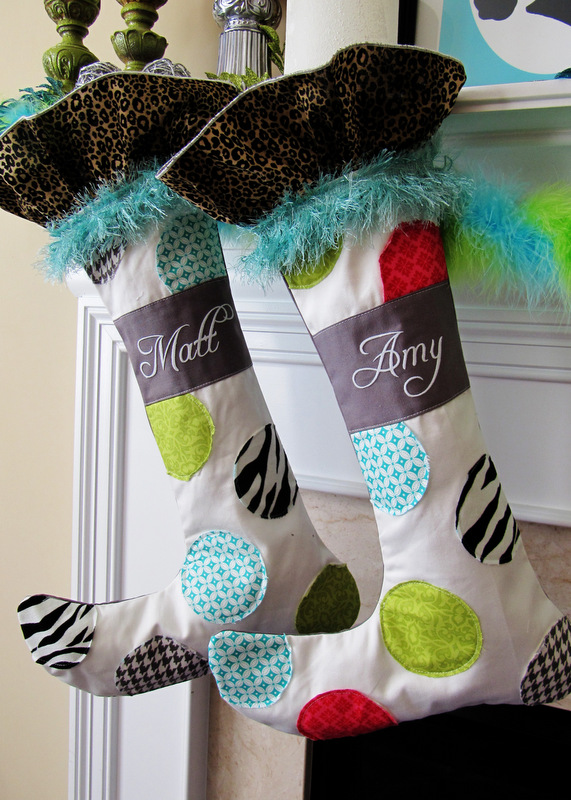
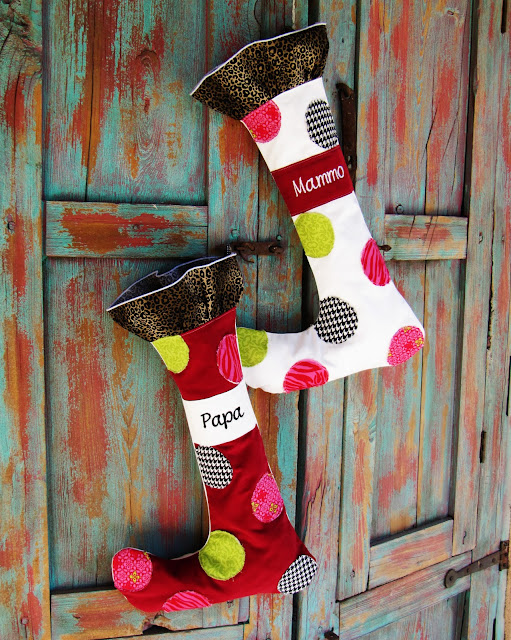
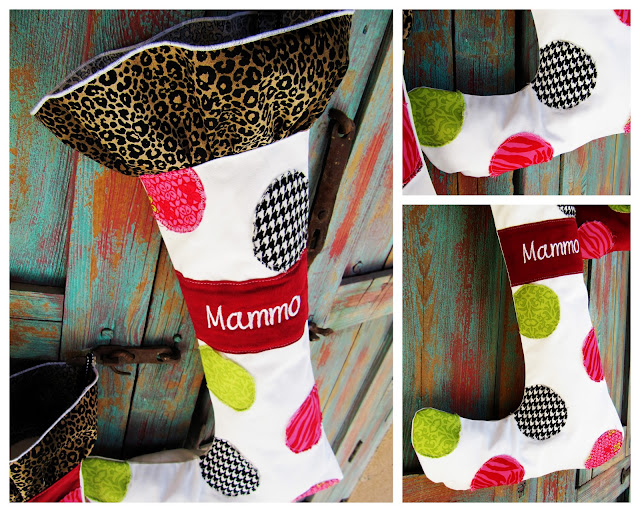
I based these guys on this set of stockings available from Ballard Designs. Being the frugal girl I am, I couldn’t help but scoff at the $35 price tag, so I opted to make my own! I made this particular set for my parents, but I have in mind to make a set for my family very soon, since I am so pleased with how they turned out.
 

For this project, you will need…
The pattern PDF files {{free download}}

Medium- to heavy-weight fabric for the outside of your stocking (I used red fine-wale corduroy for one and a cotton duck in white for the other)
Lightweight lining fabric for the inside of your stocking (I used white broadcloth)
Fabric in assorted patterns
Warm & Natural cotton batting
Fabric glue stick
Spray fabric adhesive
Coordinating thread
Basic sewing supplies: machine, shears, etc.
Optional: serger

step 1 Print off and cut out the pieces of your pattern. Assemble your pattern piece according to the instructions on the PDF documents.

step 2 With your outer fabric folded in half selvage to selvage and wrong sides facing, place your pattern piece face UP (with the toe of the piece facing left) on top of your fabric. Cut your pieces out. Repeat with the lining pieces.
step 3 Cut a total of 8 circles (2 circles from your 4 different fabrics) to decorate the front of your stocking. Based on the finished size of my stocking, my circles were 3″, or exactly the circumference of a drinking glass. Cut out 8 corresponding pieces of Warm & Natural that are about 1/8″ smaller around than your main circle pieces. Use your fabric glue stick to affix a piece of Warm & Natural to the wrong side of each of your fabric rounds.

step 4 For your name strip, cut a piece of contrasting fabric that is 1″ longer than the width of your stocking leg (mine was 7″) and 3.5″ tall. Machine embroider your name lengthwise onto this piece, remembering to leave at least a 1″ border open around your piece to accommodate your seam allowances. Fold the long sides of your name piece under 1/4″; press. 
Note: If you don’t have access to an embroidery machine, see the notes below for other ideas to personalize your stockings.

step 5 Pin your circles and name strip to the front of your stocking (remember that the toe of the stocking front should face to the left). Use my stockings as a reference for how to place your decorative elements. Top stitch around the outer perimeter of each of your circles to affix them to your stocking. Use your fingernail to “rough up” the edges of your circles for a shabby-chic look, if desired. Topstitch along the top and bottom (long) edges of your name piece to secure that piece, as well.

step 6 Spray your spray adhesive to the wrong side of your finished font panel. Precisely match this piece to the wrong side of your lining front, using your hand to smooth out any bubbles between the two layers. Repeat this step with the back outer and lining pieces.
step 7 Pin the assembled panels from step 6 with the right (outer) sides facing. Using a 1/4″ seam, stitch around the outer edge of your stocking, making sure to leave the top open. Use an overlock or zig-zag stitch to finish your seam to prevent fraying. Alternatively, you can use a serger to serge the pieces together using a 1/4″ seam, which will save you the added step of also having to finish your seam. Turn your stocking right side out and press.

step 8 Cut a piece that is approximately twice as long as the circumference of the open end of your stocking and 4″ wide. (My piece was 24.5×4″.) Finish one of the long edges of your ruffle piece either with a rolled hem or a narrow hem. (Check out this post for a great tip I shared a while back for creating faux rolled hems.) Align the short ends of your piece, right sides facing, and stitch together with a 1/4″ seam to form a tube. Run a line of gathering stitches 1/8″ from the bottom (unfinished) edge of your piece. Gather slightly.
step 9Pin the ruffle piece to the top opening of your stocking, right sides facing, adjusting the gathering as necessary. Form a loop with your ribbon hanger piece, and pin it to the back of your stocking, close to the outer side seam (the one on the heel side of your stocking), on top of your ruffle piece. Stitch together with a 1/2″ seam; finish your seam with an overlock or zig-zag stitch to prevent fraying. Press the seam so the ruffle is up and the seam is down. Top stitch on the stocking side of this seam to anchor your seam and ensure your ruffle stands up.
Note: If you have access to a serger, I recommend machine basting your ruffle and hanger pieces to your main stocking before serging everything together with a 1/2″ seam. Be sure the pins you use in the basting step are all removed before serging, as there is nothing worse for a serger than a rogue pin! Press and topstitch as indicated above to finish.


I loved these stockings that I made for my mom and dad so much, I made a similar set of these stockings for my Whimsical Christmas Mantel Display. You won’t want to miss all of the fun DIY details in that mantel design!
 
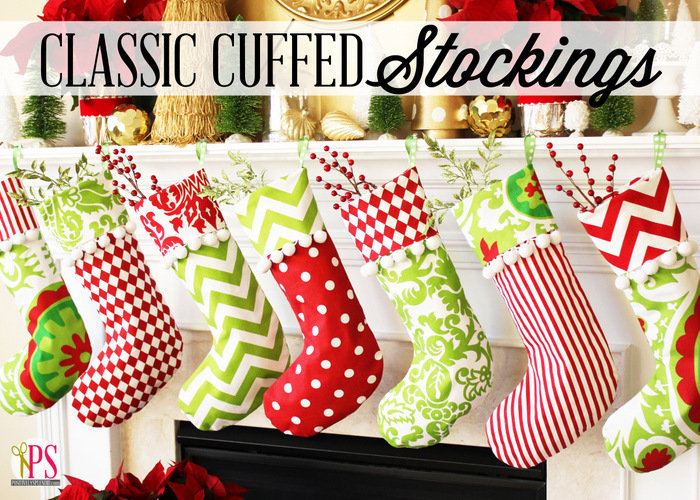
Looking for a more traditional Christmas stocking? Check out my Classic Cuffed Christmas Stocking pattern and tutorial.
 

Helpful Hints and Tips
No embroidery machine at your disposal? Look in your sewing supply store for iron-on letters to personalize your stockings, either with a full name, a monogram, or a single initial. Or, use stamps with washable ink to personalize your stockings. For a home-spun feel, you can also hand embroider your names.

Amy @ Positively Splendid

Having grown up in a home brimming with sewing notions and paintbrushes, Amy has a deep love for all things creative. On any given day, you’ll find her knee-deep in her latest creative endeavor, with projects ranging from sewing and crafts to home decor and kid-friendly ideas. Amy believes that everyone, regardless of skill level or experience, possesses the ability to create something beautiful, and Positively Splendid was born of her passion for helping others harness their innate creative potential.

EVEN MORE GREAT IDEAS JUST FOR YOU!

FacebookTweetPinYummlyPrint

Filed Under: Christmas, Christmas, Free Patterns, Holiday Crafts, Home Decor Crafts, Positively Handmade, Positively Home & Garden, Positively Seasons, Sewing, Sewing for the Home, Tutorials Tagged With: Christmas, Christmas Decor

Previous Post: « A Good-Bye to No. 42
Next Post: Merry Christmas, my friends! »

Reader Interactions

Comments

  1. casserole says

    December 14, 2010 at 2:30 pm

    Your stockings are FAB!! I linked to your tutorial over at Craft Gossip Sewing:
    http://sewing.craftgossip.com/free-pattern-whimsical-christmas-stocking/2010/12/14/
    –Anne

  2. Jessica says

    December 14, 2010 at 9:36 pm

    WOW! How cute are those stockings!!

    I’m blog hopping today and thought I would stop by your blog. Hope you will visit either or both of my blogs and say hello and follow (if you aren’t already a follower).

    Jessicas Lil Corner is my family blog at http://jessicaslilcorner.blogspot.com

    So Stylilized is where I am currently offering FREE custom blog designs at http://sostylilized.blogspot.com

    Have a VERY VERY blessed Tuesday!! :0)

  3. Jenn says

    December 15, 2010 at 11:58 pm

    I love these Amy!!! You’ve got to be one of the most creative people I’ve ever met! Maybe I can get these made before Christmas? If they’re not to advanced I might stand a chance.
    Thanks SO much for sharing! I love your tutorials…
    Hope you have a great night! 🙂

  4. jojo says

    December 16, 2010 at 1:55 pm

    c est genial merci sublime

  5. Sandy Ang says

    December 17, 2010 at 11:01 pm

    They are so cool and funky! Thanks for the tutorial.

  6. Black and White {Side by Side} says

    December 21, 2010 at 3:36 pm

    SO adorable!!! I love the leopard trim 🙂 Just like Ballard Designs! But much cheaper. Good luck on SYTYC!!!

  7. a. says

    December 23, 2010 at 6:11 am

    I love Ballard Designs, but not their prices! I think your version is much cuter – great fabrics! I’m your newest follower, btw! If you have time, please stop by & follow back! : )

    Aimee @ justkiddingaroundatlanta

  8. Jane says

    January 5, 2011 at 5:44 am

    These are super cute! I love the shape and the playfulness!

  9. Deidre says

    November 10, 2011 at 8:49 pm

    Very Inspiring!These are great! I just love knock offs! Thank you from a “Very Newbie” on the block:)

  10. Heather Mullin says

    December 12, 2011 at 3:54 pm

    Your stockings are absolutely amazing! I love the Ballard Design ones and have been waiting until after Christmas to get them. Would you consider making a few for someone? If so, how much would you charge? I don’t sew and don’t know anyone who does. Please let me know! Thank you so much!
    Blessings,
    Heather
    [email protected]

  11. Kelly M says

    January 11, 2012 at 9:31 pm

    I love these and want to make them for next year. However, my computer will not allow me to open your .pdf documents. Can I ask you to send them to me via email?

    Kelly
    [email protected]

    Thanks!

  12. mommaloves7 says

    February 5, 2012 at 5:26 am

    Wanted you to know I used your pattern to make stockings for my brother’s 4 kids. I curled the toe. Used red velveteen and white satin dots with satin-stitched edges and different lime green prints for the ruffles. My neices and nephews were thrilled with the stockings ‘Santa’ brought them.

  13. Denise says

    November 7, 2013 at 8:50 pm

    I love the embroidery names what font did you buy. Where did you purchase the font at.

    • Amy @ Positively Splendid says

      November 8, 2013 at 8:07 am

      Hi, Denise! The names on these stockings is actually flocked heat transfer that I cut out with my Silhouette CAMEO. The font is called Freebooter Script. I am unsure of whether it has been digitized for embroidery? I shared more details about these stockings here: http://www.positivelysplendid.com/2011/12/our-new-stockings-stocking-hanging-tips.html

  14. Holli Leslie says

    November 9, 2013 at 8:31 pm

    We must be kindred spirits… I have been eyeballing these stockings from Ballard for years…. Great job! Your version is all kinds of fabulous 🙂

    • Amy @ Positively Splendid says

      November 11, 2013 at 5:56 am

      Thanks so much!

Primary Sidebar

PS Search

Search this website

Seasonal Inspiration

Hocus Pocus Wreath
Ghost Plushies
Paper Pumpkins
Fabric Yo-Yo Pumpkins

Copyright © 2025 · Positively Splendid · All Rights Reserved. · Privacy Policy

Privacy & Cookies: This site uses cookies and other tracking technologies to assist with navigation and your ability to provide feedback, analyse your use of our products and services, assist with our promotional and marketing efforts, and provide content from third parties. To find out more, as well as how to remove or block these, see here: Our Cookie/Privacy Policy


Loading Comments...