• Skip to primary navigation
  • Skip to main content
  • Skip to primary sidebar

Positively Splendid {Crafts, Sewing, Recipes and Home Decor}

Handcrafted. Splendidly.

  • Home
  • Blog
  • + Handmade
    • Crafts
      • Craft Gift Ideas
      • Holiday Crafts
      • Home Decor Crafts
      • Kids’ Crafts
      • Paper Crafts
      • Quick and Easy Crafts
      • Wearable Crafts
      • Wreaths
    • Gift Ideas
      • Budget-Friendly Gifts
      • Gift Wrapping
      • Gifts for Dads and Grandpas
      • Gifts for Kids
      • Gifts for Men
      • Gifts for Moms and Grandmas
      • Gifts for Neighbors
      • Gifts for Sports Fans
      • Gifts for Teachers
      • Gifts for Women
      • Quick and Easy Gifts
    • Kid-Friendly Projects
    • Sewing
      • Sewing for Children
      • Sewing for Men
      • Sewing for the Home
      • Sewing for Women
      • Sewing Techniques
      • Sewn Accessories
      • Sewn Gifts
  • + Home & Garden
    • DIY Home Decor Projects
    • Helpful Tips
    • Home Decor Crafts
    • DIY
    • Home Tour
    • Mantels and Tablescapes
    • Organization
    • Outdoor and Garden
  • + Holidays & Seasons
    • Spring
    • St. Patrick’s Day
    • Summer
    • Teacher Appreciation
    • Thanksgiving
    • Valentine’s Day
    • Winter
    • Back to School
    • Christmas
    • Easter
    • Fall
    • Fathers’ Day
    • Graduation
    • Halloween
    • Independence Day
    • Mothers’ Day
    • New Year’s
  • + Printables
  • + Recipes
    • Soups and Stews
    • Appetizers and Salads
    • Breads
    • Desserts
    • Food Crafts
    • Main Dish

DIY Magazine Files (Free Template)

September 12, 2012 By Amy @ Positively Splendid

FacebookTweetPinYummlyPrint

This week, I’m sharing some of the DIY organizational projects I completed for my new sewing room and home office. One of my main challenges in this tight space was finding a way to keep everything organized without having everything become overly cluttered, and I knew I needed to find an attractive, discreet way to stash all of my magazines, which lately have started to take over just about every flat surface in my home!


After my little helper above assisted me in purging my magazine collection (no small feat!), I started looking for magazine files to purchase so that I could store them on the bookshelf in the space. During a recent trip to the Container Store, I was really attracted to these files:


They are sturdy and make a nice decorative statement, but the DIY’er in me simply couldn’t abide paying $11 apiece for something made of cardboard! Instead, I set to work creating a template of my own to use to make something similar for a fraction of the cost. My secret? Foam core board! Let me show you how I did it.

For this project, you will need:
Foam core board (1 20×30″ piece for each file)
Pencil
X-Acto knife
Scoring tool
Clear ruler (recommended) or yardstick
Clear packing tape
Patterned paper
Scissors
Mod Podge
Label holders

To start, print off and assemble the magazine file template, available for download below.

Helpful hints for assembling the template: First, connect pieces 1, 2, and 3, and then connect those joined pieces to piece 4. Next, connect pieces 5, 6, and 7, and then connect those joined pieces to piece 8. With the left- and right-hand sides of the template assembled, join them together at their centers, as indicated on the template pieces.

With a pen or a pencil, trace the assembled template onto the foam core board.


Working slowly and carefully, cut over the traced lines with an X-Acto knife. Be sure to work on a self-healing mat or a piece of scrap cardboard to protect your work surface!


Using a scoring tool and a clear ruler or yardstick, score along the dotted lines indicated on the template piece. Hint: To transfer these marks easily from the template onto your foam core board piece, place the template on top of the piece and mark the end points of these dotted lines onto your foam core board piece with a pencil. Then, connect the two points with your ruler and score. 


Using the scored lines as a guide, fold the the side panels to create all four vertical sides of the file. (Be sure to fold toward the scored lines.) Secure the joint where the sides connect generously with packing tape.


Fold the bottom flaps of the file and secure them with packing tape in a similar fashion.


To cover the assembled file, trace each side onto patterned paper, cut the pieces out, and then affix the paper to the file with Mod Podge. If desired, apply a protective coat of Mod Podge over the paper to seal. (FYI: I opted not to cover the bottom of my box, since I knew it wouldn’t be visible, but if having the exposed foam core board bothers you, by all means, cover it up!)


Now, attach a label holder to the front of the file. You can find traditional label holders at office supply stores, but I fell in love with these label holders from Tim Holtz that I found in the scrapbooking section at Jo-Ann.


You are finished!

There are so many options for these files!
 You could even cover them in fabric for a more streamlined, sophisticated look.

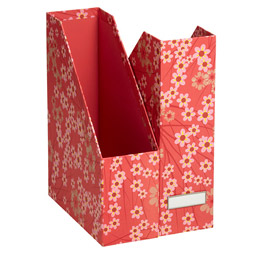
I recommend making a separate file for each magazine your subscribe to. 


Fill your files with magazines and display them happily on a shelf. No more clutter!


To download the template pieces for this project, click on the arrow in the right-hand side of the box below. Please note that if you are enjoying this post in a reader or via email subscription, you will need to click over to the blog for the download.


If you haven’t already, be sure to check out how I made a no-sew version of my diaper box storage bins for additional storage in this space.

Thanks for making me a part of your day!

Photobucket
Linking this to…
Skip to My Lou
Serenity Now
Home Stories A to Z
Tidy Mom
Tatertots and Jello
Flamingo Toes
A Glimpse Inside

Amy @ Positively Splendid

Having grown up in a home brimming with sewing notions and paintbrushes, Amy has a deep love for all things creative. On any given day, you’ll find her knee-deep in her latest creative endeavor, with projects ranging from sewing and crafts to home decor and kid-friendly ideas. Amy believes that everyone, regardless of skill level or experience, possesses the ability to create something beautiful, and Positively Splendid was born of her passion for helping others harness their innate creative potential.

EVEN MORE GREAT IDEAS JUST FOR YOU!

FacebookTweetPinYummlyPrint

Filed Under: Crafts, DIY, DIY Home Decor Projects, Home Decor Crafts, Home Decor Crafts, Organization, Positively Home & Garden, Tutorials Tagged With: home office, magazines, sewing room, Storage Ideas

Previous Post: « No-Sew Storage Bins from Diaper Boxes
Next Post: Halloween T-Shirt Wreath »

Reader Interactions

Comments

  1. Melanie@Crafty Cupboard says

    September 12, 2012 at 3:22 pm

    So cute Amy! Foam core, what a great idea!

  2. Holly @ abakershouse.com says

    September 12, 2012 at 3:40 pm

    Looks great! This is a project I’ve been meaning to get to and I’ll pin yours to keep it fresh in my mind. Thanks!

  3. Country Mouse says

    September 12, 2012 at 4:22 pm

    What a great idea! It would make my stack of magazines look so much prettier and neater! Thanks!!!

  4. Amanda @ Serenity Now says

    September 12, 2012 at 4:49 pm

    Aren’t you a smarty pants?! Love them! The embellishment is so pretty. 🙂

  5. Beverly {Flamingo Toes} says

    September 12, 2012 at 6:31 pm

    This is so great Amy!! I love the papers you chose too – so pretty!!

  6. Kari Sweeten says

    September 12, 2012 at 6:42 pm

    Amy I love, love, love these! I have those embellishments from Tim Holtz, too. Now I know what I’ll be doing with them!

  7. Sarah B says

    September 12, 2012 at 9:15 pm

    What a great idea! I wonder if this could be changed slightly to fit scrapbook pads? I hoard scrapbook paper and I have 4 sets of mismatched 12×12 magazine holders for my paper – I wonder if the foam core would be durable enough to hold up several pads of paper?
    Thanks for sharing!!!

  8. Smart School House says

    September 12, 2012 at 10:42 pm

    I might get addicted to this! What a GREAT idea!

  9. Debbie says

    September 13, 2012 at 11:27 pm

    I’ve tried do these before and it has never worked out. Somehow they always ended up different sizes. I’m so glad you posted this because it looks soooo much easier! thanks =)

  10. Bonnie @ Uncommon says

    September 14, 2012 at 12:34 am

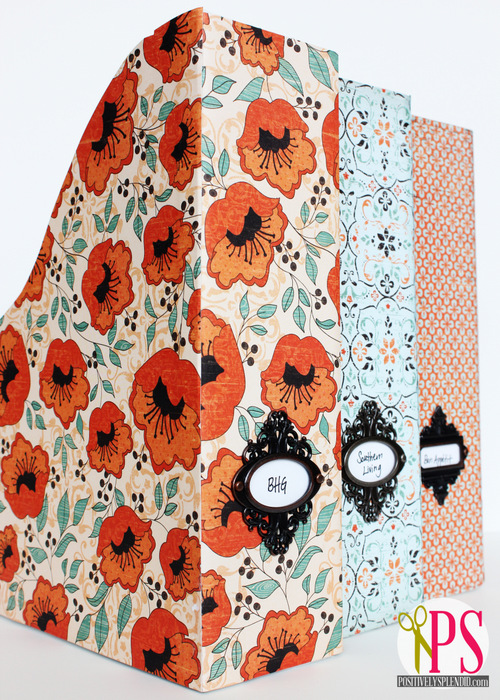
    Beautiful Amy!!! love the patterns and those little labels are perfect!

  11. aimee says

    September 15, 2012 at 8:02 am

    These look great they look so pretty. I’d love if you stopped by later and linked them up to my party at http://www.twiggstudios.com/?m=1

    Thankyou xxx

  12. Christina at I Gotta Create! says

    September 15, 2012 at 3:18 pm

    Those are Gorgeous, Amy! Love the patterns and embellishments.
    <3 Christina

  13. nest of posies says

    September 16, 2012 at 4:14 am

    these are so smart looking!

  14. Amy says

    September 16, 2012 at 12:59 pm

    Hi! Nice to meet another crafty Amy! I totally love these…the patterns you chose plus the hardware really put them over the top awesome! I would love for you to share them here:
    http://www.oneartsymama.com/2012/09/shine-on-fridays-45-and-giveaway.html

  15. scrapfancy says

    September 17, 2012 at 8:20 am

    Thanks for sharing this idea. Always need these and now with using the foam board my life can be simpler.

  16. Joan Hayes says

    September 23, 2012 at 3:41 am

    So glad I found this post. I’ve been looking for Magazine boxes for months but everything out there is just…ugly. Now I can make my own and huge bonus, I have all the supplies already so they’ll be free! Can’t wait to get started on these. Pinned!

  17. lisa cone says

    October 30, 2012 at 8:15 pm

    Supplies+shopping time+crafting time. Did you really save money?

    • Amy @ Positively Splendid says

      October 30, 2012 at 8:54 pm

      The foam board came out to $1.25, and each sheet of paper was right around 25 cents. Aside from those items, everything else I happened to have on hand. I love the fact that these are totally customized for my space, so the work to create them was worth it for me. Plus, the satisfaction from making something with my own two hands is always appealing to me! Thanks for stopping in.

  18. Pam Shipman says

    November 7, 2012 at 5:57 am

    I sure wish you were around when my kids were little. I could have used a lot of your suggestions for children. But you still have loads of crafts for me to enjoy now. Thank you for sharing your talent.

  19. Jen says

    December 17, 2012 at 4:48 pm

    What a fantastic idea, I’m trying desperately to get organised before Christmas and start the new year super organised so this is so great! And really stylish too!

  20. AverageJane says

    March 11, 2013 at 1:10 pm

    Hey Amy – found this through Pinterest. I happen to have everything at home I need. Forgive a really dumb question, maybe someone can help – but when I print out the templates, they aren’t the correct size. Any idea how to do this from Acrobat?

    • AverageJane says

      March 11, 2013 at 1:15 pm

      As a note, when I print out the paper and measure they 1″ key – it measures at 1 inch – but the pieces are super tiny. I’m totally feeling stupid over this.

    • Amy @ Positively Splendid says

      March 13, 2013 at 10:02 pm

      Hi there! The different pages are all pieces of the same template, which you have to piece together according to the directions on the pieces themselves. Since the template was larger than a standard 8.5×11 sheet of paper, I had to split it into different parts so it could be printed with a standard printer. I hope this helps!

  21. Leslie says

    March 25, 2013 at 11:12 am

    If using fabric, what would you use to attach it to the foam board?

    • Amy @ Positively Splendid says

      March 27, 2013 at 6:26 am

      Hi, Leslie! I would use a thin layer of Mod Podge to adhere the fabric to the board.

  22. Emma says

    April 6, 2013 at 10:45 am

    I have been looking for magazine files everywhere, and you’ve made this look so easy! I will definitely be making these soon!

  23. Julie says

    May 5, 2013 at 2:27 pm

    Can I ask what you used for printed paper? It doesn’t look like scrap booking paper. Maybe gift wraping paper?
    So love the idea. Thank you in advance.

  24. Kathy says

    June 27, 2013 at 4:27 pm

    These are wonderful! I cannot wait to make my craft room look wonderful with these files. Thanks!!

Primary Sidebar

PS Search

Search this website

Seasonal Inspiration

Hocus Pocus Wreath
Ghost Plushies
Paper Pumpkins
Fabric Yo-Yo Pumpkins

Copyright © 2025 · Positively Splendid · All Rights Reserved. · Privacy Policy

Privacy & Cookies: This site uses cookies and other tracking technologies to assist with navigation and your ability to provide feedback, analyse your use of our products and services, assist with our promotional and marketing efforts, and provide content from third parties. To find out more, as well as how to remove or block these, see here: Our Cookie/Privacy Policy