After sewing for many years now, I always seem to find myself reaching again and again for the same sewing tools to make my projects easier. In this round-up, I’m passing along 10+ of the sewing tools and notions I think are most essential to have in your arsenal.
Did you receive a new sewing machine recently, and are wondering what exactly you need to get started creating magic with your new toy? Or do you have a machine that has languished for years in a box at the back of a closet, simply because you don’t know where to begin? Or, maybe you simply want to learn more about sewing so you can improve the quality of your projects and get more enjoyment out of the process? If any of these applies to you, my list today is truly a must-read, because the items I’ve included will make any sewing project–no matter your skill level–easier and more enjoyable!
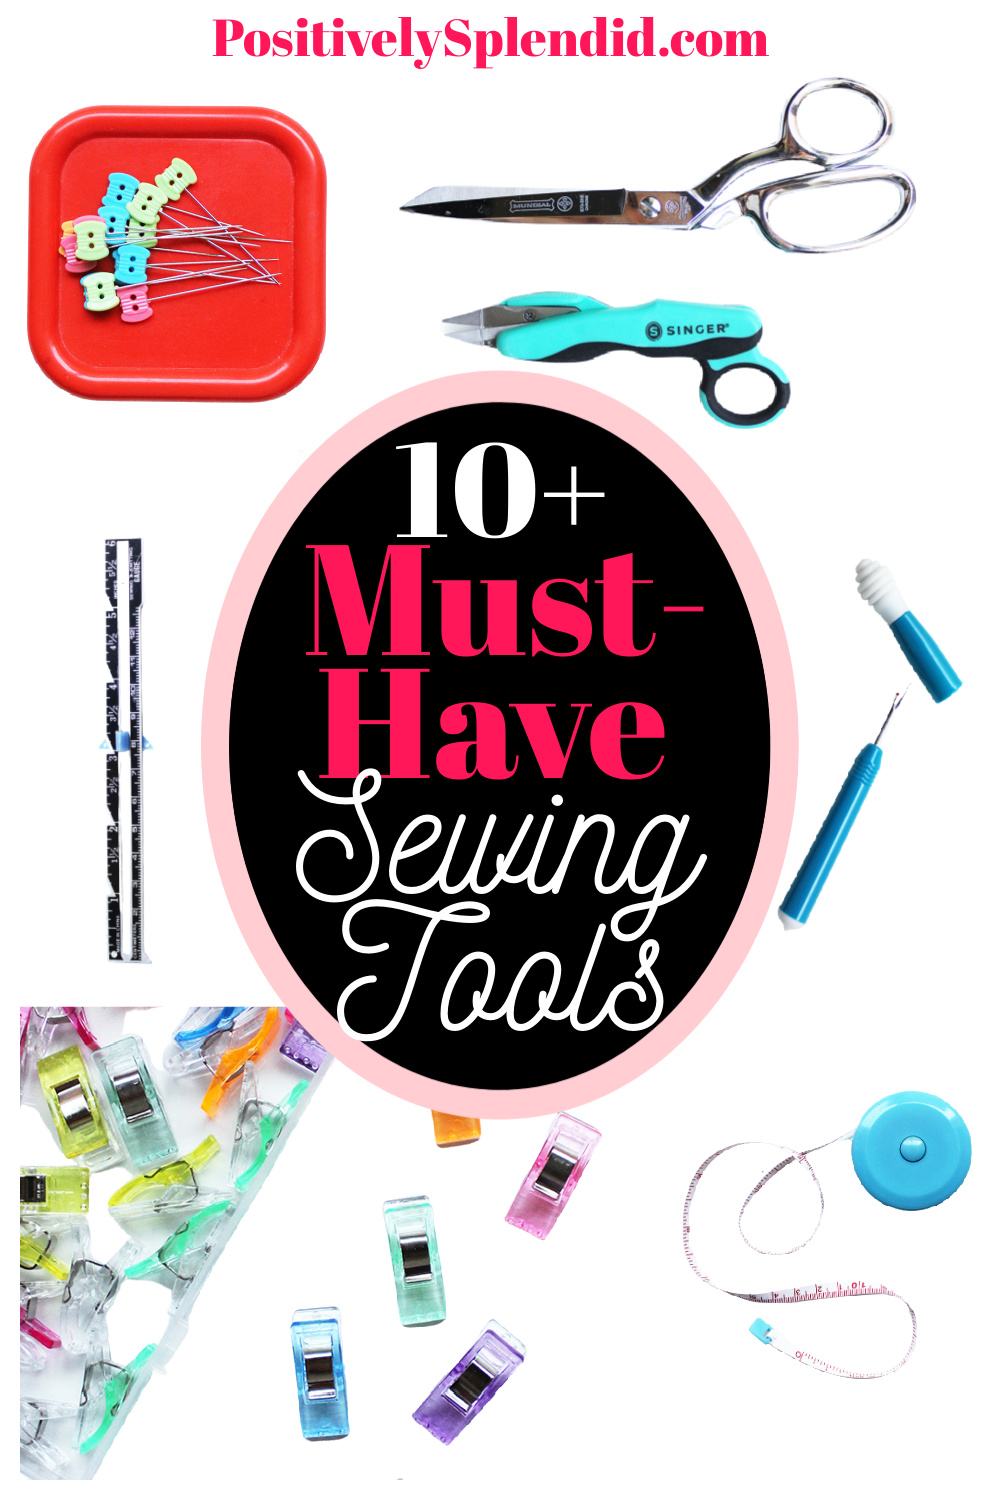
This helpful list of must-have sewing tools is divided into three different sections:
-
Sewing Tools for Cutting
-
Sewing Tools for Measuring and Marking
-
Other Core Sewing Tools
This list of sewing tools is full of all of the items I use on a regular basis for my sewing projects. A collection of these tools would be a terrific gift for anyone in your life who loves sewing or is just getting started with the hobby!
Note: This post contains affiliate links.
Sewing Tools for Cutting
Cutting and clipping are fundamental to of any sewing project, and it’s important to have just the right tools for the job. The number of cutting tools available can be overwhelming, but I’ve narrowed things down to the must-haves.
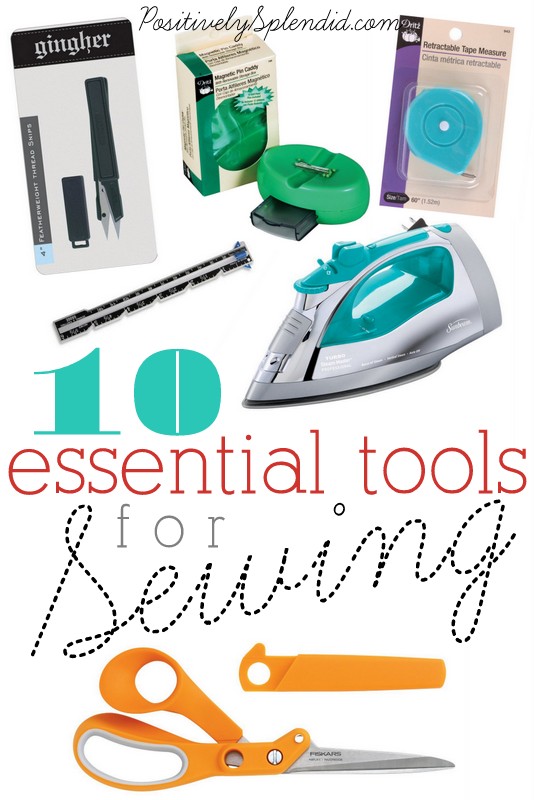
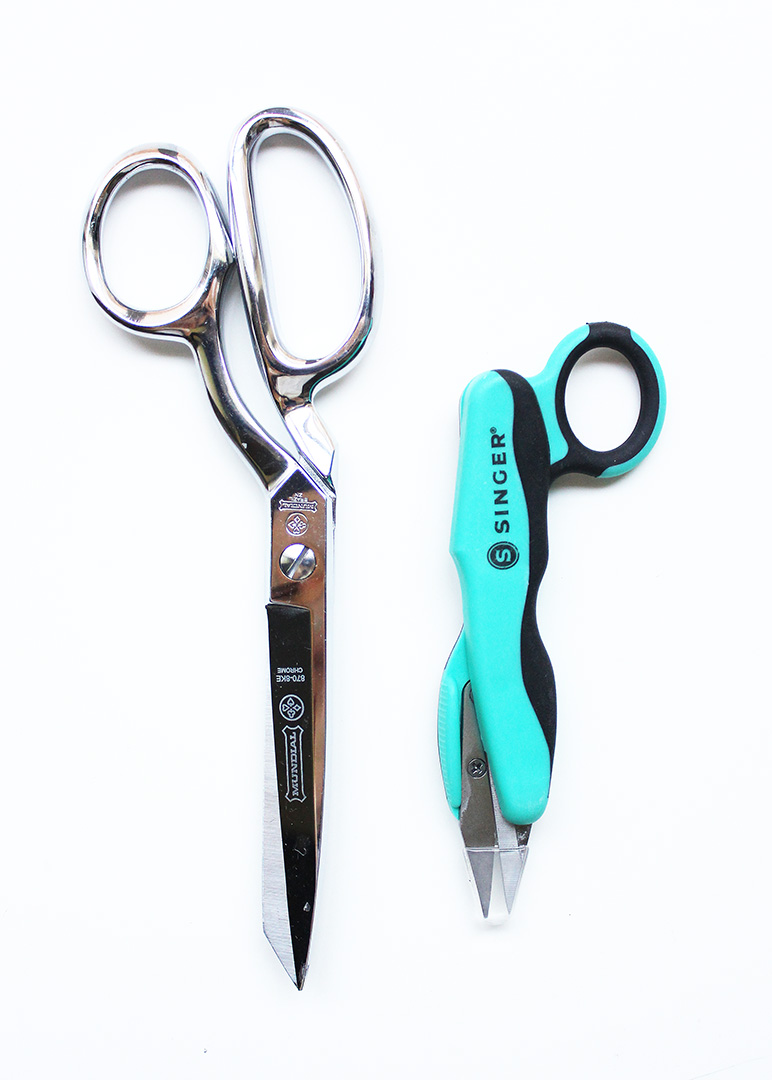
- Shears
- Thread Snips
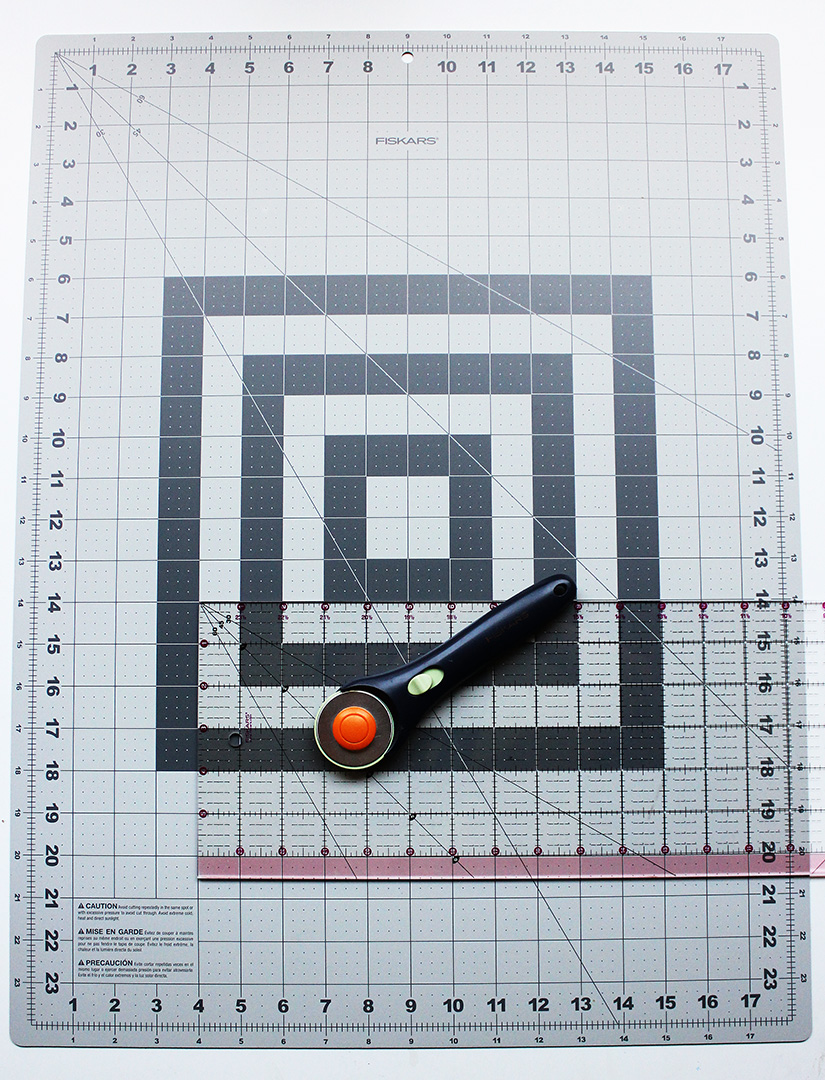
- Rotary Cutter and Mat
- Large Cutting Mat
Shears Used ONLY for Cutting Fabric
I have mentioned before that my mom is an accomplished seamstress, and I can recall so vividly as a child being scolded by her any time I made an attempt to use her sewing shears for cutting construction paper! Now, of course, I am the mama getting onto my kiddos for doing the same. 🙂 Truly, any sewist should have a pair of shears used solely for sewing projects to prevent the blades from becoming dulled and thus damaging fabrics as they are cut. I recommended investing in a quality set of stainless steel shears that can be sharpened over the years. I’ve had mine for over 15 years now, and with regular sharpenings, they still work like new.
Thread Snips
Keeping threads trimmed as you sew and trimming strays in finished projects are key to achieving professional results in your projects. Thread snips are much more manageable in size for trimming stray threads than large shears. They are great for hand sewing projects, too.
Rotary Cutter and Mat
I rarely tackle a sewing project when I don’t put my Fiskars Rotary Cutting Set to good use. The sturdy self-healing mat and clear ruler make the task of making numerous cuts a breeze, and the rotary cutting tool is easy to use, with a blade that can be switched out in seconds.
Large Cutting Mat
If you don’t have a dedicated space for cutting out projects in your home, a large cutting mat is essential to prevent surfaces from getting scratched as you make cuts. There are many different varieties of cutting mats available, but I really love my Singer Pattern and Craft Board. At 36×72 inches, it is ample for just about any project (including home decor projects), and I love that it folds up neatly for easy storage.
Sewing Tools for Measuring, Marking and Finishing
These essential sewing tools for measuring and marking help keep things nice and precise, which is the name of the game in achieving professional results in any sewing project.
- Tape Measure
- Seam Gauge
- Marking Pens
- Seam Turning Tool
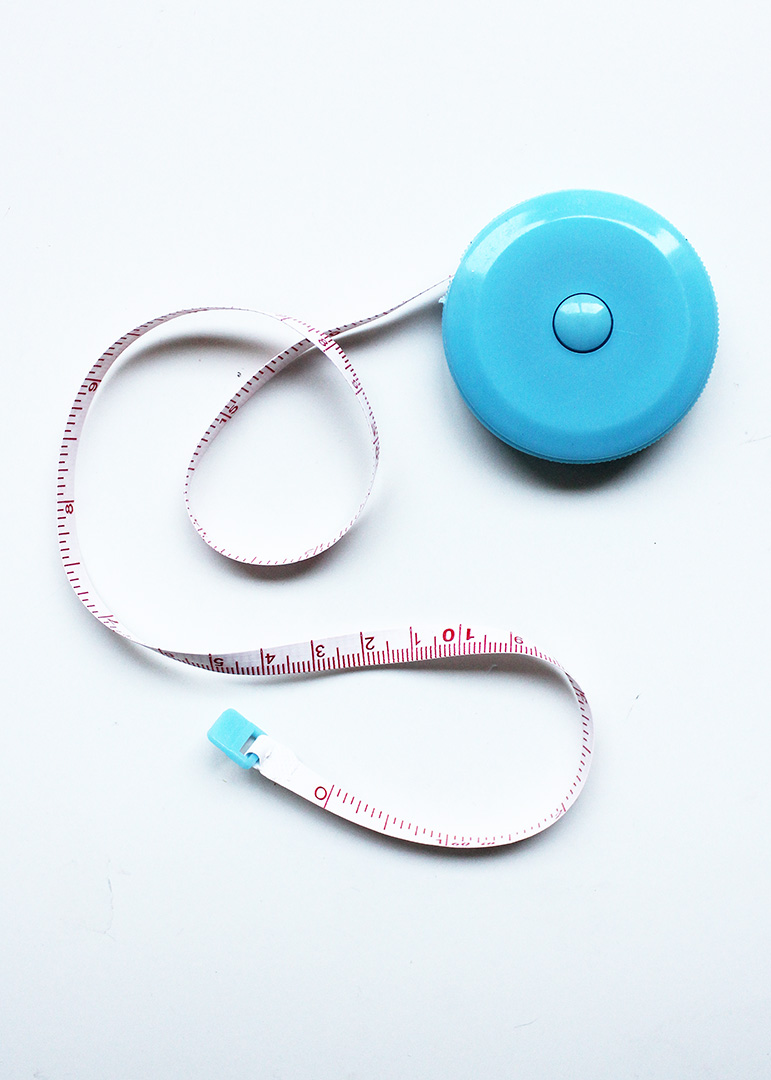
Tape Measure
A standard ribbon tape measure will do the trick, but I prefer a retractable tape measure that can be rolled up and put away in seconds.
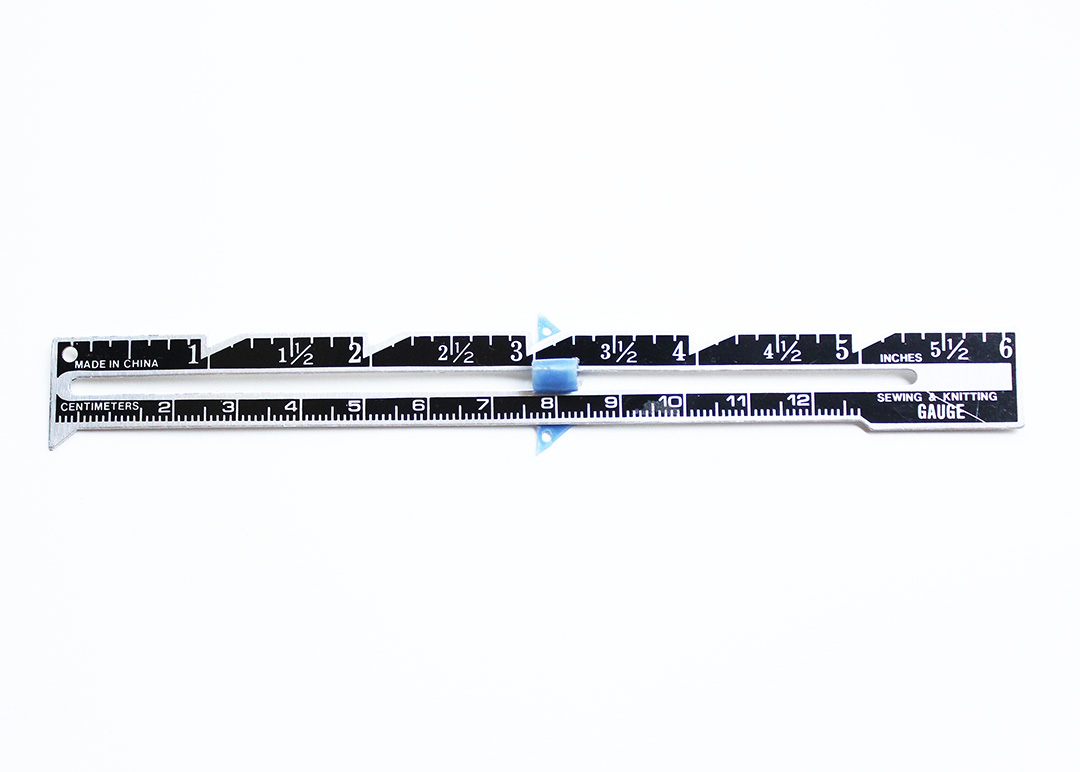
Seam Gauge
To ensure accuracy in pressing hems, pleats and more, a seam gauge really is essential. I love my simple and sweet Dritz seam gauge that has a sliding gauge to ensure even, consistent placement.
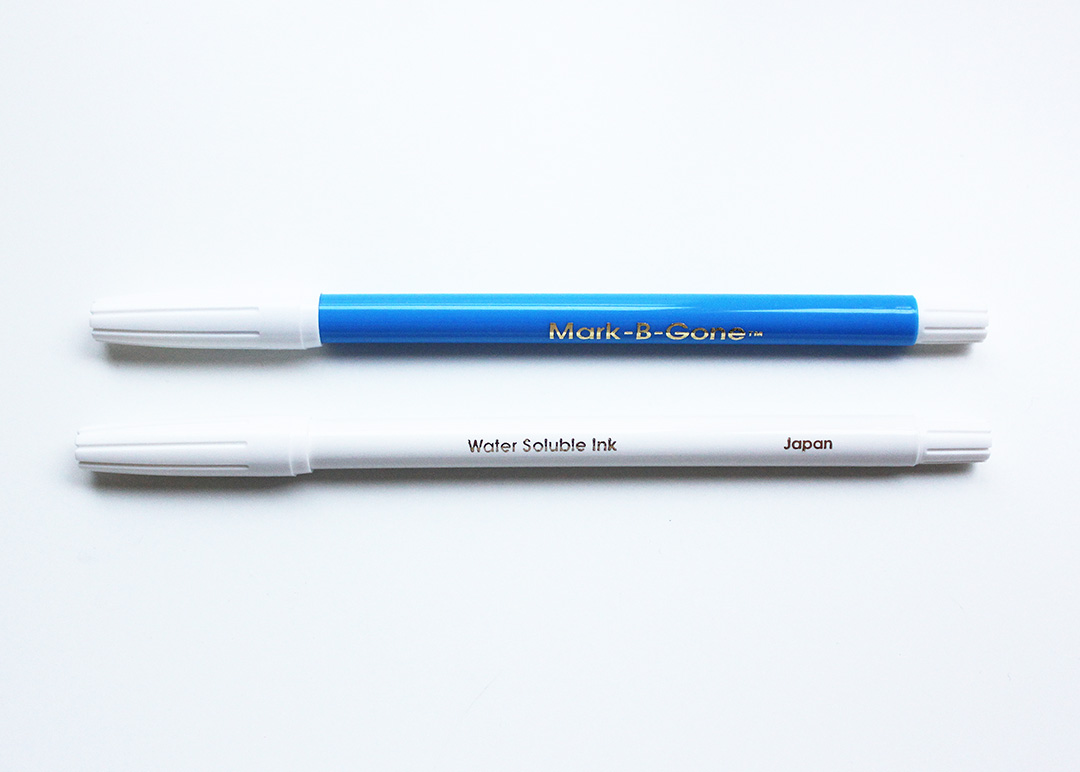
Marking Pens
Marking measurements and placements for patterns is made easy and tidy with marking pens with water-soluble or disappearing ink. You’ll need marking pens suitable for both light and dark fabrics, like this set pictured here.
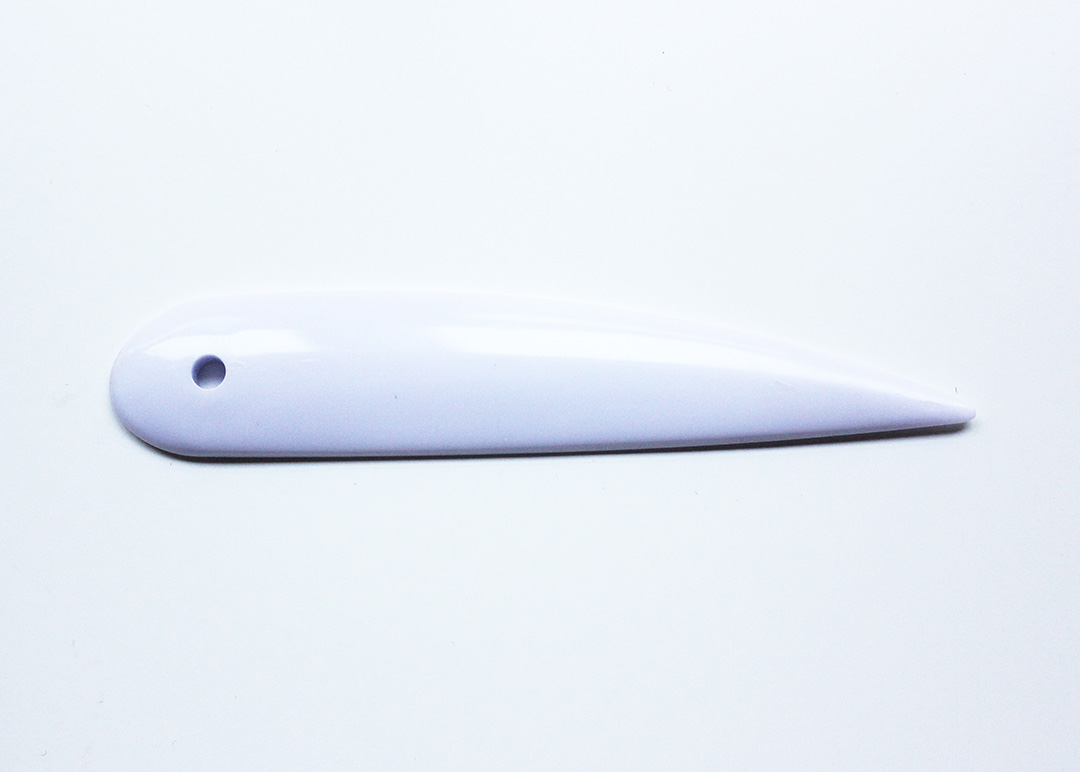
Point Turning Tool
This point turning tool is one of the tools I reach for the most as I complete projects. It is so handy for achieving crisp corners. I couldn’t live without it!
Other Core Sewing Tools
Some tools are as essential to sewing as a sewing machine itself, and this section is dedicated to those important items.
- Iron
- Pins and Pincushion
- Seam Ripper
- Sewing Clips
Iron
More than anything, I firmly believe that pressing projects is one of the most surefire ways to ensure the best possible results in finished projects! For that reason, the first purchase I recommend anyone to make once they are the proud owner of a sewing machine is an iron to use specifically for sewing projects. Select one that isn’t too heavy, and that feels comfortable in your hand. Depending upon personal preference, you can select one with an automatic turn-off (great for homes with children and pets), or one without that feature. Because a “good iron” is such a subjective concept, the perfect iron for your needs doesn’t have to cost a fortune. My favorite iron I’ve ever used was actually a very inexpensive little Sunbeam iron that lasted through nearly five years of consistent use before it finally gave out!
One last note about irons: no matter how pure the water source (or even if it’s bottled purified water), I recommend against ever filling the iron with water for steaming, even if the instruction manual says you can do so. The same steaming effect can be better accomplished with a simple spray bottle, and it will ensure the longevity of your iron for years to come!
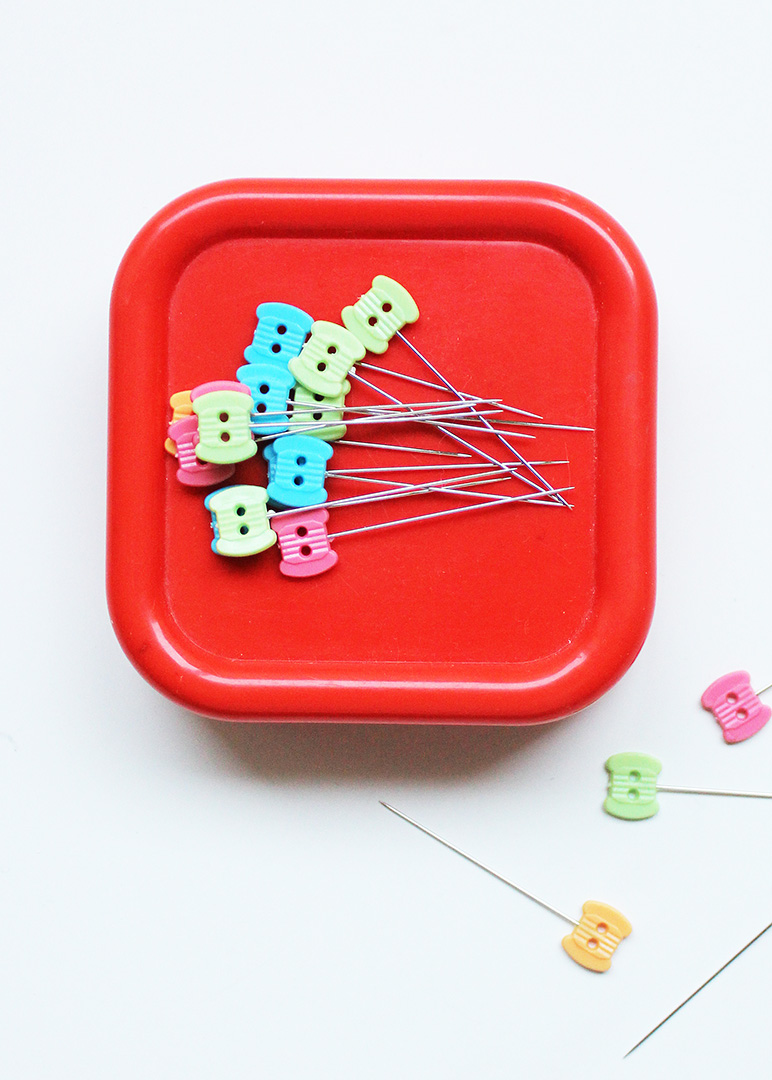
Pins and Pin Cushion
Pinning fabric layers together is a key step in any sewing project, so pins are a must-have for your sewing kit. Having a way to keep pins consolidated is just as important! In homes with children or pets (or for those of you who, like me, enjoy sewing in bare feet!) keeping pins stowed safely away is a must. There is no easier way to ensure pins wind up where they belong than to have a magnetic pincushion. This handy tool allows you to place pins in the basic vicinity of the holder, and the strong magnets pull the pins into place (and keep them there). I’ve had mine for many years, and it still works great! Of course, the standard tomato pin cushion is an inexpensive alternative, and you can even find pin cushions that go around your wrist so you can keep pins contained as you remove them when sewing.
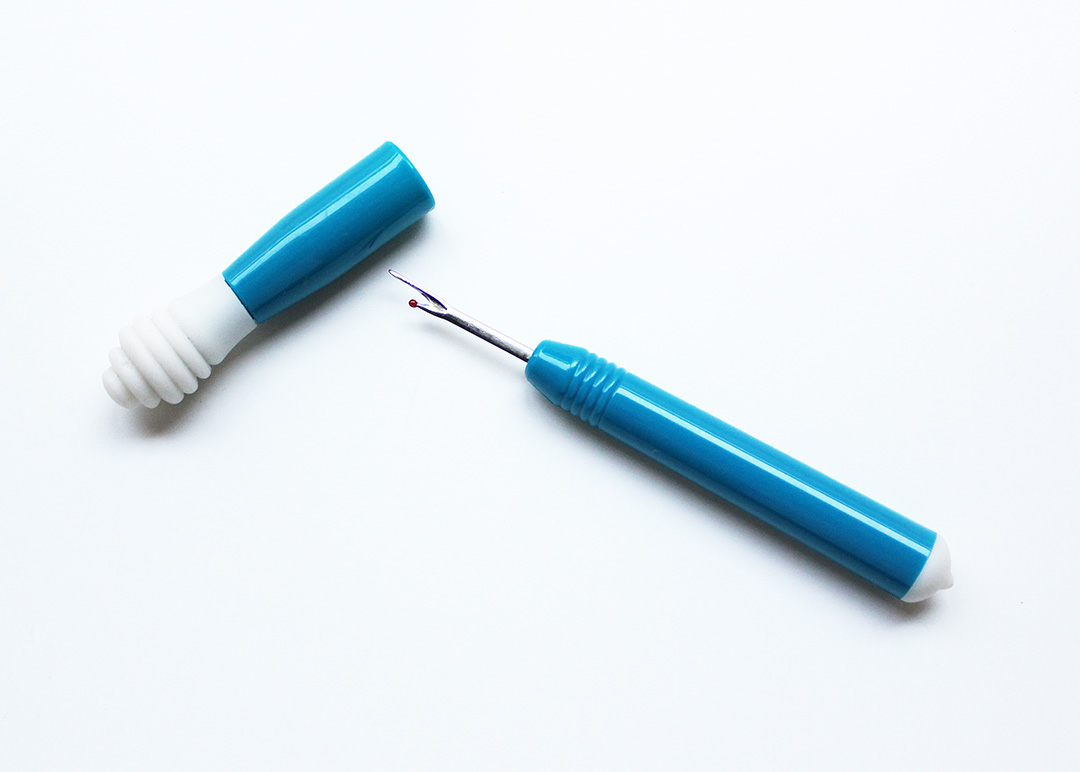
Seam Ripper
Let’s face it: mistakes happen, even for experienced sewists. A good seam ripper is a must! My mom gave me the handiest seam ripper as a stocking stuffer one year: it contains a traditional seam ripper on one end, and on the other, it has a handy rubber fitting that whisks away cut threads like magic. I don’t know how I ever lived without it!
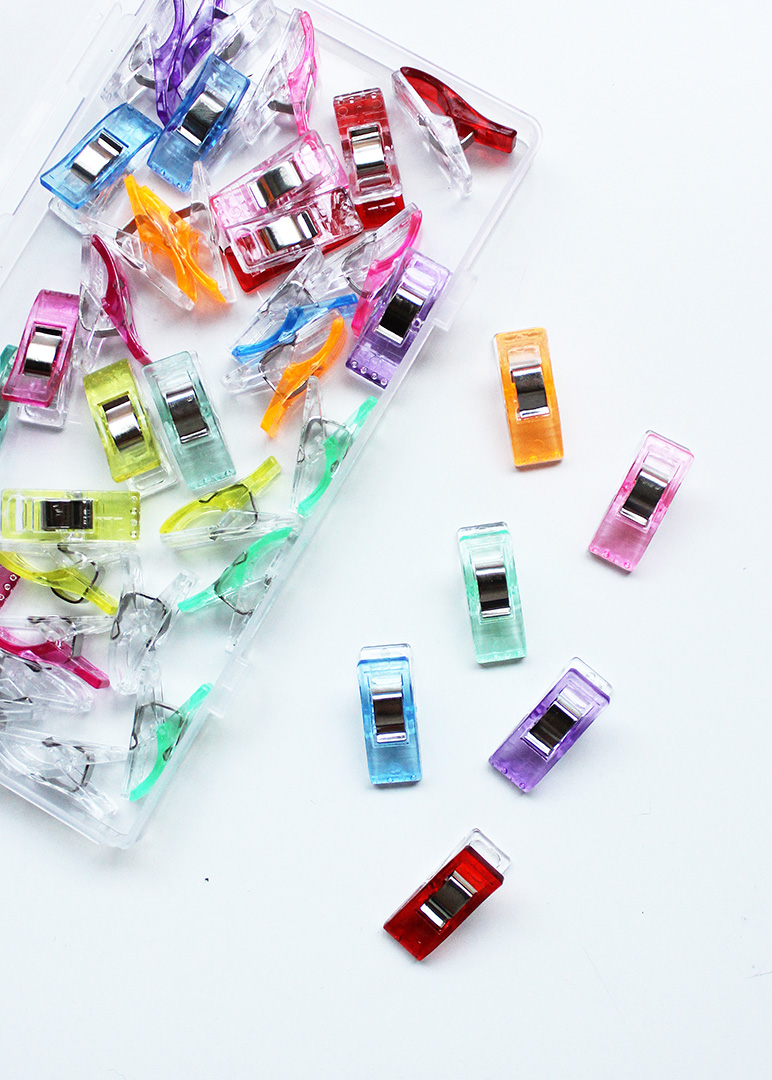
Sewing Clips
Pinning projects can admittedly be very tedious, which is why I’ve added handy sewing clips to this list. Clips can quickly and easily be attached and removed from projects, making them a great alternative.
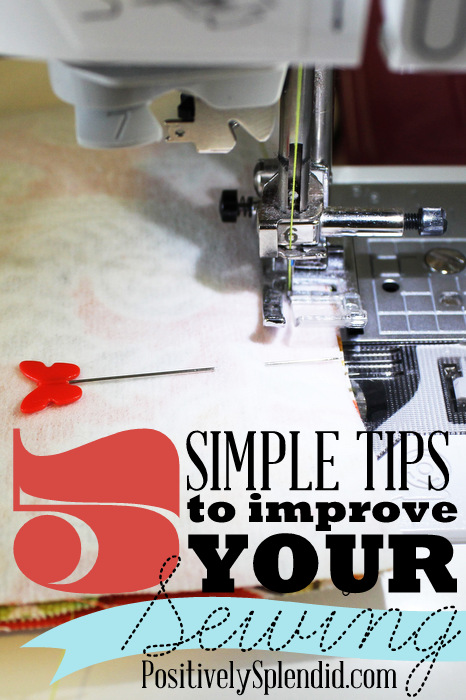
5 Simple Tips to Improve Your Sewing
8 Helpful Tips for Cutting Out Sewing Projects
This post was originally published in 2014. It has been updated with relevant links and ideas.
Having grown up in a home brimming with sewing notions and paintbrushes, Amy has a deep love for all things creative. On any given day, you’ll find her knee-deep in her latest creative endeavor, with projects ranging from sewing and crafts to home decor and kid-friendly ideas. Amy believes that everyone, regardless of skill level or experience, possesses the ability to create something beautiful, and Positively Splendid was born of her passion for helping others harness their innate creative potential.
I’d be lost without my lint roller that picks up all those lose threads. And, a large glass sugar container that holds my marking pens and scissors that I use to cut paper.
I love my lint roller, too, Patty!
I have 4 variations and 1 technique that I hold as essential
1
Curved cuticle scissors
Instead of thread snips per se, I use small curved nail/cuticle scissors.
They allow me to drop the blade very very close to the
Fabric surface without danger of snipping surrounding fabric.
I mean, of course, I cut with the lower arc down and the tips up.
This allows more confident thread attacking, and so is quicker.
As a side benefit, I swing the small, light scissors from my index finger
into my palm — great for handling the lengths of fabric without
Either catching the fabric or constantly laying down the snips.
2
Jigs
Instead of a seam gauge, I’ve used my rotary cutter to cut strips of heavy cardboard (ironing) or light plastic (placement of other stuff) in my most commonly used widths. Move it along an edge to keep things in alignment. No pins. It is a jig or spacing template. For ironing, you can easily figure out what jig would create a nice exact size double fold hem. (For instance, to get a Q” seam, cut a strip 1/16 narrower. As you align the fabric edge to the jig, iron and slide the paperboard. Next, leaving the paperboard inside, flip up the strip and keep ironing and sliding. The hem will be tight and perfectly even. Perfect width, squared edge. The thickness of the folded hem fabric is the missing 1/16th. The hem is so perfect and uniform that working the iron is both dazzling and zen like.
Your fingertips do such a good job of finding and mating edges. I use my seam gauge (like the one above) rarely. Too tedious.
3
Big clothes pins
I love your tiny clothes pins idea. Clever gal! I should’ve thought if it myself! Up until now I use big ones to move around (sling around!) large pieces of aligned fabric on my cutting mat without worry of displacing how I set things. In conjunction with weights, it makes the cutting mat work better for me.
4 tiny wheel rotary cutter
I try to do everything with a rotary cutter because pieces mate so well. A tiny rotary cutter helps you whip around curves. It’s easy to switch in without missing a beat. For curves I recommend a clear plastic curve template to guide the mini roller. The sewing curve also. Holds the fabric in place as you zoom by.
5
Eyeball the rotary cutter & let the presses foot define the seams
Since my rotary cutter makes clean and well mated seams, I eyeball cutting the seam allowance and I let the stitching process even out the wobbles. I’ve adapted my seam width to correspond to the presser-foot (half the width of my presser foot. As things fly tightly by the foot edge, making mini adjustment with your fingertips comes naturally. Eyeing the upcoming egde-feed somehow makes it clear that a wobble is upon you. I just glide by. Caveat: I have a steady hand and eye to start with.
My mission:
Eliminate special and overly precious handling whenever I can. Use the rotary cutter every chance I get.
I apply the mindset from my product design school days to sewing: perfect craft, perfect speed. I maximize the benefits of each tool in the the process itself. Then I whip out results!
Sign me “Pin Hater”
For all those who might be new to the cutting mat concept, let me add a further comment to my last one and to the above photo.
I get my best rotary cutting results from standing directly over the cutting mat. This means I prefer a slightly lower surface like a table, so I am always working basically directly over the cutting, and I press like hell on the cutting ruler.
Doing so allows a few things…
(1) My fingers or knuckles or both press down on the cutting ruler (unlike as shown above) with a mighty wrath made possibly by my left shoulder weight. With the fabric so compressed, and the ruler immobilised, I can get aggressive with the rotary cutter. For me, cutting is snappy.
(2) The cuts are in exact line of sight and I can gauge a seam allowance most accurately.
(3) Only then can your wrist react and refine the curves when using the tiny wheel rotary cutter.
(4) Your cutting arm and hand have the maximum sweep and range for long cuts.
(5) Your straight left arm and strong shoulder muscles support your weight. You never cantilever your torso.
(6) You are less likely to budge the cutting ruler out of alignment.
(7) You are less likely to knick your cutting ruler – a pain.
(8) You can better use the ruler ticks to measure seam allowances on-the-fly.
(9) You can better hold the rotary cutter 90 degrees to the board which, aided by the weight of your right shoulder, makes cutting steadier, quicker, better mated, and steadier.
(10) Even a knicked rotary blade gets pressed through all the layers.
My cutting mat is darn big … and worth it. At that size it is a tool indeed. I swivel and shift the mat while I work to get the best angle, leaving the fabric undisturbed as I do. Or, leave the fabric in place and slide the board to a new position. The mat then takes the trouble out of working with oversize pieces. Even on a tiled floor, you can cut well.
For the cutting guide, the ease of differentiating the measuring ticks is most important. In the past I’ve had a cutting ruler with retractable cleats. Cleats don’t add much for me.
I work at table height, not counter height, to amplify my cutting dominance. (Yeah!) That is a habit I picked up in design school.
In my technique my back is straight or supported by my left arm and shoulder All The Time. Your neck and back will be better off if you don’t cantilever forward. I don’t get back or neck pain unless I have a special need to work far forward of myself, or break posture and hunch over with sewing scissors.
I hope I help somebody out there. Thanks for the great blog, Amy!!!
(Note for the moderator: I’m not a blogger myself, but I’d be glad to share more in a guest blog if you think people would like to see more.)
I had to laugh about the “fabric only” scissors. That was ALWAYS the rule growing up, so when I moved out, I got my own sewing scissors, my kids know that those are for sewing only. My husband the other day tried to grab my sewing scissors to cut a simple curling ribbon, I almost took his head off. Needless to say he went and got the other household scissors.
A must for me is a THREADER!!!!! lol I can NOT see anymore!!!
This is a nice list, fairly complete here in the year 2014 although I still prefer the traditional strawberry pin cushion as opposed to the magnetic “pin cushion”. What concerns me the MOST is this term “sewist”. At first I thought I had missed something all of these years in not knowing this word but after checking different sources I’ve discovered it’s just a word someone made up who apparently didn’t like the word seamstress. One person’s thoughts are that it was a man who created the term since he didn’t like the word seamstress as that often evokes an image of a woman sewing. However, there is an easy fix for that, the term for a man who sews is tailor. So if the world doesn’t mind I think I’ll refer to myself, when sewing, as a seamstress and since my mother spent the first 25 of her working years as a seamstress and my grandmother was rarely seen without a needle and thread in her hand producing dozens and dozens and dozens of quilts in her life not to mention ALL the clothing she wore since it’s the tradition in our family.
I did learn one thing through this posting. If I don’t care for a term or word, in today’s cyber-addicted society I can just create my own term or name for something and if I put it out on the Internet in a short time it will be, without any question, just accepted.
Hi there!
It is very neat that we both have so much in common! I hail from a long line of sewing enthusiasts, as well. My grandmother sewed nearly every garment her two girls ever wore, from everyday “knockabout” dresses to frocks suitable for a princess at the ball. Today, my mother is leaving a legacy with every stitch she creates in the gorgeous garments she sews for my children. Sewing is not only an interest, but it is also a way to leave a lasting legacy by creating something beautiful. I love that!
You mention that the creation of new terms in language is something entirely unique to “today’s cyber-addicted society.” Interestingly, did you know that William Shakespeare is credited with inventing more than one thousand words throughout his canon? Before the Bard, there was no “majestic,” no “fashionable,” and no “generous.” His lexical inventions include words as seemingly mundane today as “bedroom” and “blanket” to those as titillating as “bedazzled.” I find it fascinating that when he found himself at a loss for an appropriate word for a concept, instead of resigning himself to using something he felt to be insufficient, he opted to take the bull by the horns and produce something suitable. That is the beauty of the evolution of language!
With the rich impact sewing has has on our culture, it is astounding that there doesn’t currently exist a single word that can aptly describe all of those who sew. Seamstress (or seamster, in the masculine), is indeed the most widely used historical term, but it tends to be more closely associated with those who sew (mainly clothing) as a profession, which many of us who sew do not. Sewer, when written, can easily be confused with the word “sewer,” as in a drain for carrying off waste. As it were, I believe those who use sewist are simply doing just what Shakespeare did: adding to our lexicon a word that conveys exactly how we would describe ourselves in respect to our interest. A sewer. An artist. A sewist.
Thank you for taking time to comment. Please do continue to use the word seamstress if that is what you prefer! I will continue to use the word “sewer” when spoken and “sewist” when written. All things considered, the importance of our respective self-titles pales in comparison to the significance of the immense pleasure and satisfaction we both garner from our craft, and of the legacy our loved ones have left behind with every stitch!
-Amy
Shakespeare also invented the name of my firstborn….Jessica. (But I do agree with Basketpam and, perhaps it’s an age thing…the word “sewist” has always thrown me for a loop even tho I do understand it is a more convenient and unisex word).
So interesting, Laura! I didn’t know that about the name Jessica. Thanks for stopping in!
Although I should add, I don’t think the term concerns me near as much as it seems to concern BasketPam.