• Skip to primary navigation
  • Skip to main content
  • Skip to primary sidebar

Positively Splendid {Crafts, Sewing, Recipes and Home Decor}

Handcrafted. Splendidly.

  • Home
  • Blog
  • + Handmade
    • Crafts
      • Craft Gift Ideas
      • Holiday Crafts
      • Home Decor Crafts
      • Kids’ Crafts
      • Paper Crafts
      • Quick and Easy Crafts
      • Wearable Crafts
      • Wreaths
    • Gift Ideas
      • Budget-Friendly Gifts
      • Gift Wrapping
      • Gifts for Dads and Grandpas
      • Gifts for Kids
      • Gifts for Men
      • Gifts for Moms and Grandmas
      • Gifts for Neighbors
      • Gifts for Sports Fans
      • Gifts for Teachers
      • Gifts for Women
      • Quick and Easy Gifts
    • Kid-Friendly Projects
    • Sewing
      • Sewing for Children
      • Sewing for Men
      • Sewing for the Home
      • Sewing for Women
      • Sewing Techniques
      • Sewn Accessories
      • Sewn Gifts
  • + Home & Garden
    • DIY Home Decor Projects
    • Helpful Tips
    • Home Decor Crafts
    • DIY
    • Home Tour
    • Mantels and Tablescapes
    • Organization
    • Outdoor and Garden
  • + Holidays & Seasons
    • Spring
    • St. Patrick’s Day
    • Summer
    • Teacher Appreciation
    • Thanksgiving
    • Valentine’s Day
    • Winter
    • Back to School
    • Christmas
    • Easter
    • Fall
    • Fathers’ Day
    • Graduation
    • Halloween
    • Independence Day
    • Mothers’ Day
    • New Year’s
  • + Printables
  • + Recipes
    • Soups and Stews
    • Appetizers and Salads
    • Breads
    • Desserts
    • Food Crafts
    • Main Dish

Summer Survival Guide Idea #1 (Freshly Squeezed Pillow Set)

May 2, 2011 By Amy @ Positively Splendid

FacebookTweetPinYummlyPrint

Welcome to the first post in the Summer Survival Guide series! 

(You can head over to this post for a full description of what this series is all about.) 

With summer just around the corner, I hope this guide is a source of inspiration for you as you plan the next few months. There are so many great ideas in store in the upcoming weeks from so many talented bloggers.

To kick things off this morning, I am going to share the set of outdoor pillows I made this weekend to get the ball rolling for my summery front  porch decor. I have to say that I am downright addicted at the moment to freezer paper stenciling. It is so easy to do, and the results are so dynamic – and downright professional looking!

Curious to see how I put these darlings together? Let’s get started!

For this project, you will need:

Heavy canvas fabric (I used fabric specifically for outdoor use)
White cotton twill (for the stenciled front patch)
 Cotton twill in the color of your choice (for the back of the pillow)
Coordinating thread
Two pillow forms
Freezer paper
Spray paint
A Silhouette machine
Basic sewing supplies: machine, shears, etc.

Prep Work

Cut out your fabric pieces. For each pillow, you will need three pieces, cut to the following dimensions:

1 main front piece cut from your heavy canvas fabric that is .5″ wider and longer than the length and width of your pillow form.

Example: My square pillow above is 17″, so I cut this piece to 17.5 x 17.5″.

2 back rectangle pieces from your cotton twill that are the same width measurement as your piece above. For the length of these pieces, divide the length of your piece above by two, and then add 2 inches to that number. 

Example: For my 17″ pillow, I cut two rectangles that were each 17.5 x 10.75″. (10.75 = 17.5/2 + 2)

1 front patch piece from your white cotton twill in your desired size. For my 17″ pillow, I cut a 13″ square, to ensure plenty of the bright main fabric would be easily visible in the finished product. You can choose to make your patch bigger or smaller, depending on your personal preference.

step 1 / Cut four strips of freezer paper for each pillow in your desired width (mine were 2″) to form a border around your front patch piece. Iron these into place, with the shiny side of the paper face down. Use your Silhouette to cut out a citrus silhouette (I purchased the file for mine from the Silhouette online store, by searching for citrus) and the wording for your second pillow (the font I used is Leroy Brown) from freezer paper. Carefully remove the cutouts from your mat, and iron these into place. Now, evenly spray these pieces with your paint, working in 2-3 smooth, even coats. Allow your pieces to dry completely before removing and discarding your freezer paper pieces. (You are totally allowed to squeal with delight when you see how amazing your patches look when you remove the freezer paper. I always do. 😉

step 2 / Snip a small notch from each of the corners of your patch piece, as shown. Carefully press the edges of the piece down 1/4″. Trimming the notch will keep your corners nice and tidy.

step 3 / Position your patch piece onto the center of your main front piece, and pin it into place. Topstitch 1/8″ from the outer edge of your patch to secure it to your pillow front, as shown.
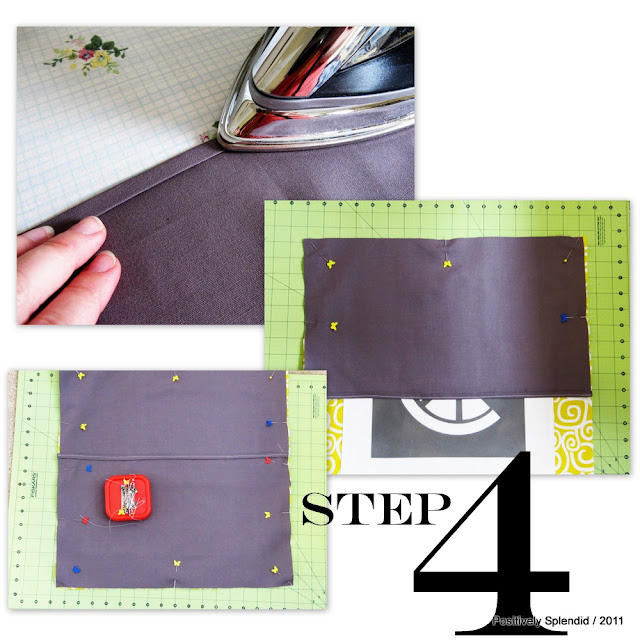
step 4 / Fold one of the long edges of your rectangular pieces down 1/4″; press. Fold under another 1/4″, and press again. Stitch to secure this hemmed edge. Repeat with your other rectangle piece. With your completed pillow front face up on your work surface, lay one of your rectangle pieces on top, right sides facing, so that the corners and edges are all aligned and the hem you just sewed runs through the center of your front piece. Pin. Now, position your other rectangle piece one the bottom portion of your pillow front piece in a similar manner. Pin. Note: The hemmed edges of your rectangle will overlap by a few inches at the center of your pillow. Using a 1/4″ seam, stitch all the way around the outer perimeter of your pinned pieces. Clip your corners and turn your pillow cover right-side out.

Repeat all of the steps above for your second pillow. 

You are finished!


Be sure to stop back in this afternoon for Idea #2 in the series from one of my favorite bloggers. It’s a real-life take on this same “freshly squeezed” concept. Yum!

Photobucket

Linking this to…
Today’s Creative Blog
Tip Junkie
The Stories of A to Z
Shanty 2 Chic
The CSI Project

Amy @ Positively Splendid

Having grown up in a home brimming with sewing notions and paintbrushes, Amy has a deep love for all things creative. On any given day, you’ll find her knee-deep in her latest creative endeavor, with projects ranging from sewing and crafts to home decor and kid-friendly ideas. Amy believes that everyone, regardless of skill level or experience, possesses the ability to create something beautiful, and Positively Splendid was born of her passion for helping others harness their innate creative potential.

EVEN MORE GREAT IDEAS JUST FOR YOU!

FacebookTweetPinYummlyPrint

Filed Under: Positively Home & Garden, Sewing, Tutorials Tagged With: Freezer Paper, Outdoor decor, Pillow Covers, Summer Survival Guide

Previous Post: « Reader Q&A
Next Post: Summer Punch (SSG Idea #2) »

Reader Interactions

Comments

  1. Alison@Oopsey Daisy says

    May 2, 2011 at 12:21 pm

    ADORABLE Amy! What a fun way to start out the series!

  2. cajungal01 says

    May 2, 2011 at 1:43 pm

    GORGEOUS! I am super excited about this series! YEA 🙂 Thanks so much for the inspiration!
    ~robin

  3. Kelli @ RTSM says

    May 2, 2011 at 4:41 pm

    So cute! I love the fabrics that you used and that lemon slice is too adorable!

  4. Katie's Nesting Spot says

    May 2, 2011 at 5:45 pm

    I love how crisp and clean the look is!

  5. All Things Fabulous says

    May 3, 2011 at 2:39 am

    I love it! Those look wonderful! Perfect for the warmer months that are coming!!

  6. Vivienne @ the V Spot says

    May 3, 2011 at 4:22 am

    Super, super cute! I love how these turned out and thank you for the tutorial!

  7. I♥naptime w/ Chocolate Sundaes says

    May 3, 2011 at 4:25 am

    oh my these are SO cute! Perfect for summer!!

  8. Holly says

    May 3, 2011 at 5:51 am

    Great graphics! Fun!

  9. Rebekah says

    May 3, 2011 at 1:07 pm

    Nice!

  10. LOTCP says

    May 3, 2011 at 3:00 pm

    I found you from Tip Junkie. I absolutely <3 these pillows! Great job

  11. Jeanna says

    May 3, 2011 at 7:45 pm

    Okay I’m so in love with this idea. Great job!

    Jeanna @ dramaqueenseams.blogspot.com

  12. Amanda @ Serenity Now says

    May 3, 2011 at 10:36 pm

    Absolutely adorable, Amy! You are so good at tutorials. 🙂 Love the font you used for the wording! Visiting from A 2 Z. 🙂

  13. Kathryn Michelle Jenkins says

    May 3, 2011 at 11:03 pm

    ok 1st, I LOVE your pillows! they would be perfect for my patio, and 2nd, I LOVE your blog. I’m glad I found it. saw you on tip junkie.

    new follower!
    kathryn
    http://www.thedragonsfairytail.blogspot.com

  14. Amanda K @ Every Creative Endeavor says

    May 5, 2011 at 5:33 am

    Amy!! I love these. They turned out so cute – so cute that I am featuring them on my blog tomorrow!

  15. LesLyons says

    May 8, 2011 at 5:30 pm

    I love your pillows, but I have question about the settings you use for cutting freezer paper on the silhouette. I tried, but it kept tearing. So can you tell me the speed, thickness, and blade?
    Thanks!
    Les
    [email protected]

  16. Jen @ tatertotsandjello.com says

    May 9, 2011 at 6:39 am

    Amazing, Amazing!!! Love them Amy!!!

    I shared them on my TT&J facebook page 🙂

    xoxo
    Jen

  17. COFFEE. CLEAN. CUPCAKE. says

    May 9, 2011 at 4:00 pm

    Just adorable! I’m a new subscriber and honestly you have so many great things going on in your page I was trying to debate where to click next! Thank you!

  18. Cassie @ Primitive & Proper says

    May 26, 2011 at 4:52 pm

    another adorable idea!

  19. Iuliana says

    July 8, 2011 at 2:04 am

    Love this project. Can I link it back to my blog?

Primary Sidebar

PS Search

Search this website

Seasonal Inspiration

Hocus Pocus Wreath
Ghost Plushies
Paper Pumpkins
Fabric Yo-Yo Pumpkins

Copyright © 2025 · Positively Splendid · All Rights Reserved. · Privacy Policy

Privacy & Cookies: This site uses cookies and other tracking technologies to assist with navigation and your ability to provide feedback, analyse your use of our products and services, assist with our promotional and marketing efforts, and provide content from third parties. To find out more, as well as how to remove or block these, see here: Our Cookie/Privacy Policy