

step 3 / Working with your muslin connecting strips, finish each of the short edges on each of these pieces with an overlock stitch using your serger. (If you do not have a serger, use your sewing machine’s overlock stitch or a zig-zag stitch.) Set these connecting pieces aside for now.

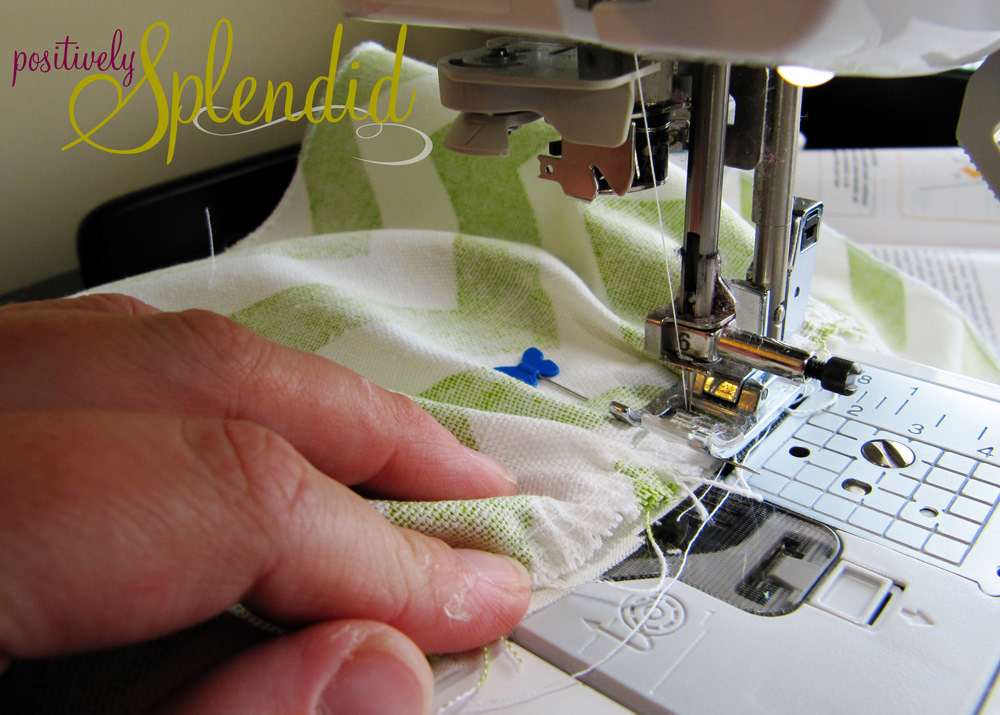
step 4 / Working with one of your ruffle pieces, stitch a line of gathering stitches 1/8″ and 1/4″ from the unfinished long edge. Repeat with each of your ruffle pieces from all four tiers. Gently pull on the bobbin thread of your gathering stitches to ruffle each of your pieces. You will need to gather each piece so it is shortened by approximately 50%.


step 5 / Working with one of your short tier 2 ruffles and one of your short (5.5×29.5″) muslin tier 2 connecting strips, adjust the gathers so the ruffled piece is the same width as the muslin piece. Pin the pieces together, right sides facing, and stitch together with a 1/2″ seam. Finish your seam with an overlock stitch on your serger or a zig-zag stitch on your sewing machine. Repeat with the other short tier 2 ruffle and the remaining short tier 2 muslin connecting strip. You will repeat this step with the each of the long tier 2 ruffle pieces and the long muslin tier 2 connecting strips, connecting one ruffle piece to one connecting strip.
When all of your tier 2 ruffles and connecting strips are sewn together, move on and do the same with all of your tier 3 ruffle and muslin connecting strips, and then all of your tier 4 ruffle and muslin connecting strips. Be sure to sew the short ruffles to the short connecting strips and the long ruffles to the long connecting strips in each tier.


step 6 / Place one of your completed short tier 4 panels face up on your work surface. Place one of the short tier 3 panels face up on top of the tier 4 piece, aligning the top raw edges of each panel, so that the right side of the tier 4 panel faces the wrong side of the tier 3 panel. Layer the tier 2 panel on top of the tier 3 and 4 panels in the same manner. Pin all three layers together, and baste them together along their top edge using a 1/4″ seam. Working with one of your short tier 1 ruffle pieces, adjust the gathers on the piece so that it is the same width as your stacked lower tiers. Pin the ruffle face up on top of the lower tiers, so that the wrong side of the ruffle piece faces the right side of the lower tiers, and baste stitch the ruffle on top of stacked lower tiers 1/4″ from the top raw edge. One short side of your crib skirt is complete!
Now, repeat this step with your remaining short tier 2, 3 and 4 panels and your remaining short tier 1 ruffles. Then move on and do the same with your long tier 2, 3 and 4 panels and tier 1 ruffles. At the end of this step, you will have two complete stacked short ruffled sides for your crib skirt and two complete stacked long ruffled sides.


step 7 / Use your washable ink marker to mark a 1/2″ square at each of the corners of your muslin platform. Trim these squares away. Working on one of the long sides of your platform piece, pin one of your long ruffled panels to this side, right sides facing, aligning the top raw edges of the pieces. Stitch together using a 1/2″ seam. Finish the seam with an overlock stitch on your serger or a zig-zag stitch on your machine. Repeat on the remaining sides of your platform piece, matching the short sides with the short ruffled pieces and the remaining long side with the remaining long ruffled piece.


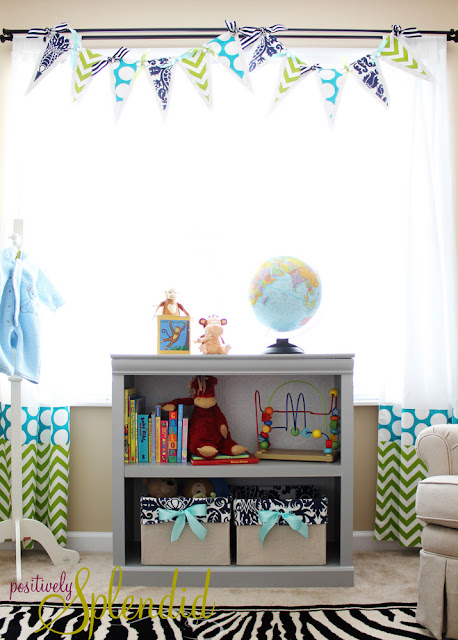
Hooray! You are finished!


Project Notes:

Having grown up in a home brimming with sewing notions and paintbrushes, Amy has a deep love for all things creative. On any given day, you’ll find her knee-deep in her latest creative endeavor, with projects ranging from sewing and crafts to home decor and kid-friendly ideas. Amy believes that everyone, regardless of skill level or experience, possesses the ability to create something beautiful, and Positively Splendid was born of her passion for helping others harness their innate creative potential.
Beautiful crib skirt and thanks for sharing the very helpful tutorial.
I literally squealed with delight when I saw this post! Baby 3 is due in 6 weeks and I’ve been WAITING for your bedding reveal and tutorial! You didn’t disappoint! Great instructions and your results are incredible…I can’t wait to see everything together. Thank you!
You are a sewing genius!!! I am so envious of your skills. I need to get my machine out and start working again. I am so impressed with all those beautiful layers of ruffles–they add such nice depth!
Absolutely adorable, Amy! I so wish I had your sewing skills. I love how vibrant the colors are!! So great for the new little man to gaze upon!
amy – i just don’t know how you do it. you are a super mom. this room is just incredible. those ruffles & that fabric. outstanding job.
have a super week!
xo
kellie
Wow, absolutely amazing. Love it!!
Oh I really love the patterns and colors chosen. It ties everything together and how adorable for a baby.
This is gorgeous! I love the bedding fabric and the whole room. It all looks amazing together.
The bedding is absolutely stunning! I am a fan of those colors and the ruffles are so sweet.
Erika
It’s a Wrap Link Party at Artful Rising
Love it.. So very colorfull and FUN!!!
You did a gorgeous job with the bedding! I also love what you did with the curtains!
LOVE it!! You did such a fabulous job on the bedding!!
I can’t wait to figure out what I want for bedding once we find out the gender on Friday. My husband would LOVE for me to sew it myself but it makes me SOOO nervous b/c I am far from an expert sewer. We’ll see!
This seriously makes me want to have a baby! You did an amazing job, Amy. You are a pro!
So cute!! Love the color combos. Makes me want a baby just so I can have a nursery!
This is SOOO gorgeous!! It almost makes me want to have another baby! Almost… Mmmm ruffles!! Fab colors!
Oh crap, I just said to my sister last night that I didn’t care for nursery bedding and wasn’t going to make any for my baby coming in April, but you’ve changed my mind! I LOVE this crib skirt and pinned it, thanks so much!
WOW!!! seriously, you’re so talented! i’m loving your color scheme— i love bright and cheery spaces 🙂 will be following on my way out — would love ya to follow back if ya like 🙂 blessings– lauren @ http://www.SummitStreetJoy.com
Wow, that is gorgeous! Thanks for sharing!
OH.MY.GOODNESS! There isn’t one bit of this entire nursery that I don’t LOVE to pieces. You are CRAZY talented!
I love those colors to death…. because I have those same colors in my fam. room. Love everything, you did a fantastic job. WELL DONE. cutest nursery. winks, jen
Absolutely stunning!
This is sooo very coincidental. I put together few fabrics today for my own nursery, and I had the exact same fabrics, the green chevron and the polka dots (in Orange). Yours look fabulous! I love it 🙂
Very very cute! However my favorite part are the matching wall decal circles! How did you make those?
I love it! I second the question about how you made the wall circles.
love it!! super cute 🙂
So gorgeous.
I LOVE it! I seriously could have used this a year ago. My first try on my ruffled crib skirt was a disaster! It looks much better now, but using muslin strips would’ve been the way to go.
This is gorgeous! Rose has a little one and she is still in a crib and this would be adorable for her room! We would love to have you link you with us, Crafty Lassie Tuesday.
http://www.SewStylishBoutique.blogspot.com
Hope to see you there!
Thanks,
Heather
Newest Followers
I love this bedroom! My 11 yo. daughter just got a duvet that resembles the large polka dots from pbteen and I would love to do some of this in her room, especially the bed skirt. Thanks for the great ideas!
Gorgeous, gorgeous, gorgeous!!
OH MY HECK!!! LOVE! nough said!
Beautiful crib skirt! The entire nursery looks adorable!
Visiting from Serenity Now!
I know I already commented to tell you how amazing this is. I just wanted to let you know that I linked to this post in my Favorite Friday post. 🙂
http://www.nestcandy.com/2012/01/favorite-friday.html
Ummm…this whole room is freakin awesome. I love everything about it, it’s put together so nicely and the colors are perfect.
so of course, I had to become a follower!
Wow! I love the way this turned out – great color combination too! I like the serged edge instead of a hem. Visiting from TT&J and a new follower. Thanks for the inspiration.
Love, Love, Love that nursery!!!
Fabulous!@ Creatively Living
Oh gosh, this is just ridiculously CUTE! I’d be thrilled if you’d come and link up your fab crib skirt to the Head to Head Showdown, going on right now at http://www.icantstopcrafting.blogspot.com ~Jen
Amazing! I’m in love!
wow! this took my breath away. you are beyond talented everything is so beautiful what a lucky abby
Beautiful nursery… love the colors!
Found you on Skip to my Lou. Such a fantastic nursery! Would you please share this with our readers for Fun Stuff Fridays? http://www.toysinthedryer.com/2012/01/fun-stuff-fridays-6.html
I am in love, my 3 favorite designs ! Is there anyway you can give me the exact measurements of each fabric design that you used for the whole room ? You are so talented !
Gorgeous, Amy! Love!
Featuring this at tonight’s party!
xoxo
Thank you for the tutorial. The tip about cutting away the corner of the platform was brilliant. Thanks again.
Do you have a ballpark figure of how much fabric you used for the nursery ?
I love this and am wanting to make it. I do have a question what is the finished length to the floor. I am concerned about dropping the mattress and the ruffles dragging the floor. Great tutorial!! This is very cute!!
Love, love, love this. I think it’s going in my room!
I was wondering if you would be willing to sell a set just like this one and how much?
Hi. So I wanted to let everyone who is thinking about doing this know: I went to premier fabric online and the fabric used for this set runs anywhere from 11.99-15.99 a yard. being a stay at home mom with only my husband working that is quite a bit for us. So I did some research and you can go to amazon.com and type in premier fabric and search and they have this exact same fabric shipped out by premier fabrics for 5.79 per yard. That is almost a third of the cost! Plus right now if you order 35.00 or more from premier on amazon you get free shipping!!
So cute!! Love the color combos:)
portable crib bedding
This is so adorable! What would you suggest if my fabric is 44″ instead of 54? Thanks so much for sharing! I’m really getting excited about my little girls nursery now!
I made the skirt over the last couple of days and it turned out absolutely adorable! I used 44″ fabric instead, and just had to add on an extra tail at the end of each tier to make up for the length. At first I wasn’t going to, until I realized that then it would make for just a wave instead of all the cute ruffles. It was a costly project (IMO), as I only made a ruffle for the front side of the crib and it cost me a bit over $25 with little fabric left over. I used $8/yd fabrics for 2 tiers and a $3/yd fabric for the other.
The room is very zen, a little plain for my taste, I think you can do more with $2000, but everyone has different styles. If your really on a budget, I suggest buying your nursery furniture on craigslist. We sold my sons (very expensive) crib and changing dresser for $300 for the set. It looked brand new, babies don’t really beat up their furniture like toddlers and older kids do.
Nursery Bedding,Crib Bedding, Baby Bedding
What an incredible set of bedding! I hate to sound silly, but you wouldn’t be willing to make another set and sell it would you? I would absolutely pay top dollar. This is a bedding set dream come true! Please let me know! I would be beyond thankful!
I love this nursery!! I was considering using some Premier Prints fabrics for a similar project and have been worried about washability. Have you washed any of the fabrics that you used? I would love to know your thoughts…with 4 kids (soon to be 5) and 3 dogs, washability is key. Thanks for your input!
I love this nursery!! I was considering using some Premier Prints fabrics for a similar project and have been worried about washability. Have you washed any of the fabrics that you used? I would love to know your thoughts…with 4 kids (soon to be 5) and 3 dogs, washability is key. Thanks for your input!
Thank you so much for the tutorial. I found you on Pinterest and featured you on my blog for Friday. Great color and fabric choices as well.
acoupleofcraftaddicts.blogspot.com
Jess
This is gorgeous! I hope this isnt too personal but how much did you end up spending on this bedding set? i would love to make my own but we are having twins and would rather not spend too much but also want a unique beautiful nursery
I love this! I just made the same bed skirt by copying your tutorial, except I used different fabrics. I was wondering how you did the fabric circles? Did you attach them to anything, or are they just stuck on the wall?
Can I just buy this bedding from you? I love it!
Love this! So for the top and bottom tiers is it 2.25 per tier or total?
Love this! So for the top and bottom tiers is it 2.25 per tier or total?
2.25 is the total needed of fabric one. Thank you for your comment!
Trying to get in touch with amy does anyone know the number? For positively splendid!
I’m interested in buying that crib skirt
Hello, Shelly! At this time, I do not make any items to sell.
This is so great and so beautiful. Hand made crin bedding ao sweet and heart touching. I would also love it too to decorate my own nursery for my baby but I hope I have the sewing skills. Good job!
Thanks so much!
I was wondering if you had the crib skirt on the sides of the crib? and if the fabric yardage that you said you needed for this bedding included the 2 shorter sides of the crib too?
The yardages included are everything you need to make a four-sided, four-tiered skirt. Thanks for stopping in!
It’s very nice, beautiful i love this. I also love to make these baby bedding. thanks for sharing this.
I have a plain white bed skirt for the crib. Wondering if I could alter this pattern and
attach the ruffles to it instead of using the muslin?
Hi, Nicky! I think that would work just fine! Great idea.
Do you have the instructions for the bumper? I would like to have the bumper made also! 🙂 I mainly need to know the instructions and the materials needed. HA!
This is the pattern I used from Sew4Home. They were really easy to put together, and I was so pleased with how they turned out! http://www.sew4home.com/projects/pillows-cushions/stylish-baby-nursery-crib-bumpers-two-cool-fabs
Hi I wanted to know if this was only for a 4tier or can I use this to also do a 3tier crib skirt I’m new to motherhood and I want to do my own nursery 🙂 thank you so much and great tutorial
Hi, Jennifer! You could make this with only three tiers, but to keep the length, you would need to widen each of the ruffles. Have fun sewing for your little one!
I would Soooo pay you to make one for me! 🙂
I don’t do any sewing for hire at this time, Amanda, but I am so glad you like this. 🙂 Have a great day!
love this! My son’s nursery is turquoise..apple green white and charcoal. I’m attempting to make bumper pads for his crib and really love the torquoise polka dot fabroc you used for the skirt but the link on your blog to Premier Fabrics shows a different fabric. Can you share that link again please! thanks so much 🙂
Hi there! Here is a link to that fabric: http://www.fabric.com/ProductDetail.aspx?ProductID=d79142c9-4b8c-4d78-b561-261318b724e9 Happy sewing!
Can you tell me how you did the pom pom mobile? The link at the bottom of the page doesn’t work and I would love to know how you made them. I love all of your stuff it is so cute!!
Here is a link to that project! So sorry for the broken link! http://www.positivelysplendid.com/2011/12/how-to-make-a-pom-pom-baby-mobile-tutorial.html
Hi there, love this sooo much, can you tell me if the ruffles go all the way around? Or are they just in the front? Thanks you so much 🙂
Hello, wondering what the finished length of this crib skirt is. Thanks so much! So cute! I’m making this for someone, but hope to make one for a little girl for me someday
I made a crib skirt following your tutorial and I am so ecstatic about it! I’m a beginner sewer and I had no problems with your directions! Thank you so much!!!
I am thrilled to hear it, Brittany! Congratulations on finishing this project. Isn’t it the best feeling? 🙂
I’m curious if you made the bumper too? If so, did you share that tutorial somewhere? I couldn’t find it. Everything is just beautiful!
Love the tutorial. Did you make the bumpers also? If so, how did you do the piping? It looks like it is just rounded over the top corners. I would really like to make my nieces crib set using piping only on the top of the bumpers, but not quite sure how to do it.
Thanks for your help.
I love this SO much & was wondering if you make & sell?? I don’t have the time to do it myself but would love to buy this!?
Amy,
First of all I want to say thank you for the amazing tutorial on the crib skirt. I made it last week and it looks amazing. Now I also saw your paper lantern mobile (hanging above the crib)and I am in love with it. I would like to do the same thing in my nursery. I was wondering how you hung the lanterns and pom pons. I tried with fishing line but I’m not sure, do I hook them all together first or pin them all to the ceiling individually? How did you do it? I would love to hear. Thanks so much.
Emily
Hi, Emily! For the mobile, I mounted eye hooks in the ceiling and hung the lanterns individually from them using fishing line. It was a labor-intensive process that required lots of height adjustments, etc., but I really love how it came together!
Thanks so much for this tutorial!! I FINALLY finished my skirt this weekend! It literally took me about 20 hours because I am a beginner to sewing, but it was well worth it! I even picked out the same fabrics because I love yours so much! Now I just have to make the bumper. I hope that’s easier!
Thanks again, you’re awesome! 🙂 🙂
Way to go, Megan!! I am so happy to hear you had success!
Hi! I’m just wondering how long it took to complete this crib skirt?
I would say it took me between 5-6 hours. Thanks for stopping in!
Hi,
First of all, I LOVE LOVE LOVE this. I’m eager to start making mine. Before I start, just wondering what your crib size is?
I’m making this for a crib that is 50″. Just wondering if it’ll be a bit long with the lengths you provide.
Thanks!
I love the crib. Where did you purchase it??
I purchased it at Walmart before my daughter was born 6 years ago.
i love the teal that contrasts but compliments each pattern fabric in turn & ties the black/white fabric with the green chevron. how did you figure that out? i love to play with fabrics and colors also, but i do not have your beautiful taste. it so so wonderful/delightful.
Thanks so much, Bunny! Honestly, I have just learned through trial and error the things that work well together. 🙂 I try to incorporate a mix of geometric and floral prints in my designs, plus varying pattern sizes for added interest.