Yesterday I posted the “tour” of my spring mantel, which I created based on the March Southern Living cover. I love finding design inspiration in unlikely places!
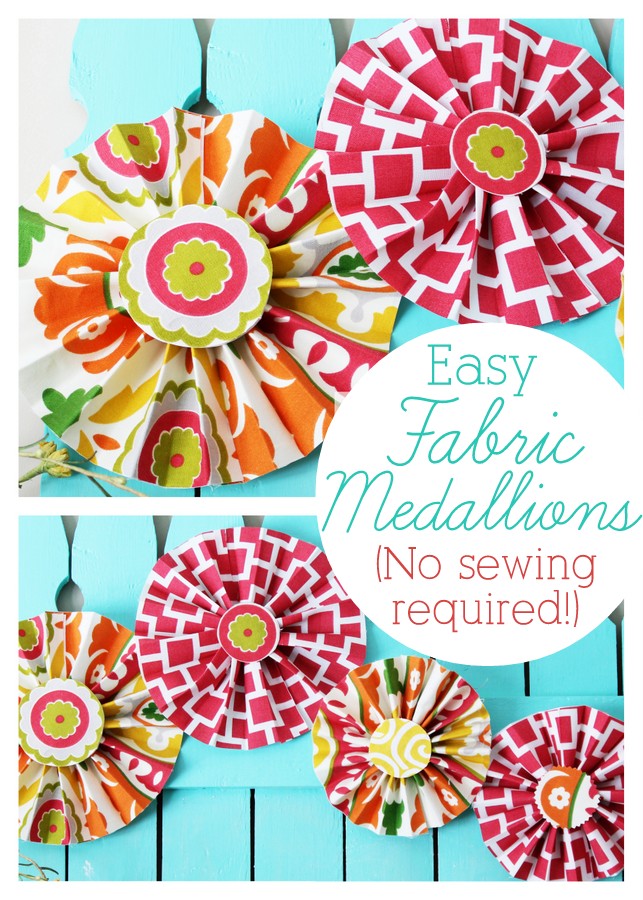
To punch up my display, I decided to add some fun medallion accents, which were inspired by these medallions shared by Jen at Tatertots and Jello earlier this month. I had initially planned to use her technique, which utilizes paper to make the medallions, but when I started to look through my stash of supplies, I realized I didn’t have enough paper on hand that would go along with the color palette of my display. However, I had plenty of fabric left over from my Freshly Squeezed Pillows from last summer that fit the color scheme perfectly.
At that point, the wheels started turning for ways to give fabric the body it needed to be formed into an accordion and stiffly hold its shape. My initial idea was to find a type of fusible interfacing for the job, but as I was making the kiddos’ lunch later that morning, I happened to glace at the package of freezer paper in the pantry. Eureka! I knew immediately that it would be perfect for this project. I love being able to use supplies I have on hand!
Now, before I go any further, I have to apologize for the sad state of my nails in these photos. Mama apparently needs a manicure. Ahem.
That being said, let’s get to the business of creating some fabric medallions, shall we? 🙂
To make your own fabric medallions, you will need…
Fabric scraps
Freezer paper
Iron
Hot glue
Cardstock
Rotary cutter and mat (optional, but recommended)
Shears
Pinking shears (optional)
2-inch circle punch (optional)
one.
Using a dry iron (no steam) on a cotton setting, iron a section of freezer paper to the back of a piece of your fabric. The size of the section of freezer paper you need will vary depending upon the number of medallions you want to make from each particular type of fabric, but I found an 18″ square to be more than enough.
Using your rotary cutter and mat, cut strips of your paper-backed fabric. For each medallion, you will need two strips of fabric. Here are the dimensions I used:
(2) 3×18″ strips for the smaller medallions
(2) 4×18″ strips for the larger medallions
If your paper comes loose from your fabric as you cut, no worries! Just run your hot iron over it to re-attach it.

two.
Working with one strip at a time, start folding your piece back and forth from one end, accordion-style, like this (each of my folds was approximately 1/2″)…

As you work, use your iron every 2-3 folds to press down your folds really well so that your fabric is very prominently creased.

This is what it will look like when you get to the end of your piece. Well done! Now, repeat with your remaining fabric strips.

three.
Apply a thin line of hot glue along one of the edges of your strips, as shown, and overlap another strip over the glued edge to secure the two together and form one long accordion strip.

Now, overlap the remaining short edges of your strip, using hot glue to secure them together. Make sure your strip doesn’t get twisted as you work! You might find your strip is a bit unwieldy as you work, but when you flatten it on a hard surface, it should form a nice little circle like this:

four.
Using your circle punch (or a 2-inch circle template and scissors), cut a circle from your cardstock. Apply a very generous amount of hot glue to the circle (the entire surface of the circle should be covered) and then affix it to the back center of your medallion, as shown. Press down on the circle firmly enough to secure it thoroughly, but not so firmly that you crush your medallion in the process.

five.
Now, cut another circle from a contrasting freezer-paper backed fabric. The size of this circle can vary depending upon your personal taste. Note: I found it looked really cute to cut this accent circle out with pinking shears. Apply a generous amount of hot glue to the back of this circle piece, and affix it to the front center of your medallion, pressing firmly so that is it thoroughly attached.

You are finished!

I can see them being perfect for party decor or in a children’s room, too.
There are so many options here!


- If your fabric has a circular design element (see the flower centers on some of my flowers above?), cut that out to use for your medallion centers.
- Apparently because of its UV-protective coating, I found freezer paper wouldn’t stay attached to the outdoor fabric I used for this project. (The pink Sunbrella fabric above.) So, my best advice would be to use a standard quilting cotton or duck fabric for the medallions.
- If handled too much, the freezer paper will become detached from the fabric front of your medallion. They don’t readily fall apart, by any means (I have actually found them to be fairly sturdy), but bear in mind when using the medallions that these are not a “permanent” type of project.
- If you don’t wind up using all of the paper-backed fabric for your medallions, simply remove the freezer paper to use the remaining fabric for a future project.
- To attach my medallions to my Picket Fence Pallet, I used a loop of masking tape affixed to the cardstock circle back on each one.
Having grown up in a home brimming with sewing notions and paintbrushes, Amy has a deep love for all things creative. On any given day, you’ll find her knee-deep in her latest creative endeavor, with projects ranging from sewing and crafts to home decor and kid-friendly ideas. Amy believes that everyone, regardless of skill level or experience, possesses the ability to create something beautiful, and Positively Splendid was born of her passion for helping others harness their innate creative potential.
Gorgeous! Thank you for the tutorial! I’ve been wanting to make some for my daughters room and couldn’t figure out how to ‘stiffen’ up fabric and didn’t want to use paper. I love this and pinned it!!
These are stunning!! LOVE the bright colors! thanks for the fabulous tutorial! 😉
Bonnie @ uncommon
http://www.uncommondesignsonline.com
Amy – these are great! For someone who doesn’t sew AT ALL, I love this because I don’t have to. Thanks for sharing. Libby O – http://www.psastampcamp.blogspot.com
I love the bright and cheery colors, especially with the blue picket fence in the background. Super Cute!!!
pretty stinkin darling – i never would have thought to make them with fabric – love the fresh crisp mantel!
1. I love your nail color.
2. I also like to try and use supplies I have on hand when I’m working on a project.
3. You make those look so easy…who knew??
They really would make a nice pop of color to any decor!
so cute. great tutorial. many thanks 🙂
Adorable adorable!!! You are just amazing Amy. I love those!!
xoxoxo
Jen
First of all I am loving your nail polish!!! These medallions are adorable. I think I know what I am making tonight – love them!!
I completely love these! I want to make some this weekend but I have a silly question first. What is freezer paper please? I have both wax paper and parchment bit I’m not sure which to use. I’m a novice. Please help!
@Courtney – Freezer paper is actually a different product that is a bit like wax paper and parchment combined. I purchase the Reynolds brand at either Kroger or Walmart. Here is a link to the product page: http://www.reynoldskitchens.com/product.asp?prod_id=1798
The beauty of freezer paper is that you can iron it onto the back of fabric, but once you peel it away, it leaves absolutely no residue! I love to use it for stenciling projects.
Let me know if you have any more questions! I am always happy to help. 🙂
I was thinking that a light layer of Mod Podge after getting it formed into a circle would keep it nice and crisp and firm or make a thinner fabric sturdier.
Great idea, Kris! I think that would work perfectly.